OpenShift Template
The following tutorial shows you how to register a (trial) subscription key from Red Hat and uses it to create an OpenShift cluster using the OpenShift template.
- The OpenShift template deploys a Self-managed OpenShift Container Platform on T Cloud Public with Bring Your Own License (BYOL).
- Your license/subscription will cover technical support from Red Hat as well as upgrades between OpenShift versions. Read more.
- Supported versions: 4.12.39 and 4.13.x.
How to use
How to deploy
- Create a new application using the template OpenShift or OpenShift HA with a selected version (e.g., 4.13.19)
- Go to Quick Deploy.
Deploy Setup
Specify base_domain
Specify the base_domain (e.g., tri-test.com). This is the domain name that you will use to access the OpenShift console after the deployment completes. A DNS Public Zone will be created on T Cloud Public with this name. Therefore this domain name must be unique in the Domain Name Service of T Cloud Public.
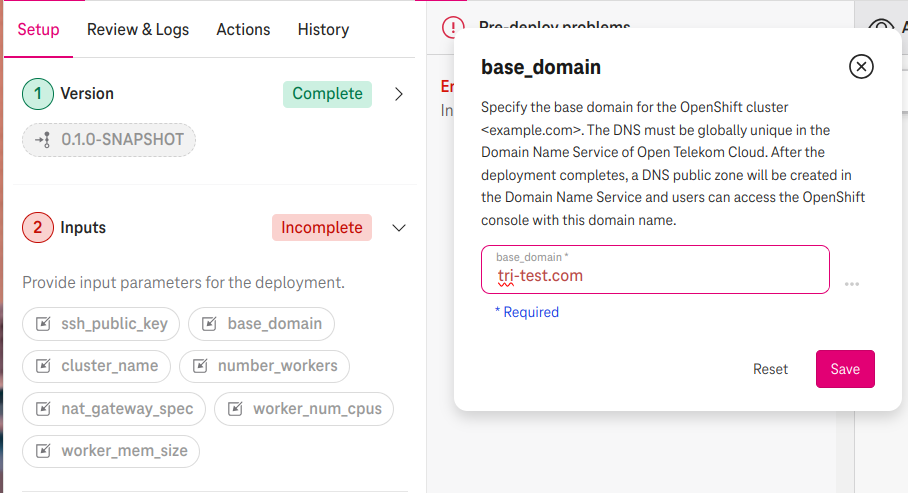
Figure 1. Specify a domain name
Specify pull_secret
- Register a trial account at Red Hat.
- Go to the Redhat Console and copy the pull secret in Section Downloads / Tokens.
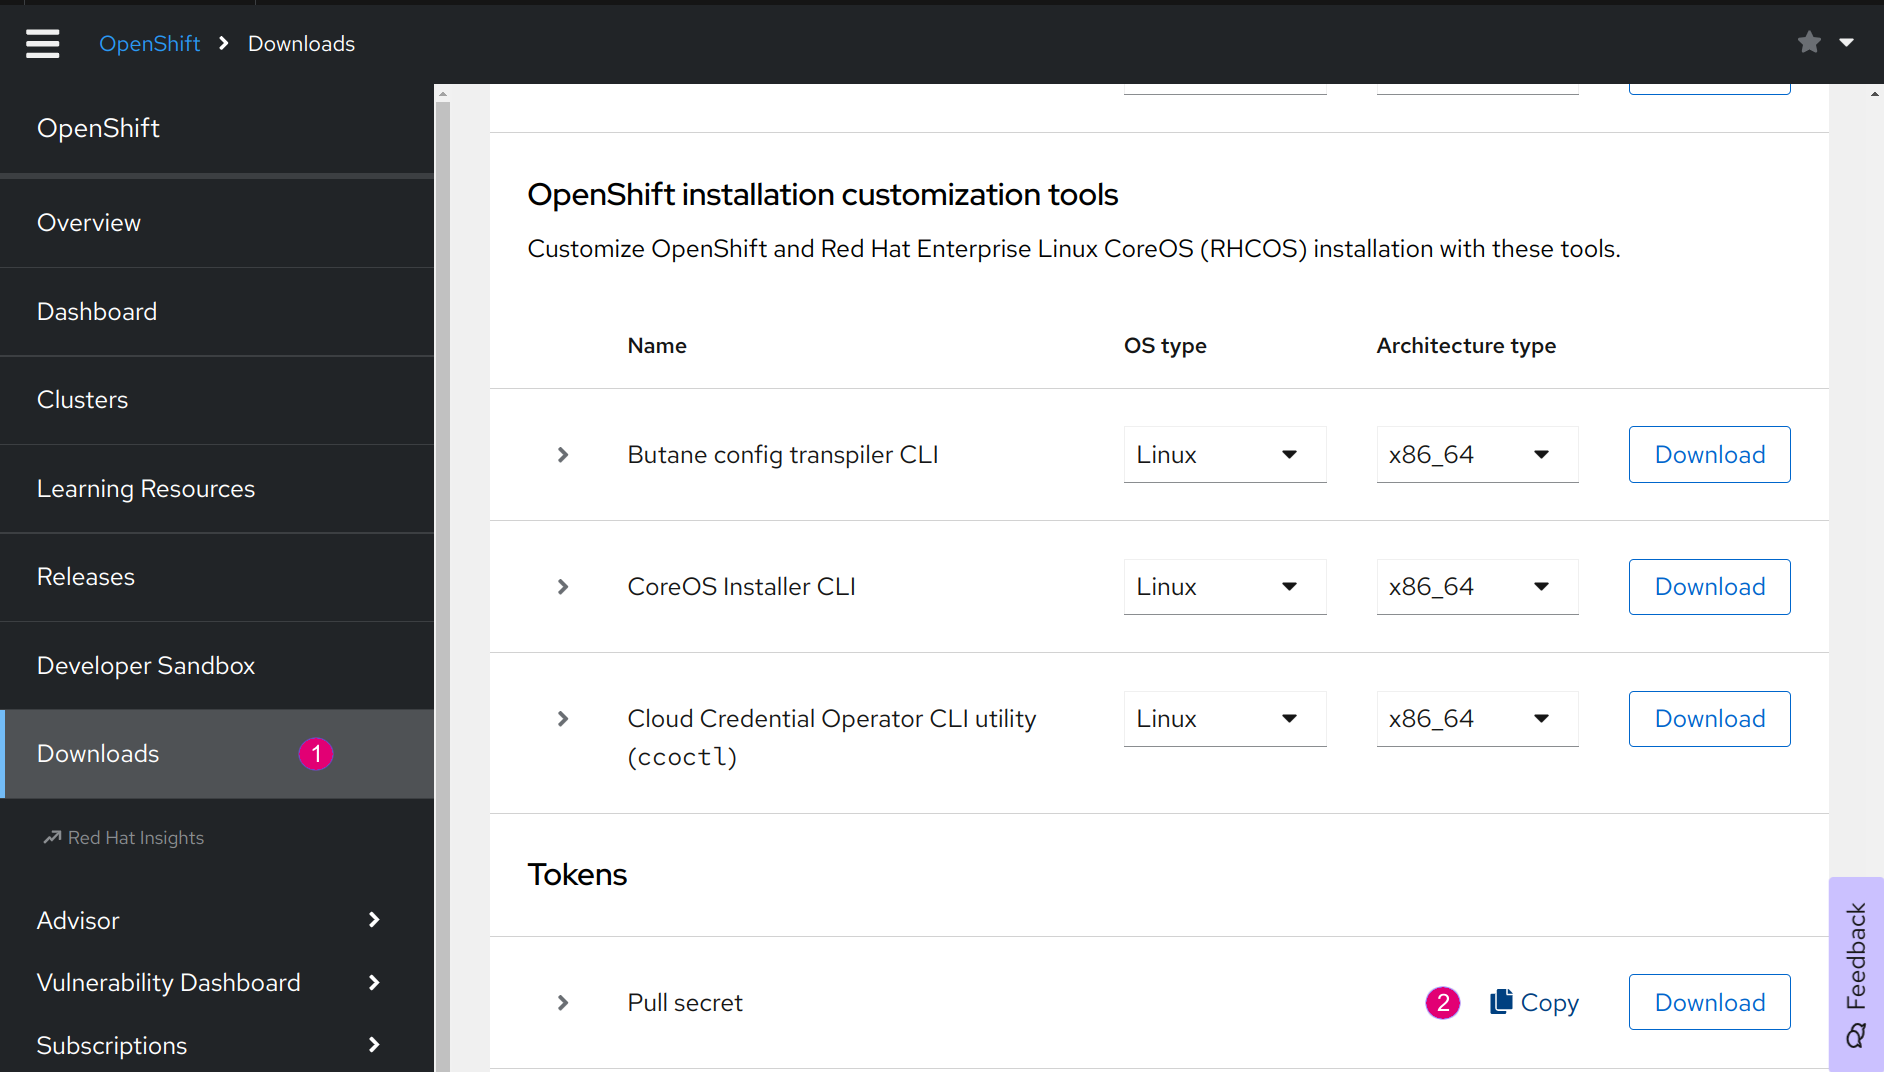
Figure 2. Copy pull secret
- Paste the content in the pull_secret in the Section Secrets Inputs.
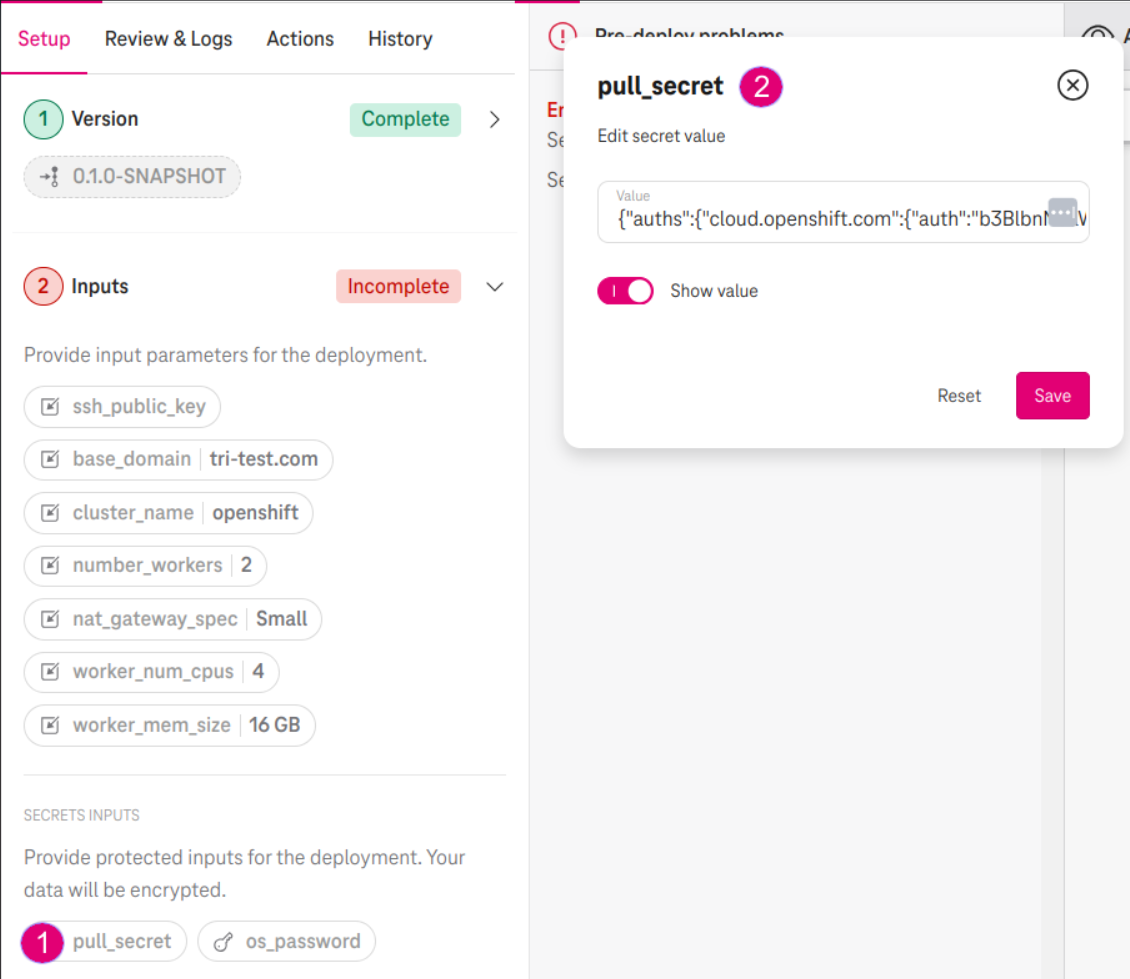
Figure 2. Paste the pull secret
Specify os_password
- Specfiy the os_password. This is the password when you login to Cloud Create.
We do not store your password but the OpenShift install needs it one time for the installation process. In the next release, we will replace this password with an application credential for password protection.
(Optional) Specify ssh_public_key
- Specify the ssh_public_key with your SSH public key (e.g.,
ssh-ed25519 AAAAC3N...). This public key will be injected in the bastion host, master and worker nodes so that you can SSH to them later on. - If ssh_public_key is not specified, we will auto-select one of your existing key pair from the T Cloud Public console instead.
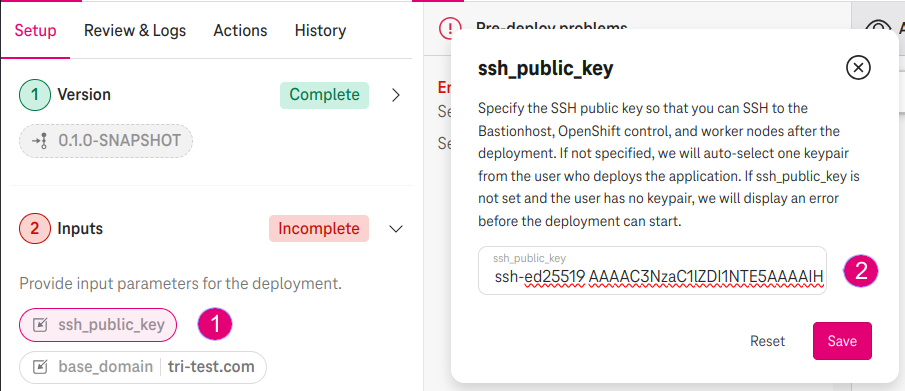
Figure 3. Specify your SSH public key
(Optional) Specify other paramters
- Specify the number_workers (e.g., 2). OpenShift requires a minimum of 2 worker nodes in total.
- Specify the nat_gateway_specs (e.g., Small). This is the flavor of the NAT Gateway for outgoing traffic.
- Specify the worker_num_cpus (e.g., 4) and worker_mem_size (e.g., 16 GB). OpenShift requires a minimum of 4vCPU and 16 GB memory for the worker node.
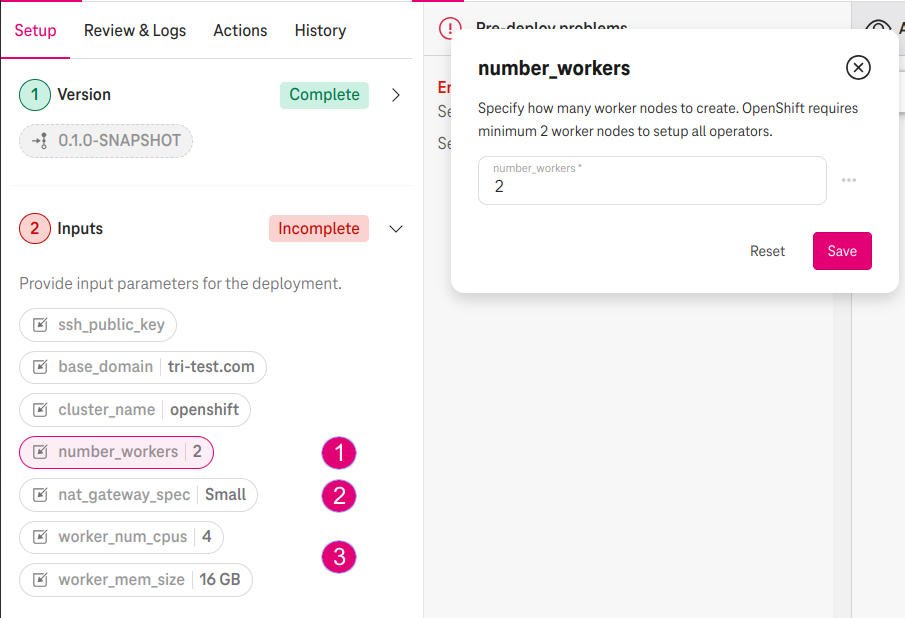
Figure 4. Specify your SSH public key
Expect result
- It takes about 2 minutes to create all compute resources on T Cloud Public. Afterwards, the OpenShift bootstrap process continues to setup the master and worker nodes.
- After about 31 minutes, the CheckOpenShiftStatus job checks the OpenShift boostrap process and reports the status.
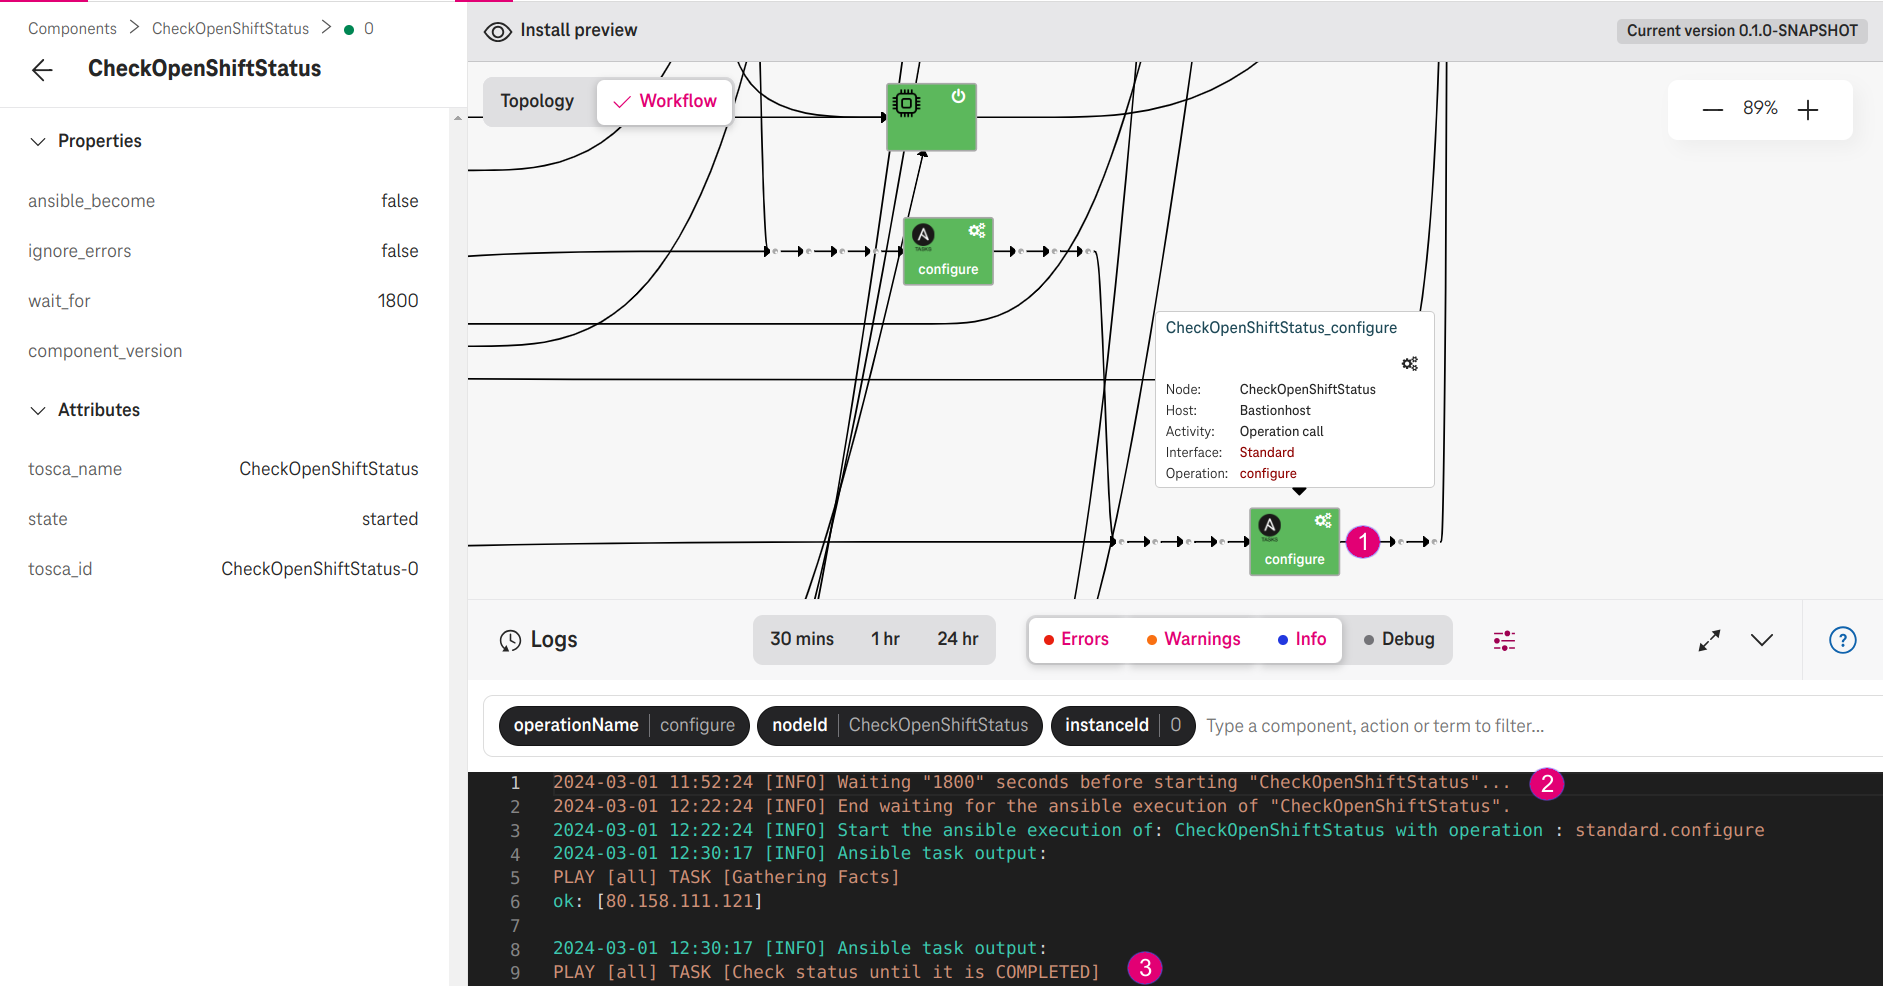
Figure 5. CheckOpenShiftStatus waits 31 minutes and checks the status
Access the console
After the deployment completes, you can access the OpenShift console as follows.
- Copy console_hostname, oauth_hostanme, and the INGRESS_VIP from the deployment outputs.
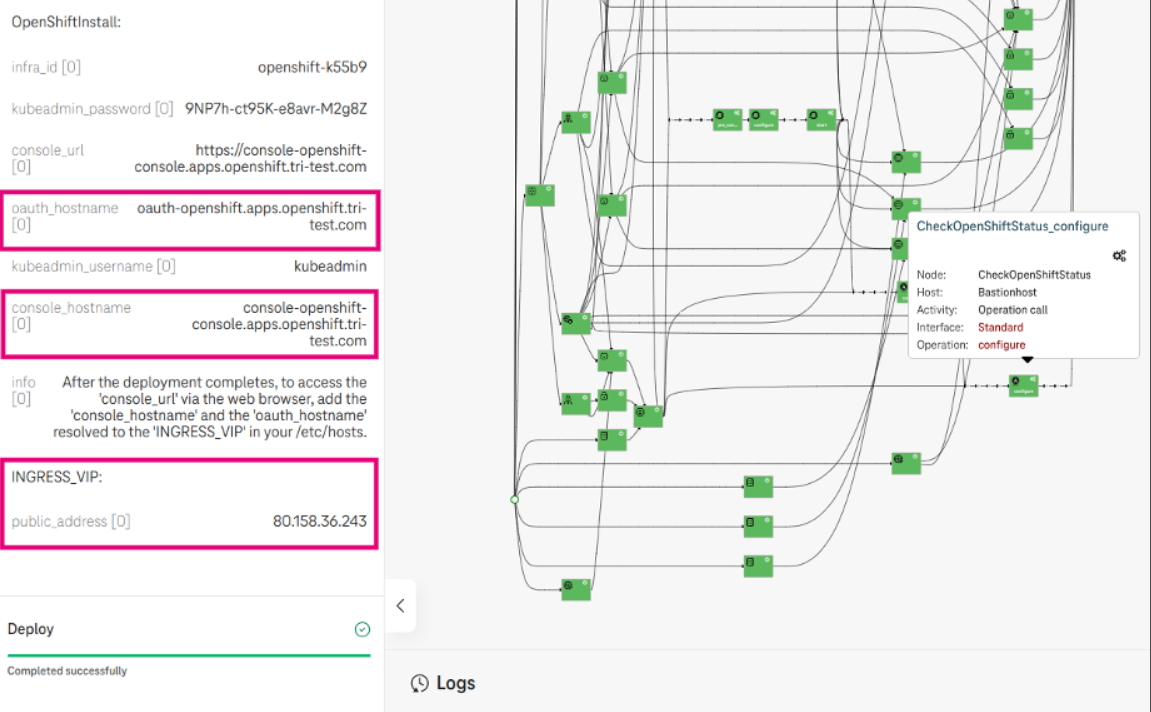
Figure 6. Copy the hostname and VIP address
- Paste console_hostname and oauth_hostanme and the INGRESS_VIP in your /etc/hosts
# vim /etc/hosts
80.158.36.243 console-openshift-console.apps.openshift.tri-test.com
80.158.36.243 oauth-openshift.apps.openshift.tri-test.com
- Access the OpenShift console URL via the web browser with the kubeadmin_username and kubeadmin_password from the deployment outputs.
# The output of the "console_url"
https://console-openshift-console.apps.openshift.tri-test.com
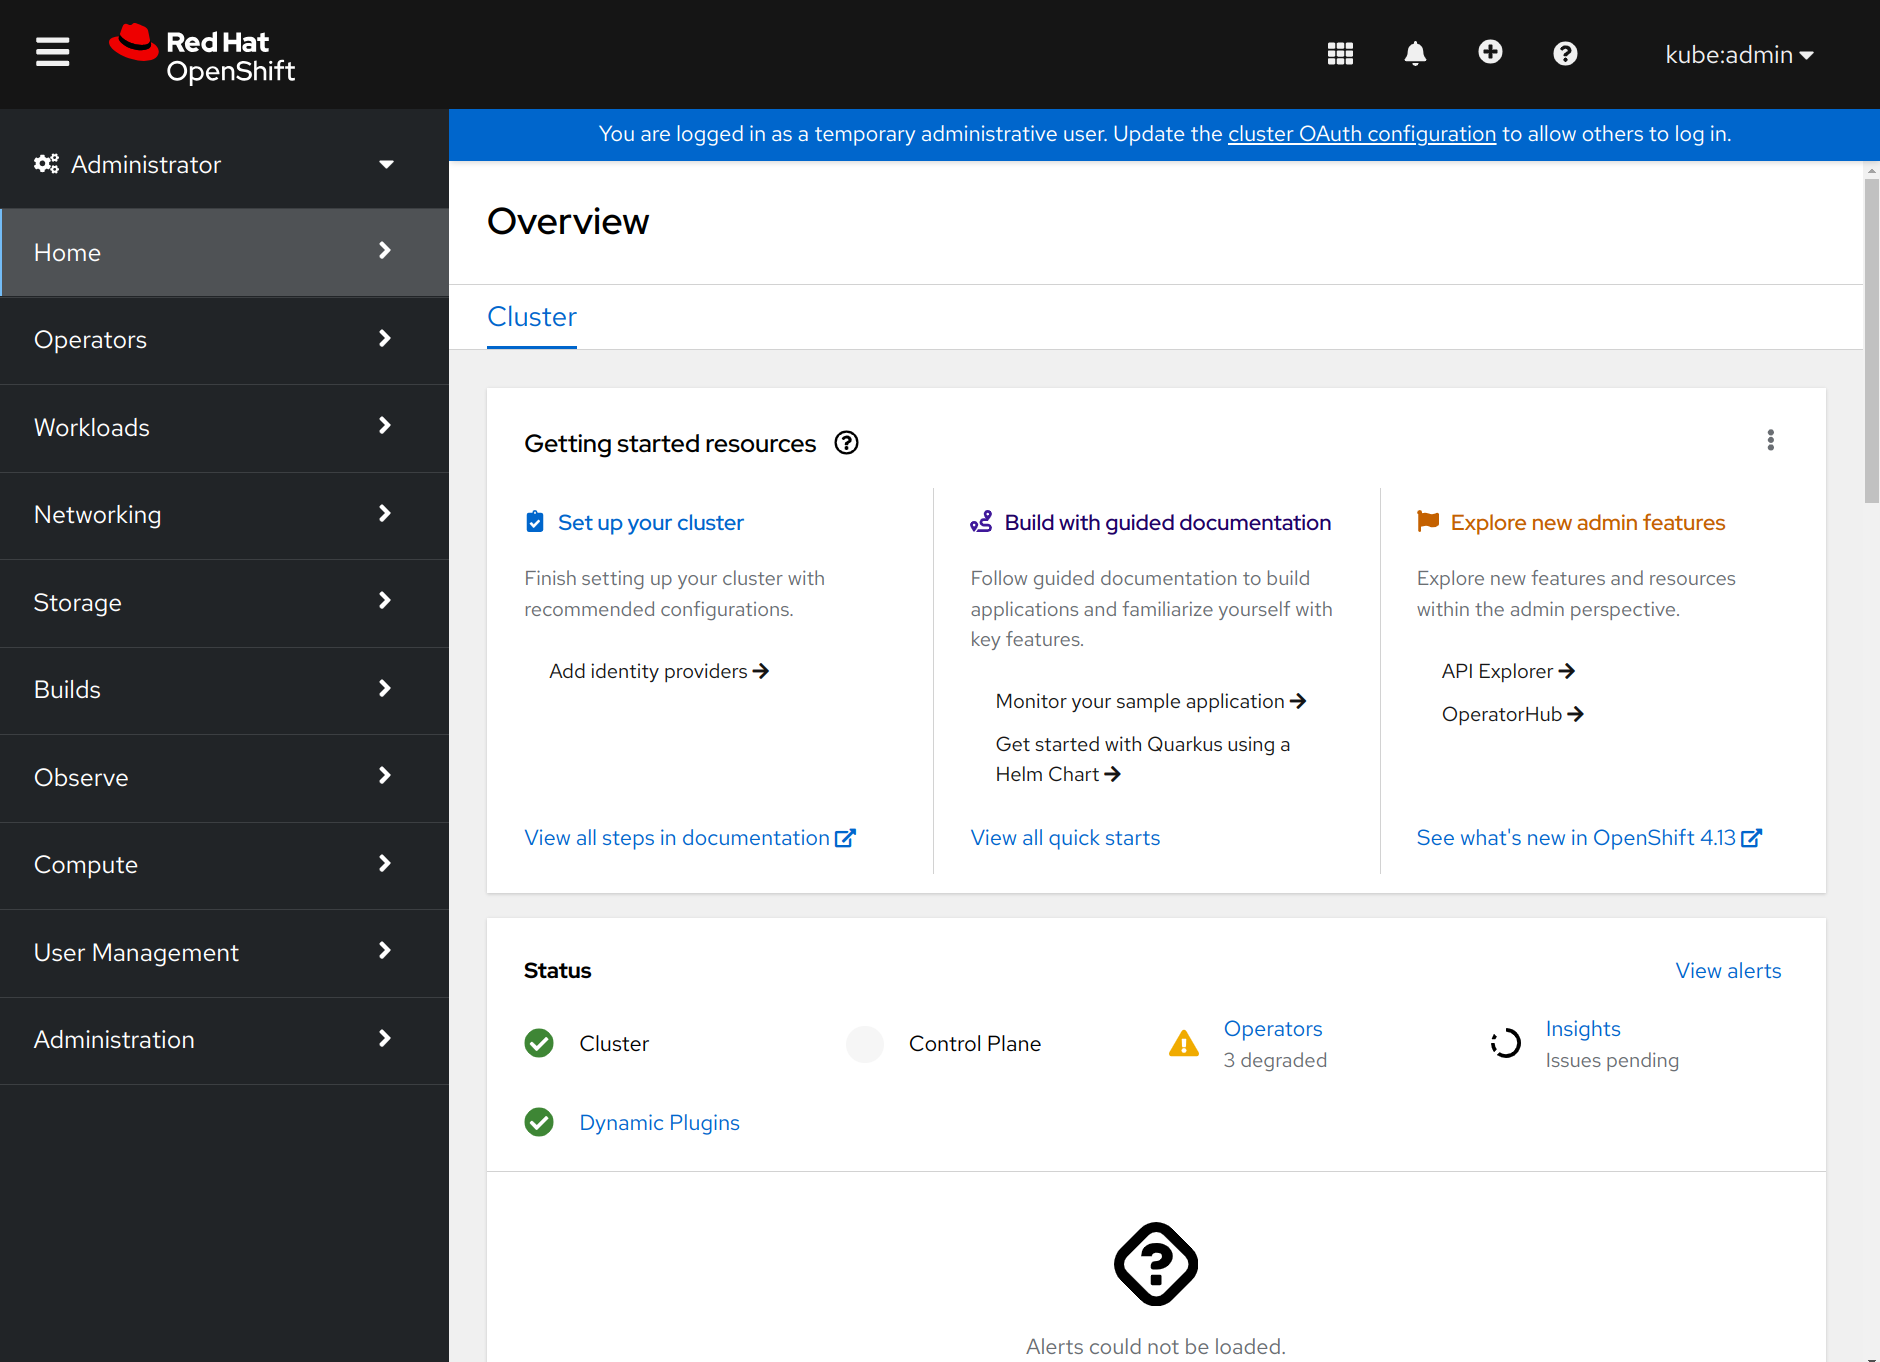
Figure 7. Access the OpenShift console
Access the bastion host
During the OpenShift bootstrap process, you can access to the bastion host as follows:
- Copy public_address of the Bastionhost
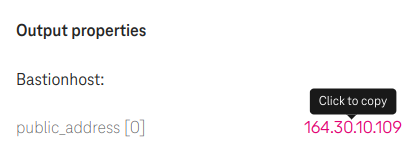
Figure 8. The public IP address of the bastion host
- Access the bastion host with the IP
# We use Ubuntu OS for the bastion host
ssh ubuntu@164.30.10.109
- Check nodes are ready
# Set KUBECONFIG
export KUBECONFIG="/home/ubuntu/openshift/auth/kubeconfig"

# Check all nodes are ready
$ oc get nodes
NAME                        STATUS   ROLES                  AGE    VERSION
openshift-k55b9-master-0    Ready    control-plane,master   179m   v1.26.9+636f2be
openshift-k55b9-master-1    Ready    control-plane,master   179m   v1.26.9+636f2be
openshift-k55b9-master-2    Ready    control-plane,master   179m   v1.26.9+636f2be
openshift-k55b9-workers-0   Ready    worker                 163m   v1.26.9+636f2be
openshift-k55b9-workers-1   Ready    worker                 163m   v1.26.9+636f2be
- Check all cluster operators are available
$ oc get clusteroperators
  NAME                                       VERSION   AVAILABLE   PROGRESSING   DEGRADED   SINCE   MESSAGE
  authentication                             4.13.19   True        False         False      156m
  baremetal                                  4.13.19   True        False         False      174m
  cloud-controller-manager                   4.13.19   True        False         False      3h1m
  cloud-credential                           4.13.19   True        False         False      3h4m
  cluster-autoscaler                         4.13.19   True        False         False      175m
  config-operator                            4.13.19   True        False         False      175m
  console                                    4.13.19   True        False         False      161m
  control-plane-machine-set                  4.13.19   True        False         False      175m
  csi-snapshot-controller                    4.13.19   True        False         False      175m
  dns                                        4.13.19   True        False         False      174m
  etcd                                       4.13.19   True        False         False      174m
  image-registry                             4.13.19   True        False         False      163m
  ingress                                    4.13.19   True        False         False      163m
  insights                                   4.13.19   True        False         False      168m
  kube-apiserver                             4.13.19   True        False         False      164m
  kube-controller-manager                    4.13.19   True        False         False      172m
  kube-scheduler                             4.13.19   True        False         False      172m
  kube-storage-version-migrator              4.13.19   True        False         False      164m
  machine-api                                4.13.19   True        False         False      171m
  machine-approver                           4.13.19   True        False         False      174m
  machine-config                             4.13.19   True        False         False      174m
  marketplace                                4.13.19   True        False         False      174m
  monitoring                                 4.13.19   True        False         False      162m
  network                                    4.13.19   True        False         False      177m
  node-tuning                                4.13.19   True        False         False      174m
  openshift-apiserver                        4.13.19   True        False         False      165m
  openshift-controller-manager               4.13.19   True        False         False      174m
  openshift-samples                          4.13.19   True        False         False      168m
  operator-lifecycle-manager                 4.13.19   True        False         False      174m
  operator-lifecycle-manager-catalog         4.13.19   True        False         False      175m
  operator-lifecycle-manager-packageserver   4.13.19   True        False         False      169m
  service-ca                                 4.13.19   True        False         False      175m
  storage                                    4.13.19   True        False         False      170m
How to create storages
Elastic Volume Service (EVS)
In OpenShift you can provision an EVS on T Cloud Public dynamically:
- Create a new storage class (e.g.,
ssd-csi) with a volume type (e.g.,SSD):
apiVersion: storage.k8s.io/v1
kind: StorageClass
metadata:
  name: ssd-csi
provisioner: cinder.csi.openstack.org
parameters:
  type: SSD # Choose 'SSD' for 'Ultra high I/O', 'SAS' for 'High I/O', 'SATA' for 'Common I/O'
reclaimPolicy: Delete
allowVolumeExpansion: true
volumeBindingMode: WaitForFirstConsumer # PVC is PENDING until the Pod is created. As a result, the volume is created in the same AZ as the POD.
(Alternative) Create a storage class with specific AZ (e.g., eu-de-01) so that volumes will be created only in this AZ:
apiVersion: storage.k8s.io/v1
kind: StorageClass
metadata:
  name: eu-de-01-ssd-csi
provisioner: cinder.csi.openstack.org
parameters:
  type: SSD # Choose 'SSD' for 'Ultra high I/O', 'SAS' for 'High I/O', 'SATA' for 'Common I/O'
reclaimPolicy: Delete
allowVolumeExpansion: true
allowedTopologies:
- matchLabelExpressions:
  - key: topology.cinder.csi.openstack.org/zone
    values:
    - eu-de-01 # Choose 'eu-de-01', 'eu-de-02', 'eu-de-03'
- Create a PersistentVolumeClaim (e.g.,
ssd-pvc) with the storage classssd-csi:
apiVersion: v1
kind: PersistentVolumeClaim
metadata:
  name: ssd-pvc
  namespace: <YOUR_NAMESPACE>
spec:
  storageClassName: ssd-csi
  accessModes:
    - ReadWriteOnce
  volumeMode: Filesystem
  resources:
    requests:
      storage: 10Gi
- Create a Pod
examplewith the PersistentVolumeClaimssd-pvc:
apiVersion: v1
kind: Pod
metadata:
  name: example
  labels:
    app: httpd
  namespace: <YOUR_NAMESPACE>
spec:
  securityContext:
    runAsNonRoot: true
    seccompProfile:
      type: RuntimeDefault
  containers:
    - name: httpd
      image: 'image-registry.openshift-image-registry.svc:5000/openshift/httpd:latest'
      ports:
        - containerPort: 8080
      securityContext:
        allowPrivilegeEscalation: false
        capabilities:
          drop:
            - ALL
      volumeMounts: # Add the following lines to the 'example' Pod to test the PVC
        - name: ssd-volume
          mountPath: /test
  volumes:
    - name: ssd-volume
      persistentVolumeClaim:
        claimName: ssd-pvc
- On OpenShift console, see Pod is running:

Figure 9. Pod example is running
- On T Cloud Public, see EVS is created:

Figure 10. A new EVS is created with the volume type "Ultra High I/O"
Scalable File Service & SFS Turbo
You can create a SFS on T Cloud Public manually and create a PersistentVolume using NFS in OpenShift, which connects to SFS via NFS protocol:
- Go to the webconsole of T Cloud Public and create a SFS or SFS Turbo:
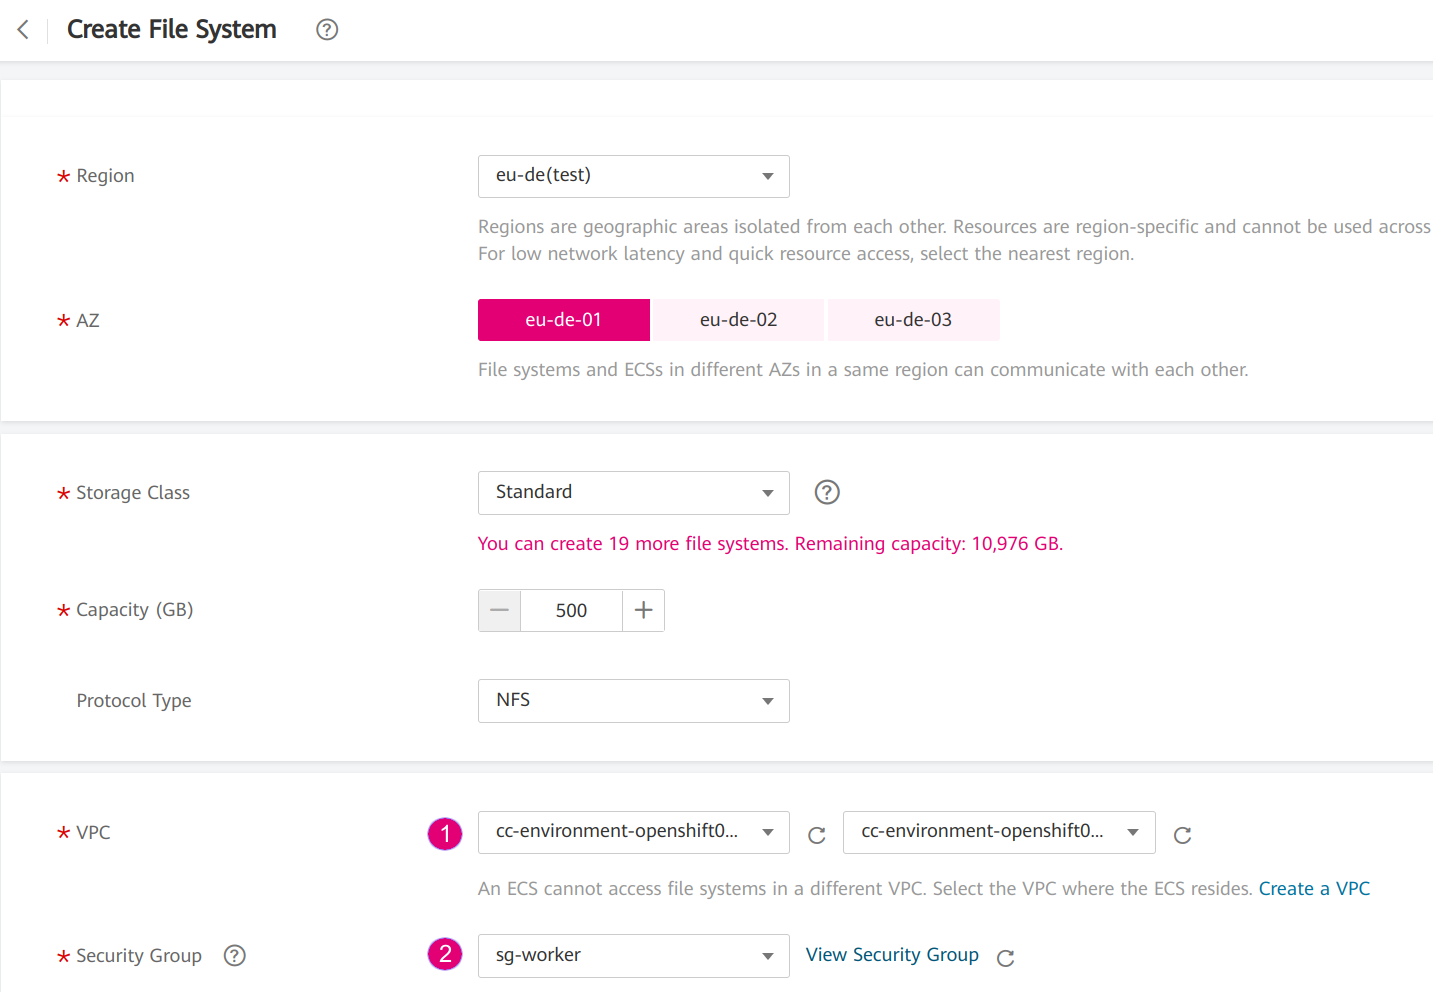
Figure 11. Create SFS via webconsole
- Choose the VPC and subnet of your OpenShift so that the SFS is created in the same subnet. The VPC
cc-environment-openshift00in this example was created by Cloud Create, which starts with the prefixcc, followed by the environement nameenviromentand the application nameopenshift00. - Choose the security group sg-worker. This is the security group of the worker nodes.
- Copy the SFS endpoint

Figure 12. Copy the SFS endpoint 10.0.207.136
- Create a PersistentVolume (e.g.,
sfs-pv) with the SFS endpoint:
apiVersion: v1
kind: PersistentVolume
metadata:
  name: sfs-pv
spec:
  capacity:
    storage: 500Gi
  accessModes:
  - ReadWriteMany
  nfs:
    server: 10.0.207.136 # SFS endpoint
    path: /
  persistentVolumeReclaimPolicy: Retain
- Create a PersistentVolumeClaim (e.g.,
sfs-pvc) with thesfs-pv:
apiVersion: v1
kind: PersistentVolumeClaim
metadata:
  name: sfs-pvc
  namespace: <YOUR_NAMESPACE>
spec:
  accessModes:
    - ReadWriteMany
  resources:
    requests:
      storage: 500Gi
  volumeName: sfs-pv
  storageClassName: "" # Important
- Create a Pod to use
sfs-pvc
Tear down
- In Cloud Create, go to Action / Undeploy to delete the OpenShift cluster.
- The PVC storages, which were created by OpenShift, will not be deleted automatically. You have to delete them manually.

Figure 12. Check PVC with Available status
Links
- Our OpenShift app template in TOSCA.
- How to create a PersistentVolume using NFS in OpenShift.