Migrating Container Images
Containers are growing in popularity. Many enterprises choose to build their own Kubernetes clusters. However, the O&M workload of on-premises clusters is heavy, and O&M personnel need to configure the management systems and monitoring solutions by themselves. For enterprises, managing a large number of images requires high O&M, labor, and management costs, and the efficiency is low. SoftWare Repository for Container (SWR) manages container images that function on multiple architectures, such as Linux and Arm. Enterprises can migrate their image repositories to SWR to reduce costs.
This blueprint describes three different scenarios for migrating image repositories to SWR smoothly. You can select one as required:
| Solution | Application Scenario | Precautions |
|---|---|---|
| Migrating images to SWR using Docker commands | Small quantity of images | - Disk storage leads to the timely deletion of local images and time-cost flushing. |
| - Docker daemon strictly restricts the number of concurrent pull/push operations, so high-concurrency synchronization cannot be performed. | ||
| - Scripts are complex because HTTP APIs are needed to perform the operations that cannot be implemented through Docker CLI. | ||
| Migrating images to SWR using image-syncer | A large number of images | - Many-to-many image repository synchronization is supported. |
| - Docker Registry V2-based image repositories (such as Docker Hub, Quay, and Harbor) can be migrated to SWR. | ||
| - Memory- and network-dependent synchronization is fast. | ||
| - Flushing the Blob information of synchronized images avoids repetition. | ||
| - The number of concurrent synchronization tasks can be adjusted in the configuration file. | ||
| - Automatically retrying failed synchronization tasks can resolve most network jitter during image synchronization. | ||
| - Docker or other programs are not required. | ||
| Synchronizing images across clouds from Harbor to SWR | A customer deploys services in multiple clouds and uses Harbor as their image repository. | Only Harbor v1.10.5 and later versions are supported. |
Migrating Images to SWR using Docker Commands
SWR provides easy-to-use image hosting and efficient distribution services. If small quantity of images need to be migrated, enterprises can use the docker pull/push command to migrate images to SWR:
-
Pull images from the source repository. Run the
docker pullcommand to pull the images.Exampledocker pull nginx:latestRun the
docker imagescommand to check whether the images are successfully pulled.docker imagesREPOSITORY TAG IMAGE ID CREATED SIZEnginx latest 22f2bf2e2b4f 5 hours ago 22.8MB -
Push the images pulled to SWR.
a. Log in to the VM where the target container is located and log in to SWR. For details, see Uploading an Image Through a Container Engine Client.
b. Tag the images: docker tag [Image name:Tag name] [Image repository address]/[Organization name]/[Image name:Tag name]
exampledocker tag nginx:v1 swr.eu-de.otc.t-systems.com/cloud-develop/nginx:v1c. Run the following command to push the images to the target image repository: docker push [Image repository address]/[Organization name]/[Image name:Tag name]
Exampledocker push swr.eu-de.otc.t-systems.com/cloud-develop/nginx:v1d. Check whether the following information is returned. If yes, the push is successful.
fbce26647e70: Pushedfb04ab8effa8: Pushed8f736d52032f: Pushed009f1d338b57: Pushed678bbd796838: Pushedd1279c519351: Pushedf68ef921efae: Pushedv1: digest: sha256:0cdfc7910db531bfa7726de4c19ec556bc9190aad9bd3de93787e8bce3385f8d size: 1780To view the pushed image, refresh the My Images page.
Migrating Images to SWR using image-syncer
If small quantity of images need to be migrated, you can use Docker commands. However, for thousands of images and several TBs of image repository data, it takes a long time and even data may be lost. In this case, you can use the open-source image migration tool image-syncer:
-
Download, decompress, and run image-syncer.
The following uses image-syncer v1.3.1 as an example.
wget https://github.com/AliyunContainerService/image-syncer/releases/download/v1.3.1/image-syncer-v1.3.1-linux-amd64.tar.gztar -zvxf image-syncer-v1.3.1-linux-amd64.tar.gz -
Create auth.json, the authentication information file of the image repositories.
image-syncer supports the Docker image repository based on Docker Registry V2. Enter the authentication information as required. In the following example, the image repository of eu-de is migrated to eu-nl.
The following describes how to write the authentication information of the source and target repositories.
{"swr.eu-de.otc.t-systems.com": {"username": "eu-de_otc@F1I3Q......","password": "2fd4c969ea0......"},"swr.eu-nl.otc.t-systems.com": {"username": "eu-nl_otc@4N3FA......","password": "f1c82b57855f9d35......"}}In the preceding commands,
swr.eu-de.otc.t-systems.comindicates the image repository address. You can obtain theusernameandpasswordfrom the login command as follows:Log in to the SWR console, and click Generate Login Command in the upper right corner to obtain the login command in the dialog box displayed, as shown in the following figure.
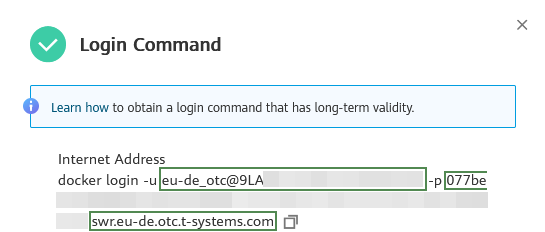
In the above figure :
eu-de_otc@9LA\...\...is theusername077be\...\...\...\.....is thepasswordandswr.eu-de.otc.t-systems.comis the image repository address.
-
Create images.json, the image synchronization description file.
In the following example, the source repository address is on the left, and the target repository address is on the right. image-syncer also supports other description modes. For details, see README.md.
{"swr.eu-de.otc.t-systems.com/org-ss/canary-consumer": "swr.eu-nl.otc.t-systems.com/dev-container/canary-consumer"} -
Run the following command to migrate the images to SWR:
./image-syncer \--auth=./auth.json \--images=./images.json\--namespace=dev-container \--registry=swr.eu-de.otc.t-systems.com\--retries=3 \--log=./log
Synchronizing Images Across Clouds from Harbor to SWR
Harbor is an open-source enterprise-class Docker Registry server developed by VMware. It extends the Docker Distribution by adding the functionalities such as role-based access control (RBAC), image scanning, and image replication. Harbor has been widely used to store and distribute container images.
Our scenarion in this blueprint is a customer that deploys services in multiple clouds and uses Harbor as their image repository. We are going to be accessing SWR through a public network.
-
Configure a registry endpoint on Harbor.
noteT Cloud Public SWR has not yet integrated with Harbor. You need clone this repo and build it from branch opentelekomcloud_adapter.
Add an endpoint and configure the following parameters.
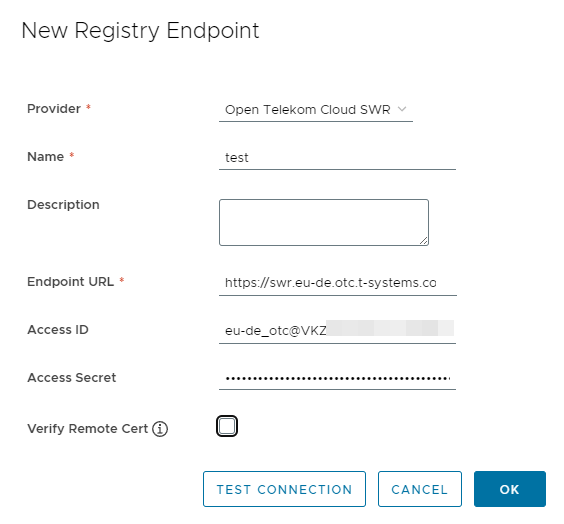
Provider: SelectT Cloud Public SWR.Name: Enter a customized name.Endpoint URL: Enter the public network domain name of SWR in the format ofhttps://{SWR image repository address}. To obtain the image repository address, log in to the SWR console, choose My Images, and click Upload Through Client. You can view the image repository address of the current region on the page that is displayed.Access ID: Enter an access ID in the format ofRegional project name@\[AK\].Access Secret: Enter an AK/SK. To obtain an AK/SK, see Obtaining a Long-Term Valid Login Command.Verify Remote Cert: Deselect the option.
-
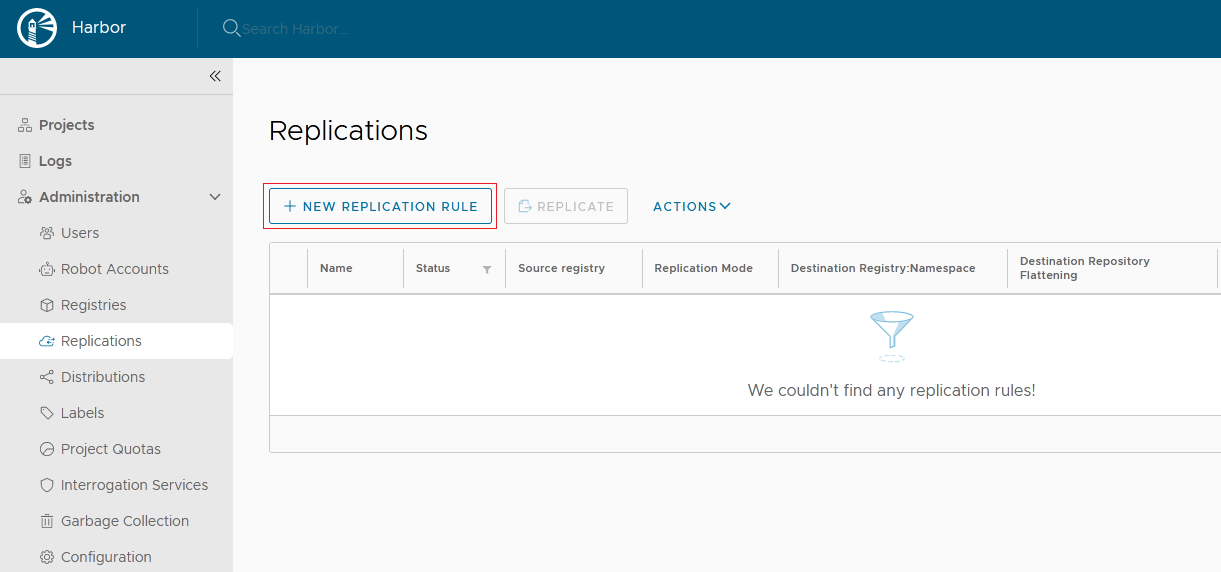
Configure a replication rule.
a. Create a replication rule.
b. Configure the following parameters:
Name: Enter a customized name.Replication mode: SelectPush-based, indicating that images are pushed from the local Harbor to the remote repository.Source resource filter: Filters images on Harbor based on the configured rules.Destination registry: Select the endpoint created previously.- Destination
Namespace: Enter the organization name on SWR.Flattening: SelectFlatten All Levels, indicating that the hierarchy of the registry is reduced when copying images. If the directory of Harbor registry is library/nginx and the directory of the endpoint namespace is dev-container, after you flatten all levels, the directory of the endpoint namespace is library/nginx -> dev-container/nginx. Trigger Mode: SelectManual.Bandwidth: Set the maximum network bandwidth when executing the replication rule. The value-1indicates no limitation.
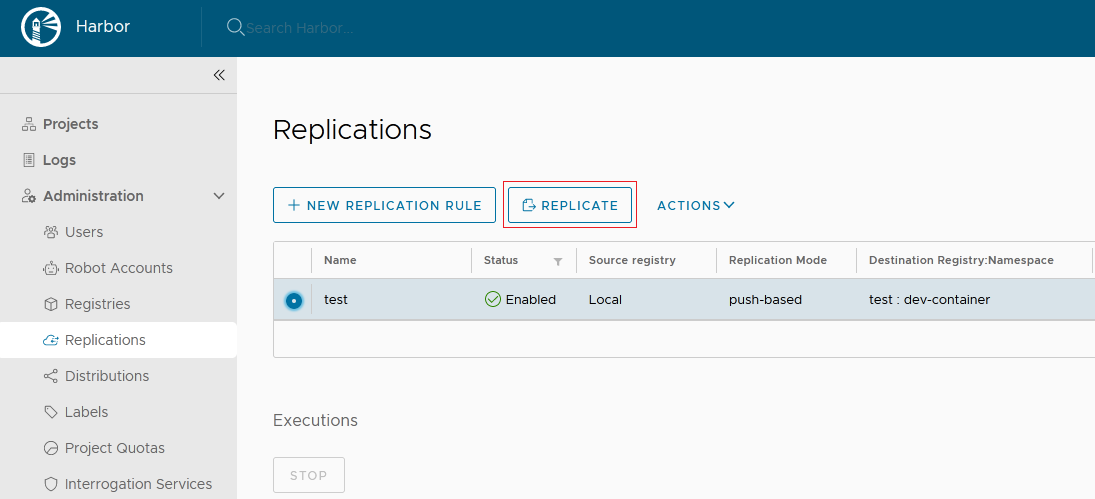
-
After creating the replication rule, select it and click REPLICATE to complete the replication.