RAID Array Creation with EVS Disks
Redundant Array of Independent Disks (RAID) is a technology that combines multiple physical disks into one or more logical units for the purposes of data redundancy and performance improvement.
In this document, Elastic Volume Service (EVS) disks instead of physical disks are used to create RAID arrays. The working principles are the same.
Solution Design
This document uses CentOS Stream 9 as the sample OS to describe how to create a RAID 10 array with four EVS disks. A RAID 10 array consists of RAID 0 and RAID 1 arrays. In this example, EVS disks are used to create a mirroring array (RAID 1) and then create a RAID 0 array to store data in stripes. At least four EVS disks are required.
Prerequisites
This practice describes the servers and disks planned for creating a RAID 10 array:
- ECS Name:
ecs-raid10 - ECS Image:
CentOS Strean 9 - ECS Specifications:
General computing, s3.medium.2 (1 vCPU, 2 GiB memory) - Elastic IP Address:
80.158.xxx.xxxif you want to access it from public internet. Alternatively you could use a bastion.
Setting up RAID 10 requires at least 4 disks. Therefore, 4 EVS disks are created and attached to the ECS in this example.
Creating an ECS
This section shows how to create an ECS. In this example, one ECS needs to be created. For details about the ECS parameter configurations, see Prerequisites:
-
Log in to the management console.
-
Under Computing, click Elastic Cloud Server.
-
Click Create ECS.
Configure the following parameters as planned:
-
Image: Select CentOS and choose
Standard_CentOS_Stream-9_latest(6GB). -
EIP: An EIP is mandatory if the ECS needs to access the public network. In this example, the multiple devices admin (mdadm) tool needs to be installed. Therefore, an EIP must be configured. Assign an EIP or configure an existing one based on the environment condition.
-
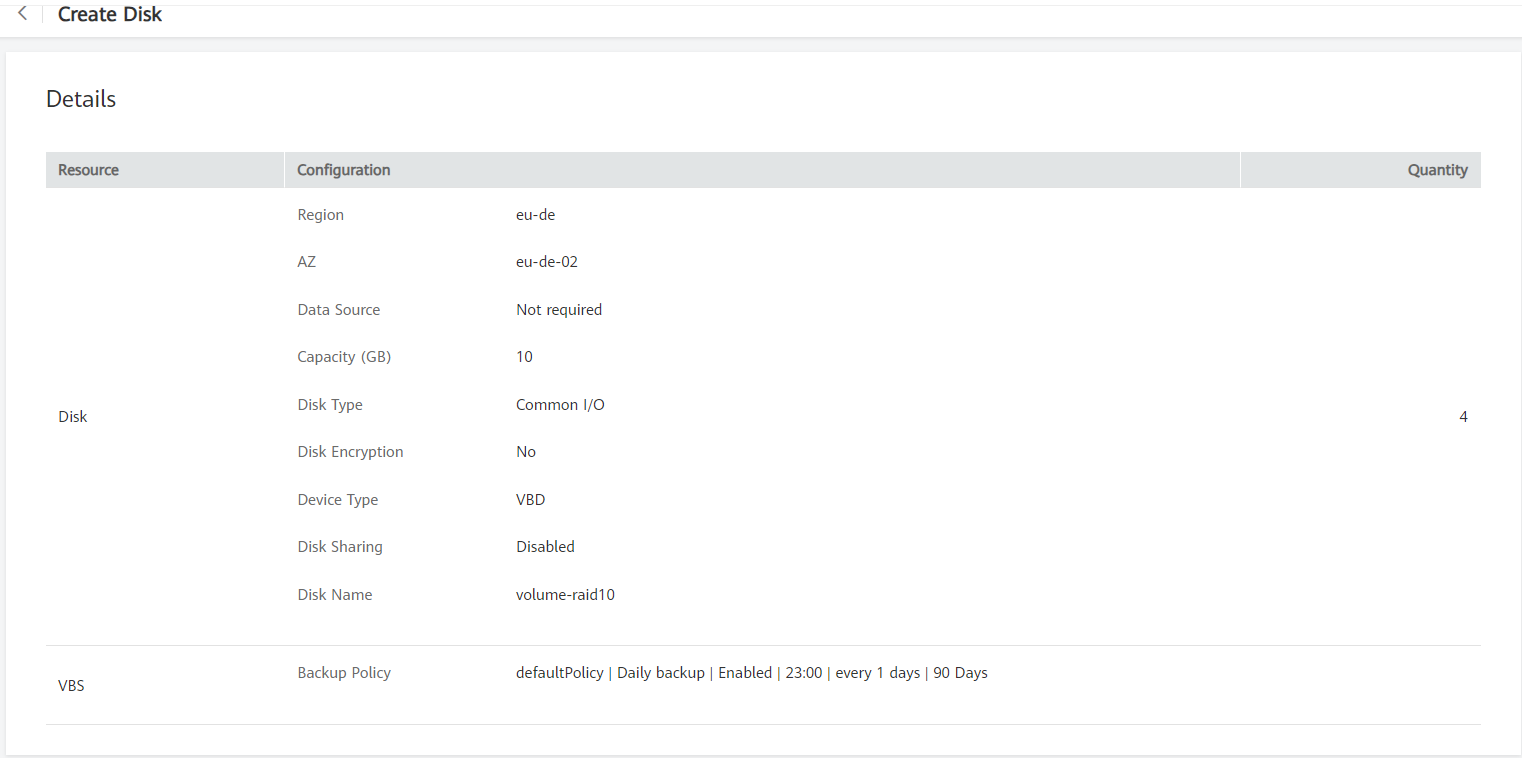
Creating and Attaching EVS Disks
This section shows how to create four EVS disks in a batch and attach the disks to the ECS.
-
Log in to the management console.
-
Under Storage, click Elastic Volume Service.
-
Click Create Disk.
-
Attach the disks to the ECS.
Creating a RAID Array Using mdadm
This section shows how to create a RAID 10 array using mdadm.
In this example, the ECS runs CentOS Stream 9. Configurations vary depending on the OS running on the ECS. This section is used for reference only. For the detailed operations and differences, see the corresponding OS documents.
-
Log in to the ECS as user root.
-
Run the following command to view and take note of the device names:
fdisk -l \| grep /dev/vd \| grep -v vdaInformation similar to the following is displayed:
[root@ecs-raid10 ~]# fdisk -l | grep /dev/vd | grep -v vdaDisk /dev/vdb: 10.7 GB, 10737418240 bytes, 20971520 sectorsDisk /dev/vdc: 10.7 GB, 10737418240 bytes, 20971520 sectorsDisk /dev/vdd: 10.7 GB, 10737418240 bytes, 20971520 sectorsDisk /dev/vde: 10.7 GB, 10737418240 bytes, 20971520 sectorsIn the command output, four disks are attached to the ECS, and the device names are
/dev/vdb,/dev/vdc,/dev/vdd, and/dev/vde, respectively. -
Run the following command to install mdadm:
yum install mdadm -ynotemdadm is a utility to create and manage software RAID arrays on Linux. Ensure that an EIP has been bound to the ECS where mdadm is to be installed.
Information similar to the following is displayed:
[root@ecs-raid10 ~]# yum install mdadm -y......Installed:mdadm.x86_64 0:4.0-13.el7Dependency Installed:libreport-filesystem.x86_64 0:2.1.11-40.el7.centosComplete! -
Run the following command to create a RAID array using the four disks:
mdadm -Cv /dev/md0 -a yes -n 4 -l 10 /dev/vdb /dev/vdc /dev/vdd /dev/vdeParameter description:
-
RAID array device name: The value can be user-definable. In this example,
/dev/md0is used. -
Disk quantity: Set this parameter based on the actual condition. In this example, RAID 10 is created, and at least four disks are required. The minimum number of disks required varies depending on the RAID level. See Introduction to Common RAID Arrays for details.
-
RAID level: Set this parameter based on the actual condition. In this example, set it to
RAID 10. -
Device name of the disk: Enter the device names of all the disks that will be used to create the RAID array. Multiple names are separated with spaces.
Information similar to the following is displayed:
[root@ecs-raid10 ~]# mdadm -Cv /dev/md0 -a yes -n 4 -l 10 /dev/vdb /dev/vdc /dev/vdd /dev/vdemdadm: layout defaults to n2mdadm: layout defaults to n2mdadm: chunk size defaults to 512Kmdadm: size set to 10476544Kmdadm: Defaulting to version 1.2 metadatamdadm: array /dev/md0 started. -
-
Run the following command to format the created RAID array:
mkfs.ext4 /dev/md0Information similar to the following is displayed:
[root@ecs-raid10 ~]# mkfs.ext4 /dev/md0mke2fs 1.42.9 (28-Dec-2013)Filesystem label=OS type: LinuxBlock size=4096 (log=2)Fragment size=4096 (log=2)Stride=128 blocks, Stripe width=256 blocks1310720 inodes, 5238272 blocks261913 blocks (5.00%) reserved for the super userFirst data block=0Maximum filesystem blocks=2153775104160 block groups32768 blocks per group, 32768 fragments per group8192 inodes per groupSuperblock backups stored on blocks:32768, 98304, 163840, 229376, 294912, 819200, 884736, 1605632, 2654208,4096000Allocating group tables: doneWriting inode tables: doneCreating journal (32768 blocks): doneWriting superblocks and filesystem accounting information: done -
Run the following command to create a mounting directory:
mkdir /RAID10 -
Run the following command to mount the RAID array:
mount /dev/md0 /RAID10 -
Run the following command to view the mount result:
df -hInformation similar to the following is displayed:
[root@ecs-raid10 ~]# df -hFilesystem Size Used Avail Use% Mounted on/dev/vda2 39G 1.5G 35G 5% /devtmpfs 911M 0 911M 0% /devtmpfs 920M 0 920M 0% /dev/shmtmpfs 920M 8.6M 911M 1% /runtmpfs 920M 0 920M 0% /sys/fs/cgroup/dev/vda1 976M 146M 764M 17% /boottmpfs 184M 0 184M 0% /run/user/0/dev/md0 20G 45M 19G 1% /RAID10 -
Perform the following operations to enable automatic mounting of the RAID array at the system start:
a. Run the following command to open the /etc/fstab file:
vi /etc/fstabb. Press i to enter editing mode.
Information similar to the following is displayed:
[root@ecs-raid10 ~]# vi /etc/fstab## /etc/fstab# Created by anaconda on Tue Nov 7 14:28:26 2017## Accessible filesystems, by reference, are maintained under '/dev/disk'# See man pages fstab(5), findfs(8), mount(8) and/or blkid(8) for more info#UUID=27f9be47-838b-4155-b20b-e4c5e013cdf3 / ext4 defaults 1 1UUID=2b2000b1-f926-4b6b-ade8-695ee244a901 /boot ext4 defaults 1 2c. Add the following information to the end of the file:
/dev/md0 /RAID10 ext4 defaults 0 0d. Press ESC, enter
:wq!, and press ENTER.The system saves the modifications and exits the vi editor.
-
Run the following command to view the RAID array information:
mdadm -D /dev/md0Information similar to the following is displayed:
[root@ecs-raid10 ~]# mdadm -D /dev/md0/dev/md0:Version : 1.2Creation Time : Thu Nov 8 15:49:02 2018Raid Level : raid10Array Size : 20953088 (19.98 GiB 21.46 GB)Used Dev Size : 10476544 (9.99 GiB 10.73 GB)Raid Devices : 4Total Devices : 4Persistence : Superblock is persistentUpdate Time : Thu Nov 8 16:15:11 2018State : cleanActive Devices : 4Working Devices : 4Failed Devices : 0Spare Devices : 0Layout : near=2Chunk Size : 512KConsistency Policy : resyncName : ecs-raid10.novalocal:0 (local to host ecs-raid10.novalocal)UUID : f400dbf9:60d211d9:e006e07b:98f8758cEvents : 19Number Major Minor RaidDevice State0 253 16 0 active sync set-A /dev/vdb1 253 32 1 active sync set-B /dev/vdc2 253 48 2 active sync set-A /dev/vdd3 253 64 3 active sync set-B /dev/vde
Configuring Automatic Start of the RAID Array at Server Startup
This section shows how to add RAID array information, such as the device name and UUID to the mdadm configuration file. In this case, the RAID array can be started by querying information in the configuration file when the system starts.
In this example, the ECS runs CentOS Stream 9. Configurations vary depending on the OS running on the ECS. This section is used for reference only. For the detailed operations and differences, see the corresponding OS documents.
-
Log in to the ECS as user root.
-
Run the following command to view the RAID array information:
mdadm \--detail \--scanInformation similar to the following is displayed:
[root@ecs-raid10 ~]# mdadm --detail --scanARRAY /dev/md0 metadata=1.2 name=ecs-raid10.novalocal:0 UUID=f400dbf9:60d211d9:e006e07b:98f8758c -
Perform the following operations to add information of the new RAID array to the mdadm file:
a. Run the following command to open the mdadm.conf file:
vi /etc/mdadm.confb. Press i to enter editing mode.
c. Add the following information to the end of the file:
DEVICE /dev/vdb /dev/vdc /dev/vdd /dev/vdeARRAY /dev/md0 metadata=1.2 name=ecs-raid10.novalocal:0 UUID=f400dbf9:60d211d9:e006e07b:98f8758cDescription:
- DEVICE line: Indicates the device names of the disks that set up the RAID array. Multiple device names are separated with spaces.
- ARRAY line: Indicates RAID array information. Input the RAID array information.
noteThe preceding information is used for reference only. Add RAID array information based on your configuration and outputs.
d. Press ESC, enter
:wq!, and press ENTER.The system saves the modifications and exits the vi editor.
-
Run the following command to check whether the mdadm.conf file is modified:
more /etc/mdadm.confInformation similar to the following is displayed:
[root@ecs-raid10 ~]# more /etc/mdadm.confDEVICE /dev/vdb /dev/vdc /dev/vdd /dev/vdeARRAY /dev/md0 metadata=1.2 name=ecs-raid10.novalocal:0 UUID=f400dbf9:60d211d9:e006e07b:98f8758cIf the information added is displayed, the file is successfully modified.
Appendix
Introduction to Common RAID Arrays
- RAID Level: RAID 0
- Description: RAID 0 stores data on multiple disks, implementing parallel read/write and providing the fastest read/write speed.
- Read/Write Performance: Parallel read/write from multiple disks achieves high performance.
- Security: Worst No redundancy capability. If one disk is damaged, the data of the entire RAID array is unavailable.
- Disk Usage: 100%
- Min. Number of Disks Required: 2
- RAID Level: RAID 1
- Description: RAID 1 implements data redundancy based on data mirroring. Half of the disk capacity in the RAID array is used, and the other half is used for mirroring to provide data backup.
- Read/Write Performance: Read performance: Same as a single disk Write performance: Data needs to be written into two disks. The write performance is lower than that of a single disk.
- Security: Highest Provides full backup of disk data. If a disk in the RAID array fails, the system automatically uses the data on the mirror disk.
- Disk Usage: 50%
- Min. Number of Disks Required: 2
- RAID Level: RAID 01
- Description: RAID 01 combines RAID 0 and RAID 1, in which half disks are first grouped into RAID 0 stripes and then used together with the other half to set up a RAID 1 array.
- Read/Write Performance: Read performance: Same as RAID 0 Write performance: Same as RAID 1
- Security: The security of RAID 01 is lower than that of RAID 10.
- Disk Usage: 50%
- Min. Number of Disks Required: 4
- RAID Level: RAID 10
- Description: RAID 10 combines RAID 1 and RAID 0, in which half disks are first set up as a RAID 1 array and then used together with the other half to create RAID 0 stripes.
- Read/Write Performance: Read performance: Same as RAID 0 Write performance: Same as RAID 1
- Security: The security performance of RAID 10 is the same as that of RAID 1.
- Disk Usage: 50%
- Min. Number of Disks Required: 4
- RAID Level: RAID 5
- Description: RAID 5 does not specify a dedicated parity disk and consists of block-level striping with parity information distributed among the disks.
- Read/Write Performance: Read performance: Same as RAID 0 Write performance: Because parity data needs to be written into disks, the write performance is lower than that of a single disk.
- Security: The security of RAID 5 is lower than that of RAID 10.
- Disk Usage: 66.7%
- Min. Number of Disks Required: 3