Zone-redundant NFS Server
The main target of this blueprint is to provide a zone-redundant NFS Server with the option to perform a failover. We are going to use ECS, EVS and Storage Disaster Recovery Service of T Cloud Public for that. Additionally we will cover operational tasks like extending the size of the NFS Share.
This guide is to be treated as proposal and it's only intend is to demonstrate the capabilities of SDRS in conjunction with high available NFS storage.
Solution Design

As you can see one can optionally use an ELB in front of the NFS Server, but for this build we will focus on using an internal NIC only.
Setting up the infrastructure
Create an ECS with an additional Disk which should be the same size as your desired NFS Share. If you are planning to use more shares (which will be the case for most use-cases), simply add up your desired size and you are good to go.
If the size is exceeding 16TB, you may use
another EVS-Disk, as each disk can only be 16TB in size.
- Create an ECS in your primary location (zone) e.g. eu-de-01 (in this example we'll choose Ubuntu as base-image)
- Add datadisk(s) of your desired size
- Place the ECS in a reasonable Network/Subnet and attach an appropriate Security Group to the interface.
- Once the ECS is up and running, create a protection Group using the Storage Disaster Recovery Service (SDRS)
- In the protection group select the ECS and a target Zone (should differ from the primary zone you chose earlier) and hit Create. After about 10mins everything should be created.
- Select the Protection group and Click on Enable protection
- This will start the synchronization, which takes about 3-5mins, depending on the size of disks etc.
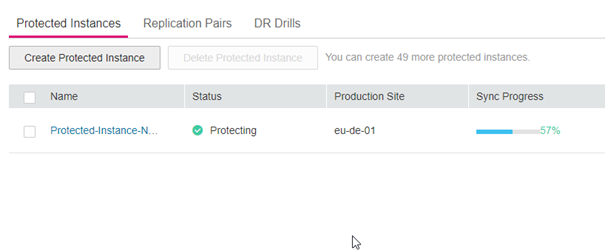
What is the sync doing: It is setting up an ECS instance as a cold standby with a set of replication pairs. Once the sync is done, everything is ready and you can proceed with the NFS Server setup.
Setting up the NFS Server
If you want to setup everything automatically using Ansible, click here. Otherwise, continue reading here:
You now need to access the newly created NFS Server (do this using SSH key or using the VNC-Console). Depending on the chosen operating system you need to install some prerequisites first:
- Prerequisites
Install the following packages:
sudo apt update
sudo apt install nfs-kernel-server -y
sudo apt install lvm2 -y
- Creating a Volumegroup and a Logical Volume
   # check the disk-names (vdb, vdc, ...)
   lsblk

   # vgcreate -> creates volumegroup
   vgcreate -s 32 vg_nfs /dev/vdb [/dev/vd... #add all needed disks here in one line if you require more]

   # lvcreate -> creates lvol #it is advised to create an lvol for each export
   lvcreate -n export1 -L 10g vg_nfs #for acceptable size values see 'man lvcreate'
   lvcreate -n export2 -L 20g vg_nfs
   lvcreate -n export3 -L 30g vg_nfs
- Making lvols mount persistent
Place them into /etc/fstab so that it looks like so:
   cat /etc/fstab
   #
   /dev/nfs_vg/export1 /export1 ext4 defaults 0 0
   /dev/nfs_vg/export2 /export2 ext4 defaults 0 0
   /dev/nfs_vg/export3 /export3 ext4 defaults 0 0
   #
- Creating directories and mount everything
   mkdir -p /export1 /export2 /export3

   #mount and verify
   mount -a
   df
- Exporting the mounts
Modify /etc/exports:
   cat /etc/exports
   /export1 *(rw,sync,no_root_squash,no_subtree_check)
   /export2 *(rw,sync,no_root_squash,no_subtree_check)
   /export3 *(rw,sync,no_root_squash,no_subtree_check)
- Ensuring that the NFS Server is enabled and running
   systemctl enable nfs-server.service
   Created symlink /etc/systemd/system/multi-user.target.wants/nfs-server.service → /lib/systemd/system/nfs-server.service.

   systemctl start nfs-server.service

   systemctl status nfs-server.service
   ● nfs-server.service - NFS server and services
        Loaded: loaded (/lib/systemd/system/nfs-server.service; enabled; vendor preset: enabled)
       Drop-In: /run/systemd/generator/nfs-server.service.d
                └─order-with-mounts.conf
        Active: active (exited) since Mon 2024-03-11 11:31:59 UTC; 23h ago
      Main PID: 2908 (code=exited, status=0/SUCCESS)
           CPU: 5ms

   Mar 11 11:31:59 nfs-server systemd[1]: Starting NFS server and services...
- Ensuring that the exports are exported and visible to others
   exportfs -a

   #on any client you can now verify the exports by running:
   # <on client machine>

   showmount -e <IP adress of NFS-Server>
   Export list for <IP adress of NFS-Server>:
   /export1 *
   /export2 *
   /export3 *
Now you have successfully setup a very basic NFS Server.
Automating NFS Server Setup using Ansible
Assuming the following circumstances, that the nfs-server has 1 additional disk of minimum 100GB, the following ansible playbook can be run locally (feel free to adjust):
   - hosts: localhost
     connection: local
     become: yes
     tags:
       - never
     tasks:
     - name: Install NFS server packages
       apt:
         name:
           - nfs-kernel-server
           - lvm2
         state: present
       tags:
         - installation

     - name: Setup physical volume
       community.general.lvg:
         vg: nfs_vg
         pvs: /dev/vdb
       tags:
         - volume_group

     - name: Create a logical volume
       community.general.lvol:
         vg: nfs_vg
         lv: nfs_lv
         size: 95g
       tags:
         - logical_volume

     - name: Format the logical volume with ext4
       filesystem:
         fstype: ext4
         dev: /dev/nfs_vg/nfs_lv
       tags:
         - filesystem

     - name: Mount the logical volume
       mount:
         path: /export
         src: /dev/nfs_vg/nfs_lv
         fstype: ext4
         state: mounted
       tags:
         - mounting

     - name: Configure NFS export
       lineinfile:
         path: /etc/exports
         line: "/export *(rw,sync,no_root_squash,no_subtree_check)"
         create: yes
       tags:
         - nfs_configuration

     - name: Ensure NFS server is running
       service:
         name: nfs-kernel-server
         state: started
         enabled: yes
       tags:
         - service_management

     - name: Apply NFS export table changes
       command: exportfs -a
       tags:
         - exports
Adding a new NFS Share
This section covers the steps to add a new NFS export, specifically
focusing on export4 as an example.
- Prerequisites
Before proceeding, ensure that there is enough available space in the volume
group (vg_nfs) to allocate to the NFS export. If there is NOT enough
space, update the disk and resize the pvol as follows.
- Extend the Disk size by the needed amount
- Resize the physical Volume
pvresize /dev/vd<DEVICELETTER> - check results with
vgsThe VFree column should now contain enough space
- Adding the Logical Volume
Use lvcreate to create the logical volume associated with export4. Use
the following iptions:
-Lto specify space you want to have, e.g.-L 5gwill create a 5g logical volume.-nto specify the name of the new volume- at the end provide the name of the volumegroup.
lvcreate -L 5g -n export4 vg_nfs
- Creating the filesystem
In our case we will use ext4:
mkfs.ext4 /dev/nfs_vg/export4
- Creating a mountpoint (directory)
mkdir -p /export4 # feel free to change this to your needs
- Making the newly created lvol mount persistent
Simply add it as a new line into /etc/fstab:
   cat /etc/fstab
   #
   /dev/nfs_vg/export1 /export1 ext4 defaults 0 0
   /dev/nfs_vg/export2 /export2 ext4 defaults 0 0
   /dev/nfs_vg/export3 /export3 ext4 defaults 0 0
   # new export below
   /dev/nfs_vg/export4 /export4 ext4 defaults 0 0
   #
- Mounting and verifying
   mount -a
   df
- Modifying /etc/exports
Add a new line for the new export:
   cat /etc/exports
   /export1 *(rw,sync,no_root_squash,no_subtree_check)
   /export2 *(rw,sync,no_root_squash,no_subtree_check)
   /export3 *(rw,sync,no_root_squash,no_subtree_check)
   # new export below
   /export4 *(rw,sync,no_root_squash,no_subtree_check)
- Ensuring that the exports are exported
exportfs -a
- Verifing Exports
On any client, you can now verify the exports by running:
   # <on client machine>

   showmount -e <IP adress of NFS-Server>
   Export list for <IP adress of NFS-Server>:
   /export1 *
   /export2 *
   /export3 *
Online resizing of the NFS Export
This section covers the steps to perform an online resize of your NFS
export, specifically focusing on export2 as an example. This
operation allows you to increase the available storage capacity of the
NFS export without interrupting its availability to clients.
- Prerequisites
Before proceeding, ensure that there is available space in the volume
group (vg_nfs) to allocate to the NFS export. If there is NOT enough
space, update the disk and resize the pvol as follows.
- Extend the Disk size by the needed amount
- Resize the physical Volume
pvresize /dev/vd<DEVICELETTER> - check results with
vgsThe VFree column should now contain enough space
- Extending the Logical Volume
Use lvextend to increase the size of the logical volume associated with
export2. Use -L+ to add the additional space you want to have, e.g. +5g
will add 5g to the logical volume:
lvextend -L+5g /dev/vg_nfs/export2
- Resizing the Filesystem
After extending the logical volume, resize the filesystem sitting on top of it to utilize the new space. For ext-filesystems, use:
resize2fs /dev/vg_nfs/export2
If you are not using ext filesystems, feel free to use the according
other tools for extending the filesystem (like growpart or
xfs_growfs and so on)
Decommissioning of the NFS Share
- Prerequisites
Decommisioning a share is a non-reversive action, proceed with caution! Ensure all clients have the NFS share unmounted! This prevents data loss and ensures no client is attempting to access the share during the decommissioning process!
- Unexporting the NFS-Share
After you have ensured, that the NFS Share is not used by any client,
remove the export configuration for the share you are decommissioning.
For export4, edit /etc/exports and remove the line corresponding
to /export4.
   # Example line to remove:
   /export4 *(rw,sync,no_root_squash,no_subtree_check)
After editing, apply the changes:
This will cut off any active connections to the share
exportfs -ra
- Unmounting the NFS Share
Ensure no process is using the share and then unmount it:
   fuser -c /export4 # should return nothing
   umount /export4
- Removing the entry from /etc/fstab
Open /etc/fstab and remove the line that corresponds to /export4, to
prevent it from mounting on reboot.
   # Example line to remove:
   /dev/vg_nfs/export4 /export4 ext4 defaults 0 0
- Deleting the Logical Volume
Remove the logical volume associated with export4.
lvremove /dev/vg_nfs/export4 # confirm with 'y'
- Removing the Directory (optional)
If the directory /export4 is no longer needed, it can be removed:
rm -r /export4
Finally you can verify that the logical volume is removed:
lvs
Optionally ensure NFS exports have been updated, by checking on a client machine:
   # <on client machine>
   showmount -e <NFS-Server IP>
This concludes the decommissioning process of an NFS-share.
DR-drill/Failover to a secondary site
- Preparation
In a real-outage scenario, when one AZ is declared as down, you must do a failover using the T Cloud Public Console. Before we perform a test failover, let's have a client mounting the actual NFS Share:
   df

   Filesystem         1K-blocks    Used Available Use% Mounted on
   tmpfs                 812816    1096    811720   1% /run
   /dev/vda1            5810764 4597652    892788  84% /
   tmpfs                4064076       0   4064076   0% /dev/shm
   tmpfs                   5120       0      5120   0% /run/lock
   tmpfs                 812812       4    812808   1% /run/user/1000
   10.0.0.180:/export  97466368       0  92469248   0% /tmp/hla
and simulate some work on it:
root@nfs-client:/tmp/hla# while true ; do echo "$(date)" >> check_time.txt ; sleep 1 ; done
This will echo the time into a file once per second while having a file-descriptor open the whole time (the process is started in the Share itself)
- Performing failover
In the T Cloud Public Console -> SDRS -> Select protection group and click More -> Fail Over:

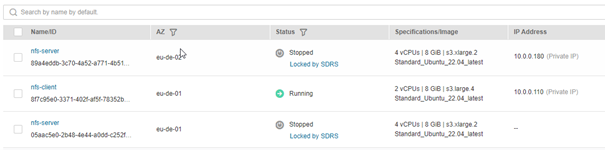
This will have the following effect:
- It unplugs the NIC from the running server and attaches it to the target host (note we were previously running in eu-de-01):

This results to the client operating-system setting the nfs-share to readonly (as it is not able to reach it):
   root@nfs-client:/tmp/hla# while true ; do echo "$(date)" >> check_time.txt ; sleep 1 ; done

   -bash: check_time.txt: Read-only file system
   -bash: check_time.txt: Read-only file system
   -bash: check_time.txt: Read-only file system
   -bash: check_time.txt: Read-only file system
   -bash: check_time.txt: Read-only file system
- It stops the previous production server (in eu-de-01)
- Failover complete – now you must actively start the nfs-server resource in eu-de-02. There is a shortcut to do that in the overview of SRDS:
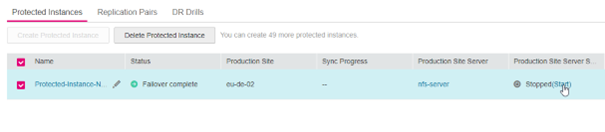
-
If set up correctly, the nfs-server should start everything on its own.
-
If you try to access the nfs-Server, it should throw an error message like this:
   ssh nfs-server
   @@@@@@@@@@@@@@@@@@@@@@@@@@@@@@@@@@@@@@@@@@@@@@@@@@@@@@@@@@@
   @    WARNING: REMOTE HOST IDENTIFICATION HAS CHANGED!     @
   @@@@@@@@@@@@@@@@@@@@@@@@@@@@@@@@@@@@@@@@@@@@@@@@@@@@@@@@@@@
   IT IS POSSIBLE THAT SOMEONE IS DOING SOMETHING NASTY!
   Someone could be eavesdropping on you right now (man-in-the-middle attack)!
   It is also possible that a host key has just been changed.
   The fingerprint for the ECDSA key sent by the remote host is
   SHA256:IfRWy+RVAgSr+sHbxwQfuoreNZAU9wfO142vfQix27c.
   Please contact your system administrator.
   Add correct host key in /home/linux/.ssh/known_hosts to get rid of this message.
   Offending ECDSA key in /home/linux/.ssh/known_hosts:5
   You can use following command to remove the offending key:
   ssh-keygen -R 10.0.0.180 -f /home/linux/.ssh/known_hosts
   ECDSA host key for 10.0.0.180 has changed and you have requested strict checking.
   Host key verification failed.
This is expected, as the nfs-server is technically now another ECS instance with the same name, ssh-key etc.; but with different ECDSA Key (fingerprint). To get rid off this message, simply use the suggested command, and re-accept the fingerprint:
   ssh-keygen -R 10.0.0.180 -f /home/linux/.ssh/known_hosts
   # Host 10.0.0.180 found: line 5
   /home/linux/.ssh/known_hosts updated.
   Original contents retained as /home/linux/.ssh/known_hosts.old
   linux@bastion:~> ssh nfs-server
   The authenticity of host '10.0.0.180 (10.0.0.180)' can't be established.
   ECDSA key fingerprint is SHA256:IfRWy+RVAgSr+sHbxwQfuoreNZAU9wfO142vfQix27c.
   No matching host key fingerprint found in DNS.
   Are you sure you want to continue connecting (yes/no/[fingerprint])? yes
   Warning: Permanently added '10.0.0.180' (ECDSA) to the list of known hosts.
   Welcome to Ubuntu 22.04.3 LTS (GNU/Linux 5.15.0-100-generic x86_64)
- Checking on the client side we can see that the process continued its work, as long as it regained connection
   root@nfs-client:~# cat /tmp/hla/check_time.txt
   .
   .
   Mon Mar 18 07:08:20 UTC 2024
   Mon Mar 18 07:08:21 UTC 2024
   Mon Mar 18 07:08:22 UTC 2024
   Mon Mar 18 07:08:23 UTC 2024
   Mon Mar 18 07:08:46 UTC 2024 #failover started here
   Mon Mar 18 07:10:50 UTC 2024
   Mon Mar 18 07:10:51 UTC 2024
   Mon Mar 18 07:10:52 UTC 2024
   Mon Mar 18 07:10:53 UTC 2024
   Mon Mar 18 07:10:54 UTC 2024
   Mon Mar 18 07:10:55 UTC 2024
   Mon Mar 18 07:10:56 UTC 2024
-
The according timeout settings in the nfs-client can be set via fstab
-
timeo=nThe time in deciseconds (tenths of a second) the NFS client waits for a response before it retries an NFS request. -
retrans=nThe number of times the NFS client retries a request before it attempts further recovery action.