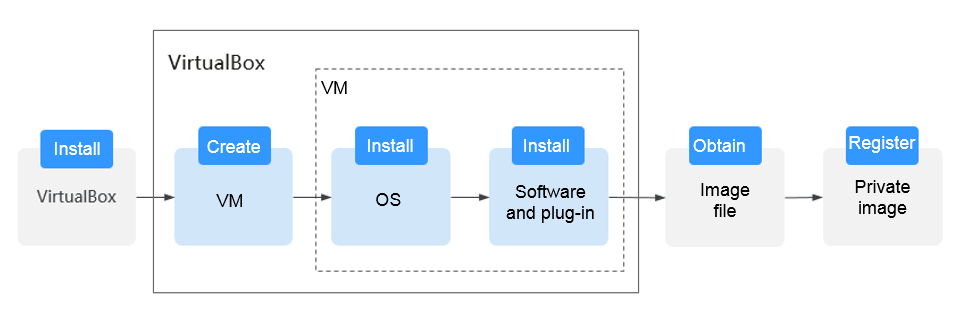
Creating a Linux Image Using VirtualBox and an ISO File
VirtualBox is free, open-source virtualization software. It was first offered by InnoTek GmbH from Germany and re-branded as Oracle VM VirtualBox when InnoTek was acquired by Oracle Corporation.
For more information about VirtualBox, visit the Oracle official website. Click here to see the guest OSs that can work with VirtualBox.
You can use a 32-bit or 64-bit Linux guest OS provided by VirtualBox to create an image file in VHD format. The following figure shows how to use VirtualBox to create an image from an ISO file.
Installing VirtualBox
Prerequisites
The host where VirtualBox is to be installed must meet the following requirements:
- A 64-bit Windows OS (recommended).
- At least 4 GB of memory and a dual-core processor. For example, the host specifications can be 8U16G.
- At least 20 GB of available disk space.
- Hardware virtualization (Intel VT-x or AMD-V). For how to enable this, see Configuring Host BIOS CPU Settings.
For details about how to install VirtualBox, see the VirtualBox user guide at
https://www.virtualbox.org/manual/UserManual.html.
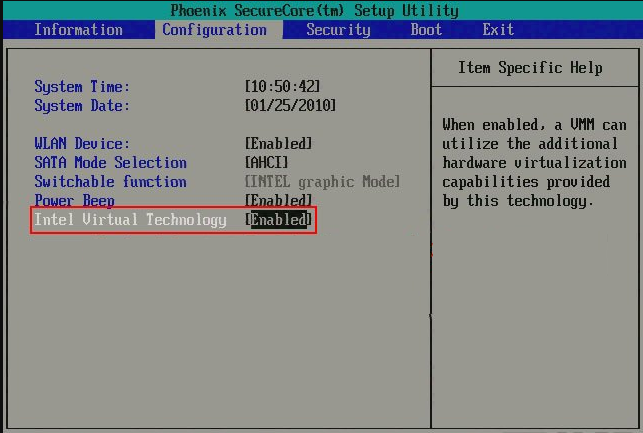
Configuring Host BIOS CPU Settings
For an Intel host, perform the following operations to enable hardware virtualization:
The operations may differ depending on the CPU type. You can do it as prompted.
-
During the host startup, press the BIOS key set by the manufacturer to access the BIOS.
-
Choose Configuration -> Intel Virtual Technology, and press Enter.
-
Select Enabled and press Enter. The value of Intel Virtual Technology will become Enabled.
-
Press F10 to save the settings and exit.
Figure 1 Enabling hardware virtualization
Installing VirtualBox Binaries
-
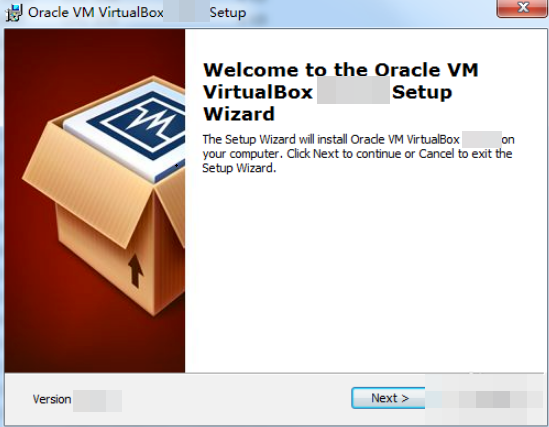
Download the VirtualBox installation package. VirtualBox-5.2.0 is used as an example.
Download it from https://www.virtualbox.org/wiki/Downloads.
-
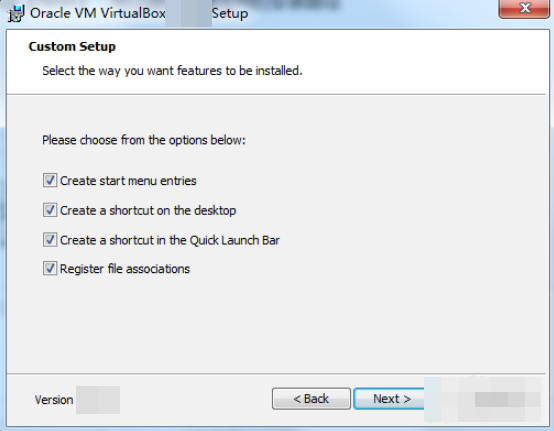
Decompress the package. Right-click VirtualBox-5.2.0-118431-Win.exe, choose Run as administrator, and click Next.
Figure 2 Installing VirtualBox
-
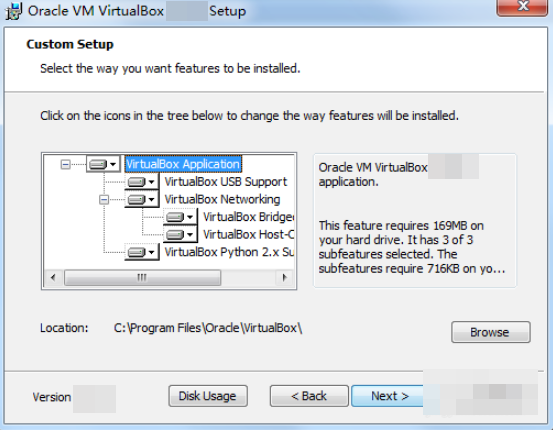
Select the VirtualBox installation path and click Next.
Figure 3 Selecting an installation path
-
Personalize the settings and click Next.
Figure 4 Personalized settings
-
Click Finish.
Creating a VM and Installing an OS
Creating an Empty VM
-
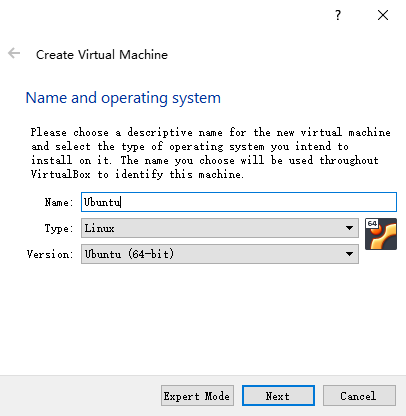
Open VirtualBox and click New. In the displayed Create Virtual Machine dialog box, enter a VM name, select an OS type and version, and click Next.
Take Ubuntu as an example. The type must be Linux. Ensure that the selected version is the same as that of the OS you want to install on the VM.
Figure 1 Creating a VM
-
In the Memory size dialog box, set a value and click Next.
You can reference the VM specifications or official OS requirements. The minimum value is 256 MB. You can set the memory size to 512 MB as an example.
Figure 2 Setting the memory size

-
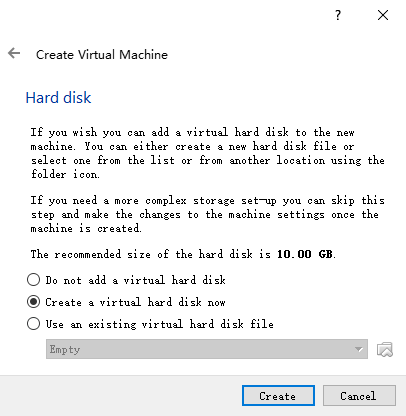
In the Hard disk dialog box, select Create a virtual hard disk now and click Create.
Figure 3 Creating a virtual hard disk
-
In the Hard disk file type dialog box, select VHD and click Next.
Figure 4 Setting the hard disk file type

-
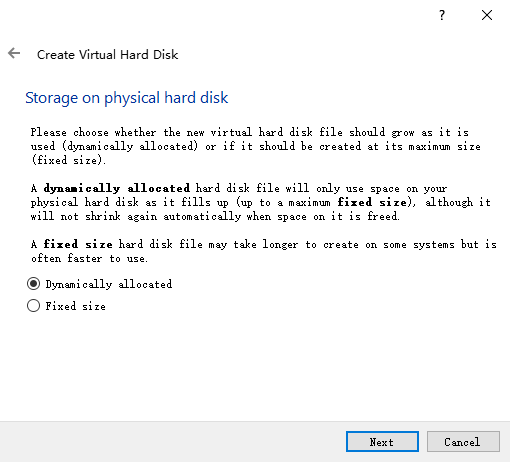
In the Storage on physical hard disk dialog box, select Dynamically allocated and click Next.
Figure 5 Selecting the disk allocation mode
-
In the File location and size dialog box, set the disk size and storage location.
For example, you can set the disk size to 20 GB.
Figure 6 Setting the disk location and size

-
Click Create.
Installing a Linux OS on the VM
The procedure varies depending on the image file you use. This section uses Ubuntu 20.04 as an example to describe how to install a Linux OS on the VM.
Make sure you have obtained the ISO image file of your target OS, for example, Ubuntu-20.04-server.iso.
Use the ISO file to install Linux for the empty VM.
-
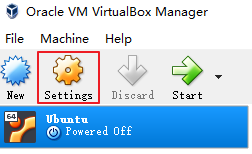
In VirtualBox Manager, select the new VM and click Settings.
Figure 1 Setting the VM
-
Choose Storage -> Empty, click
 in the Attributes area, and select the ISO image file Ubuntu-20.04-server.iso.
Figure 2 Selecting the ISO file to be mounted
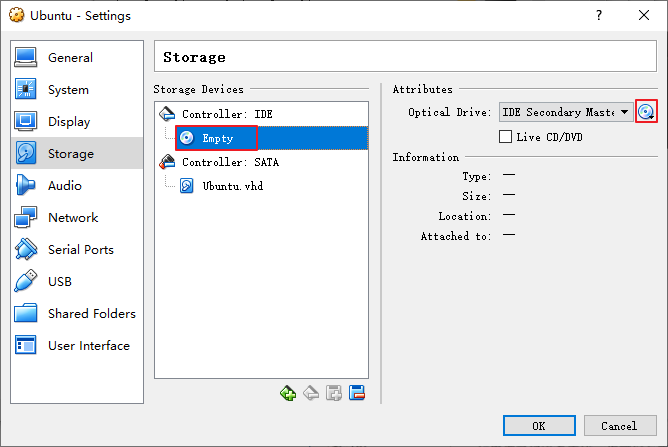
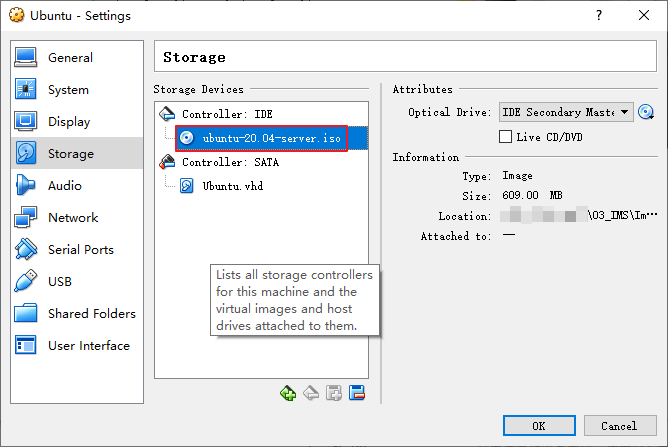
Figure 3 Mounted ISO file
-
Click OK.
-
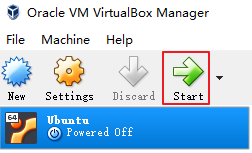
In VirtualBox Manager, select the new VM and click Start.
Figure 4 Starting the VM
-
Install the OS.
-
Select English and press Enter.

-
Select Continue without updating.

-
Retain the default settings for the keyboard. Select Done

-
Retain the default settings for the installation base. Select Done.

-
Retain the default settings for the network. Select Done.
The installation program will automatically identify the IP address. If the network cannot be found, the installation program can still continue and you can configure the network again after the installation is complete.

-
Retain the default settings for the proxy. Select Done.

-
Retain the default settings for the software source. Select Done.

-
Retain the default settings for disk partitioning (use an entire disk and set up this disk as an LVM group). Select Done.

The file system information will be displayed. Check it and select Done.
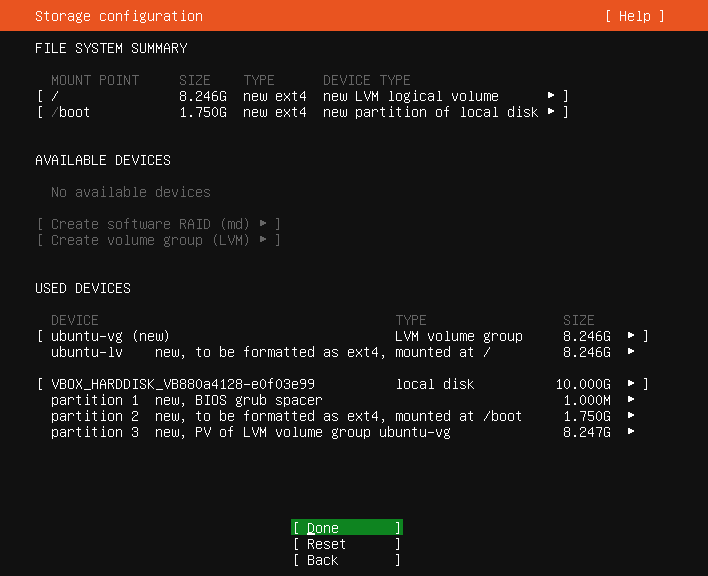
Confirm the destructive action and select Continue.

-
Configure the server name, username, and password. Select Done.
Your name: It is not a username for logging in to the server. You can consider it as server description.
Your Server's name: It is a unique server name on the same network. The name cannot contain uppercase letters.
Pick a username: It is a username for logging in to the server. If you forget it or its password, you will not be allowed to log in to the server.
Choose a password: It is the password for logging in to the server.
Confirm your password: Enter your password again.

-
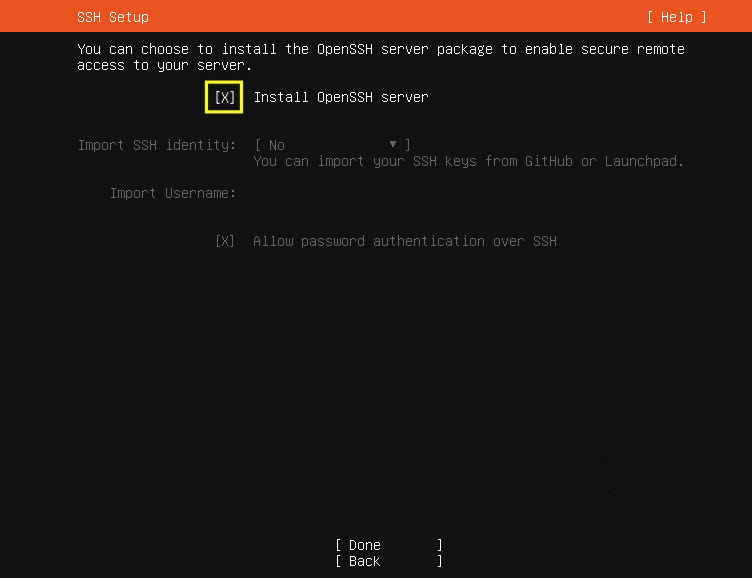
Install SSH so that you can remotely connect to the Linux server.
Select Install OpenSSH server. Then, press TAB to select Done.
-
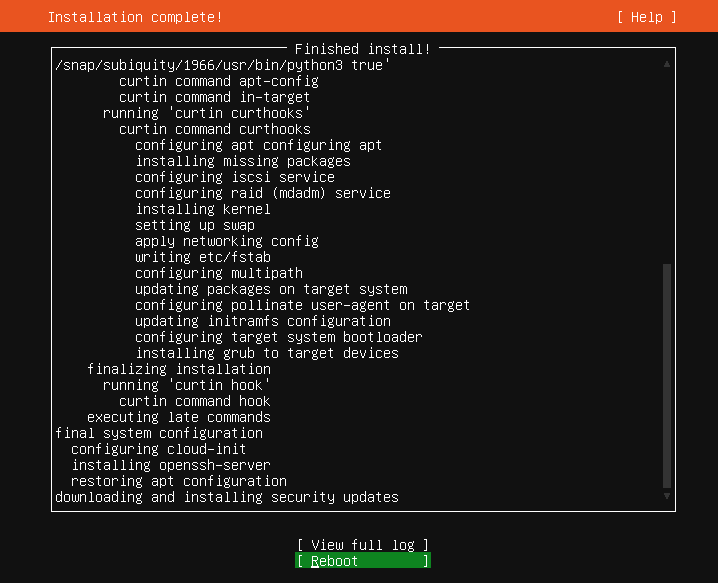
Select Done to start the OS installation.
-
After the installation is complete, select Reboot to restart the system.
-
Configuring the VM
Installing Drivers and Changing the Disk Identifiers to the UUID Format
To ensure that the ECSs created from the image support both Xen and KVM virtualization, install Native Xen and KVM drivers and change the disk identifiers to the UUID format for the VM which is used as the image source.
This section describes how to perform these operations on a Linux VM that runs Ubuntu 20.04. For other OSs, see Optimization Process (Linux).
-
Run the following command to open the modules file:
vi /etc/initramfs-tools/modules
-
Press i to enter the editing mode and add the native Xen (xen-pv) and KVM (virtio) drivers to the /etc/initramfs-tools/modules file (the format depends on the OS requirements).
[root@CTU10000xxxxx ~]#vi /etc/initramfs-tools/modules...# Examples:## raid1# sd_mOdxen-blkfrontxen-netfrontvirtio_blkvirtio_scsivirtio_netvirtio_pcivirtio_ringvirtio -
Press ESC, enter :wq, and press Enter to save the settings and exit the vi editor.
-
Run the following command to generate initrd again:
update-initramfs -u -
Run the following commands to check whether native Xen and KVM drivers have been installed:
lsinitramfs /boot/initrd.img-\`uname -r\` |grep xenlsinitramfs /boot/initrd.img-\`uname -r\` |grep virtio[root@ CTU10000xxxxx home]# lsinitramfs /boot/initrd.img-`uname -r` |grep xenlib/modules/3.5.0-23-generic/kernel/drivers/net/ethernet/qlogic/netxenlib/modules/3.5.0-23-generic/kernel/drivers/net/ethernet/qlogic/netxen/netxen_nic.kolib/modules/3.5.0-23-generic/kernel/drivers/net/xen-netbacklib/modules/3.5.0-23-generic/kernel/drivers/net/xen-netback/xen-netback.kolib/modules/3.5.0-23-generic/kernel/drivers/block/xen-blkbacklib/modules/3.5.0-23-generic/kernel/drivers/block/xen-blkback/xen-blkback.ko[root@ CTU10000xxxxx home]# lsinitramfs /boot/initrd.img-`uname -r` |grep virtiolib/modules/3.5.0-23-generic/kernel/drivers/scsi/virtio_scsi.konoteIf you add built-in drivers to the initrd or initramfs file, the VM will not be affected. This makes it easy to modify the drivers. However, the drivers cannot be shown by running the lsinitrd command. You can run the following commands to check whether the drivers are built-in ones in the kernel:
[root@ CTU10000xxxxx home]# cat /boot/config-`uname -r` | grep CONFIG_VIRTIO | grep yCONFIG_VIRTIO_BLK=yCONFIG_VIRTIO_NET=yCONFIG_VIRTIO=yCONFIG_VIRTIO_RING=yCONFIG_VIRTIO_PCI=yCONFIG_VIRTIO_MMIO_CMDLINE_DEVICES=y[root@ CTU10000xxxxx home]# cat /boot/config-`uname -r` | grep CONFIG_XEN | grep yCONFIG_XEN_BLKDEV_FRONTEND=yCONFIG_XEN_NETDEV_FRONTEND=y
Changing the Disk Identifier in the GRUB Configuration File to the UUID Format
Take Ubuntu 20.04 as an example. Run blkid to obtain the UUID of the root partition. Modify the /boot/grub/grub.cfg file and use the UUID of the root partition to configure the boot item. If the root partition already uses UUID, no modification is required. The procedure is as follows:
-
Log in to the newly created VM as user root.
-
Run the following command to query all types of mounted file systems and their device UUIDs:
blkidThe following information is displayed:
/dev/xvda1: UUID="ec51d860-34bf-4374-ad46-a0c3e337fd34" TYPE="ext3"/dev/xvda5: UUID="7a44a9ce-9281-4740-b95f-c8de33ae5c11" TYPE="swap" -
Run the following command to query the grub.cfg file:
cat /boot/grub/grub.****cfgThe following information is displayed:
......menuentry 'Ubuntu Linux, with Linux 3.13.0-24-generic' --class ubuntu --class gnu-linux --class gnu --class os --unrestricted $menuentry_id_option 'gnulinux-3.13.0-24-generic-advanced-ec51d860-34bf-4374-ad46-a0c3e337fd34' {recordfailload_videogfxmode $linux_gfx_modeinsmod gzioinsmod part_msdosinsmod ext2if [ x$feature_platform_search_hint = xy ]; thensearch --no-floppy --fs-uuid --set=root ec51d860-34bf-4374-ad46-a0c3e337fd34elsesearch --no-floppy --fs-uuid --set=root ec51d860-34bf-4374-ad46-a0c3e337fd34fiecho 'Loading Linux 3.13.0-24-generic ...'linux /boot/vmlinuz-3.13.0-24-generic root=/dev/xvda1 roecho 'Loading initial ramdisk ...'initrd /boot/initrd.img-3.13.0-24-generic} -
Check whether the /boot/grub/grub.cfg configuration file contains root=/dev/xvda1 or root=UUID=ec51d860-34bf-4374-ad46-a0c3e337fd34.
- If root=UUID=ec51d860-34bf-4374-ad46-a0c3e337fd34 is contained, the root partition is in the UUID format and no further action is required.
- If root=/dev/xvda1 is contained, the root partition is represented by a device name. Go to step 5.
-
Obtain the UUID of the root partition based on root=/dev/xvda1 and information obtained by running the blkid command.
-
Run the following command to open the grub.cfg file:
vi /boot/grub/grub.cfg -
Press i to enter the editing mode. Change the identifier of the root partition to the UUID format. For example, change root=/dev/xvda1 to root=UUID=ec51d860-34bf-4374-ad46-a0c3e337fd34.
-
Press ESC, enter :wq, and press Enter to save the settings and exit the vi editor.
-
Run the following command to verify the change:
cat /boot/grub/grub.cfgThe change is successful if information similar to the following is displayed:
......menuentry 'Ubuntu Linux, with Linux 3.13.0-24-generic' --class ubuntu --class gnu-linux --class gnu --class os --unrestricted $menuentry_id_option 'gnulinux-3.13.0-24-generic-advanced-ec51d860-34bf-4374-ad46-a0c3e337fd34' {recordfailload_videogfxmode $linux_gfx_modeinsmod gzioinsmod part_msdosinsmod ext2if [ x$feature_platform_search_hint = xy ]; thensearch --no-floppy --fs-uuid --set=root ec51d860-34bf-4374-ad46-a0c3e337fd34elsesearch --no-floppy --fs-uuid --set=root ec51d860-34bf-4374-ad46-a0c3e337fd34fiecho 'Loading Linux 3.13.0-24-generic ...'linux /boot/vmlinuz-3.13.0-24-generic root=UUID=ec51d860-34bf-4374-ad46-a0c3e337fd34 roecho 'Loading initial ramdisk ...'initrd /boot/initrd.img-3.13.0-24-generic}
Changing the Disk Identifiers in the fstab File to the UUID Format
Take Ubuntu 20.04 as an example. Run blkid to obtain the UUIDs of all partitions. Modify the /etc/fstab file and use the partition UUIDs to configure automatic partition mounting.
-
Run the following command to query all types of mounted file systems and their device UUIDs:
blkidThe following information is displayed:
/dev/xvda2: UUID="4eb40294-4c6f-4384-bbb6-b8795bbb1130" TYPE="xfs"/dev/xvda1: UUID="2de37c6b-2648-43b4-a4f5-40162154e135" TYPE="swap" -
Run the following command to query the fstab file:
cat /etc/fstabThe following information is displayed:
[root@CTU1000028010 ~]# cat /etc/fstab/dev/xvda2 / xfs defaults 0 0/dev/xvda1 swap swap defaults 0 0 -
Check whether the disk identifiers in the fstab file are device names or UUIDs.
- If they are UUIDs, no further action is required.
- If they are device names, go to step 4.
-
Run the following command to open the fstab file:
vi /etc/fstab -
Press i to enter the editing mode and change the disk identifiers to the UUID format.
-
Press ESC, enter :wq, and press Enter to save the settings and exit the vi editor.
Installing Cloud-Init
For more information on cloud-init check this link.
Configuring Cloud-Init
For more information on cloud-init check this link.
Configuring NetworkManager
Linux allows you to use NetworkManager to automatically configure the VM network. You are advised to use NetworkManager for new OS versions.
Alternatively, you can use the native network management service of the OS.
- RedHat, Oracle, CentOs, EulerOS, Fedora
- Debian 9+
- Ubuntu 14+
- SUSE 11+, openSUSE 13+
-
Run the following command to install NetworkManager:
yum install NetworkManager -
Delete ifcfg-eth1 to ifcfg-eth11 from the /etc/sysconfig/network-scripts/ directory and retain only ifcfg-eth0.
-
Run the following command to disable the network:
service network stop -
Run the following command to disable automatic startup of the network:
chkconfig network off -
Run the following commands to restart messagebus and NetworkManager and enable NetworkManager to start automatically at startup:
service messagebus restartservice NetworkManager restartchkconfig NetworkManager on
Install NetworkManager and use it for automatic network configuration.
-
Run the following command to install NetworkManager:
apt-get install network-manager -
Change the value of managed in the /etc/NetworkManager/NetworkManager.conf file to true.
-
Modify /etc/network/interfaces and retain only eth0.
-
Run the following commands to disable the network, restart messagebus and NetworkManager, and enable NetworkManager to start automatically at startup:
service network-manager restartchkconfig network-manager onservice networking stopservice messagebus restartservice network-manager restart
Install NetworkManager and use it for automatic network configuration.
-
Run the following command to install NetworkManager:
apt-get install network-manager -
Change the value of managed in the /etc/NetworkManager/NetworkManager.conf file to true.
-
Modify /etc/network/interfaces and retain only eth0.
-
Run the following command to disable the network:
service networking stop -
Run the following command to disable automatic startup of the network:
chkconfig network off -
Run the following commands to restart D-Bus and NetworkManager:
service dbus restartservice network-manager restart
Install NetworkManager and use it for automatic network configuration.
-
Delete ifcfg-eth1 to ifcfg-eth11 from the /etc/sysconfig/network-scripts/ directory and retain only ifcfg-eth0.
-
Run the following command to install NetworkManager:
zypper install NetworkManager -
Start YaST, choose Network Devices in the navigation pane on the left, and select Network Settings in the right pane. In the Network Setup Method area of the Global Options page, change Traditional Method with ifup to User Controlled with NetworkManager.
Obtaining the Image File
After the VM is configured, perform the following operations to generate and export a Linux image file:
- Open VirtualBox, select the VM, choose Settings -> Storage, and select Linux.vhd.
- On the right pane, view the image file location.
- Go to the location to obtain the generated Linux.vhd image file.
Registering the Image File as a Private Image
Upload the image file to an OBS bucket and register it as a private image.
- Only an unencrypted image file or an image file encrypted using SSE-KMS can be uploaded to an OBS bucket.
- When uploading an image file, you must select an OBS bucket with the storage class of Standard.
-
Use OBS Browser+ to upload the image file. For details, see OBS Browser+ Best Practices.
For how to download OBS Browser+, see https://docs.otc.t-systems.com/object-storage-service/tool-guide/downloading_obs_browser.html.
-
Register the external image file as a private image. For details, see Registering an Image File as a Private Image (Linux).