Using RDS for PostgreSQL to Set Up Umami on ECS
In this blueprint we are going to set up Umami on T Cloud Public leveraging an Elastic Cloud Server (ECS), while using Relational Database Service (RDS) for PostgreSQL to manage the database.
Prerequisites
We are going to need, create and configure the following components:
- a PostgreSQL Instance in RDS: RDS automates database management tasks like backups, patching, and scaling. It simplifies deploying a PostgreSQL instance without needing to manage the infrastructure directly.
- an ECS Server for Umami: The server will be used to run Umami's application layer. You will install and configure Umami on this ECS instance, which will interact with the PostgreSQL database.
- Networking: Set up secure network configurations between your ECS and RDS, ensuring communication between the Umami application and the PostgreSQL instance.
- Deployment: After configuring the ECS and connecting it to the RDS database, you can deploy Umami, connect it to the database, and start monitoring your web traffic.
Creating an ECS Server
Click on the console Elastic Cloud Server->Create ECS and pick the flavor and operating system that suits your needs. Make sure though, you place it in the same VPC/Subnet that you are planning to install your RDS DB instance. For this blueprint we are going to set up Ubuntu 22.04 on a s7n.large.4 flavor. Consequently some of the commands that are going to be executed later, will assume you are working on a Ubuntu (or Debian-based) distribution.
Creating a PostgreSQL Database
We are going to create a single, non highly available PostgreSQL v16. In Relational Database Service click Create DB Instance:
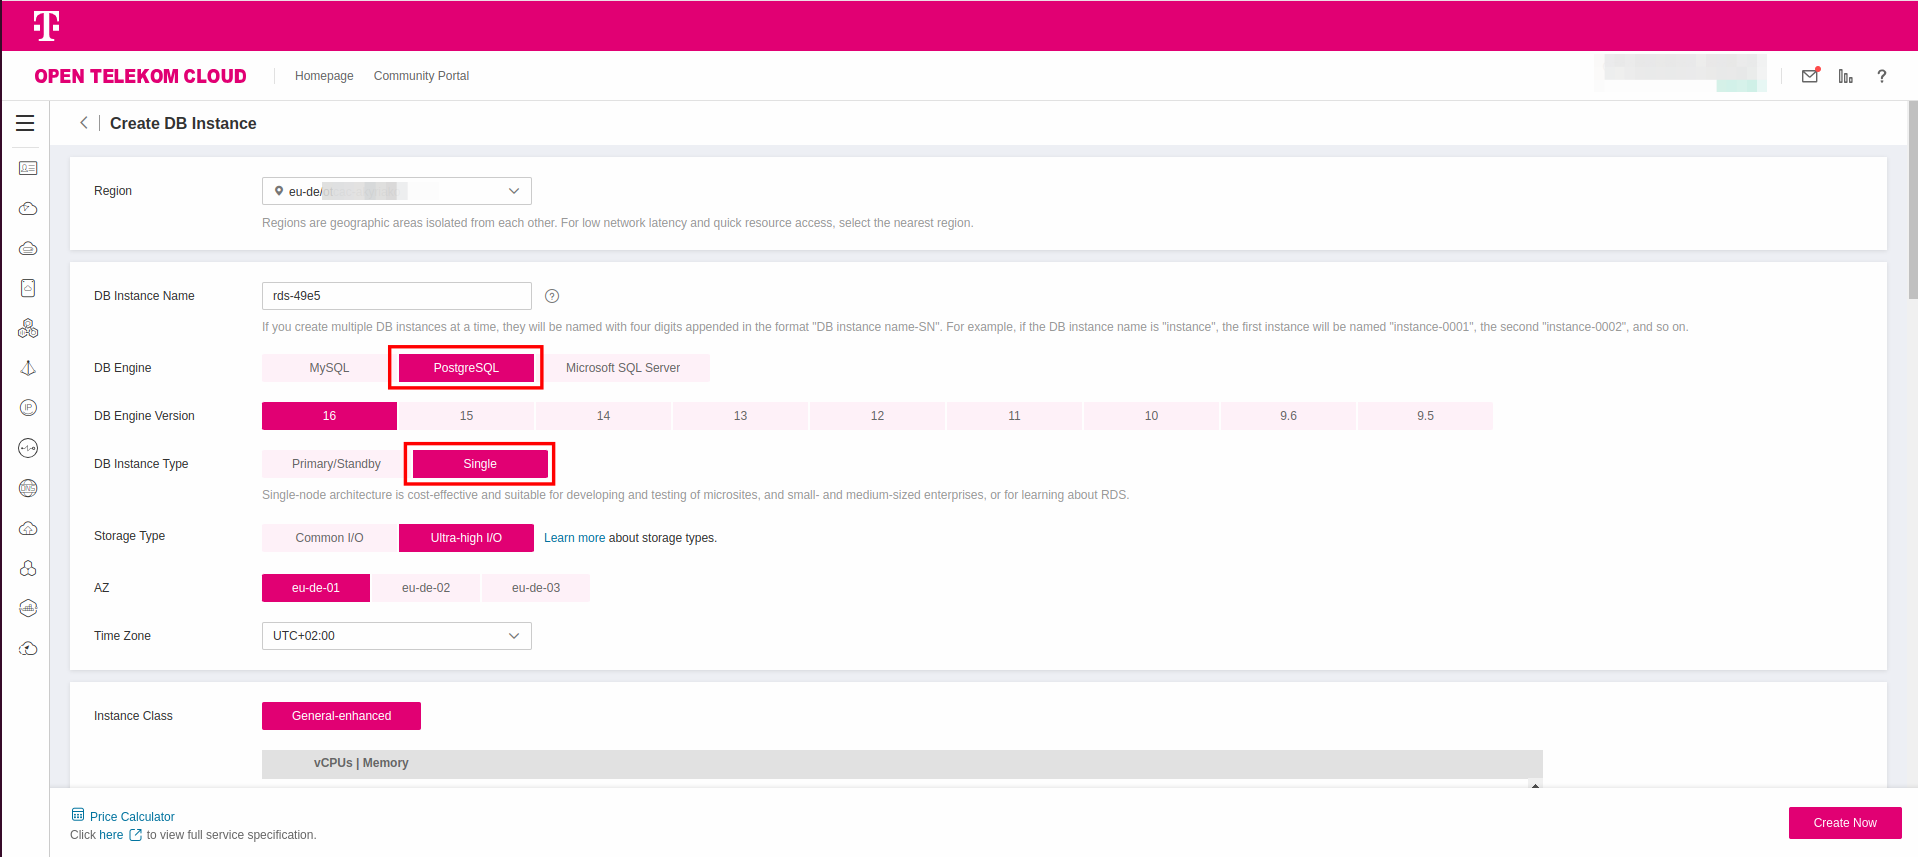
Make sure you place the database server in the same VPC/Subnet that the ECS instance lives. Choose the flavor of your liking, provide the root password and press Create Now. For the time being, we are going to make no changes in the Security Groups; we are going to fix this in the next step.

Picking a single non-HA instance is just for demonstration purposes and not suitable for production. While implementing this blueprint adjust instances and replicas according to your needs and volume projections.
Installing Cryptographic Functions Plugins
In Relational Database Service click your instance and then navigate to Plugins. Search the list for the plugin pgcrypto, and install it by click the Install link.

Establishing Connectivity
In Relational Database Service click your instance and then navigate to Connectivity & Security and under Connection Topology choose Private Connection:

In this blueprint, we are interested in variant 2, where our database instance (with floating IP 172.16.0.30) needs to establish two-way communication with the ECS(B) instance, which in our case is the ECS instance that hold the Umami installation. For that matter we need to create two Security Groups, one that will allow inbound connections to port 5432 and will be assigned to our RDS instance and a second one that will allow outbound connections from port 5432 and will be assigned to the ECS instance that our workload will run.
Creating Security Group for RDS

For additional security, make sure you set as Source the CIDR of the your Subnet (in this case 172.16.0.0/24); in that way you prohibit anyone access your database outside your VPC/Subnet.
Go back to the Connectivity & Security panel of your database and replace under Security Group Rules -> Security Group, the default Security Group with the one we just created:

Creating Security Group for ECS
Creating Outbound Rule for PostgreSQL

In the same notion, set as Destination the CIDR of the your Subnet (in this case 172.16.0.0/24).
On our ECS instance, click Security Groups -> Change Security Group, and add additionally the new Security Group to the list.

Creating Inbound Rule for SSH
You are going to need an additionnal inbound rule to allow actors accessing this ECS Server via SSH. Add in the existing Security Group (or create new one for finer granularity of permissions and reusability among more instances) port 22 in the Inbound Rules list, and set the value of Remote End as 0.0.0.0/24.

How you are going to establish this SSH connection, is entirely up to you. You can use a bastion or an Elastic IP bound to your ECS or a DNAT Rule in a NAT Gateway. Depends on your needs and your assessment.
Creating Inbound Rule for Umami
Deploying Umami
Creating the Database
Installing the PostgreSQL client tools
sudo apt-get update
sudo apt-get -y install postgresql-client-14
Creating the Umami Database
createdb umami --host=172.16.0.30 --username=root
You will be asked to provide the root password you've set during the installation.
Creating Roles and Assign Privileges
Connect to database:
psql -h 172.16.0.30 --username=root umami
Create Role & Privileges and make sure the Cryptographics Functions Plugin is on:
CREATE ROLE umami WITH LOGIN PASSWORD '{value}’;
GRANT ALL PRIVILEGES ON DATABASE umami TO umami;
\c umami
CREATE EXTENSION IF NOT EXISTS pgcrypto;
GRANT ALL PRIVILEGES ON SCHEMA public TO umami;
Replace {value} with your own password!
Installing Docker
Setup Docker's apt repository
sudo apt-get update
sudo apt-get install ca-certificates curl
sudo install -m 0755 -d /etc/apt/keyrings
sudo curl -fsSL https://download.docker.com/linux/ubuntu/gpg -o /etc/apt/keyrings/docker.asc
sudo chmod a+r /etc/apt/keyrings/docker.asc

echo \
  "deb [arch=$(dpkg --print-architecture) signed-by=/etc/apt/keyrings/docker.asc] https://download.docker.com/linux/ubuntu \
  $(. /etc/os-release && echo "$VERSION_CODENAME") stable" | \
  sudo tee /etc/apt/sources.list.d/docker.list > /dev/null

sudo apt-get update
Instal the Docker packages
sudo apt-get install docker-ce docker-ce-cli containerd.io docker-buildx-plugin docker-compose-plugin
Post-Installation Steps
sudo groupadd docker
sudo usermod -aG docker $USER
newgrp docker
Installing Umami as Docker Container
Create an APP_SECRET and export Credentials
export APP_SECRET=$(openssl rand 30 | openssl base64 -A)
export PSQL_HOST=172.16.0.30
export PSQL_ROOT_PASSWORD={value}
Replace PSQL_HOST and PSQL_ROOT_PASSWORD values with your own ones.
Create a Docker Compose file
version: '3'
services:
  umami:
    image: ghcr.io/umami-software/umami:postgresql-latest
    ports:
      - "3000:3000"
    environment:
      DATABASE_URL: postgresql://root:${PSQL_ROOT_PASSWORD}@${PSQL_HOST}:5432/umami
      DATABASE_TYPE: postgresql
      APP_SECRET: ${APP_SECRET}
    restart: always
    healthcheck:
      test: ["CMD-SHELL", "curl http://localhost:3000/api/heartbeat"]
      interval: 5s
      timeout: 5s
      retries: 5
docker compose up -d
Exposing Umami
Creating an Elastic Load Balancer
Navigate to Network Console->Elastic Load Balancing and click Create Elastic Load Balancer. Choose to create Shared Load Balancer and choose New EIP so the new ELB is automatically bound to a new elastic IP:
Creating a Listener
Choose your Elastic Load Balancer from the console and click Add Listener:

Configure Frontend Protocol as TCP, and Frontend Port as 80:

Configure a new Routing Policy, supported by a new Backend Server Group and set Backend Protocol as TCP:

Next, you need to add members to the newly created Backend Group. Click Add Backend Server and choose the Umami ECS Instance from the list:

and set the Backend Port to 3000:

Verification
Open in a browser the address: http://ELB_EIP and you should now land at the logon page of Umami:

Umami uses admin/umami as default credentials. Change them immediatelly after you log in!