Authentik as an Identity Provider for IAM
This guide will walk you through the process of integrating authentik, with Identity and Access Management (IAM) of T Cloud Public using OAuth 2.0.
Prerequisites
Before starting the integration, ensure you have:
- An authentik installation up and running
- Administrative privileges on both authentik and your IAM system
- Basic understanding of OAuth 2.0 concepts and flows
Configuring Authentik as an OAuth Provider
- Log in to your authentik admin panel
- Navigate to Applications -> Providers
- Create a new OAuth2/OpenID Provider
- Configure the provider settings:
- Name: Give your provider a descriptive name
- Client type: Public
- Client ID: Auto-generated or specify your own
- Redirect URIs: Enter the callback URL from your IAM:
https://auth.otc.t-systems.com/authui/oidc/post - Under Advanced protocol settings -> Scopes: Select the required scopes (e.g., openid, profile, email, groups)
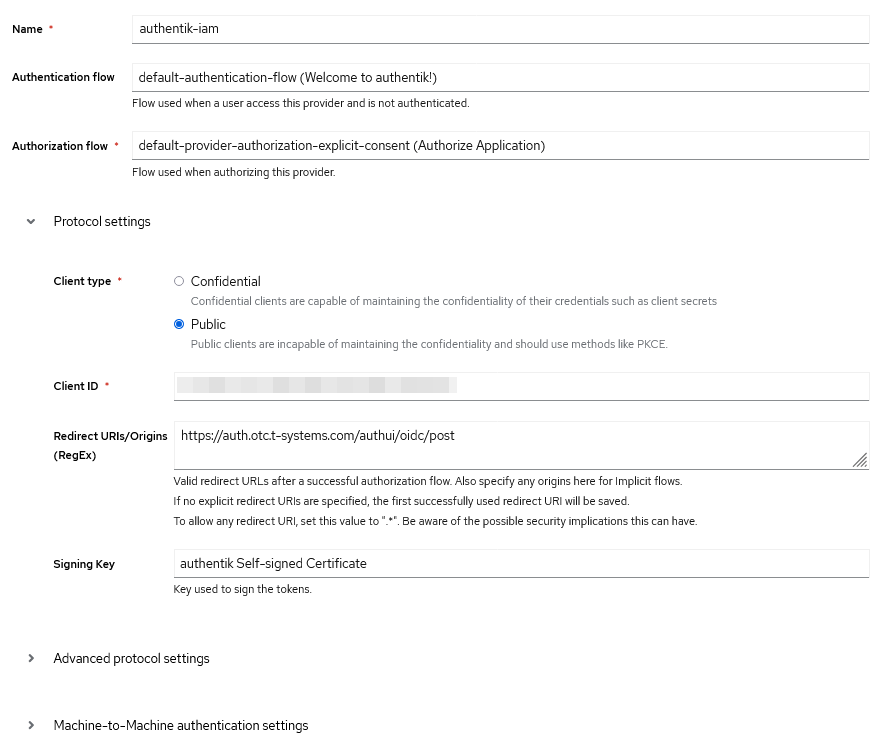
- Save the provider configuration
- Note down the Client ID, and Authorization/Token endpoints
Configuring IAM
Create a new IAM Identity Provider
- Log in to your T Cloud Public Console
- Navigate to IAM and Identity Providers under Management & Deployment
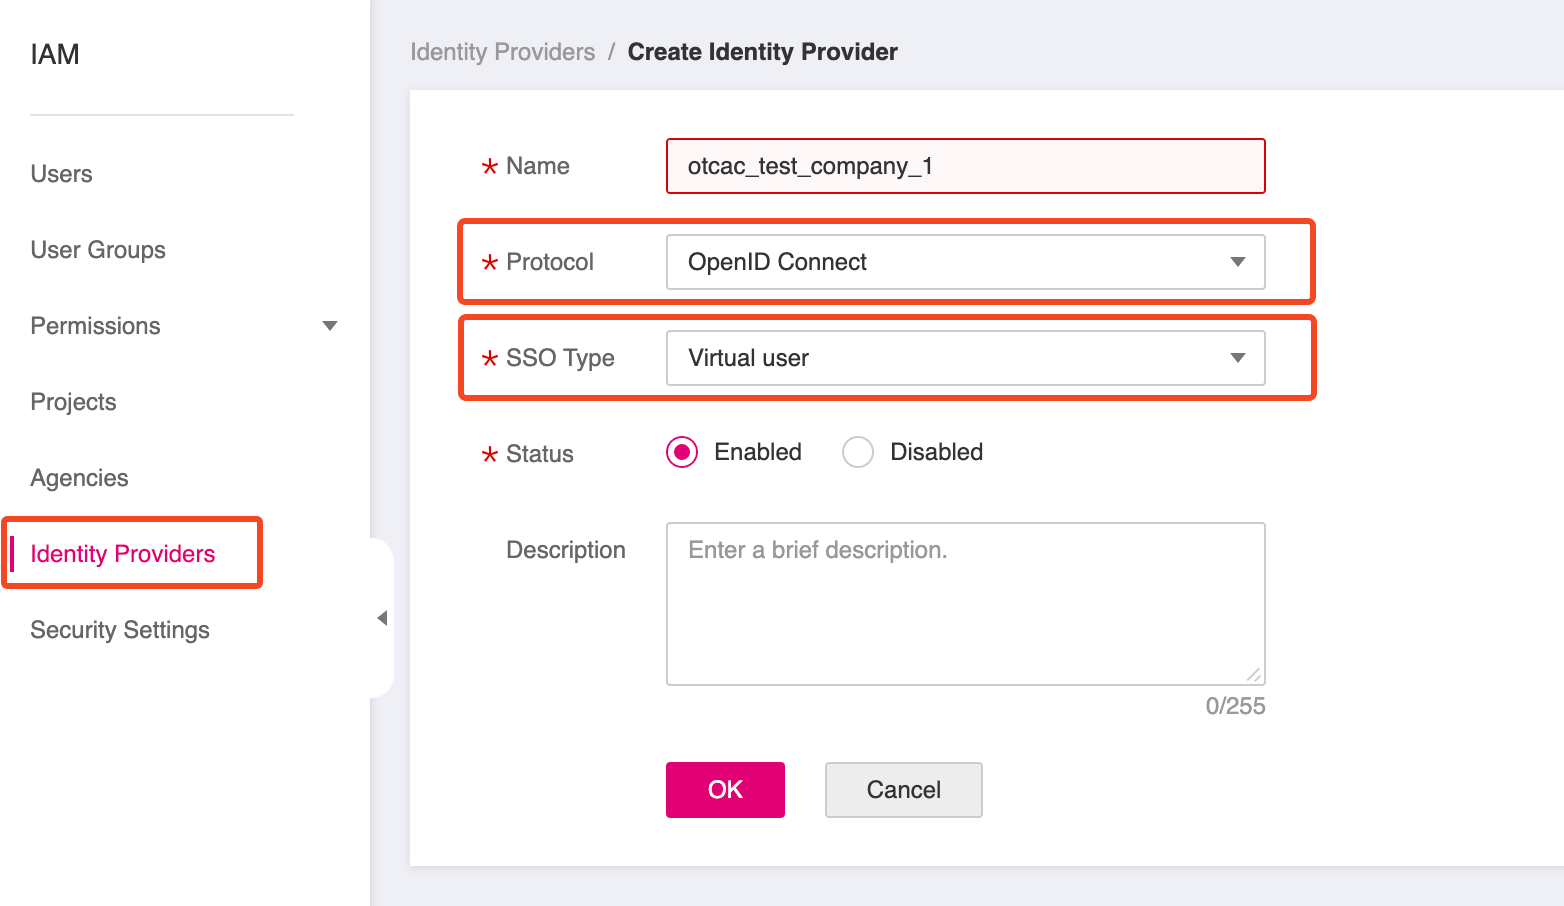
- Select Identity Providers and click Create Identity Provider to create a new identity provider with the following values:
- Name: Give your provider a descriptive name
- Protocol: OpenID Connect
- SSO Type: Virtual User
- Status: Enabled
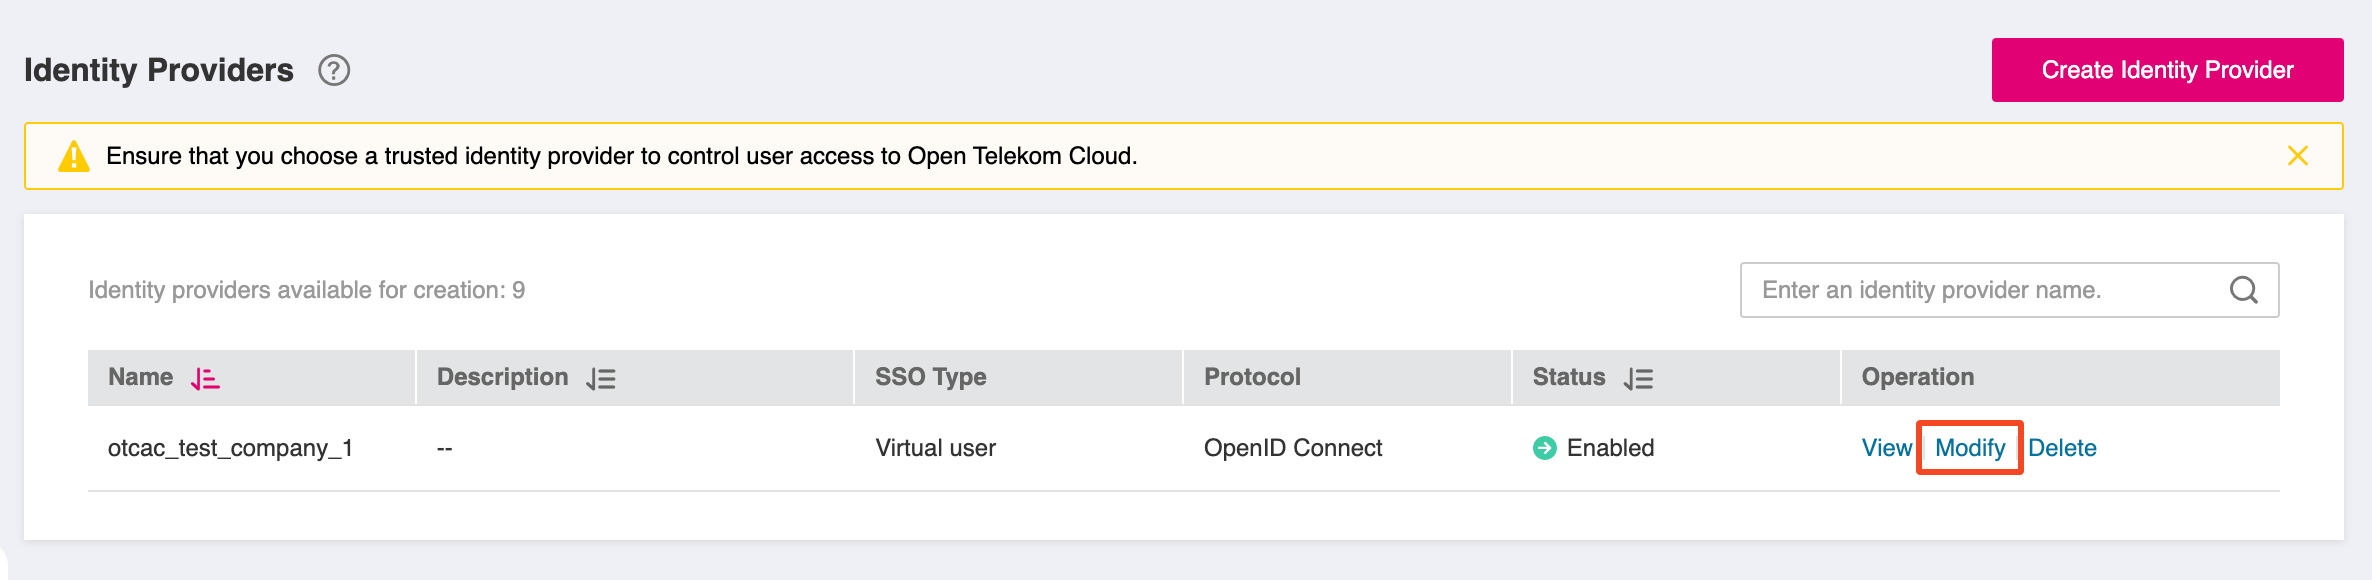
Configure the IAM Identity Provider
Find your newly created provider in Identity Providers list and click Modify:
Set the following values:
- Access Type: Programmatic access and management console access
- Identity Provider URL: URL of authentik (e.g.
https://test-domain.com/application/o/authentik-iam/) - Client ID: The id of your client as defined in Configuring Authentik as an OAuth Provider
- Authorization Endpoint: copy the value from key authorization_endpoint of the OpenID Endpoint Configuration (e.g.
https://test-domain.com/application/o/authorize/) - Scopes: Select the required scopes (e.g., openid, profile, email, groups)
- Response Mode:
form_post - Signing Key: Value of the key
jwks_uriof the OpenID Endpoint Configuration JSON output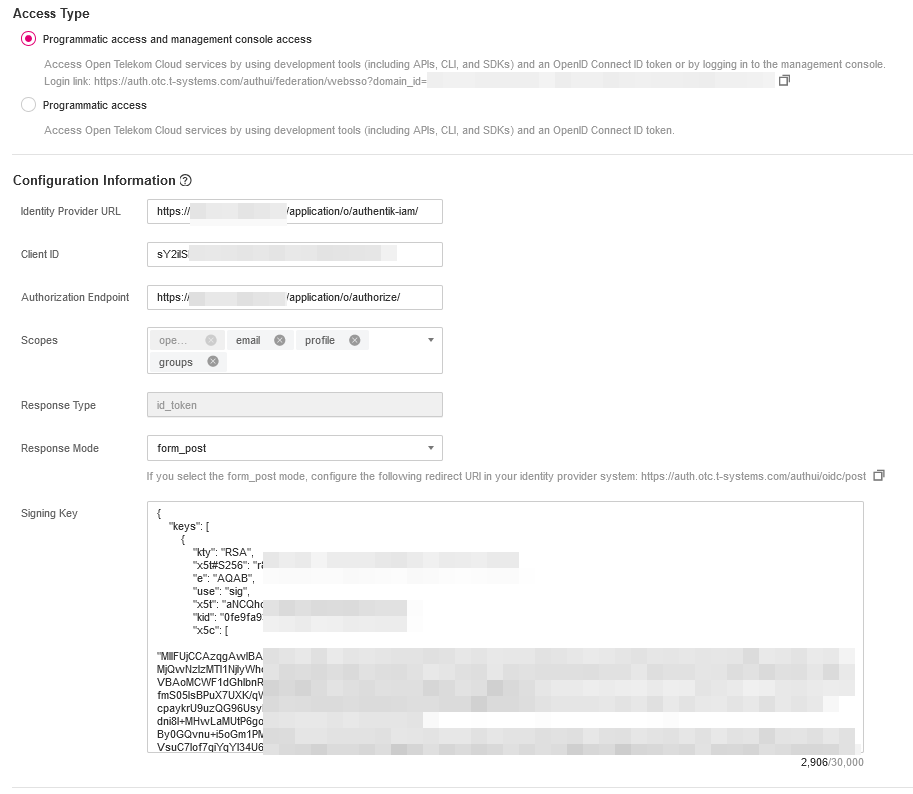
All of the links for your setup can be found under Overview page of the OAuth2/OpenID Provider in Authentik admin dashboard.
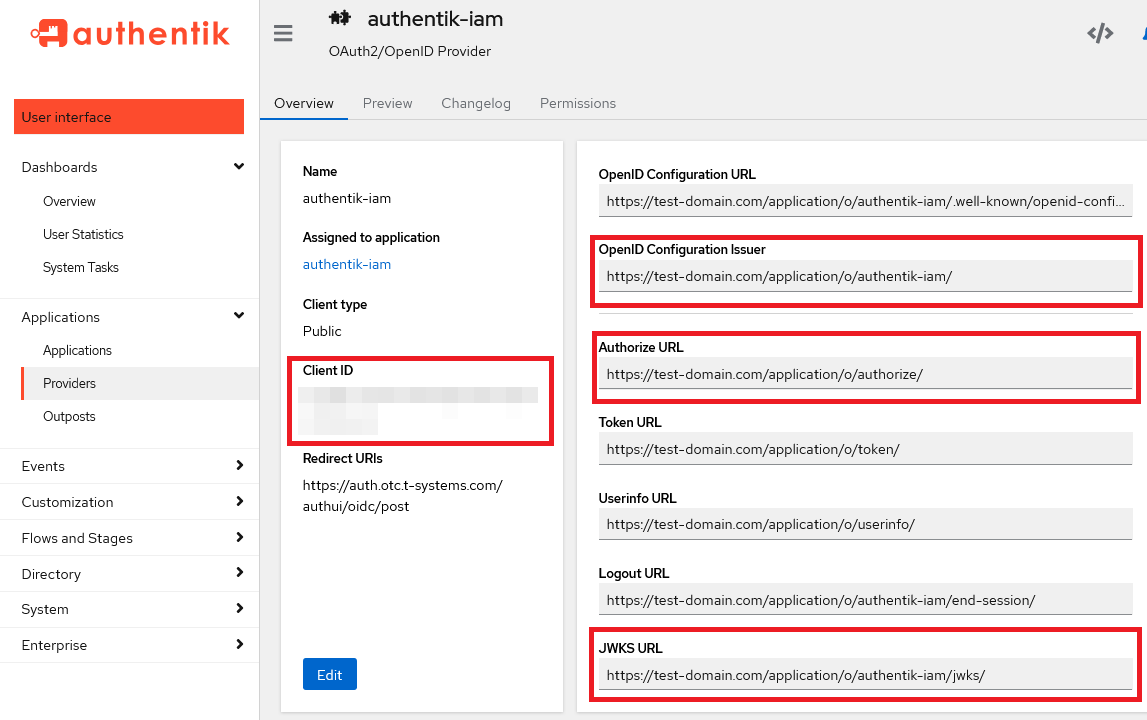
For the Signing Key you should open link provided under JWKS URL and copy the whole json file content to the respective field.
Creating an Application and Connecting the Provider
To enable users to authenticate, you need to create an application in Authentik and connect it to the provider. Follow these steps:
- In the Authentik web interface, navigate to Applications -> Applications.
- Click on Create.
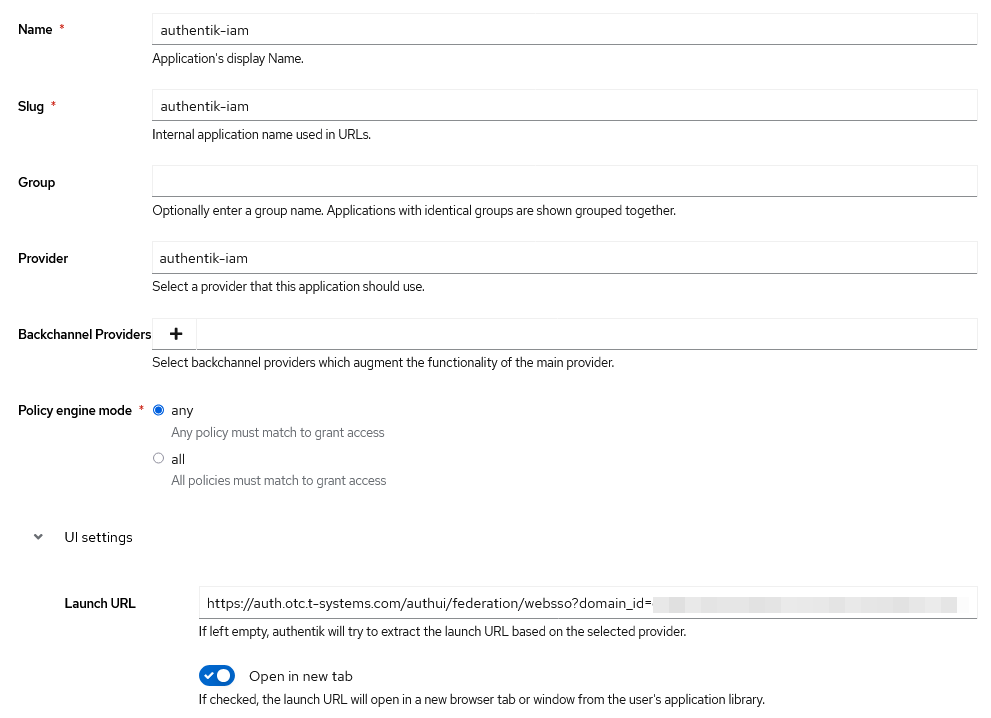
- Fill in the following details:
- Name:
Your Application Name - Slug:
your-application-slug - Provider: Select the provider you created earlier.
- Launch URL: Specify the URI where Authentik should redirect users after authentication. You can find this link under Programmatic access and management console accesses of the previously created Identity provider in your tenant.
- Name:
- Save the application settings.
Configure the IAM Identity Provider Conversion Rules
You can use identity conversion rules to map the identities of existing users to T Cloud Public and control their access to cloud resources.
By default federated users are named FederationUser in the T Cloud Public platform. These users can only log in to the cloud platform and they do not have any other permissions. You can configure identity conversion rules on the IAM console to achieve the following:
- Display enterprise users with different names in the cloud platform.
- Assign permissions to enterprise users to use the cloud platform resources by mapping these users to IAM user groups. Ensure that you have created the required user groups.
This can be done by editing the Identity Conversion Rules. Edit the conversion rule of previously created Identity Provider in IAM:
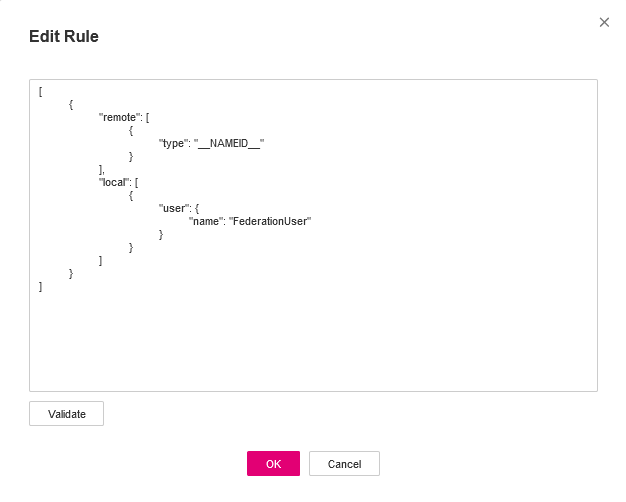
Paste the following conversion rule in the Edit Rule panel:
[
  {
    "remote": [
      {
        "type": "email"
      },
      {
        "type": "groups"
      }
    ],
    "local": [
      {
        "user": {
          "name": "fidp-{0}"
        }
      },
      {
        "groups":  "{1}"
      }
    ]
  }
]
The remote part describes the requested Scopes (profile or email) of the user.
The local part defines the mapping between the remote properties and the local IAM. The user will get a name
as the value of fidp-<user-email> and will automatically belong to the groups on your tenant which have the same name as the groups that the user is a member of on authentik.
Administrators must exercise extreme caution when naming groups in Authentik. Group names are critical because conversion rules within the Identity provider automatically assign users to groups based on these names in this configuration.
If a group is improperly named or if the naming conventions are not strictly followed, users might be incorrectly assigned to sensitive groups. This misconfiguration could grant unauthorized users elevated permissions or access to restricted resources, thereby posing a significant security risk to the tenant.
Always use clear, descriptive, and unique names for groups that align with your access control policies. Regularly review and audit group names and associated conversion rules to ensure they are correctly configured and do not inadvertently expose the tenant to security vulnerabilities.
You can find more detailed info about Conversion Rules under: