Identity Federation with GitHub
Identity Federation with GitHub refers to the process of allowing users to authenticate using their GitHub credentials to access various applications and services. This method leverages GitHub as an identity provider (IdP), enabling single sign-on (SSO) capabilities and simplifying user management across different platforms.
How It Works
- User Initiates Login: When a user attempts to access an application, they are presented with an option to log in using GitHub.
- Redirection to GitHub: The application redirects the user to GitHub's authentication page.
- User Authenticates: The user enters their GitHub credentials (username and password) to log in.
- GitHub Issues Token: Upon successful authentication, GitHub generates an OAuth token and sends it back to the application.
- Token Validation: The application validates the token with GitHub to ensure its authenticity.
- Access Granted: Once validated, the user is granted access to the application based on their GitHub identity and associated permissions.
Benefits
- Simplified User Management: Administrators can manage user access through GitHub, reducing the need to maintain separate credentials for each application.
- Enhanced Security: By using GitHub's robust authentication mechanisms, applications can benefit from multi-factor authentication (MFA) and other security features.
- Improved User Experience: Users can access multiple applications with a single set of credentials, reducing login fatigue and enhancing productivity.
- Centralized Identity Management: Organizations can centralize their identity management practices, making it easier to enforce security policies and compliance requirements.
Use Cases
- Development Environments: Developers can use their GitHub accounts to access development tools, repositories, and CI/CD pipelines without needing to manage multiple logins.
- Corporate Applications: Employees can use their GitHub credentials to access internal corporate applications, streamlining the onboarding process and enhancing security.
- Open Source Projects: Open source contributors can authenticate using their GitHub accounts, ensuring a seamless experience across various project management and collaboration tools.
Connecting Authentik with GitHub for Federation and Social Login
This guide will walk you through the process of setting up GitHub as an authentication source in authentik, allowing users to log in using their GitHub credentials.
Prerequisites
Before you begin, make sure you have:
- An authentik installation
- Access to your GitHub account
- Administrative access to both authentik and GitHub
Throughout this guide, we'll use the following placeholders:
authentik.test-domain.comas the FQDN of your authentik installationtest-domain.comas your site's homepage URL
Setting up GitHub OAuth App
- Go to GitHub Developer Settings: https://github.com/settings/developers
- Click on Register a new application
- Fill in the application details:
- Application Name: Choose a recognizable name (e.g., "authentik")
- Homepage URL: Enter your site's URL (e.g.,
www.test-domain.com) - Authorization callback URL:
https://authentik.test-domain.com/source/oauth/callback/github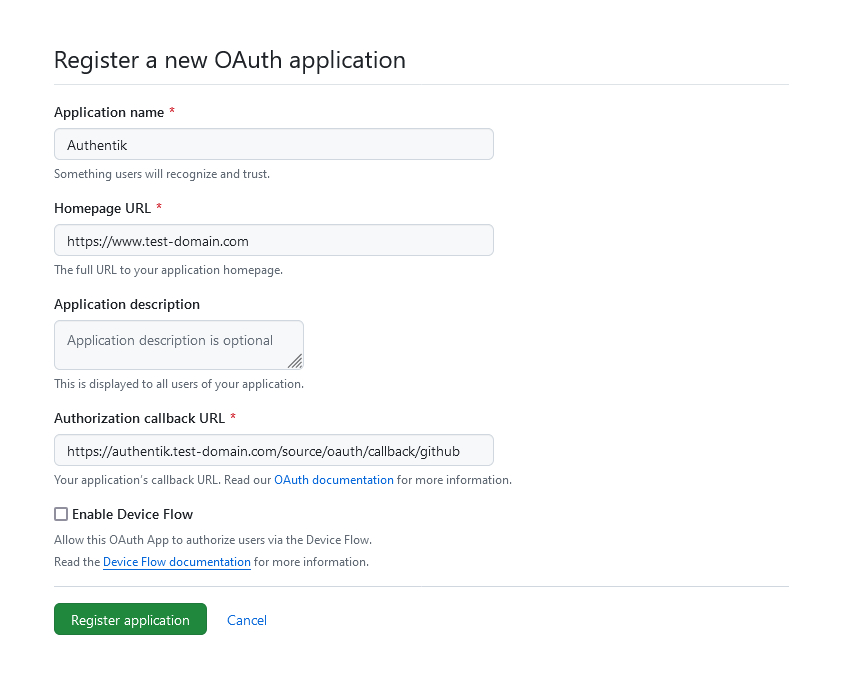
- Click Register Application
- On the next page, note down the Client ID
- Click Generate a new client secret and immediately copy it
You won't be able to see the client secret again, so make sure to save it securely.
Configuring Authentik
-
In authentik, navigate to Directory -> Federation & Social login
-
Click Create -> Github OAuth Source
-
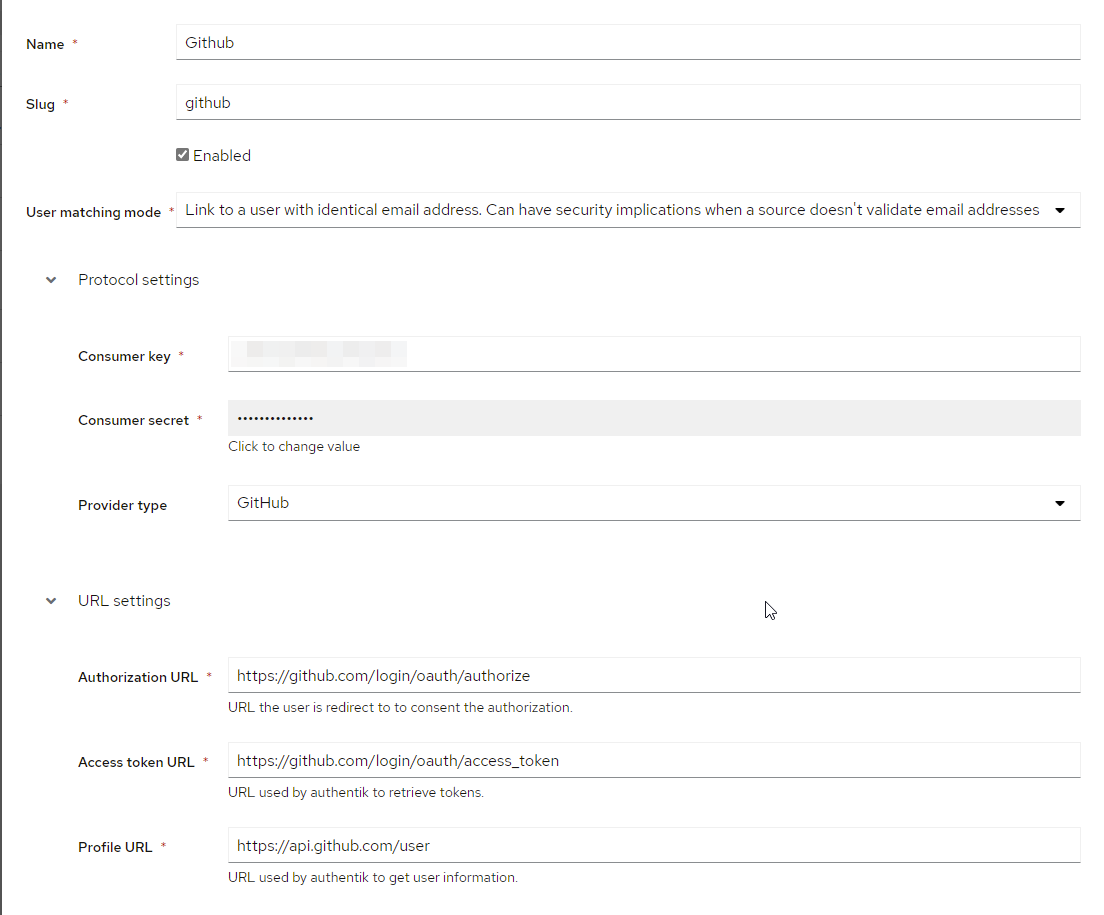
Fill in the source details:
- Name: Choose a name (e.g., "GitHub")
- Slug:
github(or choose a custom slug, but remember to update URLs accordingly) - Consumer Key: Paste the Client ID from GitHub
- Consumer Secret: Paste the Client Secret from GitHub
-
Save the configuration
The User Matching Mode in Authentik can be configured to match users based on different identifiers including email or username
-
Email Matching: This mode matches users based on their email address. It is often the most reliable option because email addresses are generally unique and consistent across different platforms. However, you must ensure that users' email addresses are standardized across all identity providers. There is also a risk if users have multiple accounts with different email addresses. Also the admin should make sure that the Email is already validated.
-
Username Matching: This mode matches users based on their username. This can be useful in environments where usernames are more consistent or standardized across systems. However, it poses a higher risk of conflicts, especially if users have different usernames on different platforms. It's crucial to ensure that usernames are unique and managed consistently to avoid potential mismatches or user duplication.
When selecting the matching mode, carefully consider the consistency and uniqueness of either the email or username across the identity providers you plan to integrate.
Your GitHub OAuth Source in authentik is now set up and ready to use.
Adding the GitHub Source to the Login Page
To make the GitHub login option visible on your authentik login page, you'll need to add it to your login flow. Refer to the authentik documentation for detailed steps on how to add sources to the default login page.
Adding GitHub Users to a Default Group
To automatically add users who log in via GitHub to a default group in authentik, you can use a post-authentication flow. This process involves creating a group, setting up a policy, and adding the policy to a flow that runs after successful authentication. Here's how to do it:
Step 1: Create a New Group
- Go to Directory -> Groups
- Click Create
- Name the group (e.g., "gitHub-users")
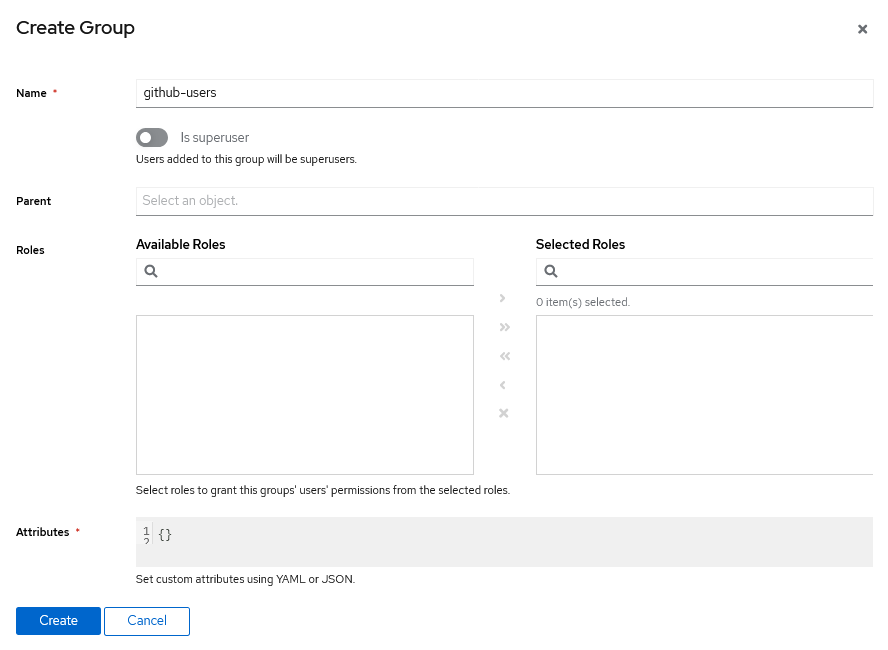
- Save the group
Step 2: Modifying Enrollment flow
- Navigate to Flows and Stages -> Flows
- Under Enrollment section select the enrollment flow which is connected to the Github OAuth Source its default name is default-source-enrollment
- Click Stage Bindings
- Click Edit Stage of stage which has type of User Write Stage
- Set a default group under Group for the newly created users which login using github
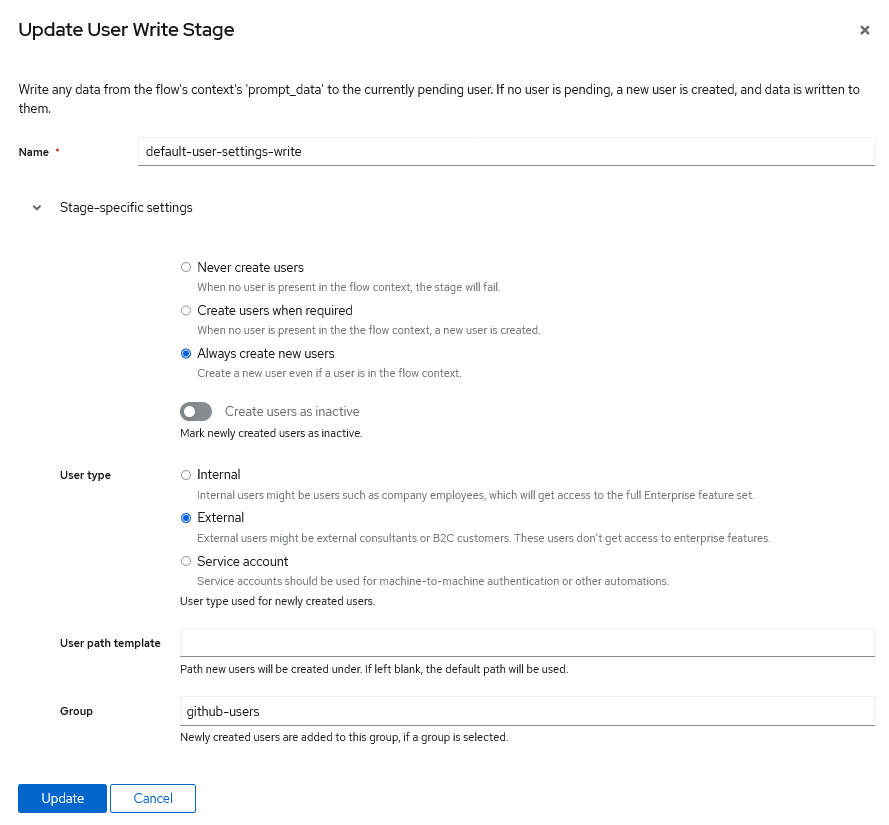
- Click Update
Step 4: Configure Post-Authentication Flow
- If you created a new Enrollment flow, make sure it's set as a Enrollment flow in your Github OAuth Source configuration
- If you're using an existing flow, verify that it runs after successful authentication
Now, when users log in successfully via GitHub, they will be automatically added to the specified group. This allows you to manage permissions and access control for GitHub users more easily within authentik.
Remember to test this setup thoroughly in a non-production environment before implementing it in your live system. Ensure that the group assignment works as expected and doesn't interfere with other authentication processes.
Checking GitHub Organization Membership
If you want to restrict access to users who are members of a specific GitHub organization, you can implement a policy in your authentik flows. This feature requires authentik version 2021.12.5 or later.
It is crucial to verify that users belong to a specific GitHub organization before granting them access to your resources. Failing to implement this check can pose a significant security threat to your tenant.
Without verifying GitHub organization membership, anyone with a GitHub account could potentially log in to your system, which would leave your tenant open to unauthorized access. This effectively makes your application public, which is a severe security concern.
- B2C Scenario Exception: If you are intentionally offering a B2C (Business-to-Consumer) authentication for a SaaS (Software as a Service) scenario, bypassing this check might be acceptable. However, in most cases this should be strictly prohibited to prevent unauthorized access.
-
Navigate to Directory -> Federation and Social login and edit previously created Github OAuth Source
-
Add the
read:orgscope to your GitHub OAuth Source and save it -
Then navigate to Flows and Stages -> Flows -> Enrollment and click
default-source-enrollment -
Go to the Policy / Group / User Bindings tab, then Create and bind Policy
-
Create a new policy of type Expression Policy with the following Python code as Expression:
# Ensure flow is only run during oauth logins via Githubif context["source"].provider_type != "github":return Trueaccepted_org = "your_org_name"connection = context["goauthentik.io/sources/connection"]access_token = connection.access_tokengithub_username = context["oauth_userinfo"]orgs_response = requests.get("https://api.github.com/user/orgs",auth=(github_username["login"], access_token),headers={"accept": "application/vnd.github.v3+json"})orgs_response.raise_for_status()orgs = orgs_response.json()user_matched = any(org['login'] == accepted_org for org in orgs)if not user_matched:ak_message(f"User is not member of {accepted_org}.")return user_matched -
Under Edit Binding ensure that the policy is Enabled and Failure result is Don't pass and save the policy.
-
Go back and edit the
default-source-enrollmentflow, under Behavior settings ensure that Denied action is set toMESSAGEand Policy engine mode is set toall
For Authentik to successfully check a user's membership in a GitHub organization, the following condition must be met:
- OAuth App Configuration: The Github OAuth App used for authentication should either be created by the GitHub organization or explicitly trusted by the organization. If the OAuth App is created by a different user or organization, the GitHub organization must trust the app for Authentik to retrieve and verify the organizations to which the user belongs.
Ensuring these configurations are in place is essential for the secure and correct functioning of the organization membership verification policy.
This part is taken form official authentik documentation.
IAM Identity Provider Conversion Rules
After creating and connecting the Identity provider on your tenant to the authentik if you wish to give users which login with github access to your tenant you can use the following conversion rules.
If you haven't created a Identity Provider on your tenant first follow steps described in Connecting Authentik with IAM for Login and then use the conversion rules given below.
Edit the conversion rule of previously created Identity Provider in IAM:
Paste the following conversion rule in the Edit Rule panel:
[
  {
    "remote": [
      {
        "type": "email"
      },
      {
        "any_one_of": [
          "github-users"
        ],
        "type": "groups"
      }
    ],
    "local": [
      {
        "user": {
          "name": "fidp-{0}"
        }
      },
      {
        "group": {
          "name": "ecs-admin"
        }
      }
    ]
  }
]
The remote part describes the requested Scopes (profile or email) of the user.
The local part defines the mapping between the remote properties and the local IAM. The user will get a name
as the value of fidp-<user-email> and will automatically belong to the ecs-admin if it is a member of github-users.
Notice that the ecs-admin group is created in advanced so the IAM can find the group locally and it would automatically add all the users which belong to the github-users in remote identity provider to this local group. If it cannot match the user to any group the access of the user would be simply denied.