Deploy Keycloak on CCE
This blueprint explains how to deploy Keycloak on a Cloud Container Engine (CCE) using an RDS PostgreSQL database for the supporting stateful storage. It guides through creating appropriate security groups, provisioning the database, and establishing DNS zones and endpoints. It covers all the necessary steps from provisioning the CCE cluster, deploying Keycloak secrets, application and services and exposing it externally using an ingress.
Prerequisites
- a Cloud Container Engine (CCE) cluster
- a PostgreSQL instance in Relational Database Service (RDS)
- a bastion host in Elastic Cloud Service (ECS) (an Ubuntu instance will be used for this guide)
Deploying a PostgreSQL with RDS
Keycloak, as a stateful workload, requires the presence of a persistent storage in order to maintain its data and configuration during pod restarts. We could deploy a PostgreSQL database as a CCE workload, but this would require additional administrative overhead from your side. The Managed Relational Database Service of T Cloud Public is a perfect fit for this scenario. A scalable turn-key solution, that fully integrated with the rest of managed services of the platform without demanding from the consumer additional administrative effort.
This step involves provisioning a PostgreSQL database instance via T Cloud Public’s RDS service. Select an instance class and storage configuration that align with your anticipated workload; consider factors such as expected connection volume, data growth, and performance requirements. For production environments, it's recommended to opt for a compute-optimized or memory-optimized instance class, along with provisioned IOPS storage if consistent performance is critical. This ensures that Keycloak operates reliably under load and can scale as demand increases.
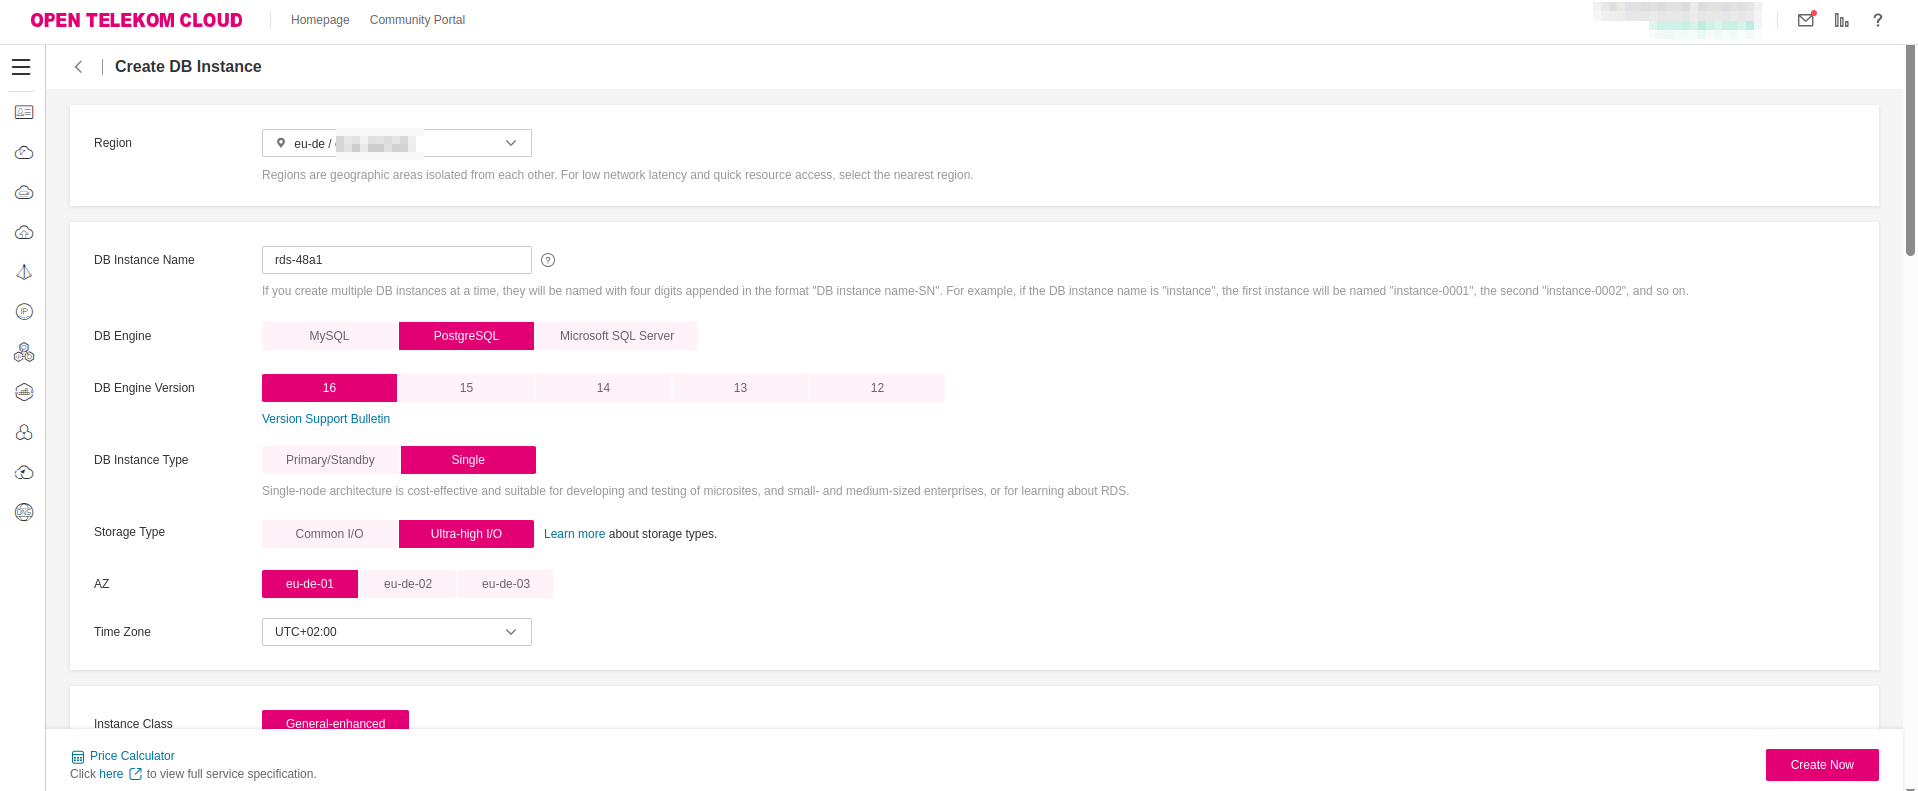
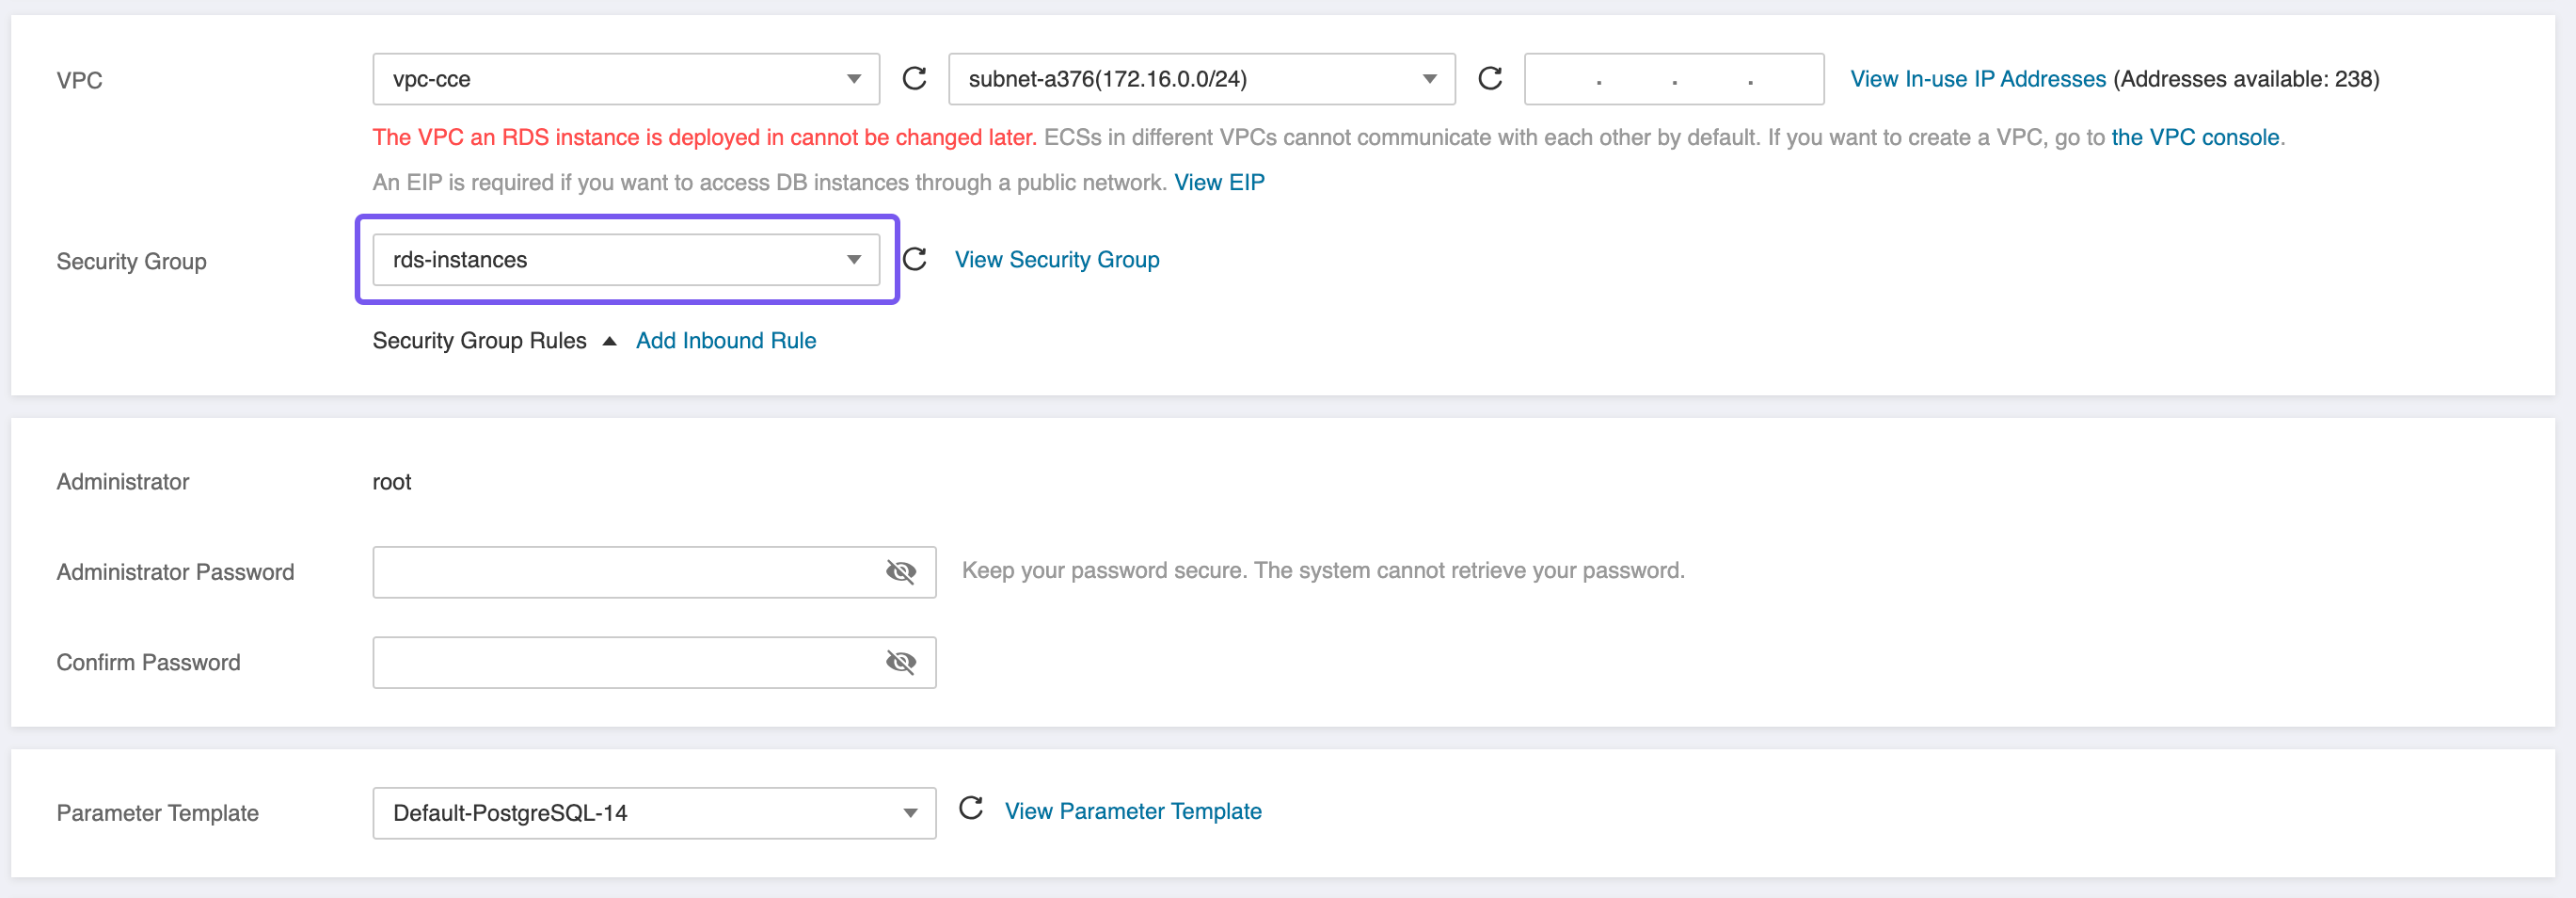
When provisioning the PostgreSQL instance, ensure the following network and security configurations are in place:
- Create two Security Groups,
rds-instancesandrds-clients, as described in best practice: Configure Security Groups for PostgreSQL RDS Instances and Clients. - Deploy the RDS instance within the same Virtual Private Cloud (VPC) as your CCE cluster to enable low-latency, private network communication between the application and the database.
- Attach the previously created
rds-instancesSecurity Group to the RDS instance. This group must allow inbound traffic on port5432from the Subnet or Security Group associated with the CCE nodes to enable secure database access.
Creating a Private DNS Zone
We are provisioning PostgreSQL in order to support the functionality of Keycloak. For that matter, although T Cloud Public employs this RDS instance with a floating IP address, it would be better that we connect the RDS instance with Keycloak via a fully qualified domain name and let the T Cloud Public's DNS service to manage the resolution of that endpoints. In the Domain Name Service management panel click Private Zone and create a new one that points to the VPC that CCE and RDS nodes are placed:
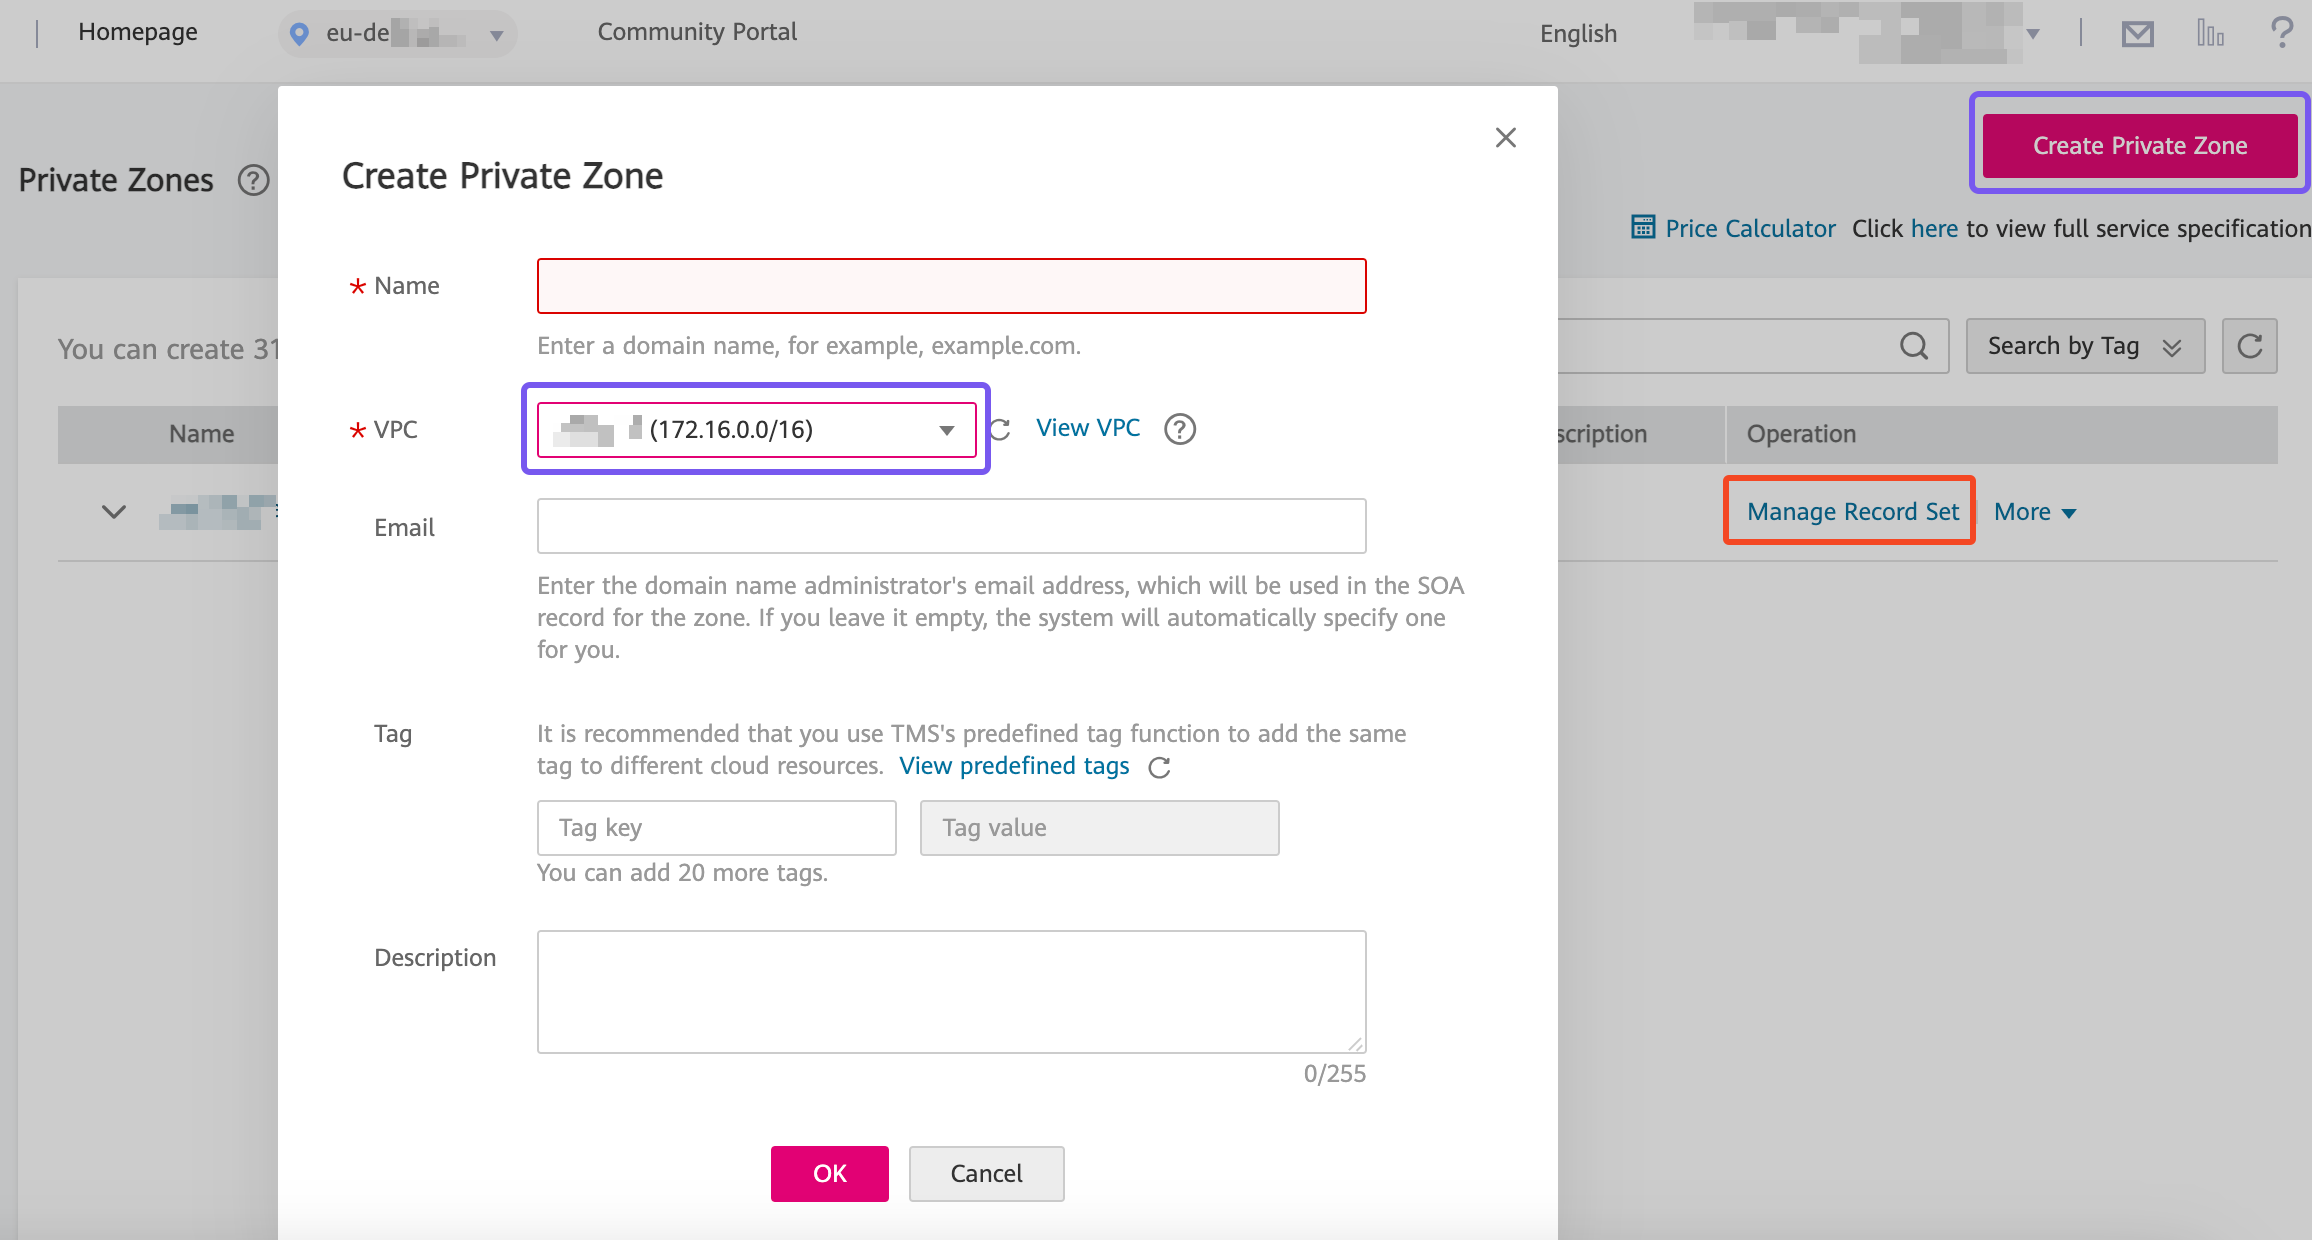
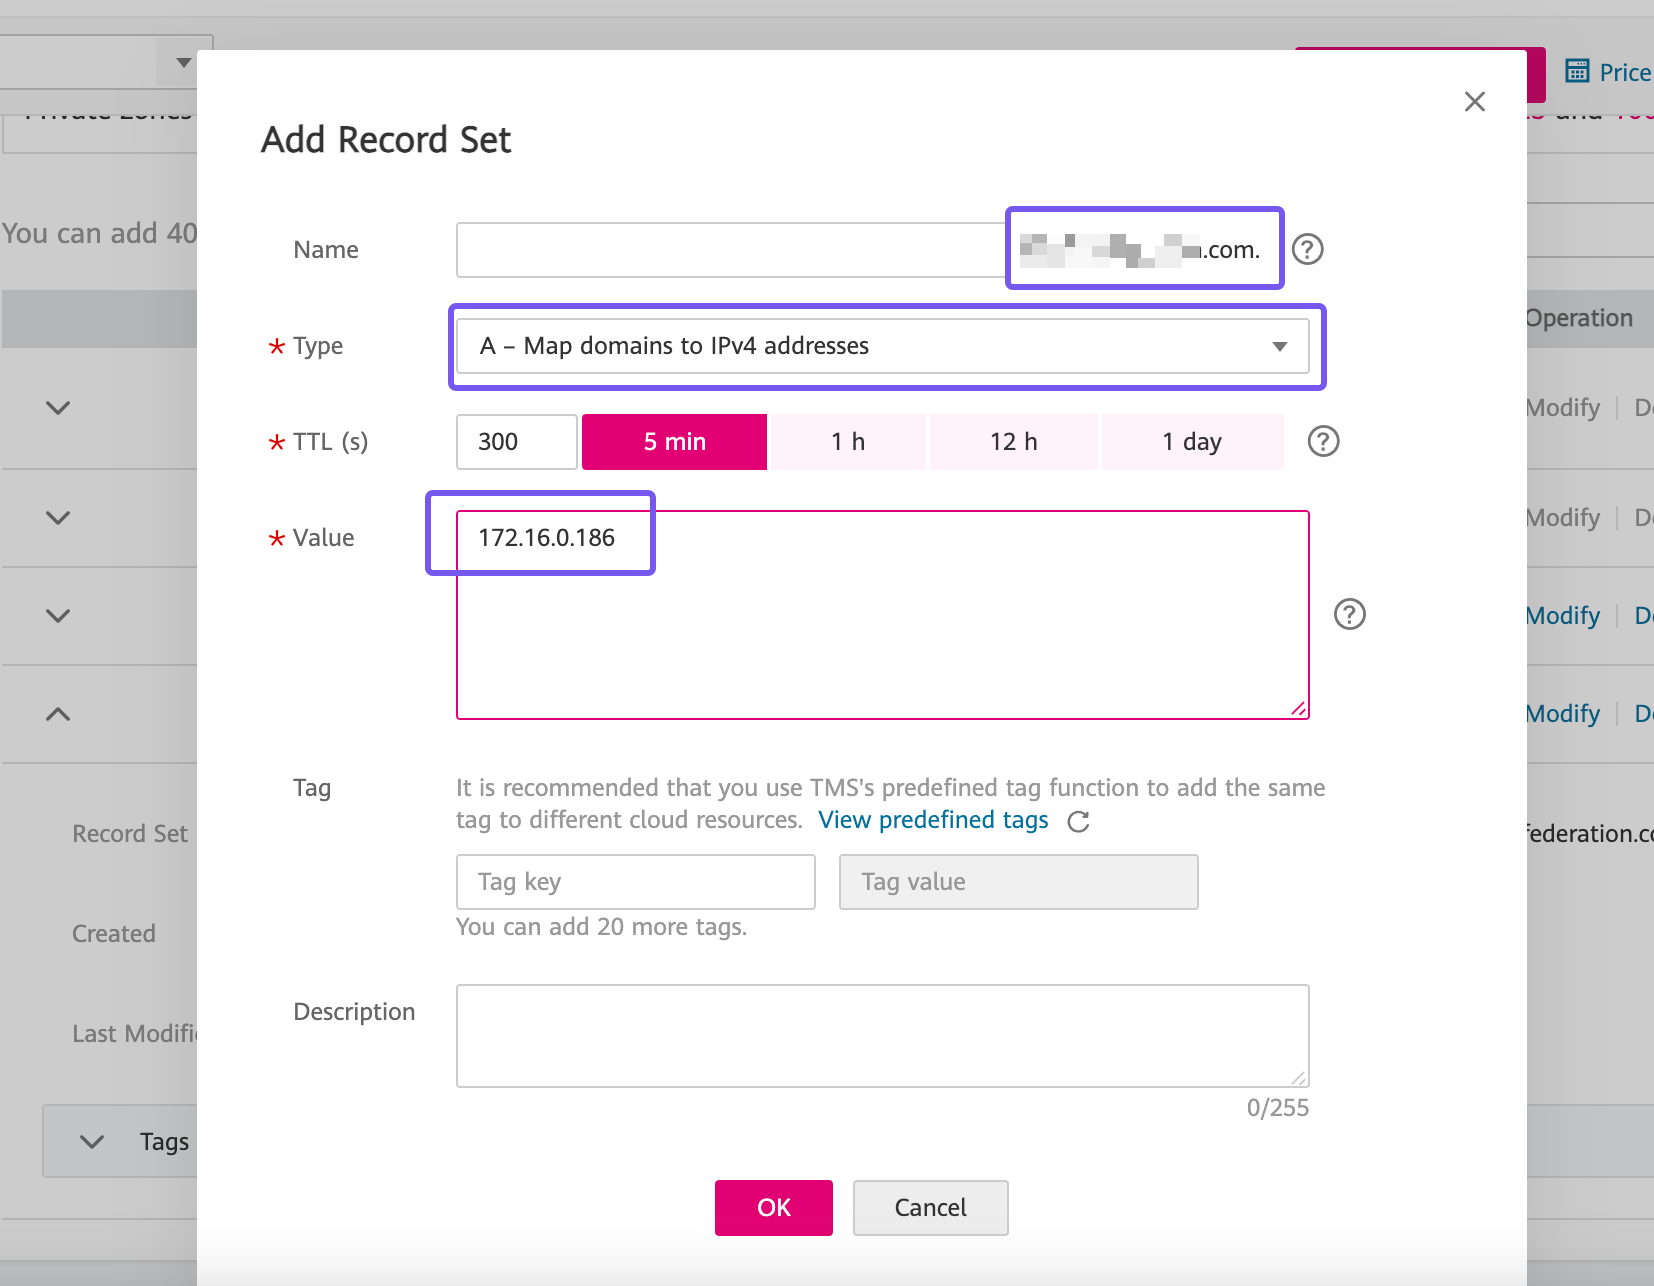
and then click Manage Record Set to add a new A Record to this zone:
The domain name, will be a fictitious domain representing your solution and not a public one. It can be virtually any domain or subdomain that conforms to the a FQDN rules.
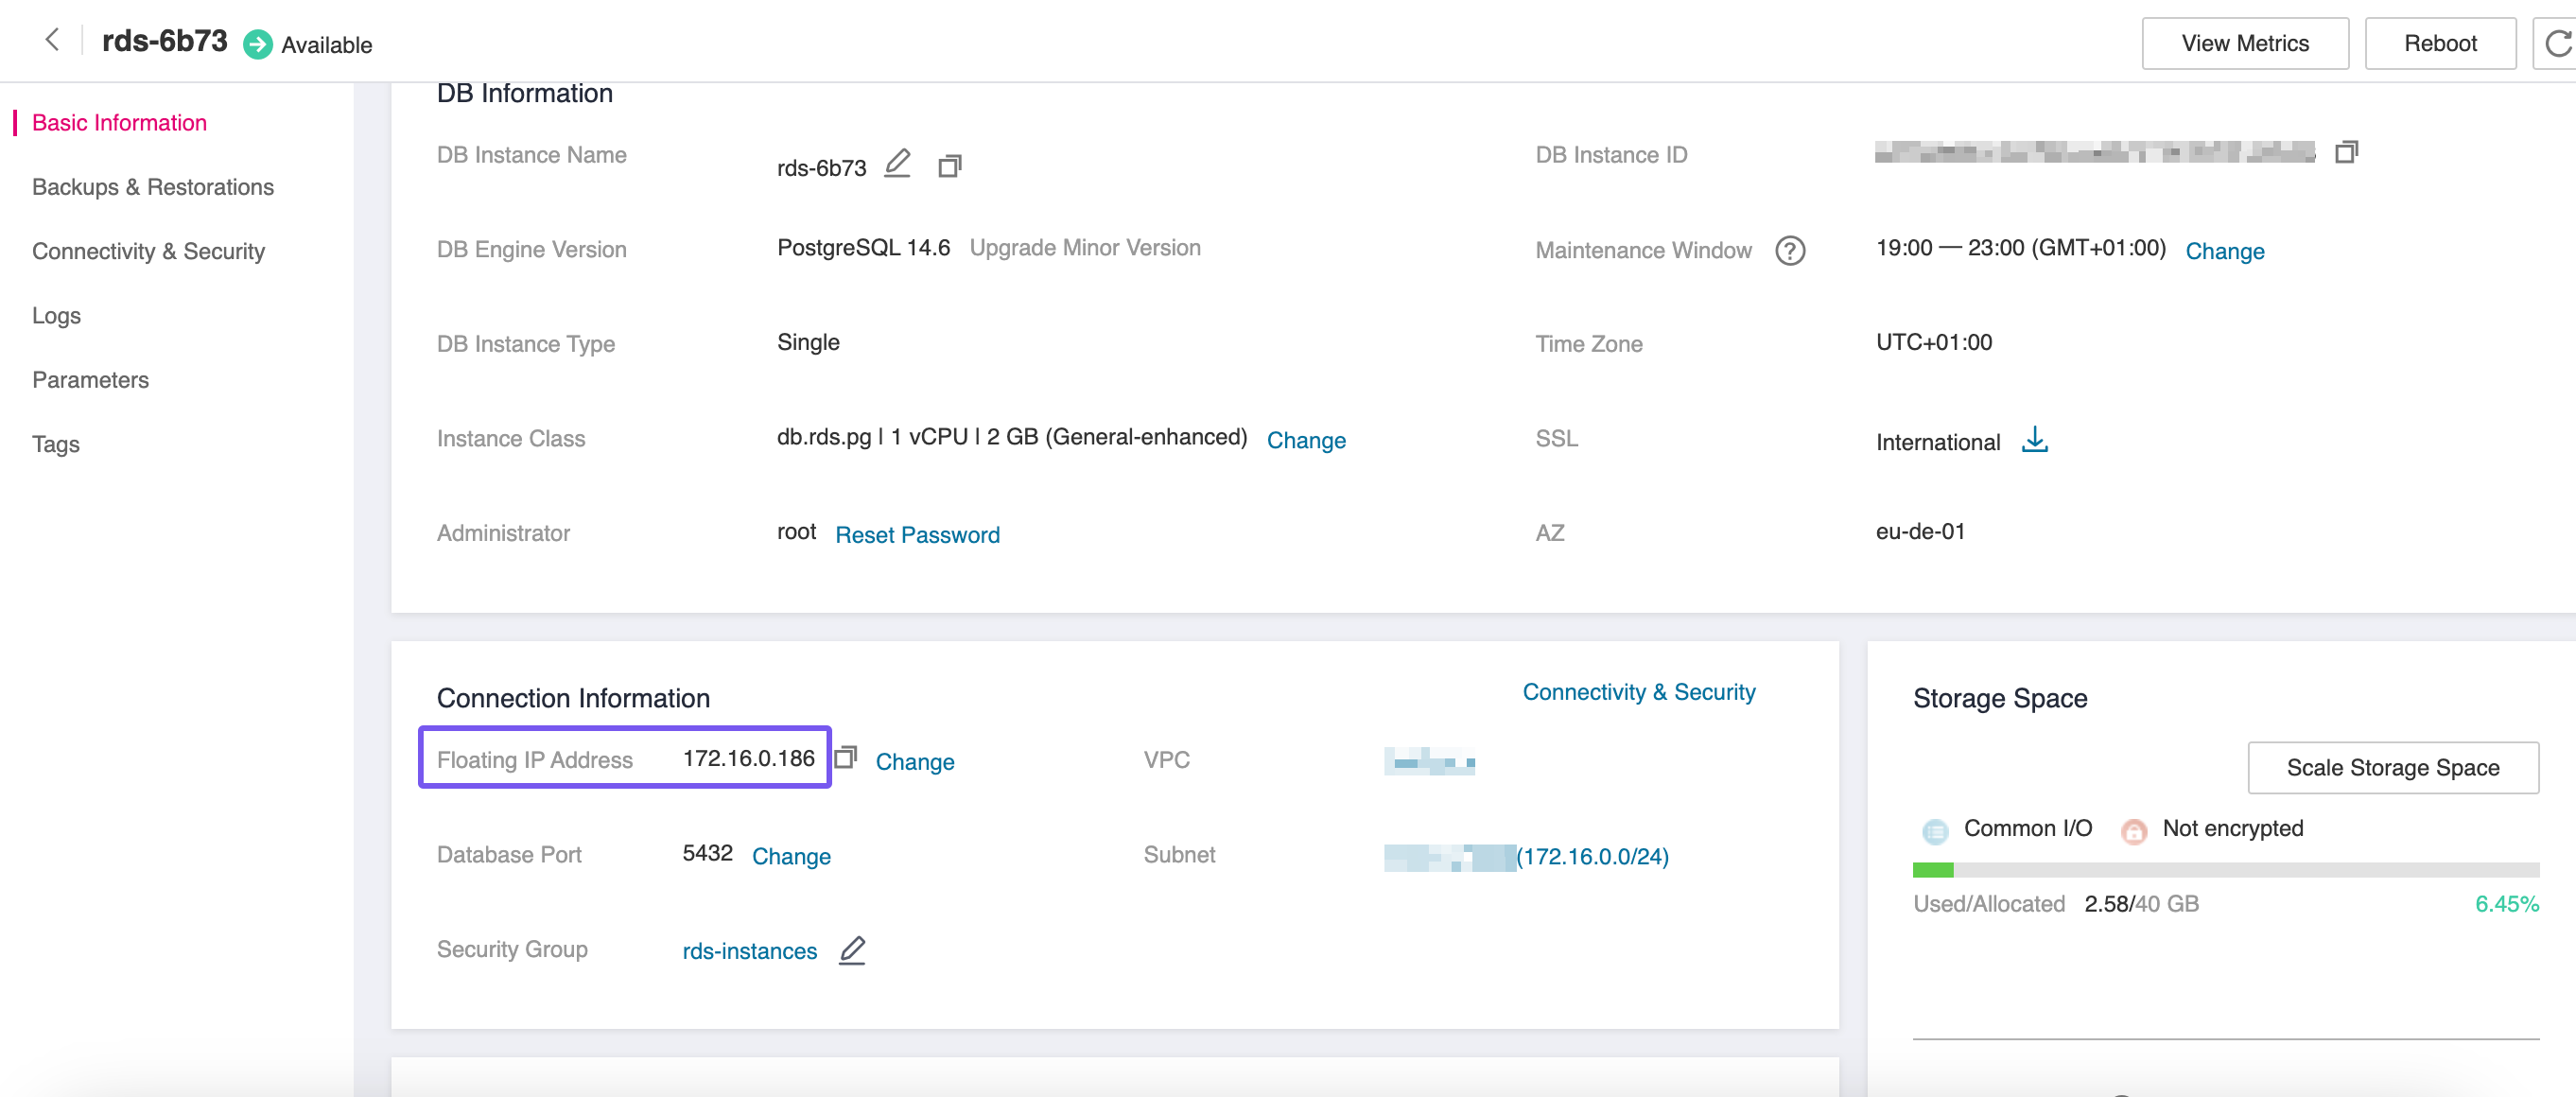
The floating IP of the RDS instance can be found in the Basic Information panel of the database:
Provisioning a Database
Now as next, we need to provision a PostgreSQL database for the Keycloak installation. SSH to the bastion host and install the Postgres Client:
sudo apt update
sudo apt install -y postgresql-client-14
- you've placed the bastion in the same VPC with the RDS nodes
- to assign
rds-clientsas the Security Group for the bastion node
Create the following file in your bastion host:
SELECT 'CREATE USER keycloak WITH PASSWORD ''<RDS_ADMIN_PASSWORD>'';'
WHERE NOT EXISTS (SELECT 1 FROM pg_roles WHERE rolname = 'keycloak')
\gexec

SELECT 'CREATE DATABASE keycloak OWNER keycloak;'
WHERE NOT EXISTS (SELECT 1 FROM pg_database WHERE datname = 'keycloak')
\gexec

GRANT CONNECT, TEMPORARY ON DATABASE keycloak TO keycloak;

\connect keycloak

CREATE SCHEMA IF NOT EXISTS kc AUTHORIZATION keycloak;

GRANT USAGE, CREATE ON SCHEMA kc TO keycloak;

ALTER DEFAULT PRIVILEGES IN SCHEMA kc
GRANT SELECT, INSERT, UPDATE, DELETE, REFERENCES, TRIGGER ON TABLES TO keycloak;

ALTER DEFAULT PRIVILEGES IN SCHEMA kc
GRANT USAGE, SELECT, UPDATE ON SEQUENCES TO keycloak;
Replace <RDS_ADMIN_PASSWORD> with the value you provided in the previous step.
and then let's create the necessary database, user and schema required by Keycloak:
export PGPASSWORD='<RDS_ADMIN_PASSWORD>'

psql \
  --host=<FQDN_PRIVATE_ZONE> \
  --port=5432 \
  --username=root \
  --dbname=postgres \
  --set=sslmode=require \
  --file=create-keycloak-db.sql

unset PGPASSWORD
Replace <RDS_ADMIN_PASSWORD> and <FQDN_PRIVATE_ZONE> with the values you configured in the previous steps.
Provisioning a CCE Cluster
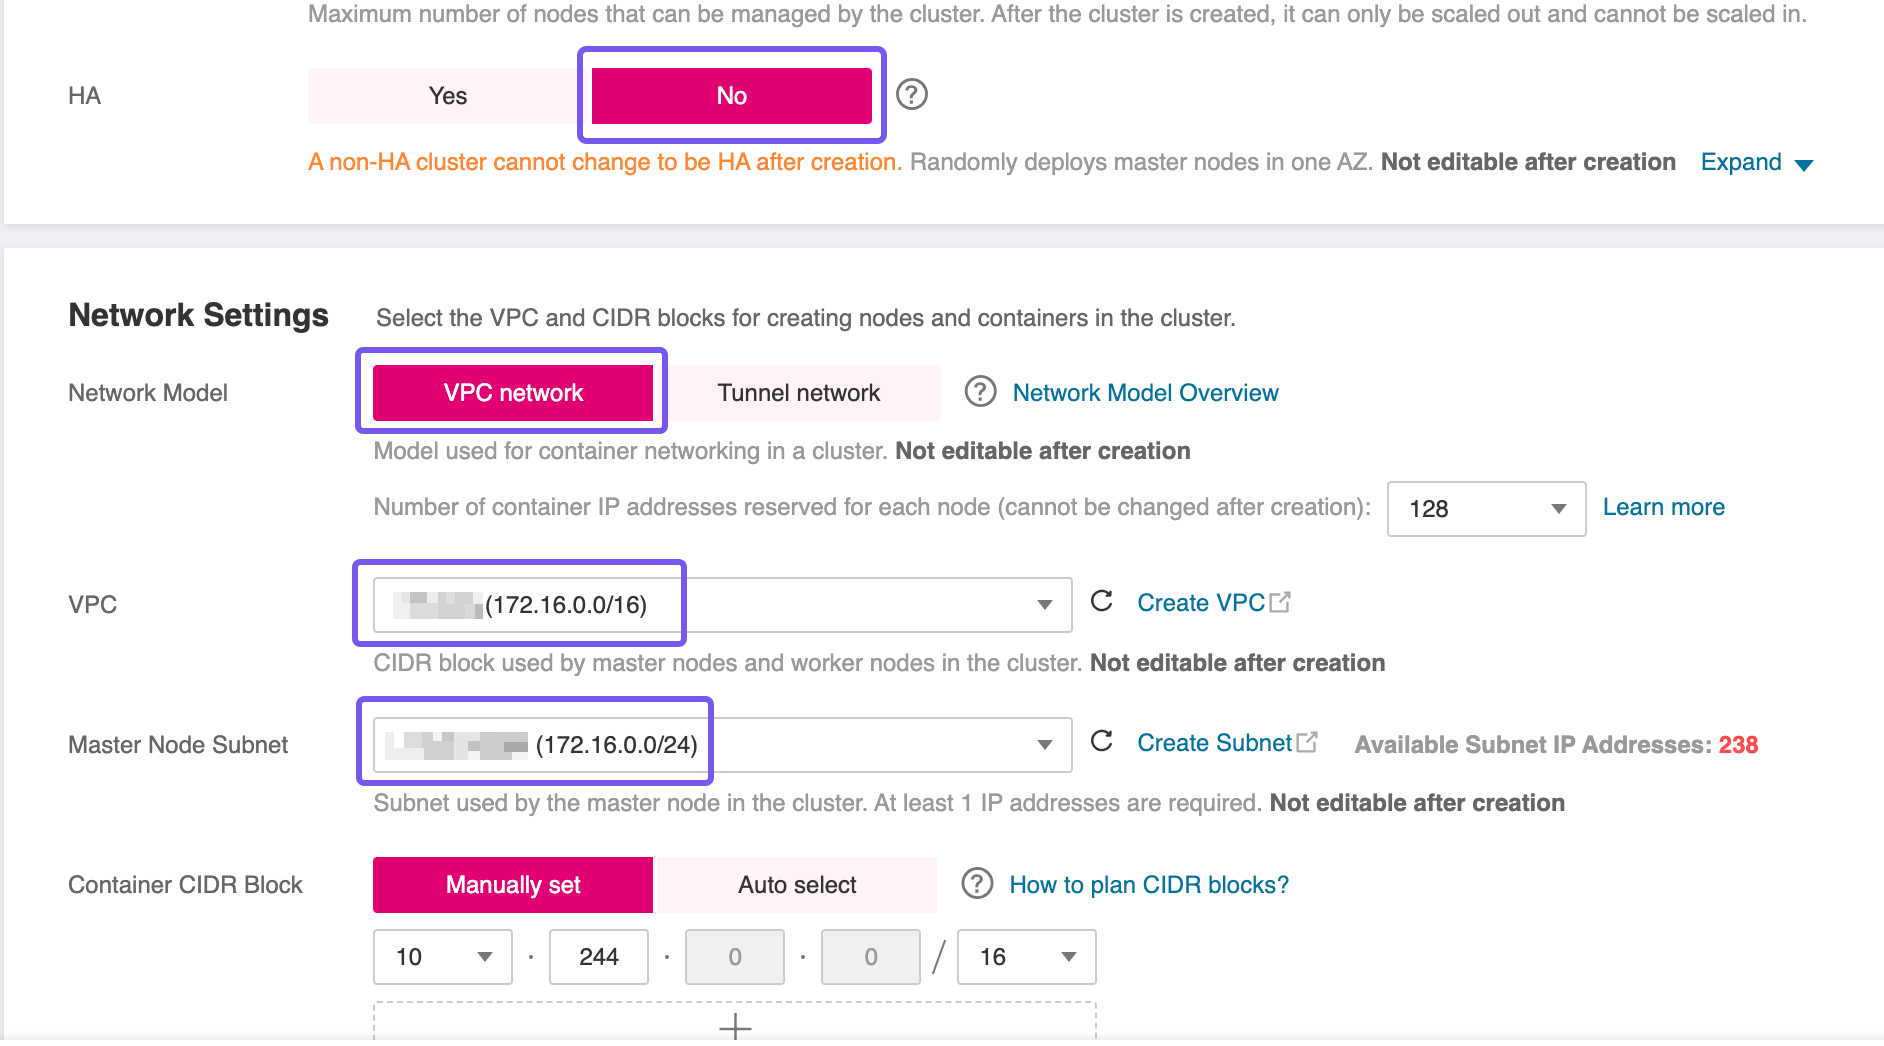
To proceed with the setup, you'll need to provision a Cloud Container Engine (CCE) cluster. Use the T Cloud Public wizard for cluster creation, and pay close attention to the following configuration specifics:
- High Availability (HA): For this blueprint, a non HA-cluster was used which is not advised for production workloads. However, if your workload demands fault tolerance and availability guarantees, consider enabling HA during creation—as this setting is immutable post-deployment.
- Network Placement: Ensure the CCE cluster is provisioned within the same VPC as the RDS instance to facilitate secure and low-latency communication.
- Subnet Configuration: If you're using a single Subnet for both services, place the CCE worker nodes in the same Subnet as the RDS instance to align with the predefined security group and routing rules.
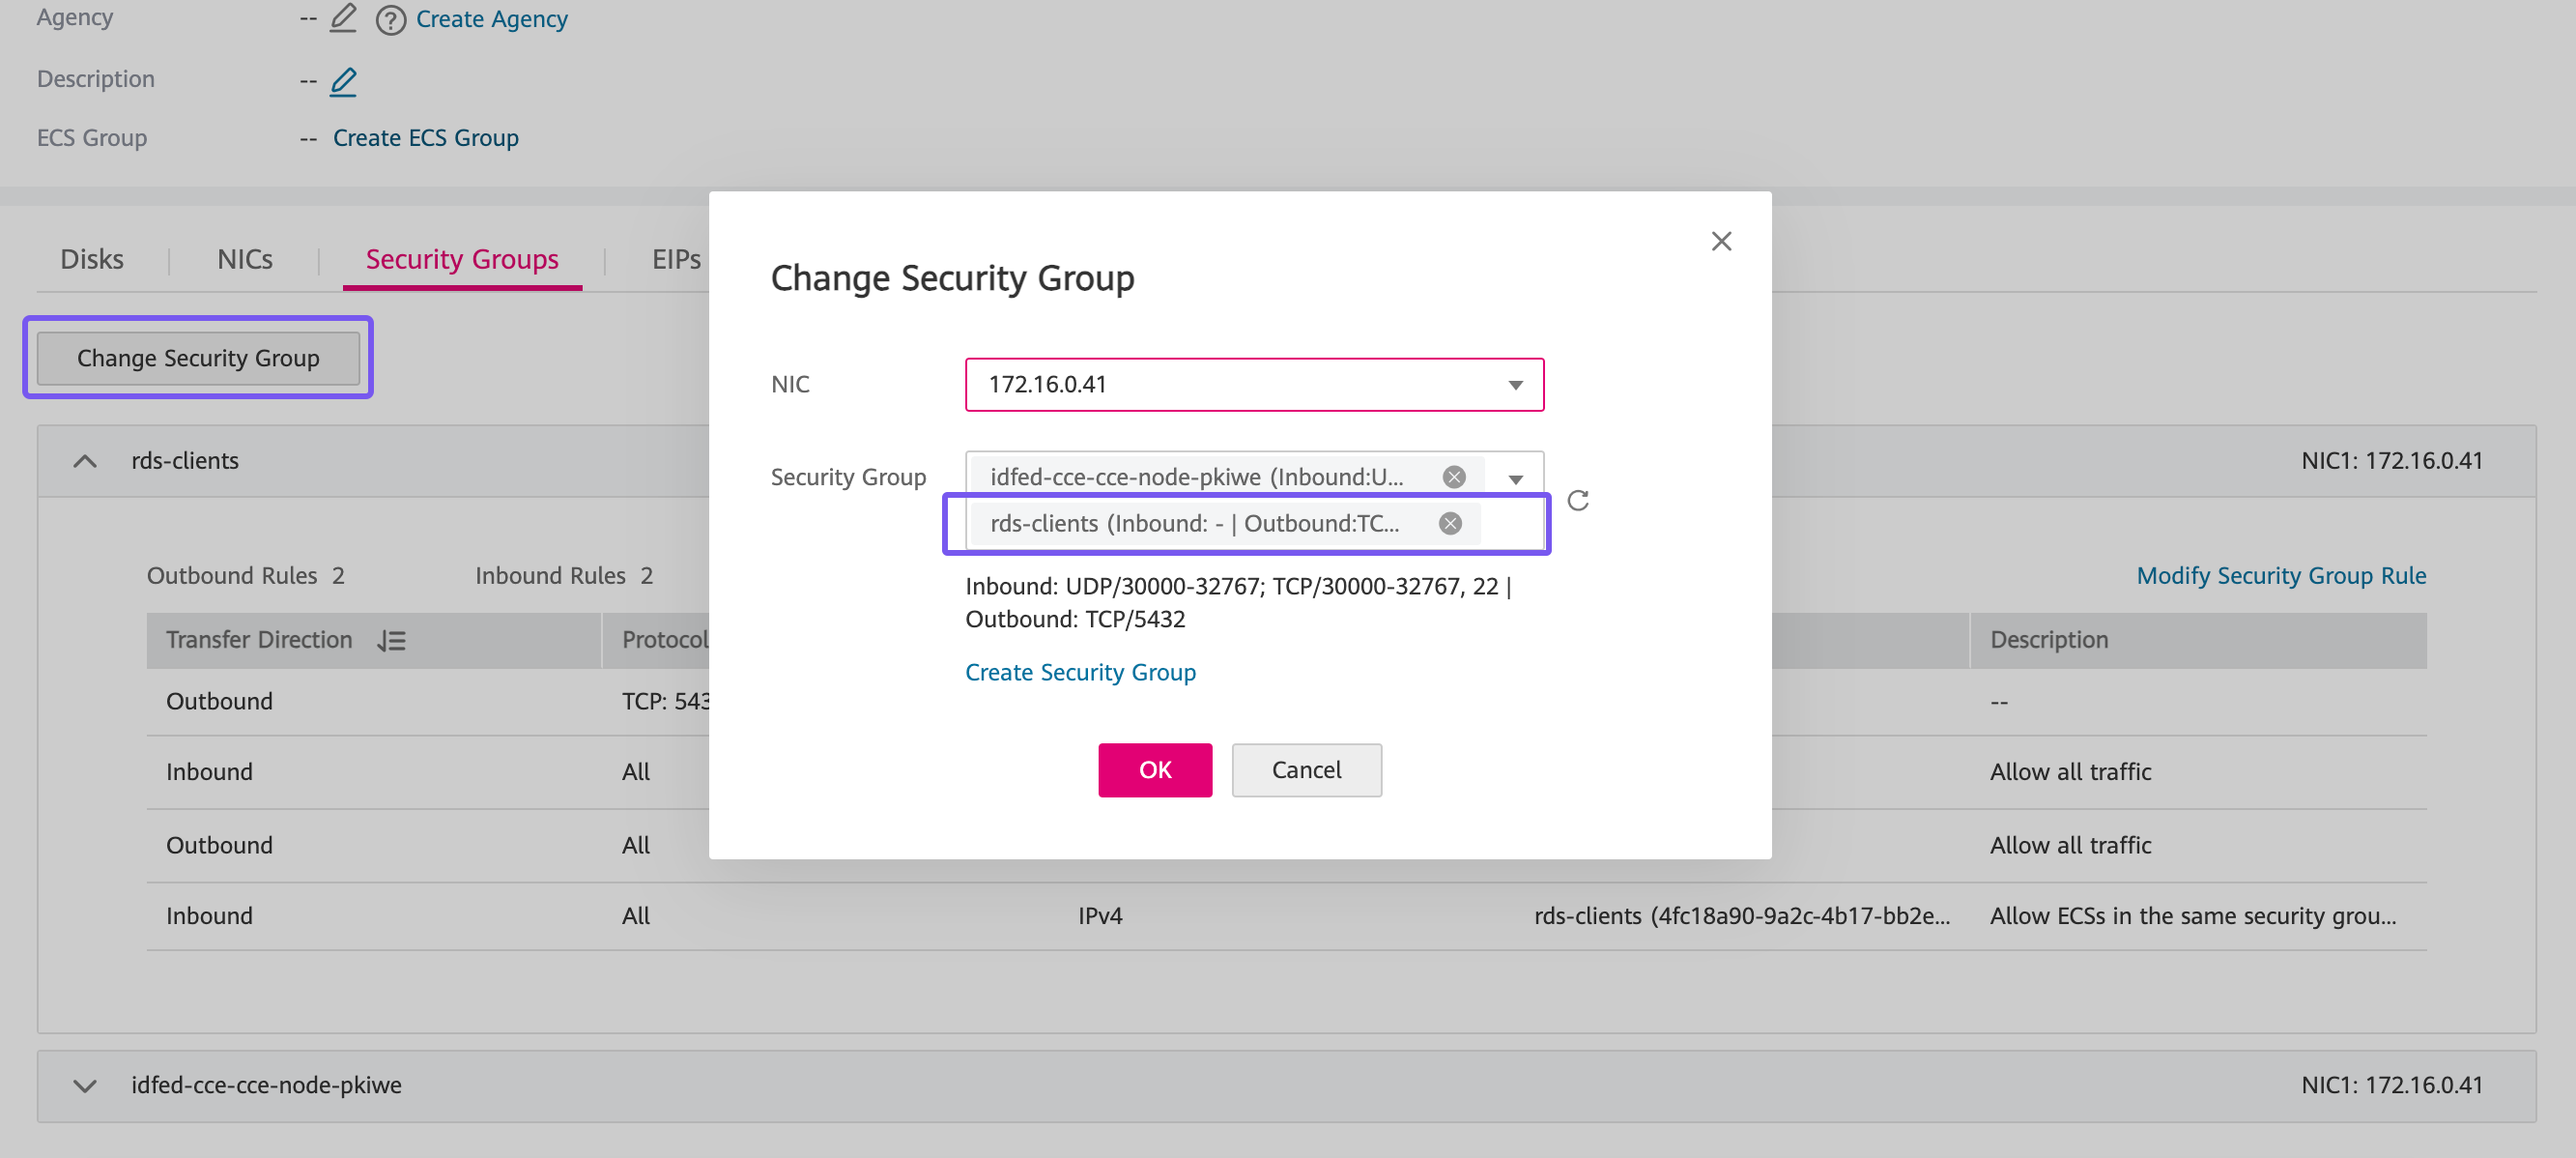
Add worker nodes to the CCE cluster using the wizard, and wait all nodes
to become operational. Then add to each node an additional Security
Group, in particular the rds-client that we created earlier in this
lab.
Make your own decision how you're going to access this CCE Cluster afterwards. You can assign an Elastic IP Address and access it over the Internet or provision and additional public-facing bastion host and access it through this machine. We categorically recommend the latter.
Deploying Keycloak
We are going to deploy Keycloak using simple Kubernetes manifests. Deploy the following YAML manifests in the order described below using kubectl on your bastion host, or in any other machine if you chose to go for an EIP.
First we are going to need a Namespace in our CCE Cluster, in order to deploy all the resources required by Keycloak:
kubectl create namespace keycloak
Deploying Secrets
We are going to need two Secrets. One, postgres-credentials, that will
contain the credentials to access the PostgreSQL database instance and a
second one, keycloak-secrets, that will contain the necessary
credential to access the web console of Keycloak:
apiVersion: v1
kind: Secret
metadata:
  name: postgres-credentials
  namespace: keycloak
type: Opaque
stringData:
  POSTGRES_USER: root
  POSTGRES_PASSWORD: <RDS_ADMIN_PASSWORD>
  POSTGRES_DB: keycloak
  POSTGRES_SCHEMA: kc
---
apiVersion: v1
kind: Secret
metadata:
  name: keycloak-secrets
  namespace: keycloak
type: Opaque
stringData:
  KEYCLOAK_ADMIN: admin
  KEYCLOAK_ADMIN_PASSWORD: <KC_BOOTSTRAP_ADMIN_PASSWORD>
RDS_ADMIN_PASSWORD is the password for the root user your provided
during the creation of the RDS instance. Set KC_BOOTSTRAP_ADMIN_PASSWORD as the password
for the temporary Keycloak admin bootstrap account.
You can easily createrandom strong passwords, in Linux terminal, with the following command:
openssl rand -base64 14
Deploying Application
Next step, is deploying Keycloak itself as a Statefulset with 2 replicas:
apiVersion: apps/v1
kind: StatefulSet
metadata:
  name: keycloak
  namespace: keycloak
  labels:
    app: keycloak
spec:
  serviceName: keycloak-discovery
  replicas: 2
  selector:
    matchLabels:
      app: keycloak
  template:
    metadata:
      labels:
        app: keycloak
    spec:
      containers:
        - name: keycloak
          image: quay.io/keycloak/keycloak:26.4.0
          args: ["start"]
          env:
            - name: KC_LOG_LEVEL
              value: DEBUG
            - name: KC_DB
              value: "postgres"
            - name: POSTGRES_DB
              valueFrom:
                secretKeyRef:
                  name: postgres-credentials
                  key: POSTGRES_DB
            - name: POSTGRES_SCHEMA
              valueFrom:
                secretKeyRef:
                  name: postgres-credentials
                  key: POSTGRES_SCHEMA
            - name: KC_DB_URL
              value: jdbc:postgresql://<FQDN_PRIVATE_ZONE>:5432/$(POSTGRES_DB)?currentSchema=$(POSTGRES_SCHEMA)
            - name: KC_DB_USERNAME
              valueFrom:
                secretKeyRef:
                  name: postgres-credentials
                  key: POSTGRES_USER
            - name: KC_DB_PASSWORD
              valueFrom:
                secretKeyRef:
                  name: postgres-credentials
                  key: POSTGRES_PASSWORD
            - name: KC_BOOTSTRAP_ADMIN_USERNAME
              valueFrom:
                secretKeyRef:
                  key: KEYCLOAK_ADMIN
                  name: keycloak-secrets
            - name: KC_BOOTSTRAP_ADMIN_PASSWORD
              valueFrom:
                secretKeyRef:
                  key: KEYCLOAK_ADMIN_PASSWORD
                  name: keycloak-secrets
            - name: KC_PROXY_HEADERS
              value: "xforwarded"
            - name: KC_HTTP_ENABLED
              value: "true"
            - name: KC_HOSTNAME
              value: "<FQDN_PUBLIC_ADDRESS>"
            - name: KC_HOSTNAME_STRICT
              value: "false"
            - name: KC_HEALTH_ENABLED
              value: "true"
            - name: KC_CACHE
              value: 'ispn'
            - name: KC_CACHE_STACK
              value: 'kubernetes'
            - name: POD_IP
              valueFrom:
                fieldRef:
                  fieldPath: status.podIP
            - name: JAVA_OPTS_APPEND
              value: '-Djgroups.dns.query="keycloak-discovery" -Djgroups.bind.address=$(POD_IP)'
          ports:
            - name: http
              containerPort: 8080
          startupProbe:
            httpGet:
              path: /health/started
              port: 9000
            periodSeconds: 1
            failureThreshold: 600
          readinessProbe:
            httpGet:
              path: /health/ready
              port: 9000
            periodSeconds: 10
            failureThreshold: 3
          livenessProbe:
            httpGet:
              path: /health/live
              port: 9000
            periodSeconds: 10
            failureThreshold: 3
          resources:
            requests:
              memory: "1Gi"
              cpu: "512m"
            limits:
              memory: "1Gi"
              cpu: "512m"
---
apiVersion: v1
kind: Service
metadata:
  name: keycloak
  namespace: keycloak
  labels:
    app: keycloak
spec:
  ports:
    - protocol: TCP
      port: 8080
      targetPort: http
      name: http
  selector:
    app: keycloak
  type: ClusterIP
---
apiVersion: v1
kind: Service
metadata:
  name: keycloak-discovery
  namespace: keycloak
  labels:
    app: keycloak
spec:
  selector:
    app: keycloak
  publishNotReadyAddresses: true
  clusterIP: None
  type: ClusterIP
Replace <FQDN_PRIVATE_ZONE> & FQDN_PUBLIC_ADDRESS with the values you configured in the previous steps.
kubectl apply -f keycloak-sts.yaml
Deploying Ingress
Before deploying the Ingress, the CCE cluster must be equipped with a set of foundational components. You will need to install and configure essential prerequisites such as the NGINX Ingress Controller for routing external traffic, cert-manager for managing TLS certificates, and other supporting workloads. These components establish the baseline infrastructure required to expose services securely and ensure smooth operation of the application stack within the Kubernetes environment.
Follow the guidelines in the best practice Enabling External Traffic with Ingress & TLS before proceeding to the next steps.
And finally, the last step of this guide is to deploy an Ingress to expose Keycloak workload:
apiVersion: networking.k8s.io/v1
kind: Ingress
metadata:
  name: keycloak-ingress
  namespace: keycloak
  annotations:
    cert-manager.io/cluster-issuer: opentelekomcloud-letsencrypt
spec:
  ingressClassName: nginx
  tls:
    - hosts:
        - <FQDN_PUBLIC_ADDRESS>
      secretName: keycloak-tls
  rules:
    - host: <FQDN_PUBLIC_ADDRESS>
      http:
        paths:
          - path: /
            pathType: Prefix
            backend:
              service:
                name: keycloak
                port:
                  number: 8080
replace <FQDN_PUBLIC_ADDRESS> with the public address of your instance and apply the manifest with kubectl:
kubectl apply -f keycloak-ingress.yaml
We can now open the url address we defined in our Public DNS Zone for this application and land on the welcome page of Keycloak:

Troubleshooting
Drop Database
In your bastion host create the following file:
REVOKE CONNECT ON DATABASE keycloak FROM keycloak;

SELECT pg_terminate_backend(pid)
FROM pg_stat_activity
WHERE datname = 'keycloak';

DROP DATABASE IF EXISTS keycloak;
DROP ROLE IF EXISTS keycloak;
and execute the following commands in order to clean the database and schema and start over:
export PGPASSWORD='<RDS_ADMIN_PASSWORD>'

psql \
  --host=<FQDN_PRIVATE_ZONE> \
  --port=5432 \
  --username=root \
  --dbname=postgres \
  --set=sslmode=require \
  --file=rollback-keycloak-db.sql

unset PGPASSWORD