ZITADEL as an Identity Provider for IAM
This guide outlines the steps required to integrate ZITADEL with the Identity and Access Management (IAM) of T Cloud Public using the SAML 2.0 standard. The objective is to configure ZITADEL as a trusted external Identity Provider (IdP), enabling federated login for OTC users and services. This setup allows your ZITADEL-managed identities to authenticate against T Cloud Public resources, forming a bridge between your custom IAM solution and the native authentication infrastructure of T Cloud Public.
Prerequisites
Before initiating the integration process, make sure the following prerequisites are met:
- A fully deployed and accessible ZITADEL instance, reachable via a valid domain with HTTPS enabled. Otherwise, follow the guide: Deploy ZITADEL on CCE.
- Administrator-level access to both ZITADEL and T Cloud Public's Identity and Access Management (IAM) console.
- A working knowledge of SAML 2.0, particularly around concepts such as assertions, metadata exchange, and service provider (SP) vs. identity provider (IdP) roles. If needed, refer to the SAML 2.0 specification for a foundational overview.
These requirements ensure that you're equipped to configure and validate the trust relationship between the two platforms.
Creating a new Organization
ZITADEL deploys a default organization (configured via the ZITADEL_FIRSTINSTANCE_ORG_* parameters) that is necessary for bootstrapping and administering the instance initially, and it is generally not recommended for routine operational use because:
- It carries system-level privileges that might not be safe for day-to-day operations.
- Default settings may not meet production-grade security requirements.
- Separation of system and operational data helps reduce risk and improves manageability.
- Tailored organizations allow better control over permissions, policies, and audit management.
For these reasons, it's best to use the first organization strictly for initial setup and administrative purposes—and then create separate organizations tailored to your application's production, testing, or multi-tenant requirements.
For further details, check out the ZITADEL documentation, which provides more context on security best practices and organization management in ZITADEL.
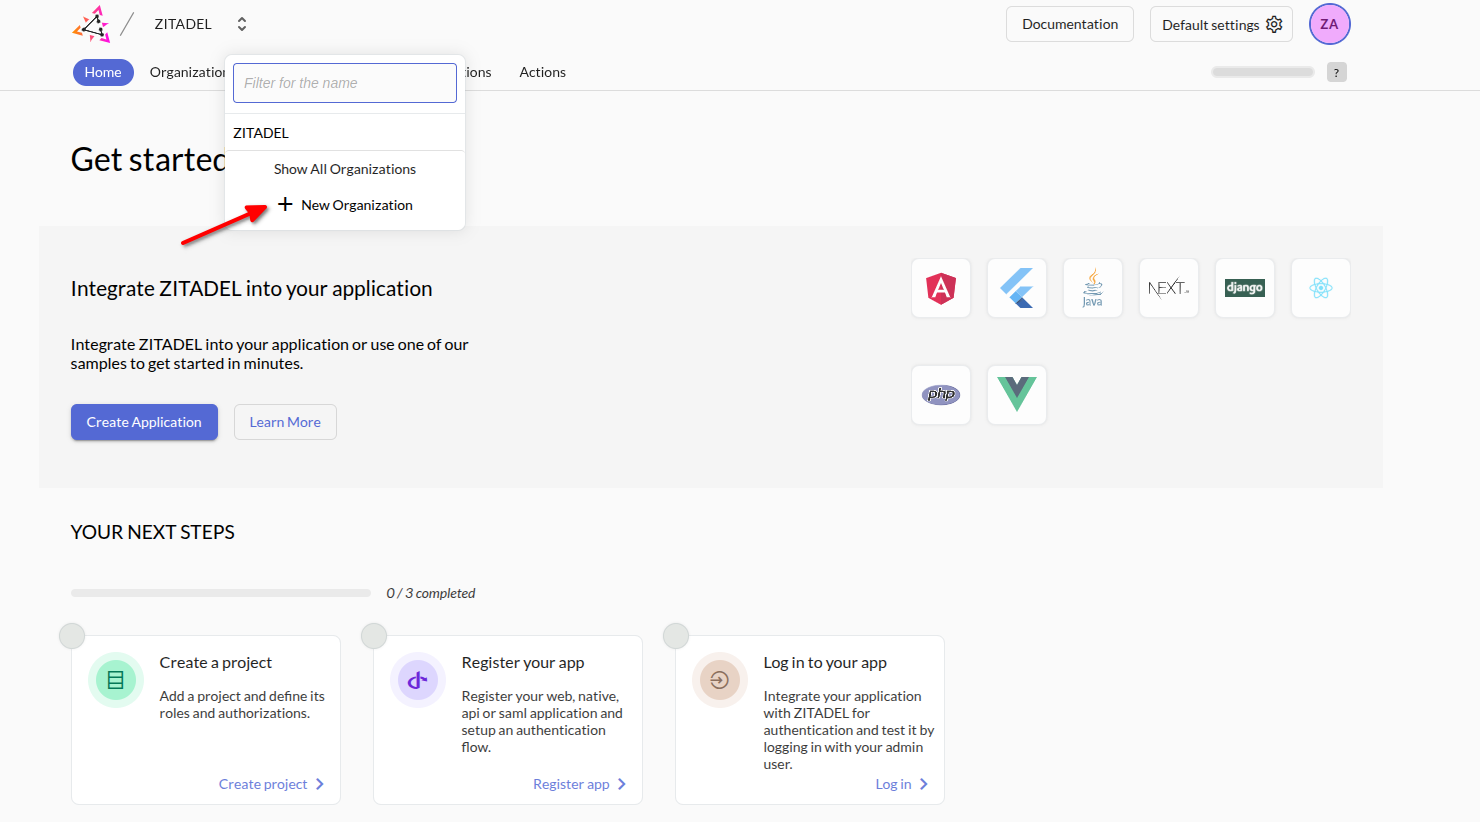
Go to the ZITADEL Dashboard and click New Organization:
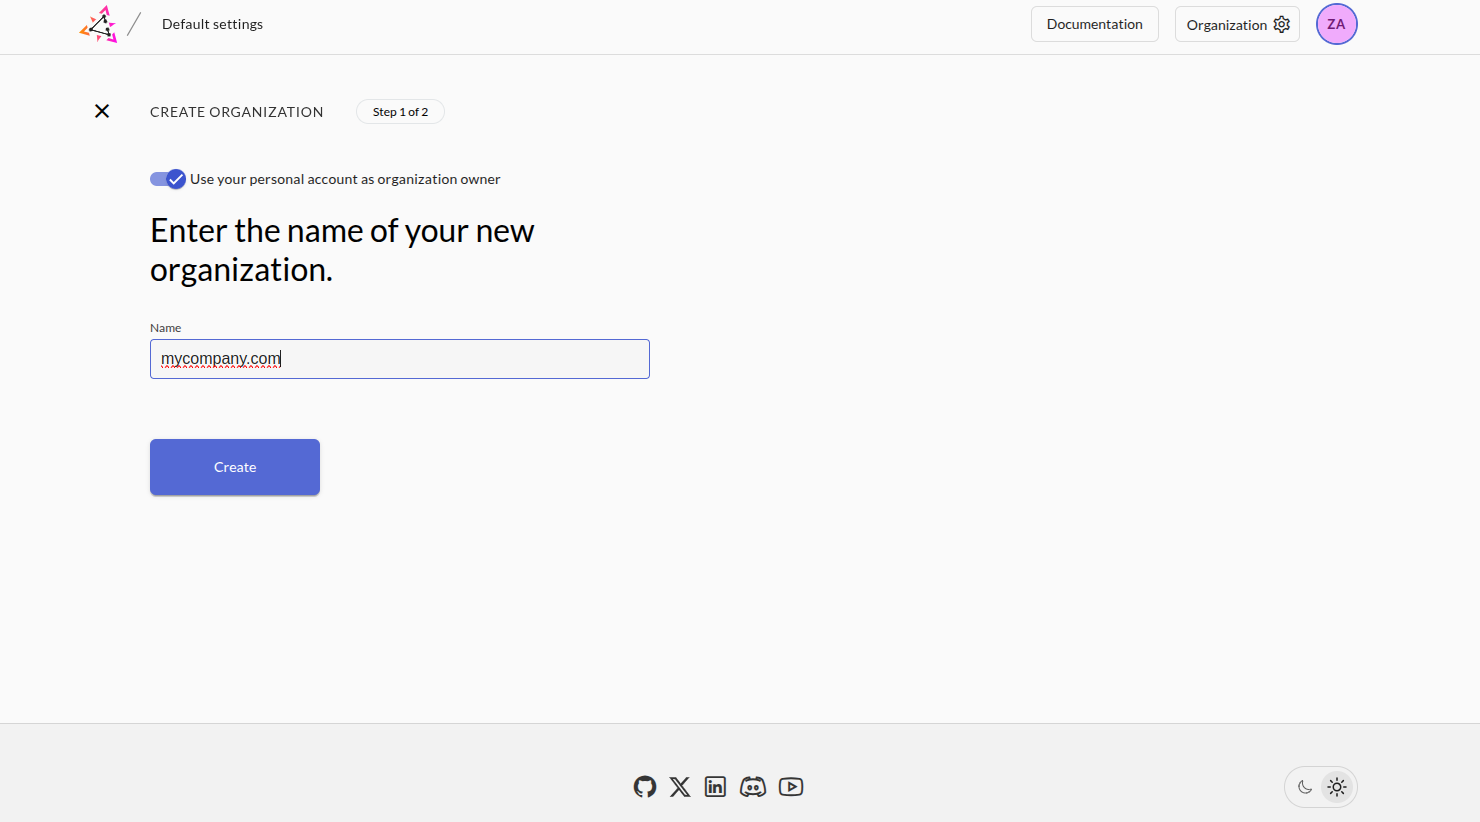
Enter the name of your new organization, (e.g. mycompany.com) and click Create:
Creating a new Project
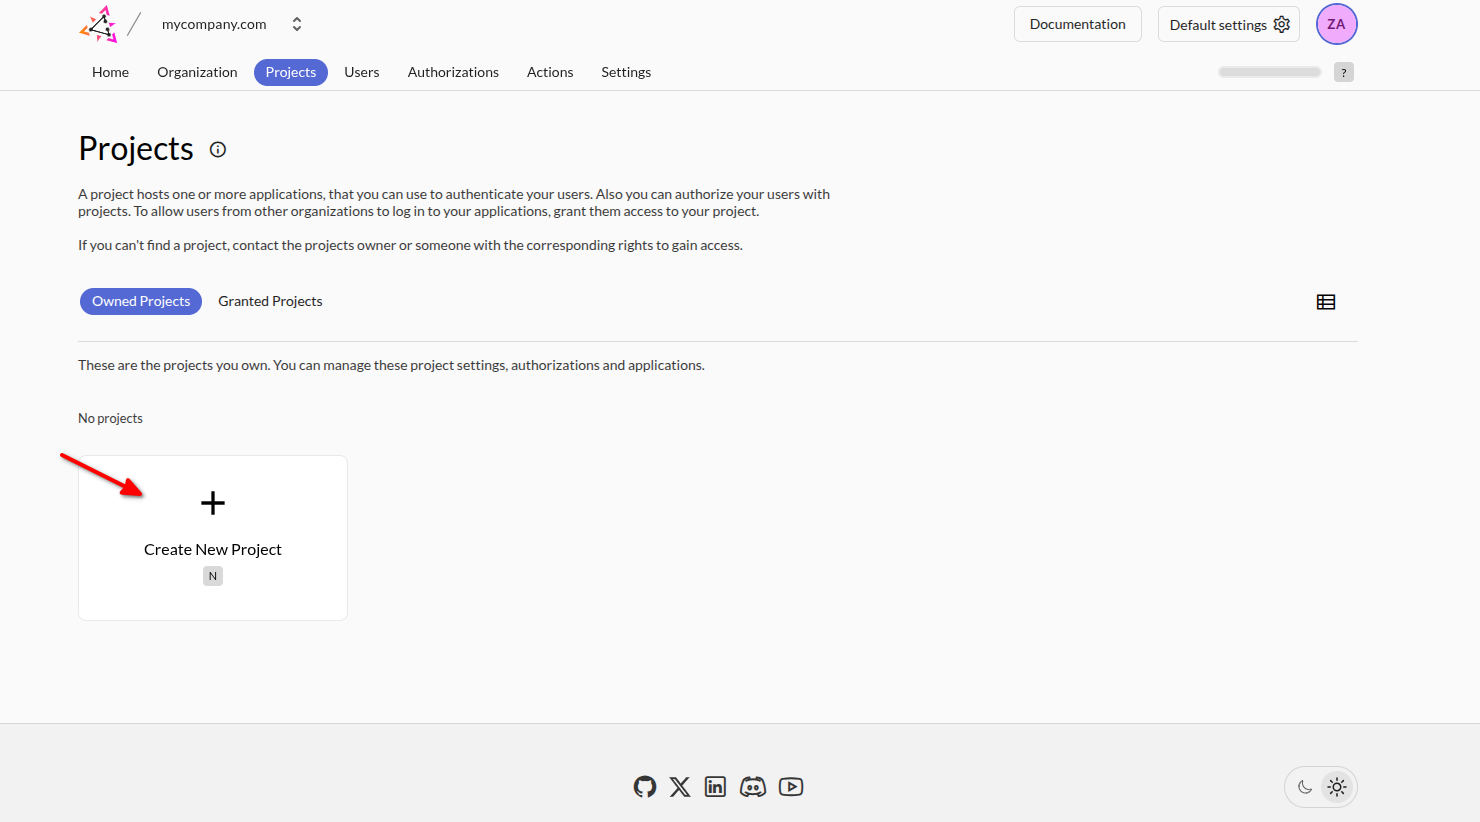
Go to the new Organization Dashboard -> Projects -> Owned Projects and click Create New Project:
and name it after your tenant in T Cloud Public:
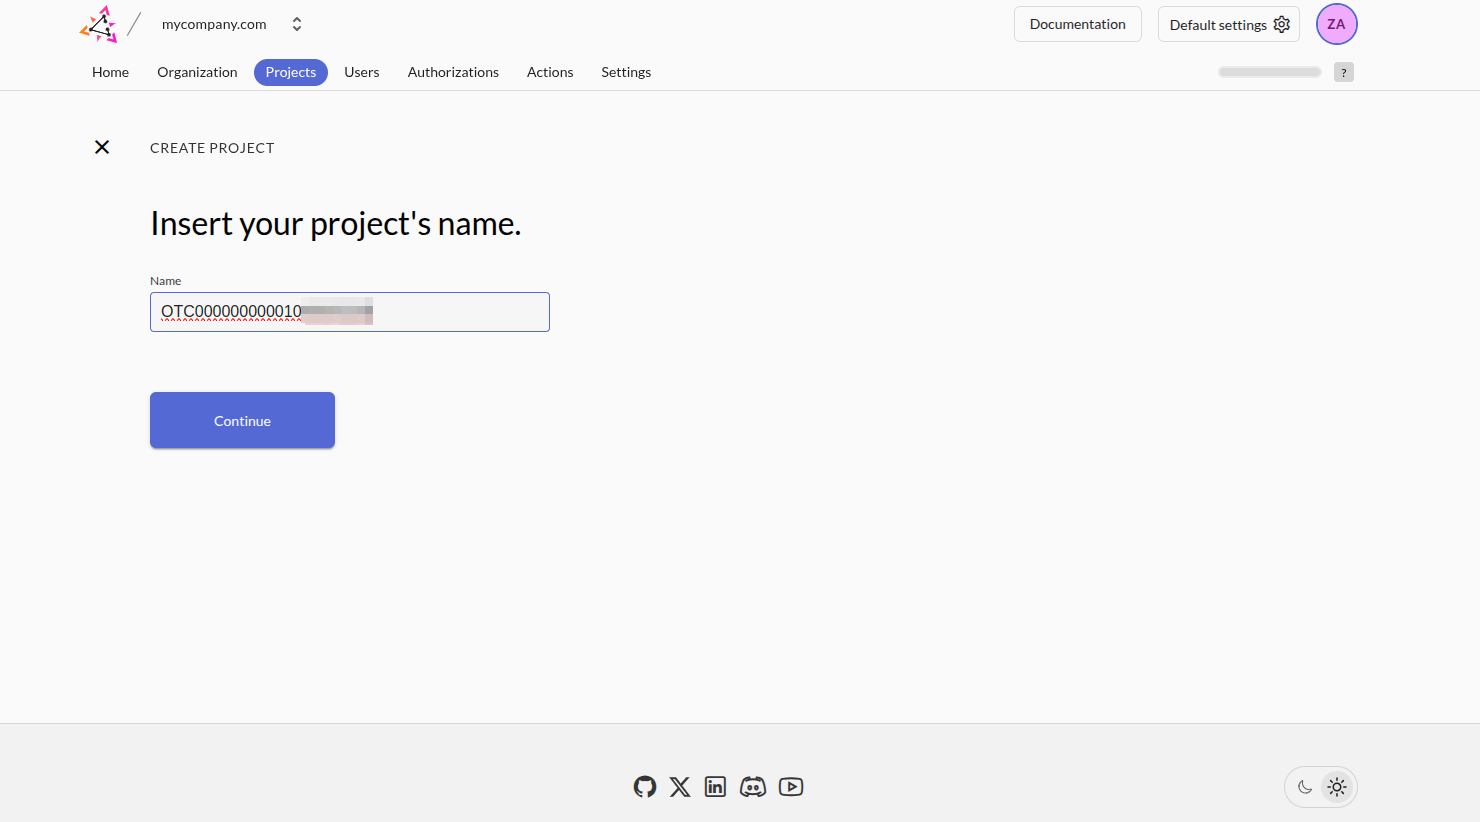
While naming the ZITADEL project after your T Cloud Public tenant isn't strictly required, it does offer clarity—especially in multi-tenant or federated environments. Aligning project names with your organizational structure or tenant identifiers helps maintain consistency, eases traceability, and simplifies access policy management. You're free to adapt naming conventions based on your broader application landscape, governance model, or internal naming standards. Prioritize what makes sense for your operational context.
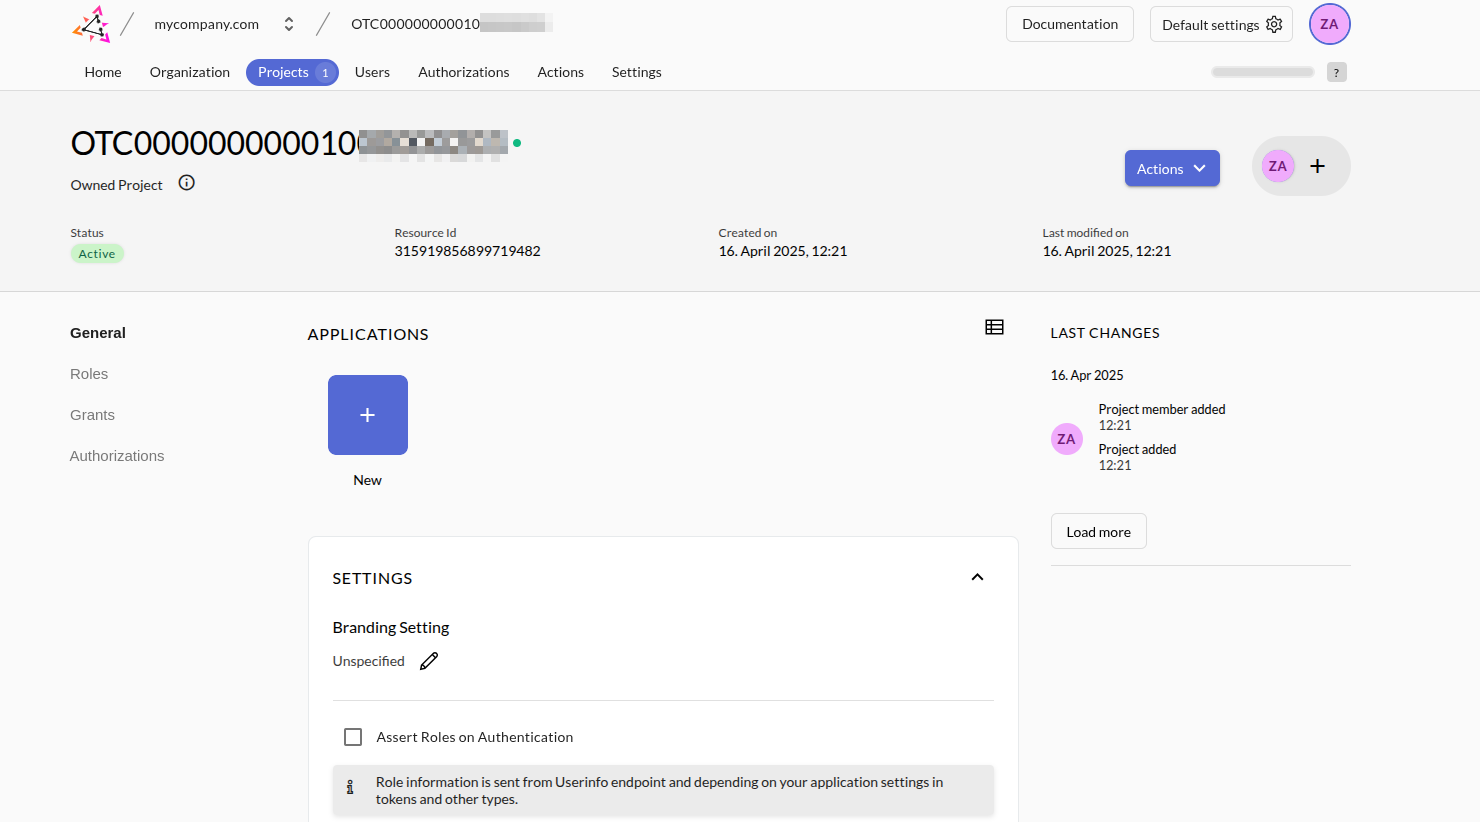
Creating a new Application
Go to the new Project Dashboard and click New Application:
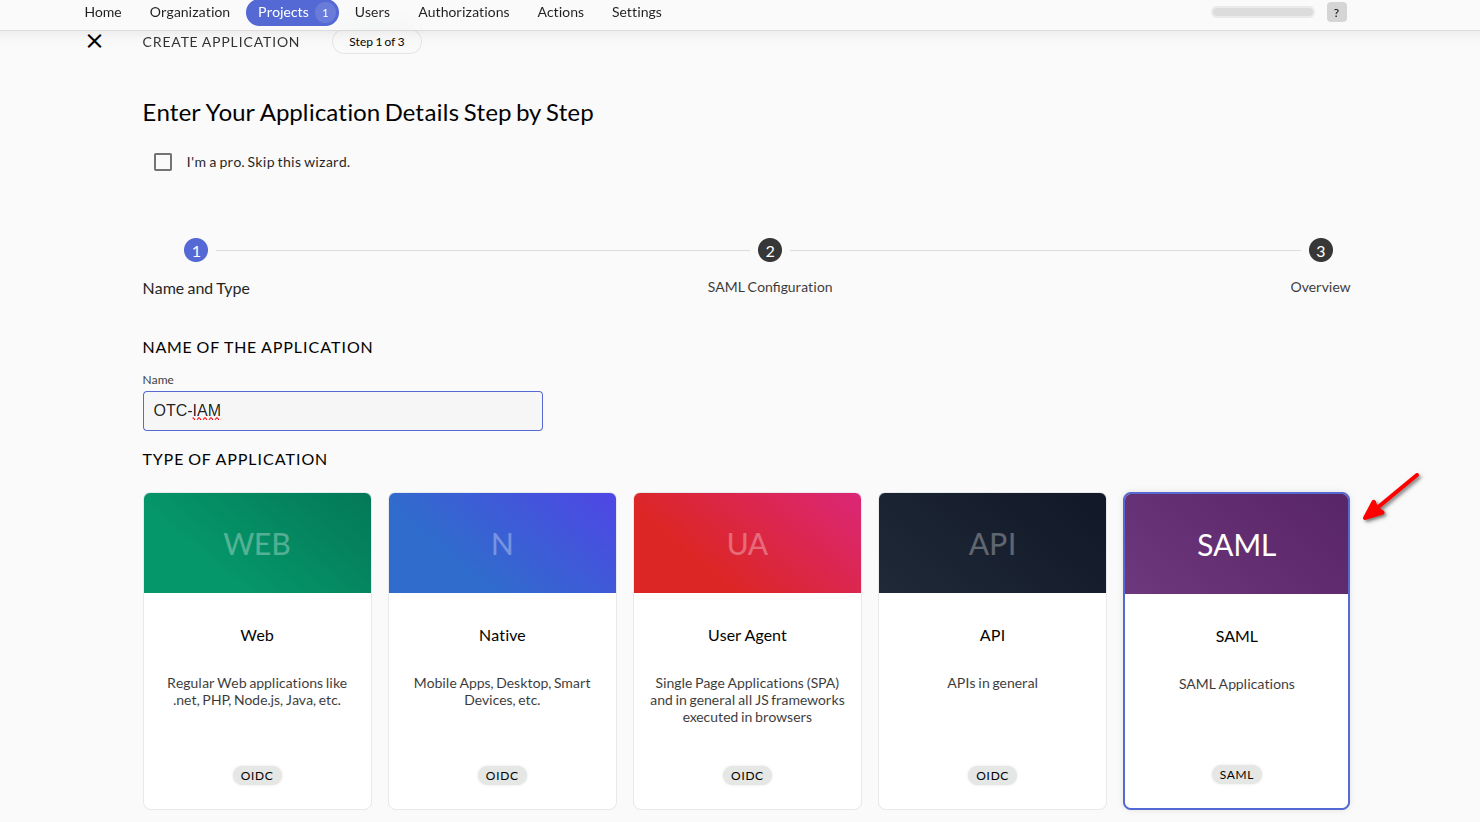
- Assign a name to the new application and for the application type select
SAML.
-
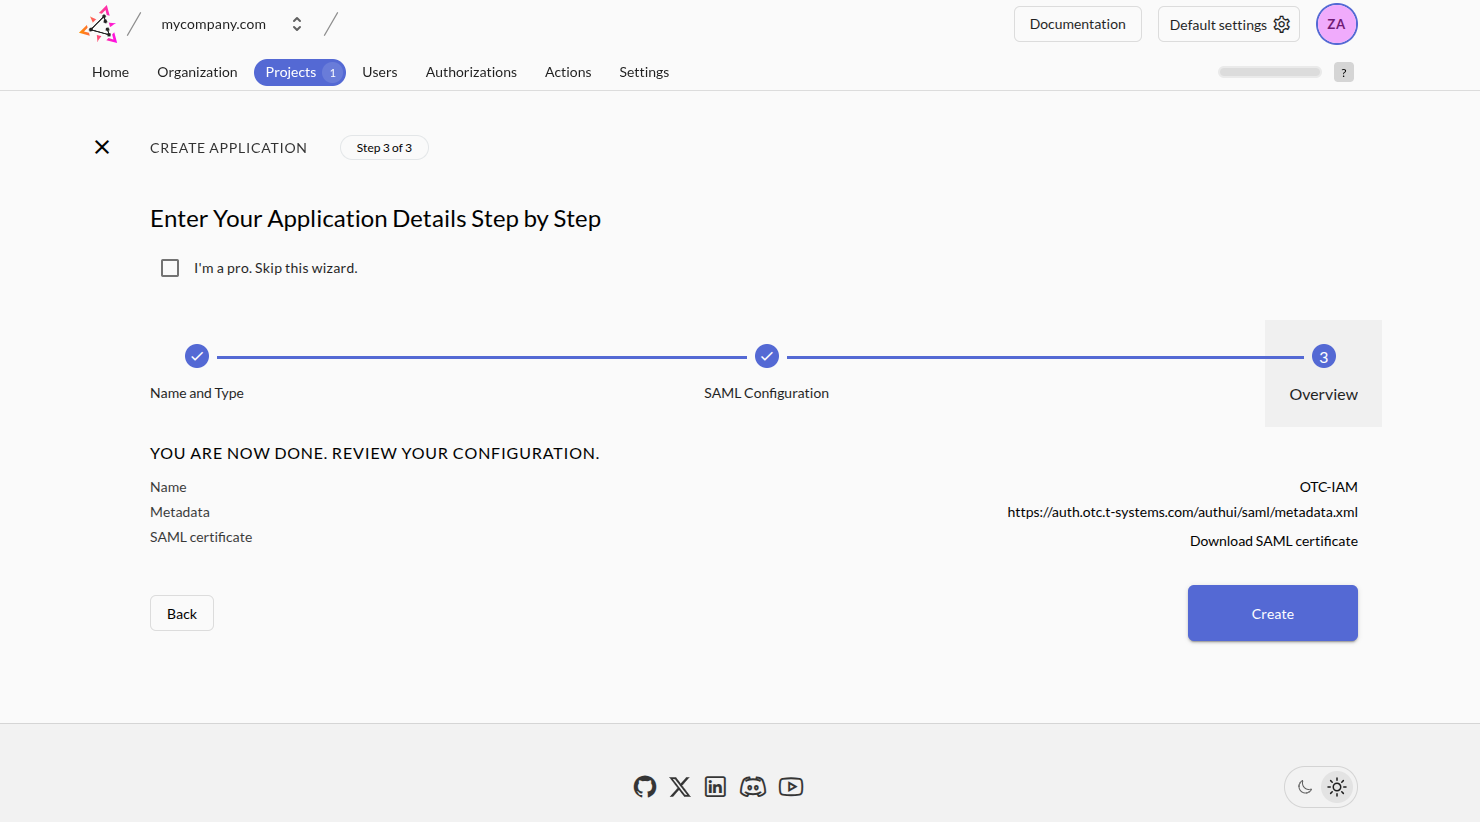
In Step 2 of the application setup, configure the SAML integration using Option 1: Metadata URL. This approach allows ZITADEL to fetch the necessary service provider metadata automatically.
Set the metadata URL to:
https://auth.otc.t-systems.com/authui/saml/metadata.xmlThis URL points to the SAML metadata of T Cloud Public’s Identity and Access Management system. After entering the URL, proceed by clicking Continue through the remaining steps of the wizard. No additional configuration is required at this point. Once you exit the wizard, the application will be created with the SP metadata preloaded and ready for further claim mapping and policy setup
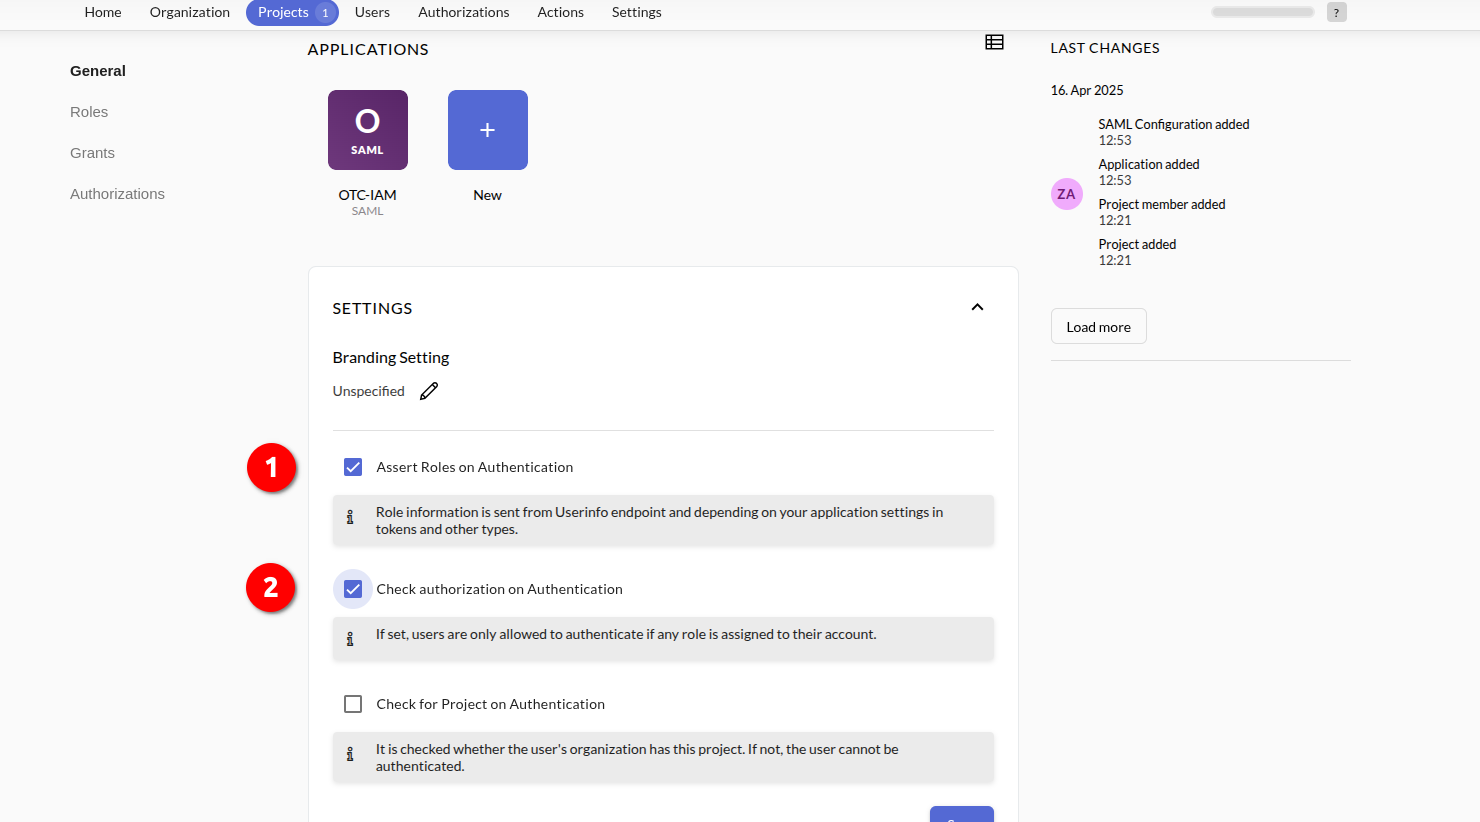
- Back on the Application Dashboard, enable Assert Roles on Authentication and Check authorization on Authentication and click Save:
Creating a new User
Go to the Project Dashboard -> Users -> Users and click New. Fill in the form and enable Email verified and Set initial password and click Create:
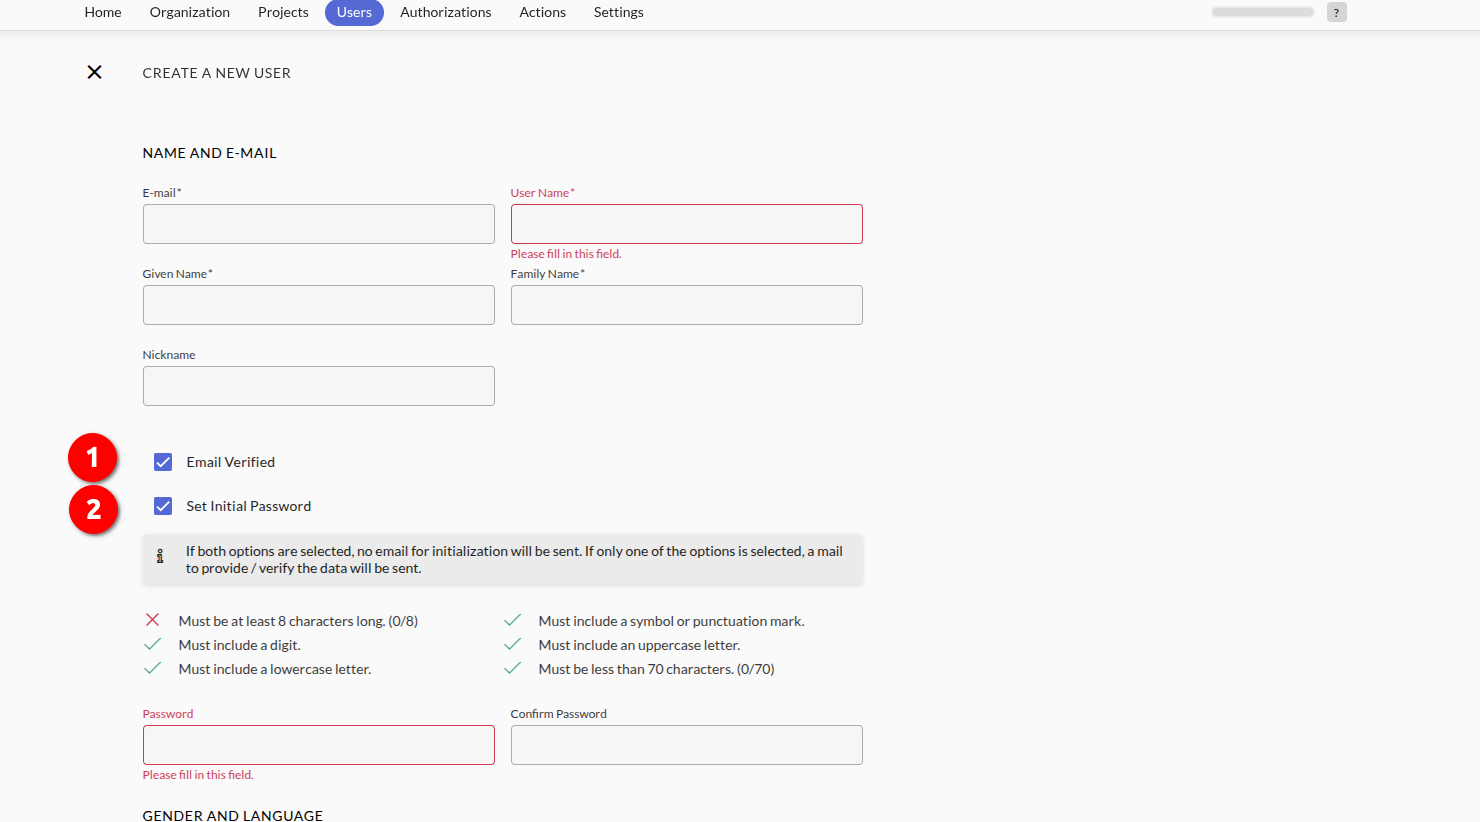
Enabling Email Verified at this stage is shown purely for the sake of progressing through the blueprint without the need for multi-factor authentication (MFA), SMS gateway, or SMTP server setup. This shortcut allows testing and validation of the SAML integration without additional infrastructure.
However, it's important to stress that bypassing email verification in a production environment is strongly discouraged. Doing so undermines the integrity of user identity assurance and opens the door to impersonation or unauthorized access. In real-world deployments, always enforce verified email addresses through proper delivery mechanisms and integrate MFA where possible to align with security best practices.
Creating Roles & Authorizations
This blueprint operates under the assumption that your T Cloud Public IAM environment includes the following two User Groups:
| Group | Policy/Role | Description |
|---|---|---|
| rds-admin | Tenant Guest | Tenant Guest (Exclude IAM) |
| RDS Administrator | RDS Administrator | |
| Server Administrator | Server Administrator | |
| ecs-admin | ECS Admin | All permissions of ECS service. |
These groups will later be used in the SAML attribute mapping process, where ZITADEL will assert a user’s group membership as part of the authentication response. The IAM service in T Cloud Public will consume these SAML attributes and dynamically assign (virtual) users to the appropriate group. This enables fine-grained, role-based access control that aligns with your organizational structure and enforces least privilege principles across your cloud environment.
You can either create these groups directly in your T Cloud Public tenant, or adapt the remainder of this blueprint to align with your own existing IAM group structure. The key requirement is that the group names used in ZITADEL's SAML attribute mappings correspond exactly to the group names defined in your T Cloud Public IAM configuration. This ensures that access control decisions based on group membership are applied correctly during federated login. Whichever approach you choose, consistency between identity assertions and IAM group definitions is essential for maintaining a secure and predictable access model.
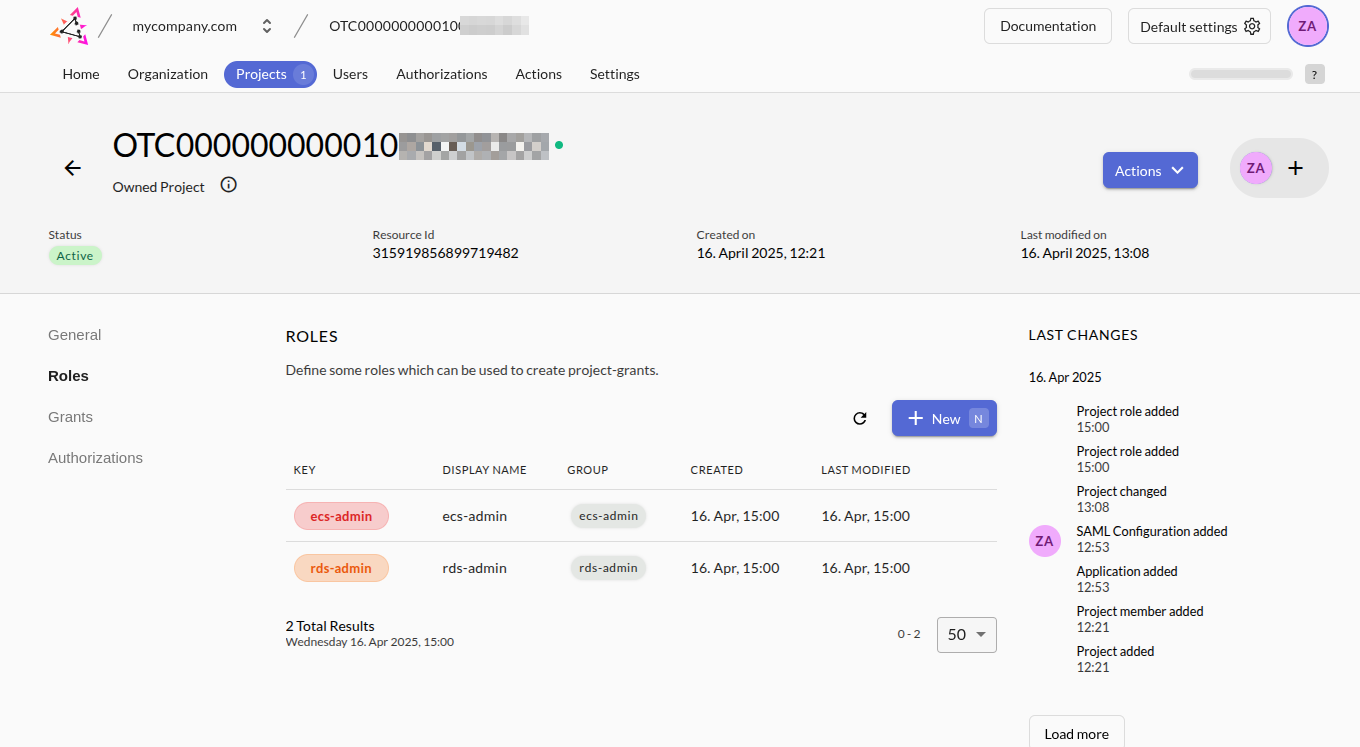
Creating Roles
Go to the Project Dashboard -> Roles and click New. Fill in Key, Display Name and Group as: ecs-admin. Repeat for rds-admin and click Save.
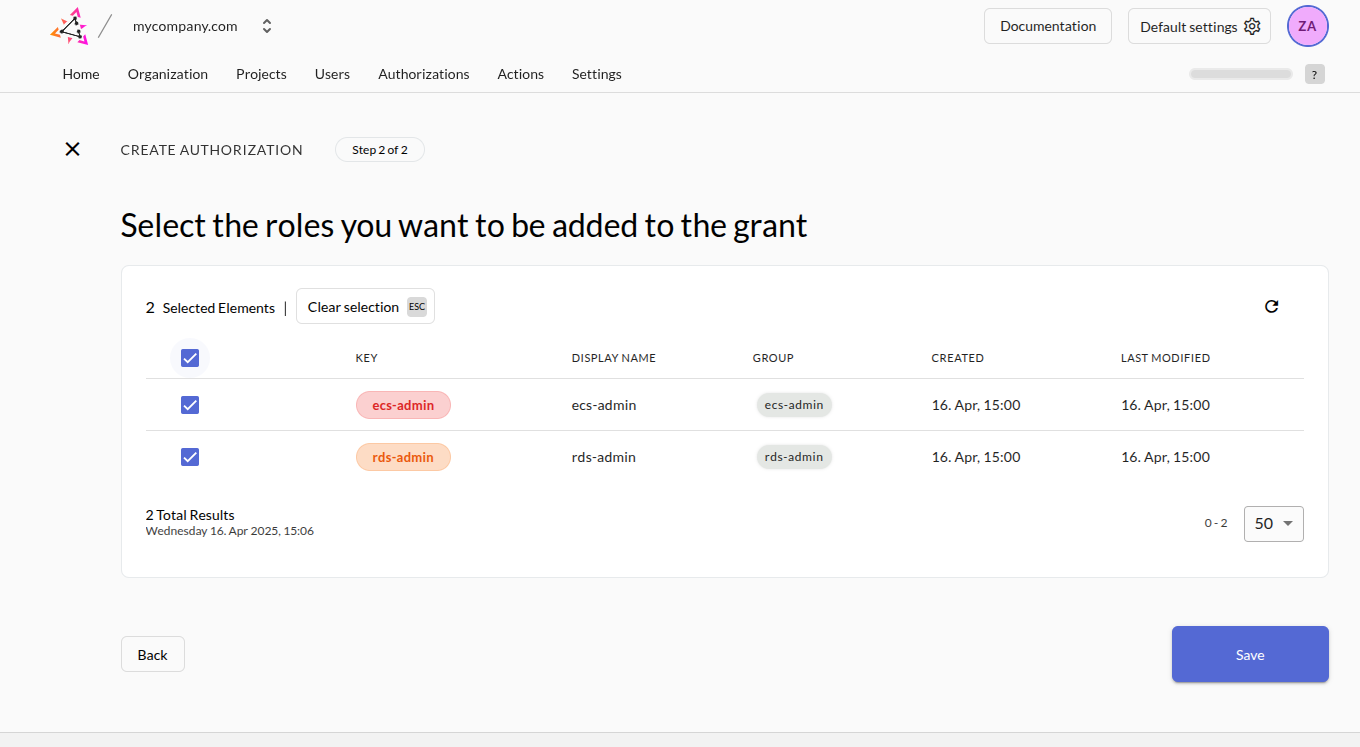
Creating Authorizations
Go to the Project Dashboard -> Authorizations and click New:
- Select the user we created earlier
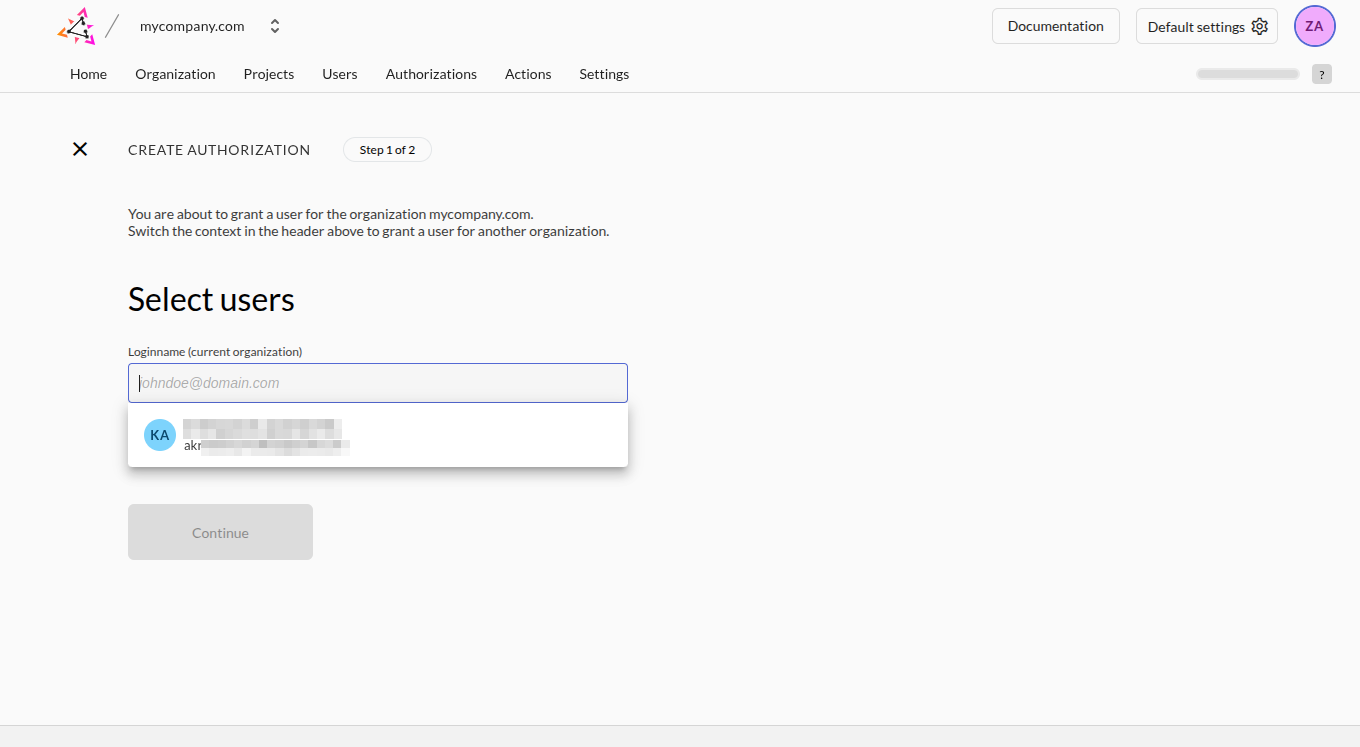
- Assign to the user the role(s) you want to test and click Save.
Retrieving ZITADEL's SAML 2.0 Metadata
At this point, ZITADEL has already been configured to trust T Cloud Public by consuming its SAML metadata (as outlined in earlier steps). Now, we need to perform the reverse—extract ZITADEL’s own SAML metadata so that it can be registered as a trusted Identity Provider within OTC.
If you’ve deployed ZITADEL using the guide Deploy ZITADEL on CCE, the metadata is served automatically at the following endpoint: https://$ZITADEL_EXTERNALDOMAIN/saml/v2/metadata
Replace $ZITADEL_EXTERNALDOMAIN with the actual fully qualified domain name pointing to your ZITADEL instance. This URL exposes an XML-formatted metadata document containing ZITADEL’s SAML configuration, including its public signing key and SSO endpoints. You’ll use this metadata when registering ZITADEL as an Identity Provider in the OTC IAM console, so download and save it in your workspace as e.g. metadata.xml.
Exchanging SAML metadata between the identity provider (ZITADEL) and the service provider (T Cloud Public IAM) is a foundational step in establishing mutual trust within a SAML-based authentication flow. The metadata files serve as structured, signed documents that contain the public key infrastructure (PKI) necessary to validate digital signatures on SAML assertions—ensuring that identity claims are authentic and have not been altered in transit.
Beyond cryptographic trust, SAML metadata also defines key operational endpoints such as the Single Sign-On (SSO) and Single Logout (SLO) endpoint. By exchanging this information up front, both systems can interoperate seamlessly, eliminating the need for manual configuration and significantly reducing the risk of misrouted authentication messages. This automation is critical for ensuring that authentication flows are reliable, secure, and standards-compliant.
Creating a new Action
If we examine the metadata.xml retrieved from ZITADEL, we will notice that it does not include any predefined SAML attribute assertions that map users to roles or groups. By default, ZITADEL exposes only the minimal identity information required for authentication—such as the NameID and basic profile attributes.
<AttributeAuthorityDescriptor xmlns="urn:oasis:names:tc:SAML:2.0:metadata" ID="_fcb399cf-7e22-41d2-bf5c-f451605905e2" validUntil="2025-04-16T13:36:08.647Z" protocolSupportEnumeration="urn:oasis:names:tc:SAML:2.0:protocol">
    <AttributeService xmlns="urn:oasis:names:tc:SAML:2.0:metadata" Binding="urn:oasis:names:tc:SAML:2.0:bindings:SOAP" Location="https://zitadel.example.com/saml/v2/attribute"/>
    <NameIDFormat>urn:oasis:names:tc:SAML:2.0:nameid-format:persistent</NameIDFormat>
    <AttributeProfile>urn:oasis:names:tc:SAML:2.0:profiles:attribute:basic</AttributeProfile>
        <Attribute xmlns="urn:oasis:names:tc:SAML:2.0:assertion" Name="Email" NameFormat="urn:oasis:names:tc:SAML:2.0:attrname-format:basic"><AttributeValue/></Attribute>
        <Attribute xmlns="urn:oasis:names:tc:SAML:2.0:assertion" Name="SurName" NameFormat="urn:oasis:names:tc:SAML:2.0:attrname-format:basic"><AttributeValue/></Attribute>
        <Attribute xmlns="urn:oasis:names:tc:SAML:2.0:assertion" Name="FirstName" NameFormat="urn:oasis:names:tc:SAML:2.0:attrname-format:basic"><AttributeValue/></Attribute>
        <Attribute xmlns="urn:oasis:names:tc:SAML:2.0:assertion" Name="FullName" NameFormat="urn:oasis:names:tc:SAML:2.0:attrname-format:basic"><AttributeValue/></Attribute>
        <Attribute xmlns="urn:oasis:names:tc:SAML:2.0:assertion" Name="UserName" NameFormat="urn:oasis:names:tc:SAML:2.0:attrname-format:basic"><AttributeValue/></Attribute>
        <Attribute xmlns="urn:oasis:names:tc:SAML:2.0:assertion" Name="UserID" NameFormat="urn:oasis:names:tc:SAML:2.0:attrname-format:basic"><AttributeValue/></Attribute>
    <KeyDescriptor xmlns="urn:oasis:names:tc:SAML:2.0:metadata" use="signing">
    </KeyDescriptor>
</AttributeAuthorityDescriptor>
For T Cloud Public IAM to make authorization decisions based on group membership or roles, we must explicitly configure ZITADEL to include custom SAML attributes in its assertions. To enrich the SAML response with role(s) information, we’ll define a custom Action in ZITADEL.
Actions in ZITADEL allow you to inject additional logic during the authentication flow, including modifying the SAML assertion payload before it is sent to the service provider.
In this case, the Action will append one or more custom attribute statements to the SAML response—such as user roles, or other identity context information as e.g. the Organization ID—that T Cloud Public can then map to IAM groups. This is the mechanism that bridges ZITADEL’s internal user model with T Cloud Public's access control expectations, enabling dynamic role assignment based on federated identity.
The Action will be triggered during SAML login and executed in the context of the authentication pipeline, ensuring all outbound assertions include the required metadata for authorization decisions downstream.
Creating new Script
Go to Organization Dashboard -> Actions -> Scripts and click New. Set the Name of the script as setCustomAttribute, add this JavaScript function as payload and click Add.
function setCustomAttribute(ctx, api) {
    const user = ctx.v1.getUser()
    api.v1.attributes.setCustomAttribute('OrgID', '', user.resourceOwner)

    if (ctx.v1.user.grants == undefined || ctx.v1.user.grants.count == 0) {
        return;
    }
    let roles = [];
    ctx.v1.user.grants.grants.forEach(grant => {
        grant.roles.forEach(role => {
            roles.push(role)
        })
    })
    api.v1.attributes.setCustomAttribute('Roles', '', ...roles)
  }
When creating the custom Action in ZITADEL, it’s oblligatory that the name of the Action and the name of the JavaScript function defined within it are identical.
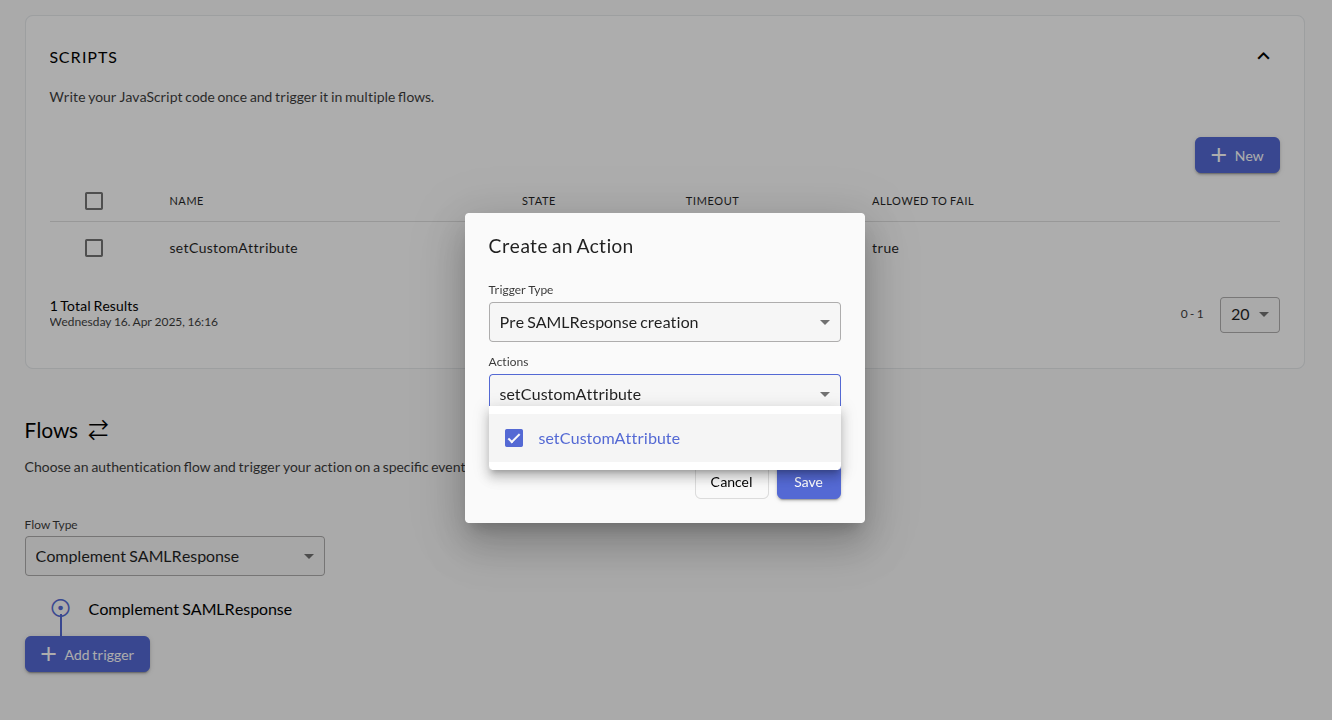
Binding Script to a Flow
To integrate your custom Action into ZITADEL’s authentication process, you need to bind it to a specific authentication flow and define the trigger event that will execute it.
Go to Organization Dashboard -> Actions -> Flows, choose Complement SAMLResponse as Flow Type, Pre SAMLResponse creation as Trigger Type, setCustomAttribute as Action and click Save.
Configuring IAM
Creating a new Identity Provider
Go to T Cloud Public Console -> IAM -> Identity Providers and click Create Identity Provider:
Set the following parameters and click OK.
- Protocol:
SAML - SSO Type:
Virtual user
Choosing Virtual user allows OTC to create ephemeral user sessions based on SAML assertions without requiring persistent user accounts in IAM. This mode is suitable for scenarios where user identity and group memberships are fully managed by the external IdP (ZITADEL in this case). For more information about Virtual Users check the documentation in our Help Center.
Configuring the new Identity Provider
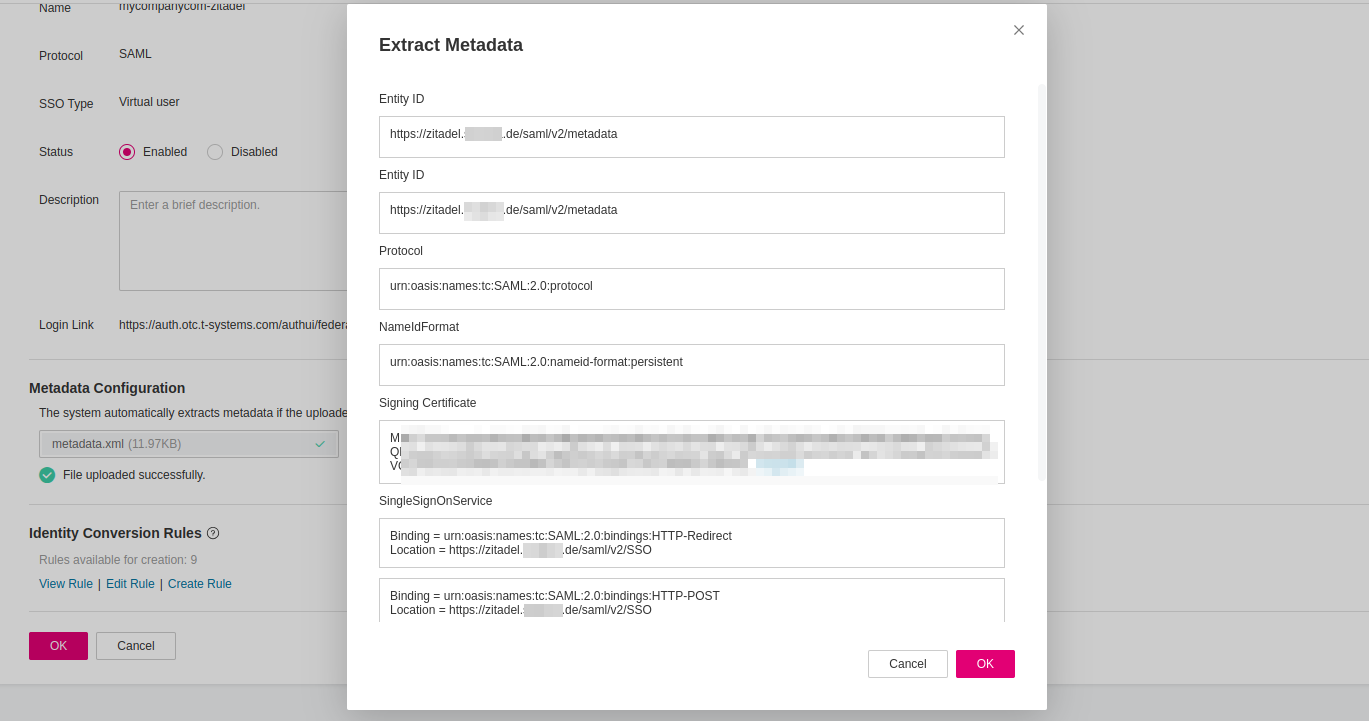
After your ZITADEL Action is in place and correctly injecting the necessary assertions and the T Cloud Public Identity Provider has been created, navigate to the Identity Providers and click on Modify next to the provider to finalize the trust relationship by uploading ZITADEL's metadata to T Cloud Public IAM. Under the Metadata Configuration section click Upload and select the metadata.xml file you retrieved earlier.
This file contains ZITADEL’s SAML configuration, including its public keys and SSO endpoints. Uploading it allows T Cloud Public IAM to trust and process incoming authentication responses from ZITADEL securely, based on signed and validated assertions. Once uploaded, save the configuration to apply the changes.
Click twice OK to apply changes and exit.
Configuring the Conversion Rules
Now that the metadata exchange is complete and ZITADEL is trusted by T Cloud Public IAM, the next step is to define conversion rules. These rules map incoming SAML attributes, such as custom roles, to IAM user groups within your T Cloud Public tenant. This mapping is essential for authorization. It ensures that users federated through ZITADEL are granted the correct level of access in OTC based on the attributes included in the SAML assertions.
Return to the IAM -> Identity Providers section in the T Cloud Public IAM Console, locate your configured ZITADEL SAML provider, and click Modify. Scroll to the bottom of the configuration page and click on the Edit Rule link under Identity Conversion Rules. This will open the rule editor where you can define how SAML attributes from ZITADEL are translated into T Cloud Public IAM group memberships.
In the Edit Rule popup, remove the default rule and paste the following conversion logic. This rule maps users from ZITADEL to the appropriate T Cloud Public IAM group(s) based on the Roles attribute included in the SAML assertion:
This rule takes three SAML attributes from the incoming assertion:
__NAMEID__: the user's unique identifier.Roles: a custom attribute representing the user's role(s) within the ZITADEL Organization.OrgID: the identifier of the ZITADEL Organization the user belongs to.
It then constructs a federated username in the format: <NAMEID>@zitadel/<OrgID>
Simultaneously, it assigns the user to a, or more, local IAM group(s) based on the Roles attribute. This dynamic mapping allows for automatic group assignment and user identification in T Cloud Public, based on the structure and semantics of the identity data asserted by ZITADEL.
Once pasted, click twice OK to apply the rule.
[
    {
        "remote": [
            { "type": "__NAMEID__" },
            { "type": "Roles" },
            { "type": "OrgID" }
        ],
        "local": [
            {
                "user": {
                    "name": "{0}@zitadel/{2}"
                },
                "group": {
                    "name": "{1}"
                }
            }
        ]
    }
]
These rules will be evaluated at login time, dynamically assigning federated users to the appropriate IAM groups based on the attributes delivered by ZITADEL. This ensures secure, policy-aligned access without the need for manual user provisioning.
You can find more detailed information about Conversion Rules in T Cloud Public Help Center:
Verification
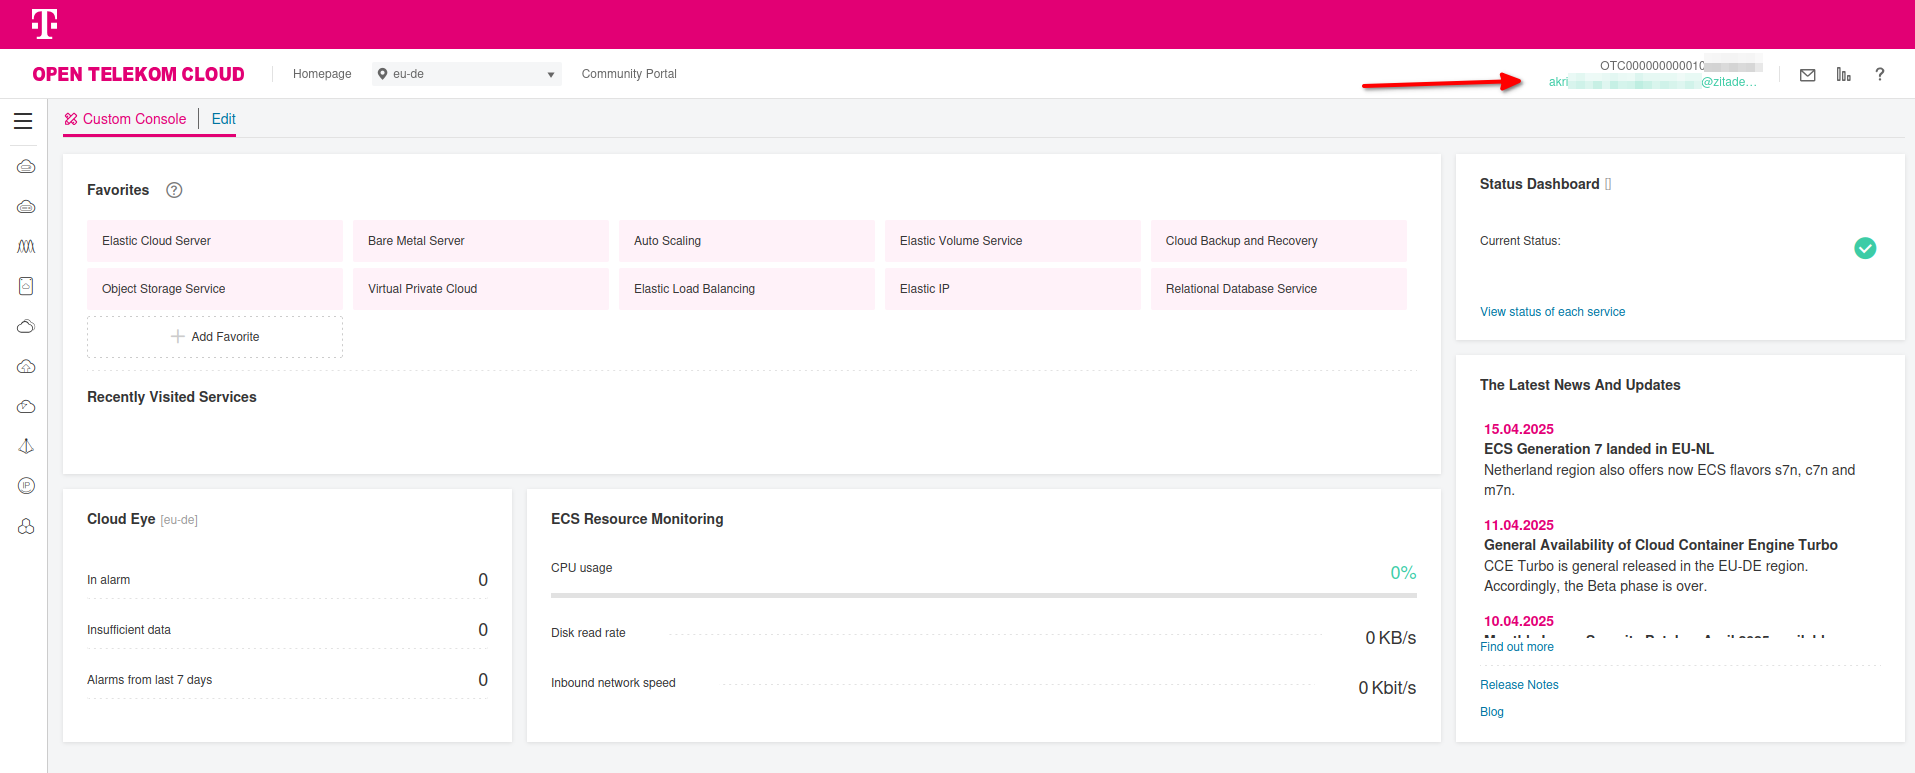
Return to the IAM -> Identity Providers section in the T Cloud Public IAM Console, locate your configured ZITADEL SAML provider, Then click View next to your configured Identity Provider. In the details panel, locate the Login Link, copy its value, and open it in an incognito or private browsing session using your preferred browser.
Complete all first-time login steps as prompted, and if the SAML assertions and conversion rules were applied correctly, and the federation flow succeeded, you should be redirected to the T Cloud Public Console, now logged in as a federated user. Your federated identity should reflect the mapped username and organization membership based on the SAML attributes provided by ZITADEL, confirming that the trust relationship and role mappings are functioning as intended.
Troubleshooting
If the SAML federation flow is not working as expected, follow this step-by-step guide to isolate and resolve issues:
1. Inspect ZITADEL Logs
Check the ZITADEL pod logs for any runtime errors or failed SAML processing:
kubectl logs -n zitadel <zitadel-pod-name>
Look for messages related to SAML assertions, Action execution, or failed request handling.
2. Verify Action Execution
- Ensure the Action name and the JavaScript function name are identical.
- Confirm the Action is bound to the correct Flow and Trigger (
PreSAMLResponse). - Use ZITADEL’s audit logs or admin interface to verify that the Action is being executed.
3. Review the SAML Assertion
Use a browser extension like SAML-tracer to inspect the actual SAML Response from ZITADEL.
Check for:
- Presence of expected attributes (
Roles,OrgID, etc.) - Correct
NameIDformat - Proper digital signature
- Matching certificate from metadata
4. Validate Metadata Exchange
Make sure metadata was correctly exchanged between both parties:
- ZITADEL metadata (served at):
https://<ZITADEL_EXTERNALDOMAIN>/saml/v2/metadata - OTC metadata (configured in ZITADEL):
https://auth.otc.t-systems.com/authui/saml/metadata.xml
Ensure both endpoints are reachable and contain valid XML metadata.
5. Check TLS and DNS
Verify the following for your ZITADEL domain:
- DNS
Arecord correctly resolves to your ELB’s Elastic IP - TLS certificate is valid and trusted
- The domain is publicly accessible
6. Debug T Cloud Public IdP Conversion Rules
In the T Cloud Public IAM Console:
- Go to Identity Providers -> Modify -> Edit Rules
- Verify that the rules match the SAML attributes returned by ZITADEL
- Use test users to validate whether the expected IAM group is assigned
8. Test in Incognito Mode
Always perform SAML login tests in a private browser session to avoid cached credentials or tokens:
- Go to Identity Providers -> View
- Copy the Login Link
- Paste it in a new Incognito/Private Browsing window
- SAML-tracer: Firefox/Chrome Extension to inspect SAML traffic
- https://www.samltool.io: for decoding and validating SAML assertions