Deploy ZITADEL on CCE
This guide walks through the deployment of ZITADEL within a Cloud Container Engine (CCE) Kubernetes cluster on T Cloud Public. It covers the necessary configuration steps, from preparing the environment to running ZITADEL as a production-ready identity management service within your Kubernetes workload.
Prerequisites
Before proceeding with the deployment, make sure you have control over a publicly registered domain name. This is required for configuring ingress access and enabling secure communication over HTTPS.
Creating a VPC and a Subnet
You'll need a Virtual Private Cloud (VPC) along with at least one Subnet to host the required infrastructure—specifically, the RDS instances and the CCE worker nodes. For improved security isolation and more granular network control, consider provisioning separate Subnets for compute (CCE) and database (RDS) resources. This separation allows for tighter access policies and better segmentation within the VPC.
Go to T Cloud Public Console -> Virtual Private Cloud and click Create VPC:
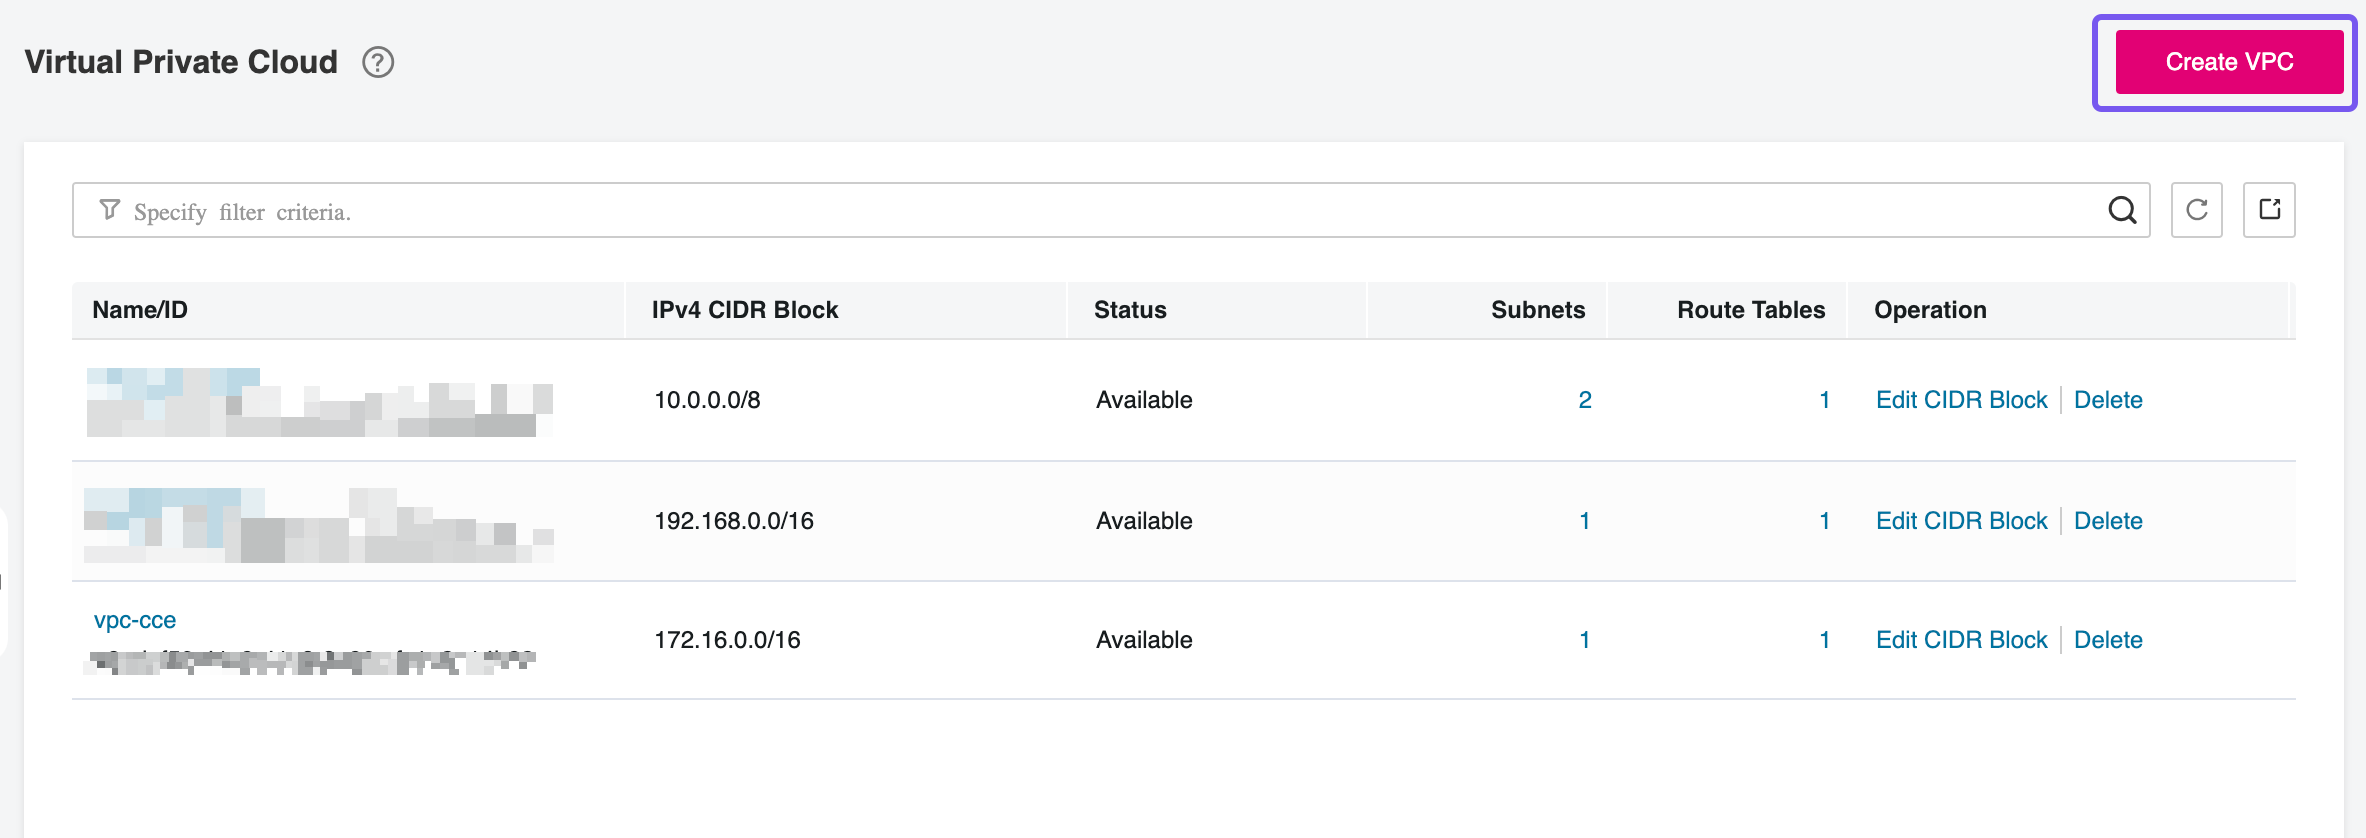
This deployment model assumes that both the RDS instances and the CCE nodes are provisioned within the same VPC. Keeping all resources within a single virtual network simplifies routing, reduces latency, and allows for more straightforward security group and network ACL management.
Creating a RDS PostgreSQL Database
Since ZITADEL is a stateful application, it requires persistent storage to retain data and configuration across pod restarts. While it's technically feasible to deploy a PostgreSQL instance directly within the CCE cluster, this approach introduces operational complexity and shifts responsibility for database management to the application team. A more efficient solution is to leverage T Cloud Public's Relational Database Service (RDS). It provides a scalable, fully managed PostgreSQL backend that integrates seamlessly with other managed services on the platform, significantly reducing administrative overhead and ensuring high availability and operational resilience.
Creating Security Groups
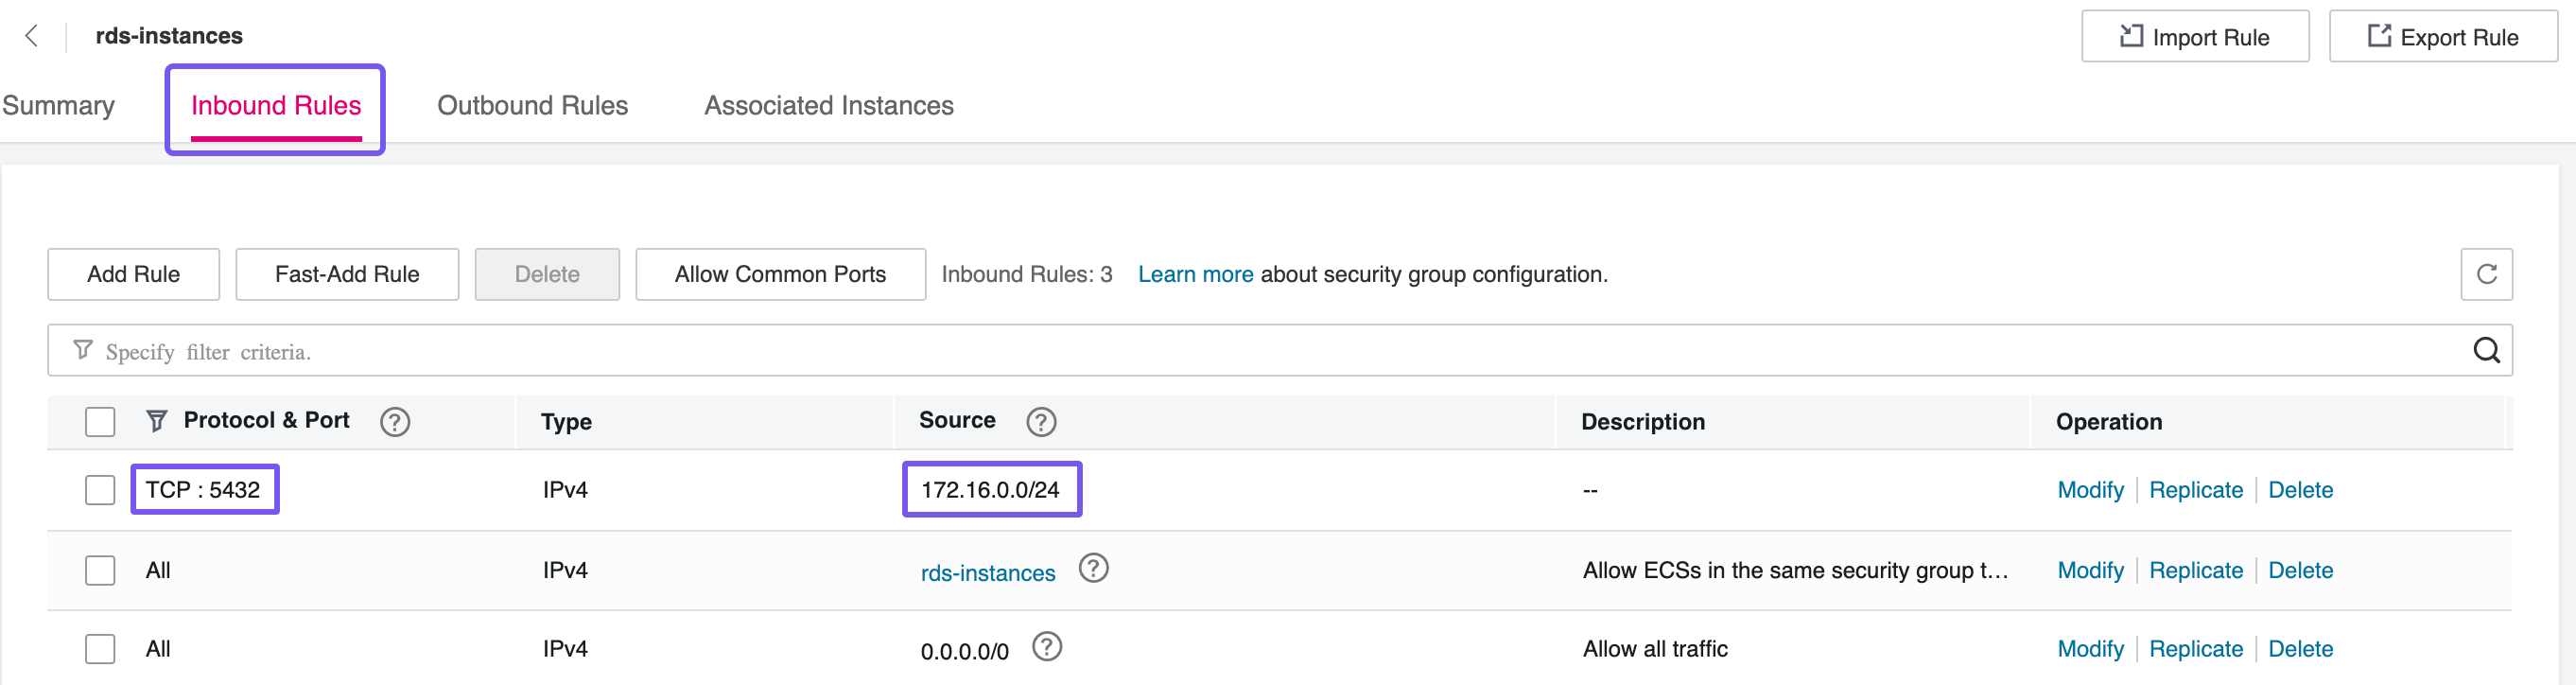
Two distinct Security Groups will be required for this setup. The first will be assigned to the RDS instance/nodes and must allow inbound traffic on port 5432, which is the default PostgreSQL port. If both the RDS and CCE nodes are deployed within the same Subnet, this rule can be restricted to that Subnet’s IP range for tighter control. This ensures that only internal workloads—such as ZITADEL running on CCE—can initiate connections to the database, minimizing exposure and adhering to the principle of least privilege.
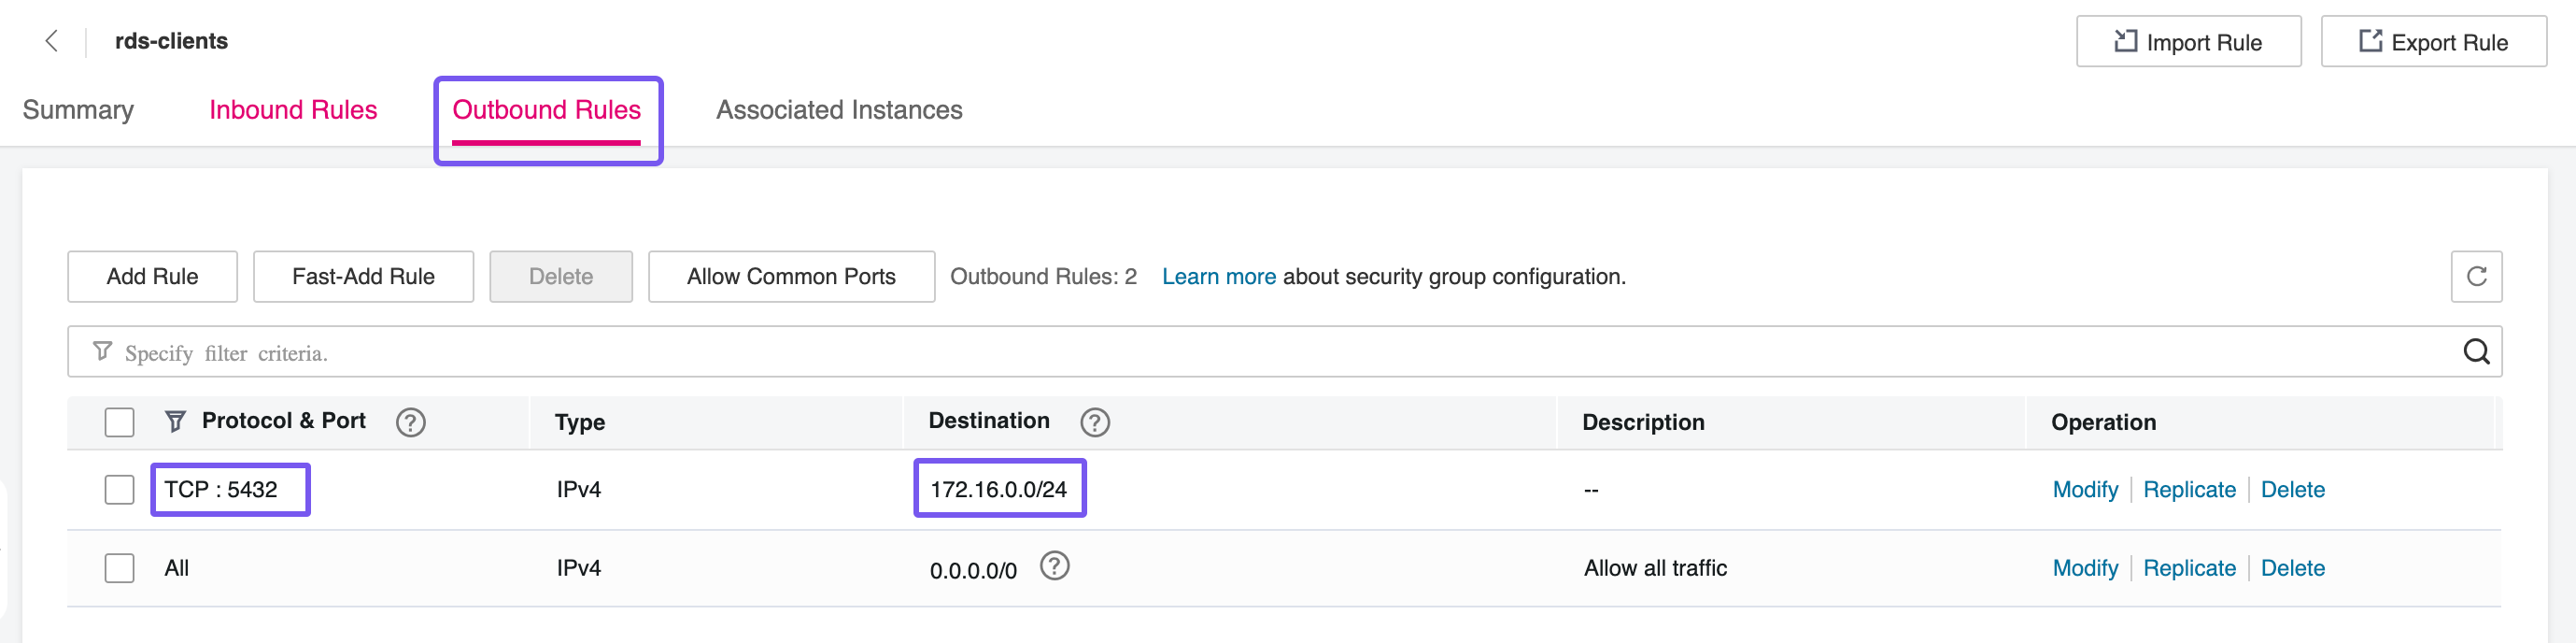
The second Security Group will be assigned to the client nodes—in this case, the CCE worker nodes where ZITADEL will be running. This group must allow outbound traffic on port 5432 to reach the RDS instance. By explicitly controlling egress rules, you can enforce that only authorized services within your Kubernetes environment can initiate connections to the database, maintaining a secure and auditable network flow between components.
Provisioning a Database
The next step involves provisioning a PostgreSQL database instance via T Cloud Public’s RDS service. Select an instance class and storage configuration that align with your anticipated workload—consider factors such as expected connection volume, data growth, and performance requirements. For production environments, it's recommended to opt for a compute-optimized or memory-optimized instance class, along with provisioned IOPS storage if consistent performance is critical. This ensures that ZITADEL operates reliably under load and can scale as demand increases.
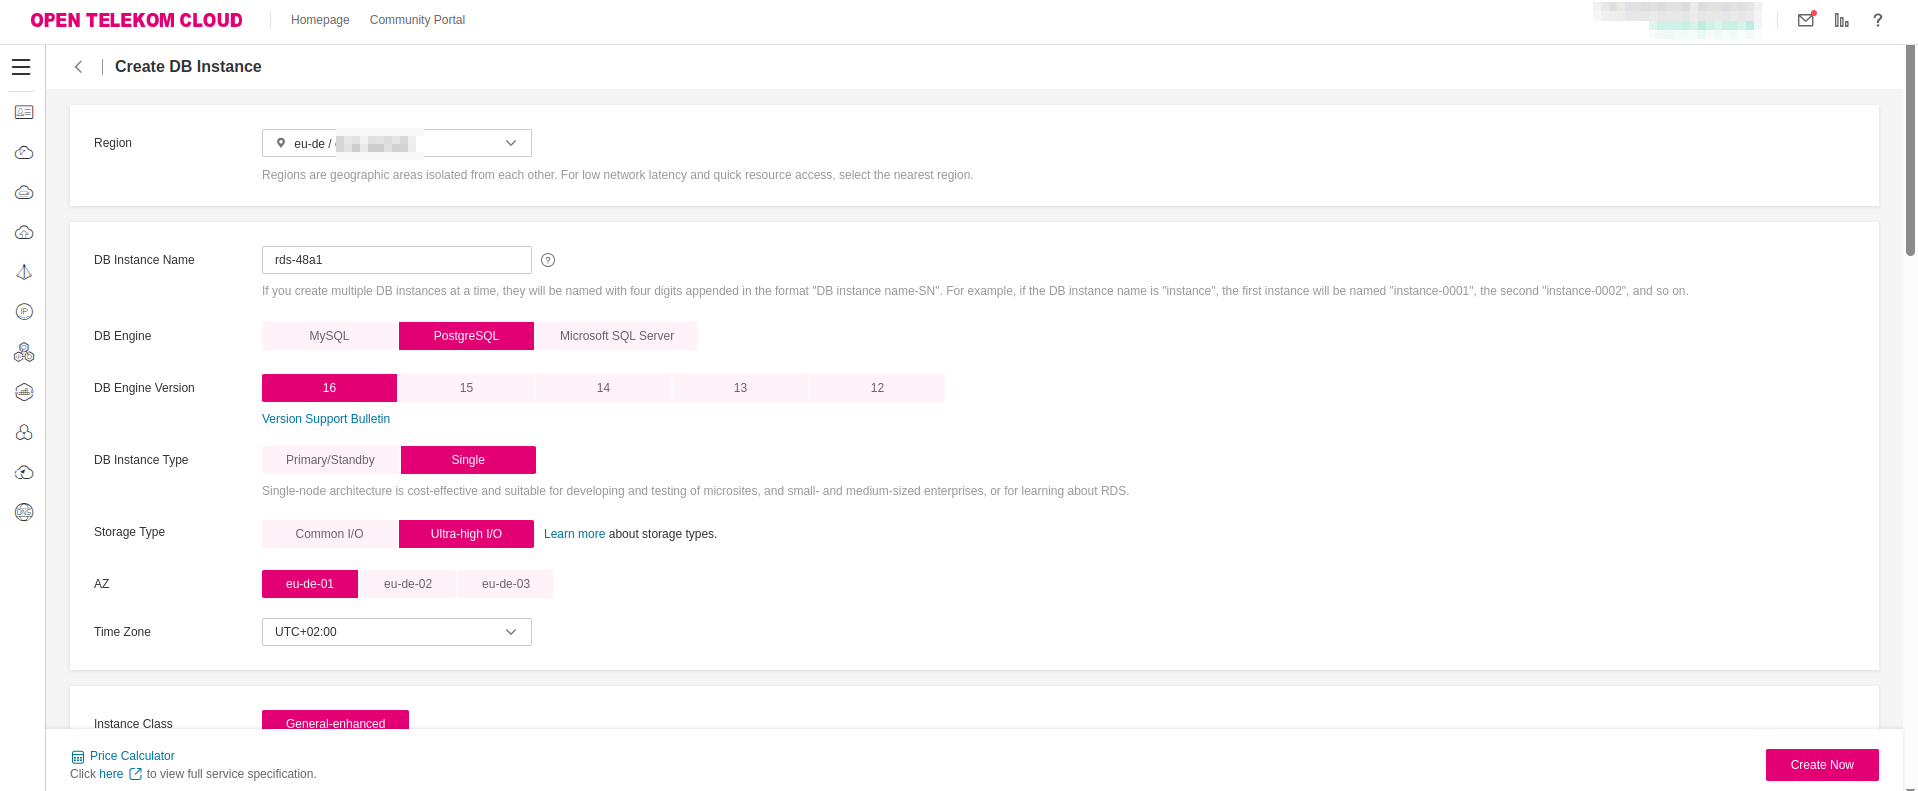
When provisioning the PostgreSQL instance, ensure the following network and security configurations are in place:
- Deploy the RDS instance within the same Virtual Private Cloud (VPC) as your CCE cluster to enable low-latency, private network communication between the application and the database.
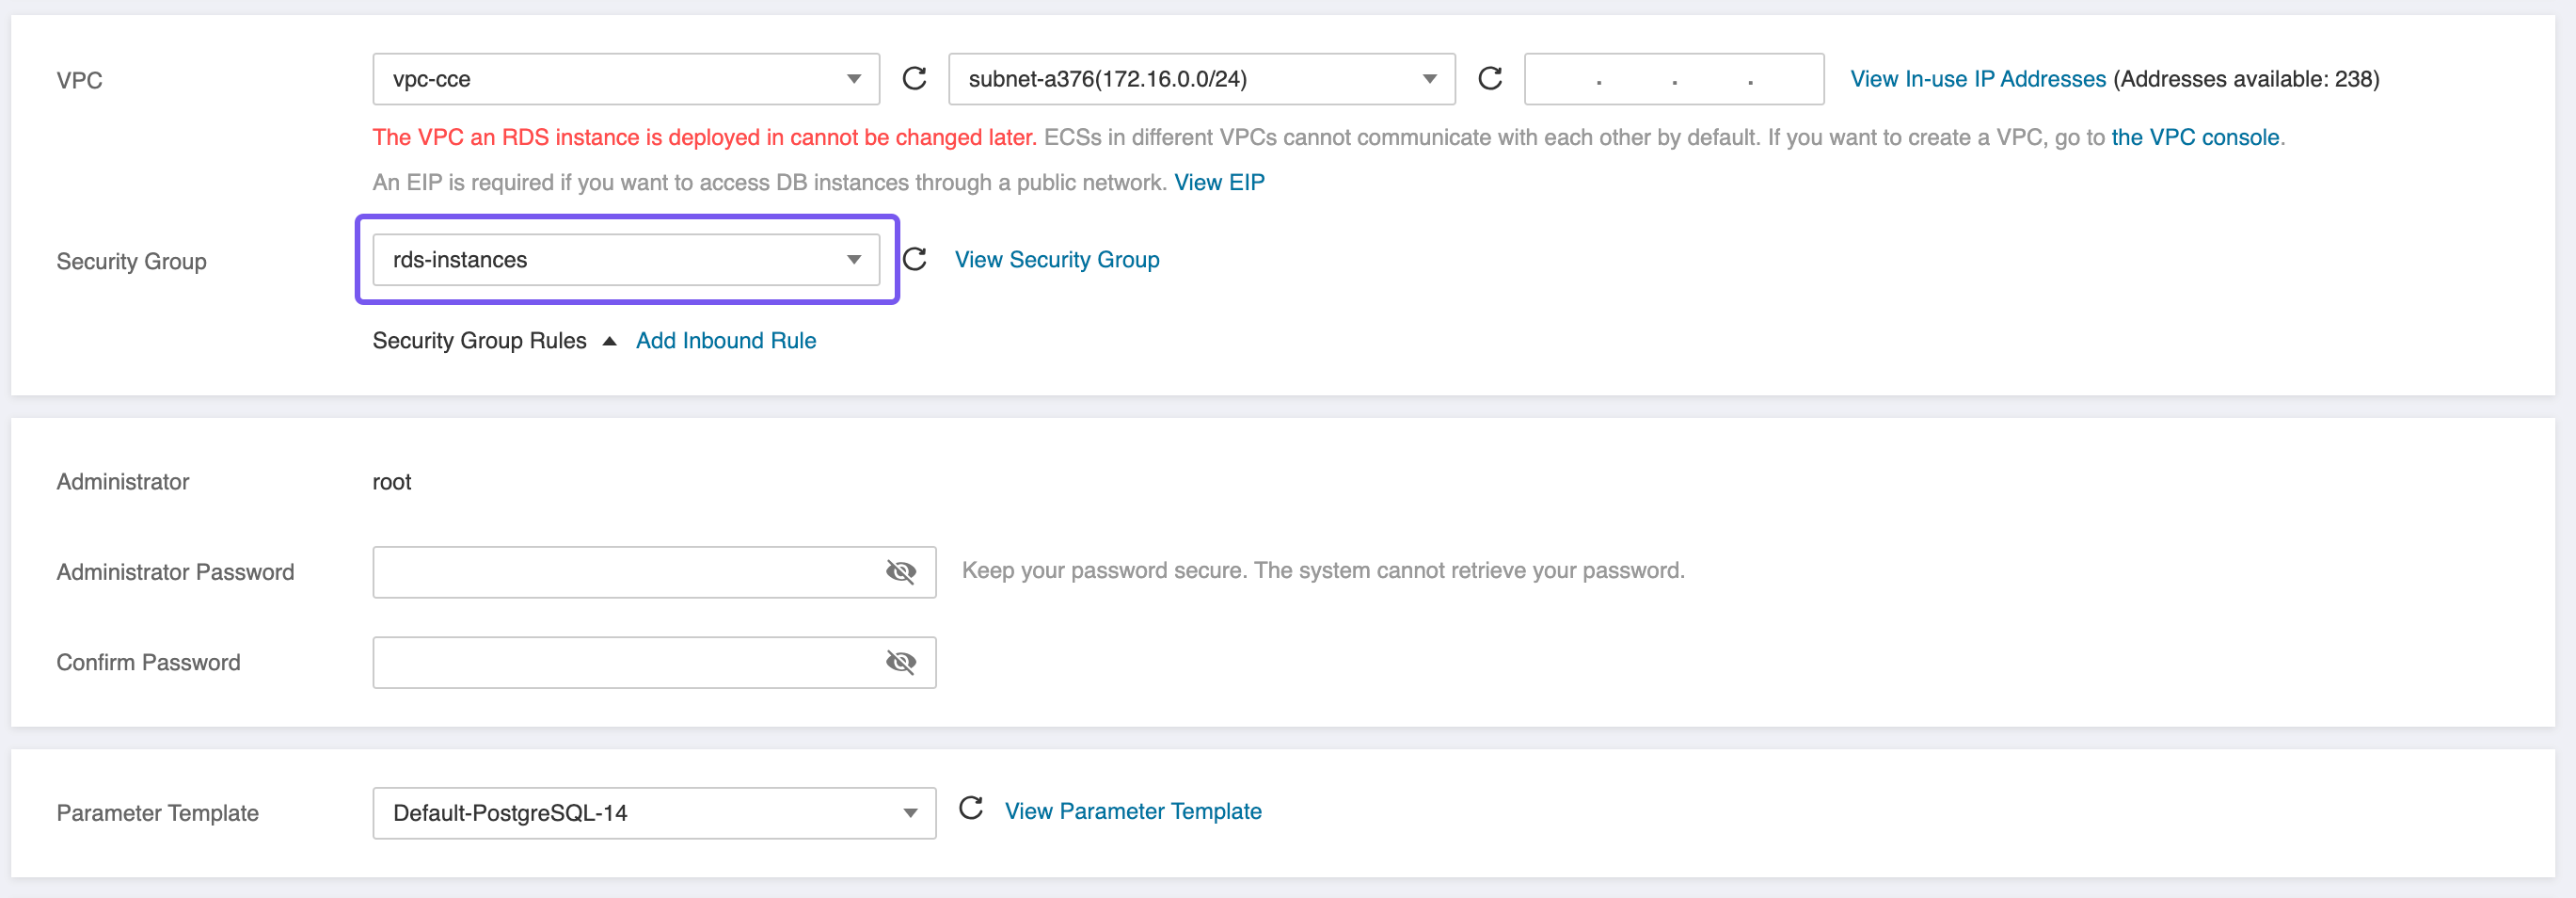
- Attach the previously created
rds-instancesSecurity Group to the RDS instance. This group must allow inbound traffic on port5432from the Subnet or Security Group associated with the CCE nodes to enable secure database access.
Exporting Database SSL Certificate
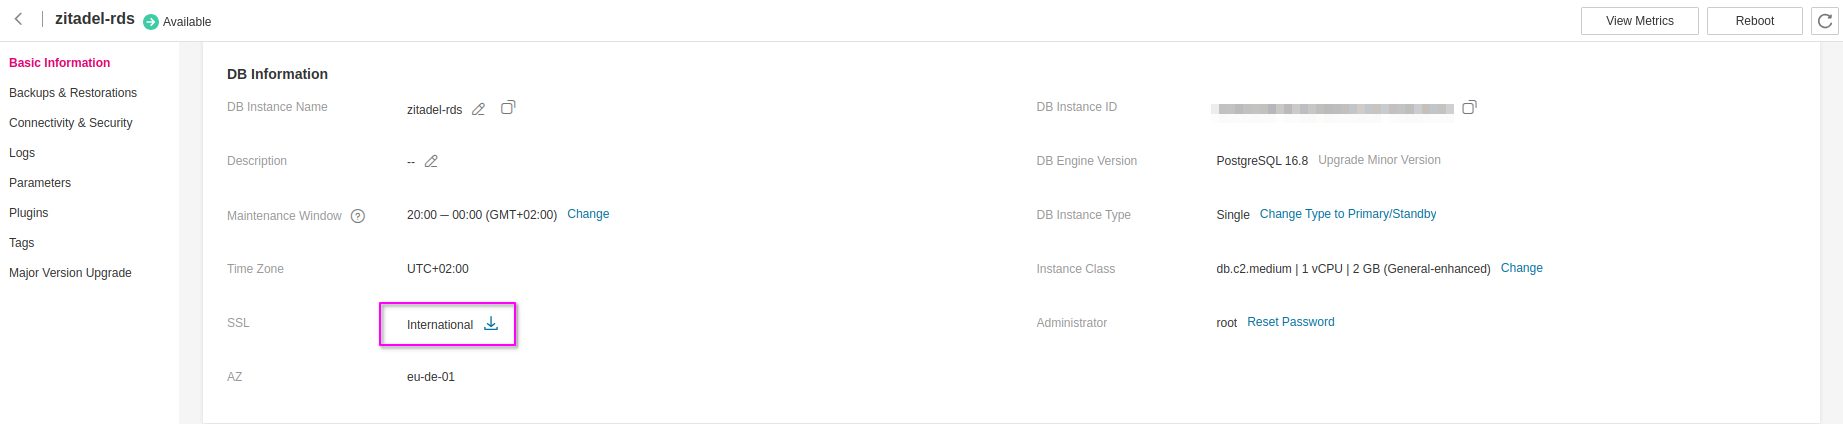
Navigate to the T Cloud Public Console -> Relational Database Service from the service menu. Locate the PostgreSQL instance you just provisioned and click on it to open its details page. From there, go to the Basic Information tab. This section provides critical configuration data, including the instance's private IP address, connection endpoint, port, and associated security groups—information you’ll need to configure application-level connectivity from your CCE workloads.
Secure Socket Layer (SSL) is a protocol designed to establish encrypted communication between clients and servers over the Internet. It plays a critical role in maintaining confidentiality, authenticity, and integrity of data in transit. In the context of RDS on T Cloud Public, enabling SSL ensures:
- Server and client authentication, verifying that connections are established with legitimate endpoints.
- End-to-end encryption, protecting sensitive data from eavesdropping or tampering during transmission.
- Data integrity, ensuring that transmitted information is not altered en route.
To establish the necessary SSL connection between your database connection and ZITADEL, locate the SSL/International section on the Basic Information page of your RDS instance. Download the pre-installed SSL certificate by clicking the provided link. Once downloaded, extract the archive and place the resulting otc-ca-rds.pem file in your local working directory—it will be required during the client configuration stage.
Provisioning a CCE Cluster
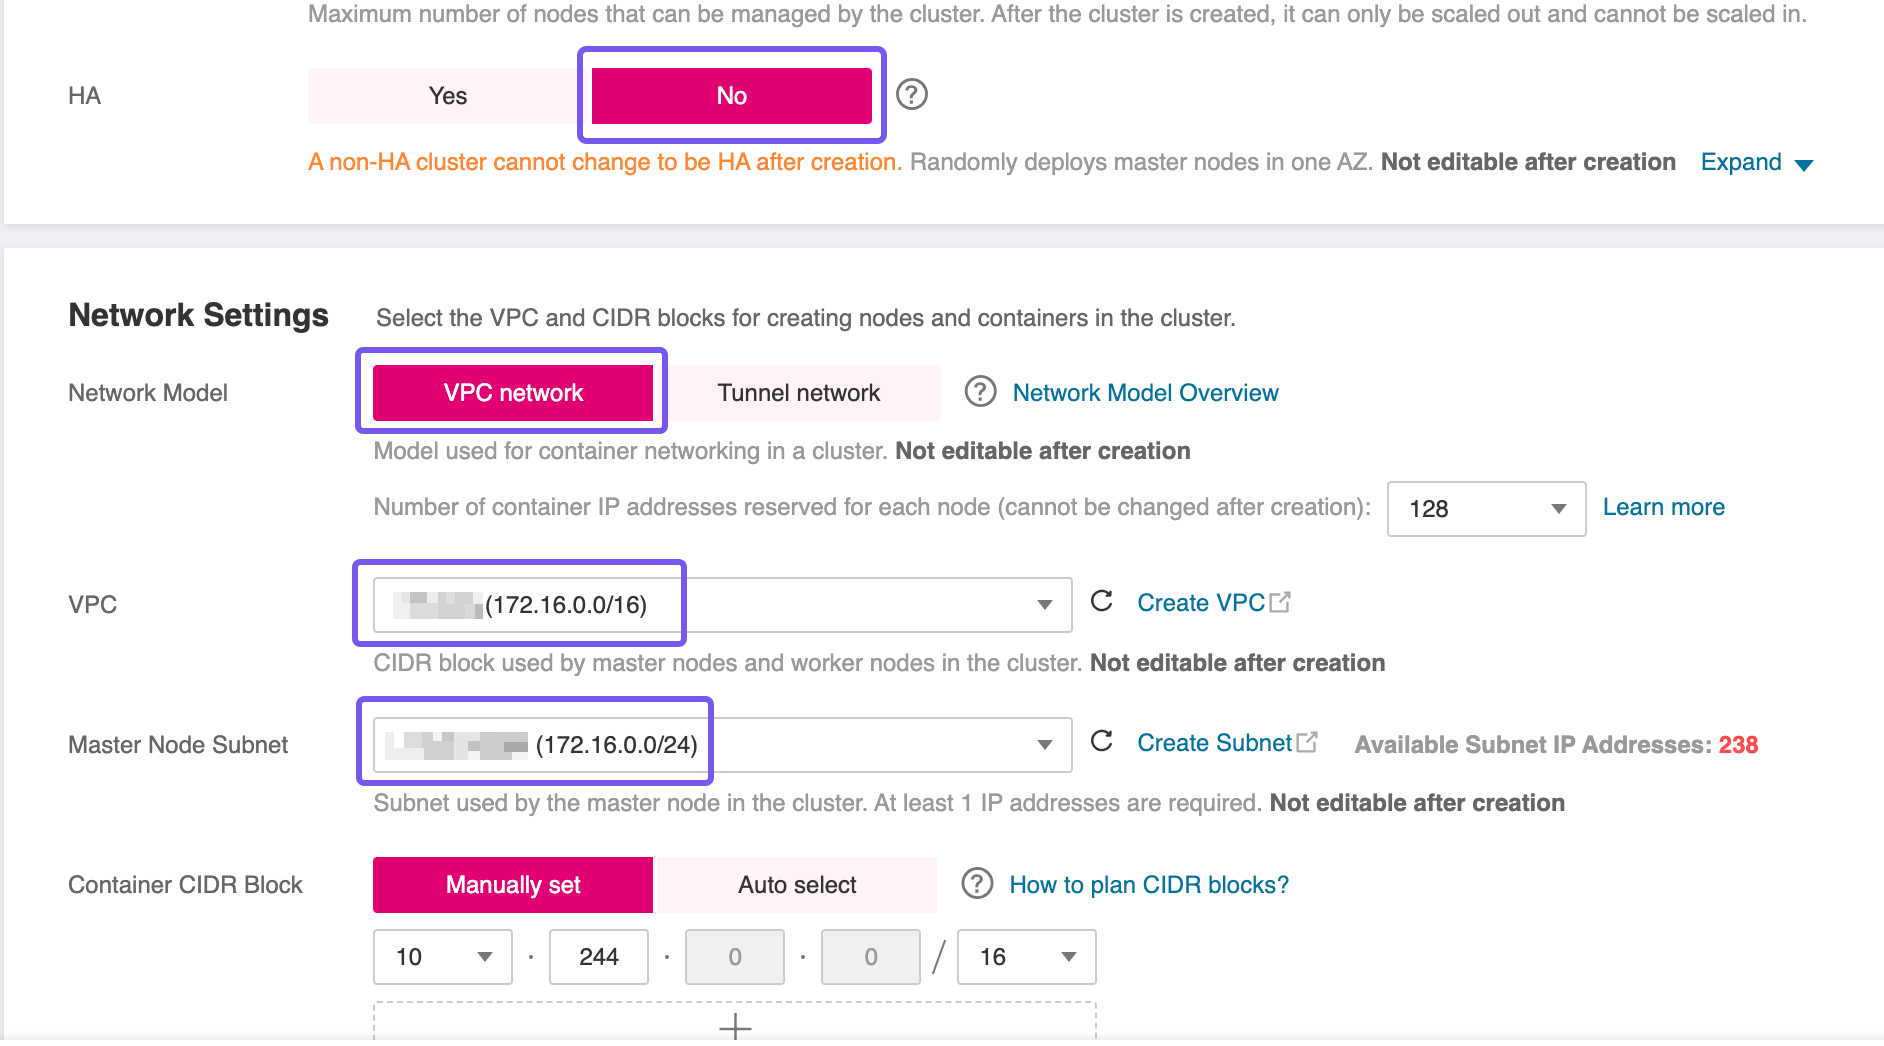
To proceed with the setup, you'll need to provision a Cloud Container Engine (CCE) cluster. Use the T Cloud Public wizard for cluster creation, and pay close attention to the following configuration specifics:
- High Availability (HA): For this blueprint, a non HA-cluster was used which is not advised for production workloads. However, if your workload demands fault tolerance and availability guarantees, consider enabling HA during creation—as this setting is immutable post-deployment.
- Network Placement: Ensure the CCE cluster is provisioned within the same VPC as the RDS instance to facilitate secure and low-latency communication.
- Subnet Configuration: If you're using a single Subnet for both services, place the CCE worker nodes in the same Subnet as the RDS instance to align with the predefined security group and routing rules.
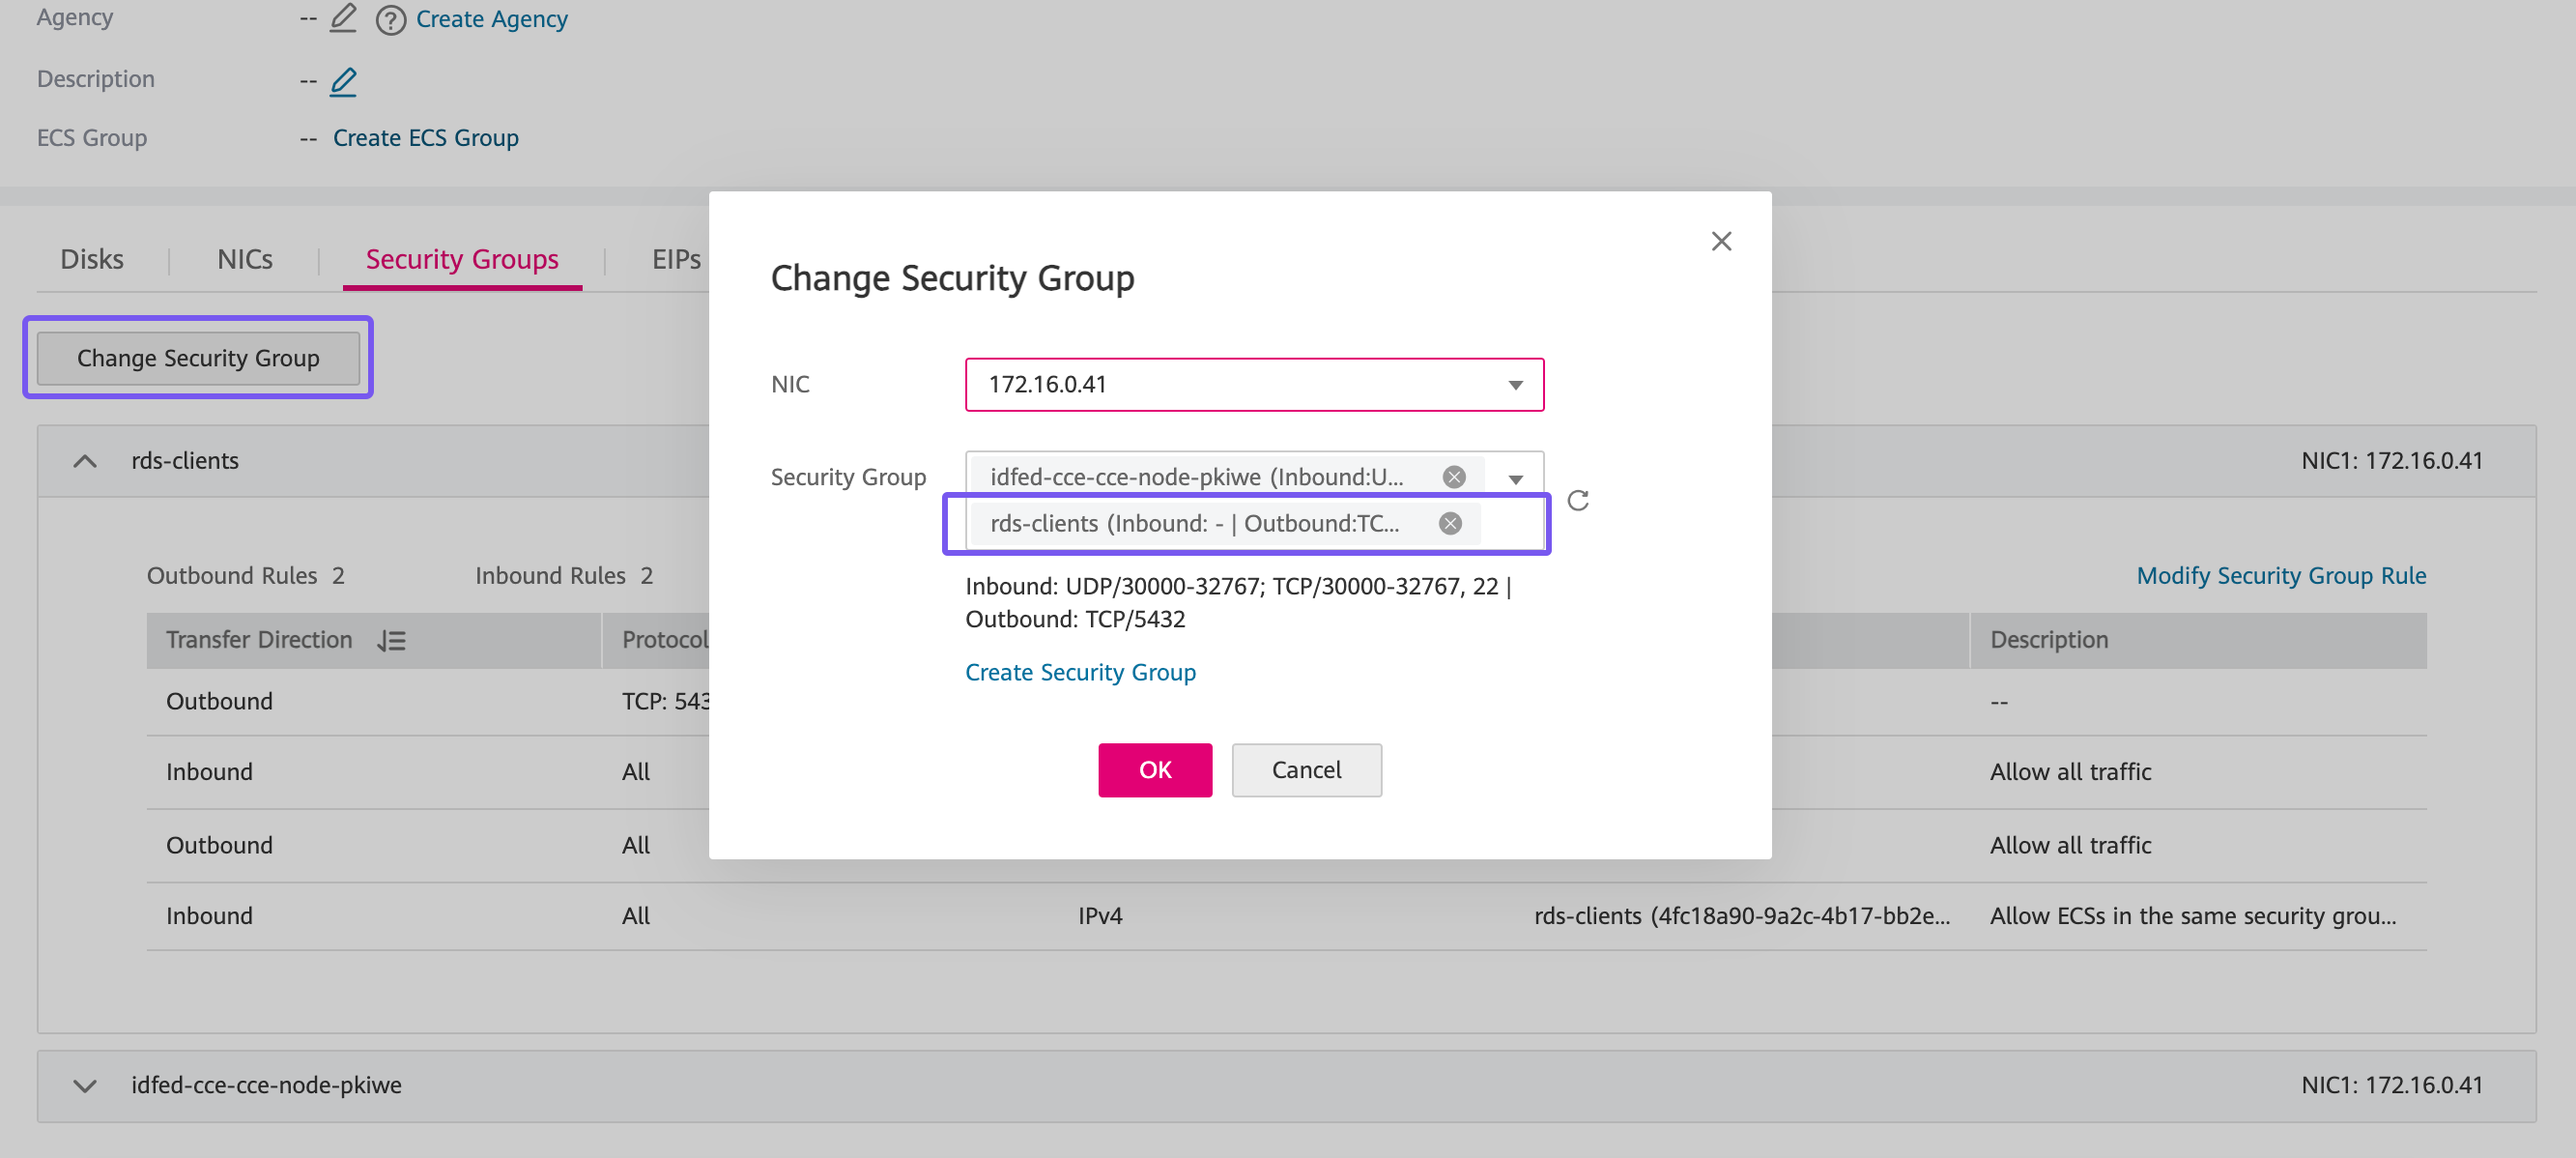
After the CCE cluster has been created, proceed to add worker nodes using the wizard. Once all nodes are in a Running or Ready state, you’ll need to update their network configuration to enable outbound connectivity to the database.
For each worker node, attach the previously created rds-client Security Group in addition to any existing group already associated with the node. This step ensures that outbound traffic on port 5432—required for connecting to the RDS instance—is permitted, establishing a secure and functional path between your application layer and the database backend.
Decide on the access method you'll use to interact with the CCE cluster post-deployment. There are two main options:
- Assigning an Elastic IP (EIP) and allowing direct access over the public Internet.
- Provisioning a bastion host in a public Subnet within the same VPC, and using it as a secure jump point to reach internal resources.
While the first option is quicker to set up, the recommended approach is to use a bastion host. This method significantly reduces the attack surface by isolating the cluster from direct Internet exposure. The bastion can be tightly locked down with security groups and monitored more easily, aligning with best practices for secure infrastructure access.
Creating an Elastic Load Balancer
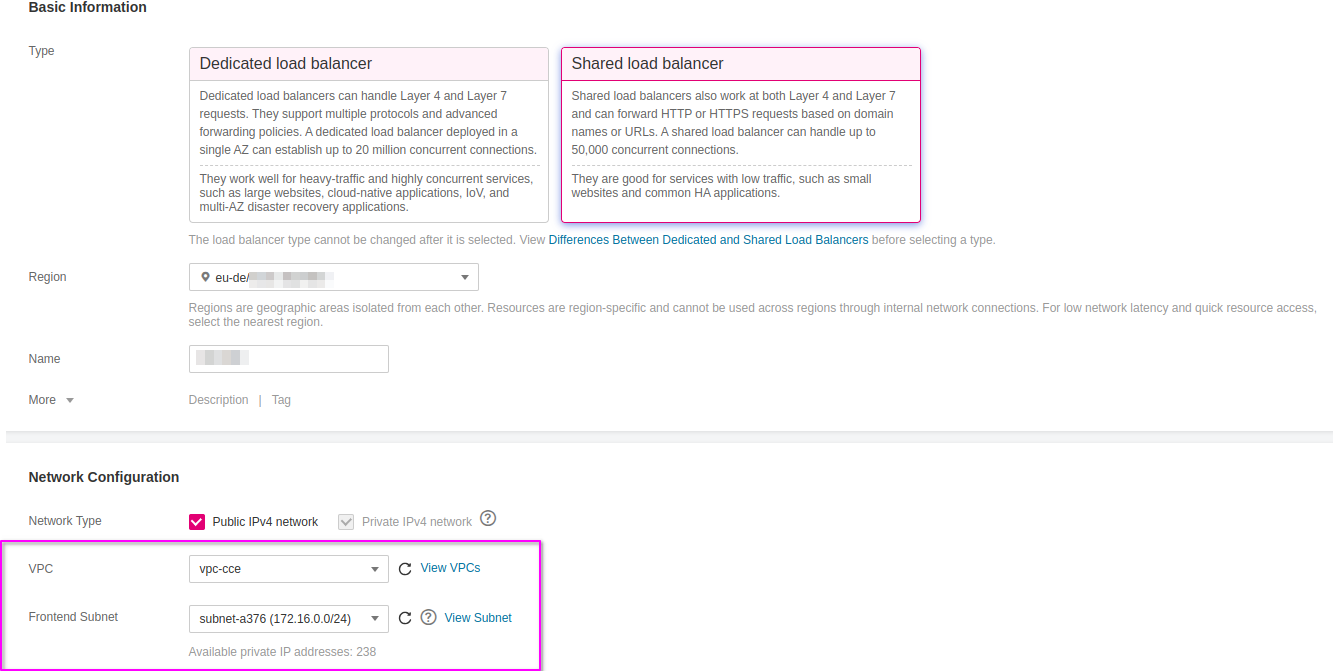
The first step in preparing the environment is to provision an Elastic Load Balancer (ELB), which will serve as the external entry point for traffic into the CCE cluster. Setting up an ELB setup is critical for handling external traffic and forwarding requests to services within the cluster, such as the Ingress Controller.
Go to T Cloud Public Console -> Network -> Elastic Load Balancing and click Create Elastic Load Balancer. Ensure that the Elastic Load Balancer is provisioned within the same VPC and Subnet as your CCE cluster. This network alignment is essential to allow the load balancer to reach the CCE worker nodes directly using their private IP addresses. Misplacing the ELB in a different network segment would result in unreachable backends and broken ingress routing.
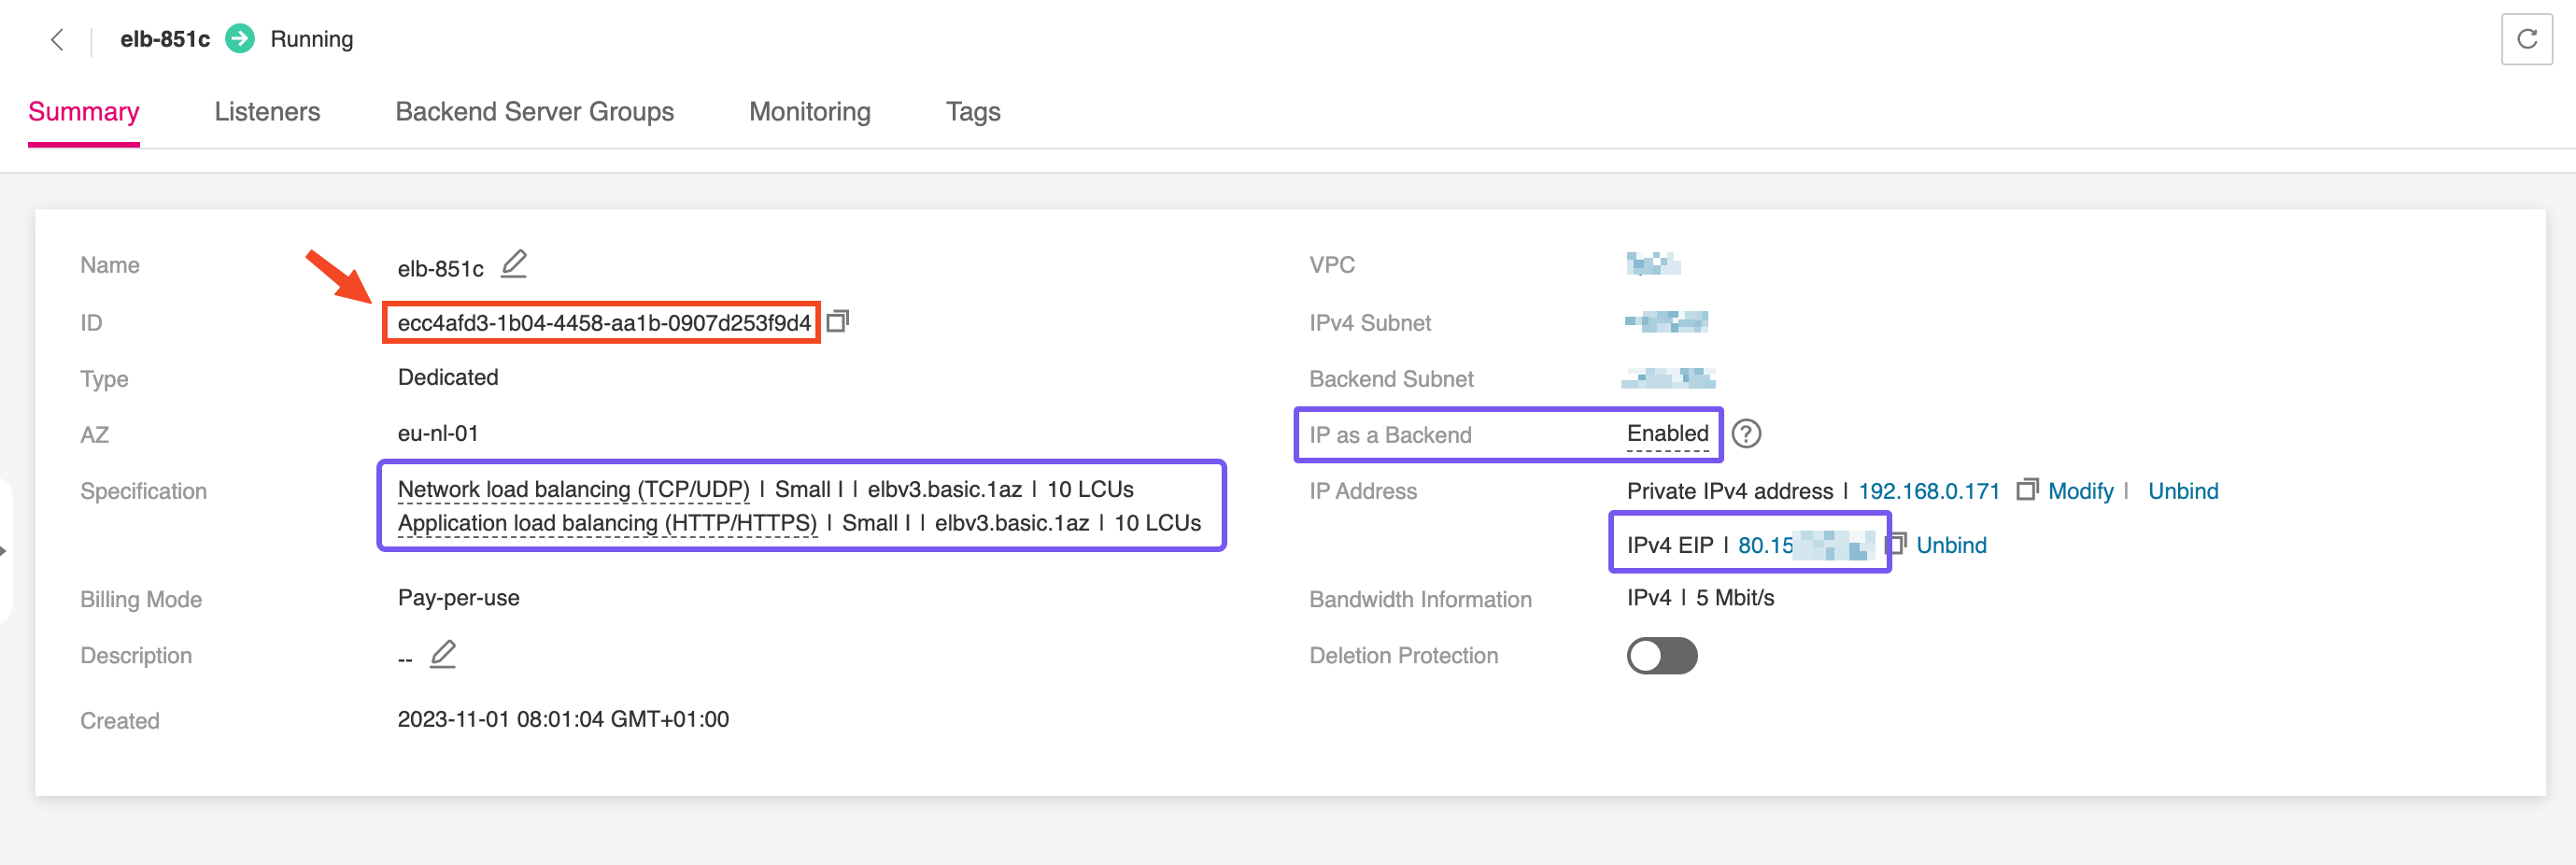
Once the Elastic Load Balancer is provisioned, make sure to note down the ELB ID. This identifier will be required during the configuration of the NGINX Ingress Controller, allowing it to bind correctly to the external load balancer and handle incoming traffic. The ELB ID serves as a reference for associating Kubernetes resources with the underlying network infrastructure, ensuring seamless integration between your Ingress layer and the public-facing endpoint.
Creating a Public DNS Endpoint
As we’ll address in a later stage—when integrating this ZITADEL instance as an Identity Provider (IdP) within your T Cloud Public tenant—it is essential that the Elastic IP (EIP) assigned to your ELB resolves to a valid and secure FQDN. This means the public DNS entry must point to the EIP and be backed by a properly issued TLS certificate.
Without this, the T Cloud Public platform will not accept the IdP registration due to trust and validation requirements. Ensuring your ZITADEL endpoint is accessible over a recognized, secure URL is not just best practice—it’s a prerequisite for federation scenarios with OTC’s IAM services.
To enable full DNS-based automation and allow for secure domain validation—especially when configuring ZITADEL as an Identity Provider—you need to delegate domain management to T Cloud Public's Domain Name Service (DNS). This requires transferring authority over your domain’s NS (Name Server) records to OTC.
Start by logging into your domain registrar’s control panel and ensure the following:
-
Disable any dynamic DNS features associated with the domain or subdomains that will be used by ZITADEL.
-
Update the NS records of your domain to point exclusively to the following OTC name servers:
ns1.open-telekom-cloud.com
ns2.open-telekom-cloud.com
Once the nameserver change propagates and OTC has authoritative control over your domain, you’re ready to define DNS zones and records. You have two paths forward, depending on your operational model:
-
Manual Configuration via the OTC Console
Create a Public DNS Zone in the T Cloud Public DNS service, then define an A record that maps your ZITADEL domain (e.g.,zitadel.example.com) to the EIP of the external load balancer. -
Automated Configuration with ExternalDNS
Integrate the ExternalDNS controller into your Kubernetes cluster. It monitors Ingress resources and automatically creates and updates DNS records in your OTC DNS zone based on annotations. This option is ideal for dynamic environments or production setups that benefit from infrastructure-as-code and reduced manual intervention.
Choose the approach that best fits your deployment strategy and automation preferences.
Preparing the CCE Cluster
Before deploying ZITADEL, the CCE cluster must be equipped with a set of foundational components. In this section, we'll install and configure essential prerequisites such as the NGINX Ingress Controller for routing external traffic, cert-manager for managing TLS certificates, and other supporting workloads. These components establish the baseline infrastructure required to expose services securely and ensure smooth operation of the application stack within the Kubernetes environment.
Installing NGINX Ingress Controller
In this step, we’ll deploy the NGINX Ingress Controller, which will act as the interface between the Elastic Load Balancer and the ZITADEL service running inside the CCE cluster. The Ingress Controller handles HTTP(S) routing and termination, forwarding external traffic to the appropriate internal services based on host and path rules. For this lab, we’ll expose ZITADEL using a custom domain name—zitadel.example.com—which should point to the public EIP associated with your ELB. This setup enables secure, domain-based access to ZITADEL and forms the foundation for managing ingress traffic across the cluster.
Don't forget that the Fully Qualified Domain Name (FQDN) you use to expose the ZITADEL service—such as zitadel.example.com—must correspond to a real, resolvable domain or subdomain that you own and control. You’ll need to create a DNS record (typically an A or CNAME record) that points this FQDN to the public Elastic IP assigned to your load balancer. Without a valid DNS mapping, certificate issuance and external access to the ZITADEL instance will fail, especially if you're using TLS termination via cert-manager.
We’ll use Helm to deploy the NGINX Ingress Controller into the CCE cluster. Helm is the de facto package manager for Kubernetes, streamlining the deployment of complex applications using templated charts. If Helm is not yet installed on your local machine or the bastion host you're using to manage the cluster, you can install it using the following commands:
curl -fsSL -o get_helm.sh https://raw.githubusercontent.com/helm/helm/main/scripts/get-helm-3
chmod 700 get_helm.sh
./get_helm.sh
To deploy the NGINX Ingress Controller properly, we need to supply Helm with a custom values file—commonly named overrides.yaml—which defines specific configuration parameters for the deployment. One of the most critical values in this file is the internal ID of the Elastic Load Balancer (ELB). This ID ensures that the Ingress Controller binds to the correct load balancer, enabling it to route external traffic to internal Kubernetes services.
The kubernetes.io/elb.id attribute will be used to annotate the Service resource created by the Ingress Controller, so that all Ingress resources referencing this ingress class will automatically be linked to the designated load balancer:
controller:
  replicaCount: 1
  service:
    externalTrafficPolicy: Cluster
    annotations:
      kubernetes.io/elb.id: "{ELB_ID}"
Make sure to replace {ELB_ID} with the actual ID of the Elastic Load Balancer we created earlier.
With the overrides.yaml file prepared, you can now proceed to install the NGINX Ingress Controller using Helm. This will deploy all required components into a dedicated namespace called nginx-system. Run the following commands:
helm repo add ingress-nginx https://kubernetes.github.io/ingress-nginx
helm repo update

helm install nginx-ingress ingress-nginx/ingress-nginx \
  --namespace nginx-system \
  --create-namespace \
  --values overrides.yaml
This will set up the Ingress Controller with your custom configuration, including the ELB binding. Once deployed, Kubernetes Ingress resources referencing the nginx class will route traffic through this controller.
Installing OTC ACME DNS01 Solver
Cert-manager DNS providers are integrations with various DNS (Domain Name System) service providers that allow cert-manager, a Kubernetes add-on, to automate the management of SSL/TLS certificates. DNS providers enable cert-manager to automatically perform challenges to prove domain ownership and obtain certificates from certificate authorities like Let's Encrypt.
By configuring cert-manager with the compatible T Cloud Public DNS provider, we can set up automatic certificate issuance and renewal for our T Cloud Public CCE workloads without manual intervention. This automation is crucial for securing web applications and services deployed on CCE clusters.
To enable automated TLS provisioning for workloads in your CCE cluster, follow the recommended approach for as in the Best Practice: Issue an ACME Certificate with DNS01 Solver in CCE.
Importing Database SSL Certificate
To enable secure database connections from within the cluster, the .pem file you previously downloaded—containing the SSL certificate for the RDS instance—must be added to Kubernetes as a Secret. This allows workloads such as ZITADEL to mount the certificate and establish encrypted connections to the database.
Use the following command to create the secret (replace the placeholder with your actual filename):
kubectl create namespace zitadel

kubectl create secret generic zitadel-rds-ssl-cert \
  --from-file=ca.crt=otc-ca-rds.pem \
  --namespace zitadel
This will create a Secret named zitadel-rds-ssl-cert in the specified namespace. You can then reference it in the ZITADEL's Helm charts values to inject the certificate into your pods securely as a mounted volume.
Installing ZITADEL Using Helm
For detailed documentation on the ZITADEL Helm chart and its configurable parameters, refer to the official repository at https://github.com/zitadel/zitadel-charts. This blueprint does not cover the internal concepts, deployment modes, or configuration options of ZITADEL itself. It assumes that readers are already familiar with ZITADEL's architecture and operational model, and are primarily focused on integrating it into a CCE-based infrastructure on T Cloud Public.
Since Helm does not render the values file as a template by default, we need to pre-process our values in a values.yaml.tpl and then interpolate the actual values to values.yaml using a tool like envsubst:
zitadel:
  masterkey: ${ZITADEL_MASTERKEY}
  configmapConfig:
    ExternalSecure: true
    ExternalDomain: ${ZITADEL_EXTERNALDOMAIN}
    TLS:
      Enabled: false
    Database:
      Postgres:
        Host: ${ZITADEL_DATABASE_POSTGRES_HOST}
        Port: 5432
        Database: ${ZITADEL_DATABASE_POSTGRES_DATABASE}
        MaxOpenConns: 20
        MaxIdleConns: 10
        MaxConnLifetime: 30m
        MaxConnIdleTime: 5m
        User:
          Username: zitadel
          SSL:
            Mode: verify-ca
        Admin:
          Username: root
          SSL:
            Mode: verify-ca
    FirstInstance:
      Org:
        Name: ZITADEL
        Human:
          UserName: zitadel-admin
          FirstName: ZITADEL
          LastName: Admin
          NickName: zitadel-admin
          DisplayName: ZITADEL Admin
          Email:
            Address: ${ZITADEL_FIRSTINSTANCE_ORG_HUMAN_EMAIL_ADDRESS}
            Verified: true
          PreferredLanguage: en
          Password: ${ZITADEL_FIRSTINSTANCE_ORG_HUMAN_PASSWORD}
          PasswordChangeRequired: false

  secretConfig:
    Database:
      Postgres:
        User:
          Password: ${ZITADEL_RDS_ROOT_PASSWORD}
        Admin:
          Password: ${ZITADEL_RDS_ROOT_PASSWORD}

  dbSslCaCrtSecret: zitadel-rds-ssl-cert

ingress:
  enabled: true
  className: "nginx"
  annotations:
    cert-manager.io/cluster-issuer: opentelekomcloud-letsencrypt
    kubernetes.io/elb.http2-enable: 'true'
  hosts:
    - host: ${ZITADEL_EXTERNALDOMAIN}
      paths:
        - path: /
          pathType: Prefix
  tls:
    - hosts:
        - ${ZITADEL_EXTERNALDOMAIN}
      secretName: zitadel-otc-certificate-tls
Define the following environment variables based on the resources you’ve provisioned in the previous steps. These variables will be used to configure ZITADEL's Helm charts.
export ZITADEL_MASTERKEY=$(tr -dc 'A-Za-z0-9' < /dev/urandom | head -c 32)
export ZITADEL_EXTERNALDOMAIN="zitadel.example.com"
export ZITADEL_DATABASE_POSTGRES_HOST="172.16.0.161"
export ZITADEL_DATABASE_POSTGRES_DATABASE="zitadel"
export ZITADEL_FIRSTINSTANCE_ORG_HUMAN_EMAIL_ADDRESS="zitadel-admin@example.com"
export ZITADEL_FIRSTINSTANCE_ORG_HUMAN_PASSWORD=$(tr -dc 'A-Za-z0-9!@#$%^&*()_+-=' < /dev/urandom | head -c 32)
export ZITADEL_RDS_ROOT_PASSWORD="my_rds_root_password_here"
Let ZITADEL_MASTERKEY and ZITADEL_FIRSTINSTANCE_ORG_HUMAN_PASSWORD be randomly generated as 32-character strings (the length is a ZITADEL's requirement).
Let's perform now the environment variable substitution on the template file and install the Helm Chart using the generated values.yaml:
envsubst < values.yaml.tpl > values.yaml
helm upgrade -install zitadel zitadel/zitadel --values values.yaml --namespace zitadel
Verifying Installation
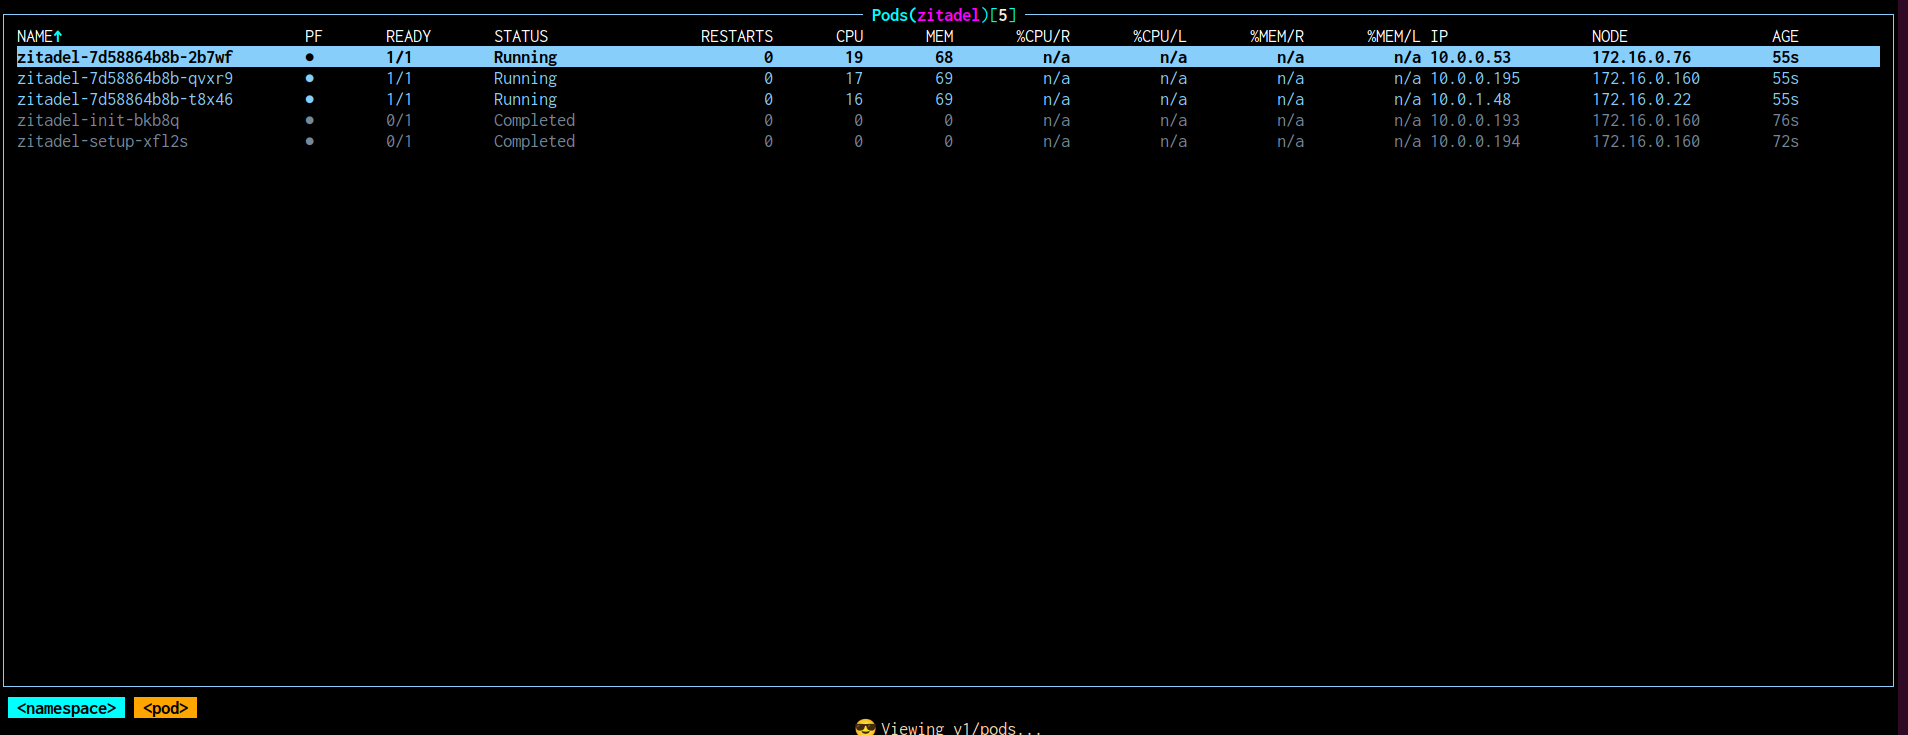
After initiating the Helm deployment, monitor the status of the ZITADEL-related pods to ensure that the installation has completed correctly. Specifically, wait for both the *-init and *-setup pods to reach a Completed state. These pods are responsible for bootstrapping the database schema and applying the initial application configuration.
Successful completion of these two components, and eventually the creation of 3 ZITADEL pods, indicates that ZITADEL has initialized its backend correctly and is ready for service startup. If either pod enters a failed or crashloop state, check the logs to identify misconfigurations or connectivity issues before proceeding.
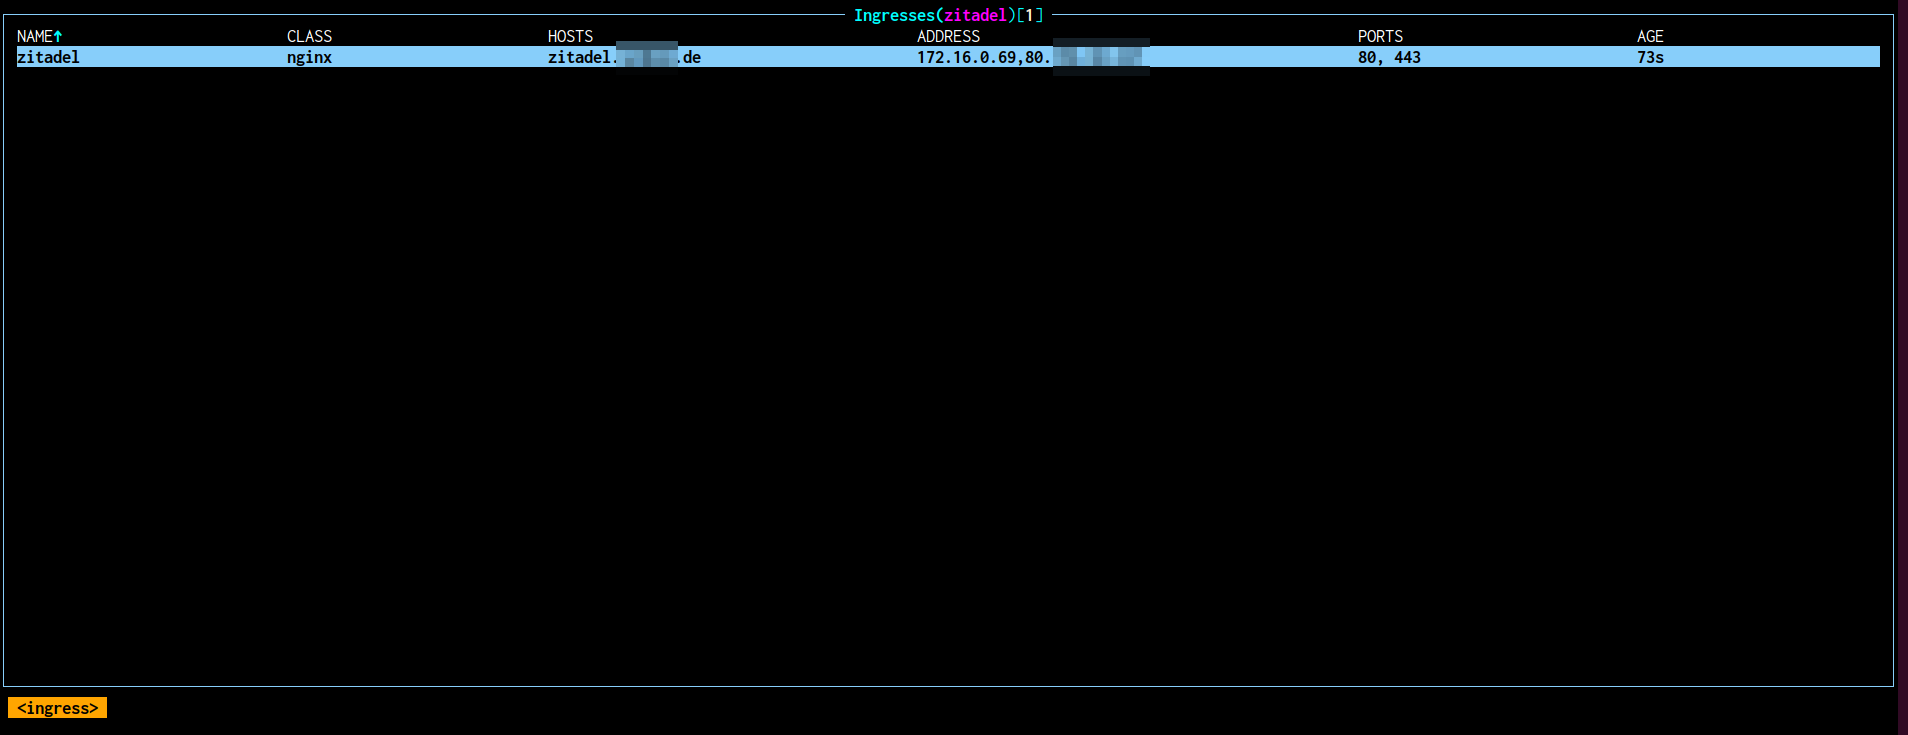
Once the Helm deployment completes and the ZITADEL pods are in a healthy state, verify that the Ingress resource has been successfully created and is bound to the expected Elastic Load Balancer (ELB) with the correct Elastic IP (EIP).
The output should display the external IP or hostname that matches the EIP associated with your ELB. If the IP is missing or incorrect, inspect the annotations and Ingress class bindings to ensure they point to the NGINX controller configured with your ELB ID.
Additionally, confirm DNS resolution for your custom domain (e.g., zitadel.example.com) points to this EIP. This alignment is critical for secure TLS termination and external access to the ZITADEL service.
Accessing ZITADEL
Open the URL defined in the ZITADEL_EXTERNALDOMAIN environment variable using your preferred web browser. This should resolve to the domain you configured (e.g., https://zitadel.example.com) and direct you to the ZITADEL login interface.
For the initial login, use the credentials defined in the following environment variables:
- Username:
ZITADEL_FIRSTINSTANCE_ORG_HUMAN_EMAIL_ADDRESS - Password:
ZITADEL_FIRSTINSTANCE_ORG_HUMAN_PASSWORD
Upon successful authentication, you’ll be prompted to set a new password. After completing the reset, you should be redirected to the default organization within the ZITADEL instance—assuming no changes were made to the default organization name during Helm templating. This confirms that the deployment is operational and the platform is ready for further configuration and integration.