Issue an ACME Certificate with DNS01 Solver in CCE
A DNS01 challenge is a type of challenge used in the Domain Name System (DNS) to verify ownership of a domain during the process of obtaining an SSL/TLS certificate, often through services like Let's Encrypt.
When you request a certificate, the Certificate Authority (CA) needs to ensure that you have control over the domain for which you're requesting the certificate. The DNS01 challenge is one of the methods used to prove this control. Here's how it generally works:
-
Challenge Issuance: The CA provides you with a unique token (a random string of characters) that needs to be added to your domain's DNS records.
-
DNS Record Addition: You must create a specific DNS TXT record for your domain that includes the token provided by the CA. This record usually follows a format like
_acme-challenge.example.comwith a value corresponding to the token. -
Verification: Once you've added the TXT record to your domain's DNS configuration, the CA will query your domain's DNS records to look for the TXT record. If it finds the correct token, it confirms that you control the domain.
-
Certificate Issuance: After successful verification, the CA will issue the SSL/TLS certificate.
The DNS01 challenge is commonly used because it allows for domain validation without needing to serve files over HTTP, which can be advantageous in certain situations, such as when you don't have a web server configured or when you're managing multiple subdomains.
One of the tools, that can be employed in the context of Kubernetes, to secure certificates from a Certificate Authority (CA) via the ACME protocol using the the DNS01 challenge, is cert-manager. Specifically for Open Telekom Cloud, we can use an additional webhook that acts as an ACME DNS01 solver for Open Telekom Cloud's Domain Name Service, cert-manager-webhook-opentelekomcloud.
Prerequisites
Only prerequisite is cert-manager. If you don't have it already installed on your CCE Cluster, this can be very easily done using a Helm Chart:
helm repo add jetstack https://charts.jetstack.io
helm repo update

helm install \
  cert-manager jetstack/cert-manager \
  --namespace cert-manager \
  --create-namespace \
  --version v1.15.3 \
  --set crds.enabled=true
Installing the ACME DNS01 Solver
cert-manager-webhook-opentelekomcloud is an ACME DNS01 solver webhook for Open Telekom Cloud DNS written in Golang, and requires cert-manager to be installed first.
Acquiring Access/Secret Keys
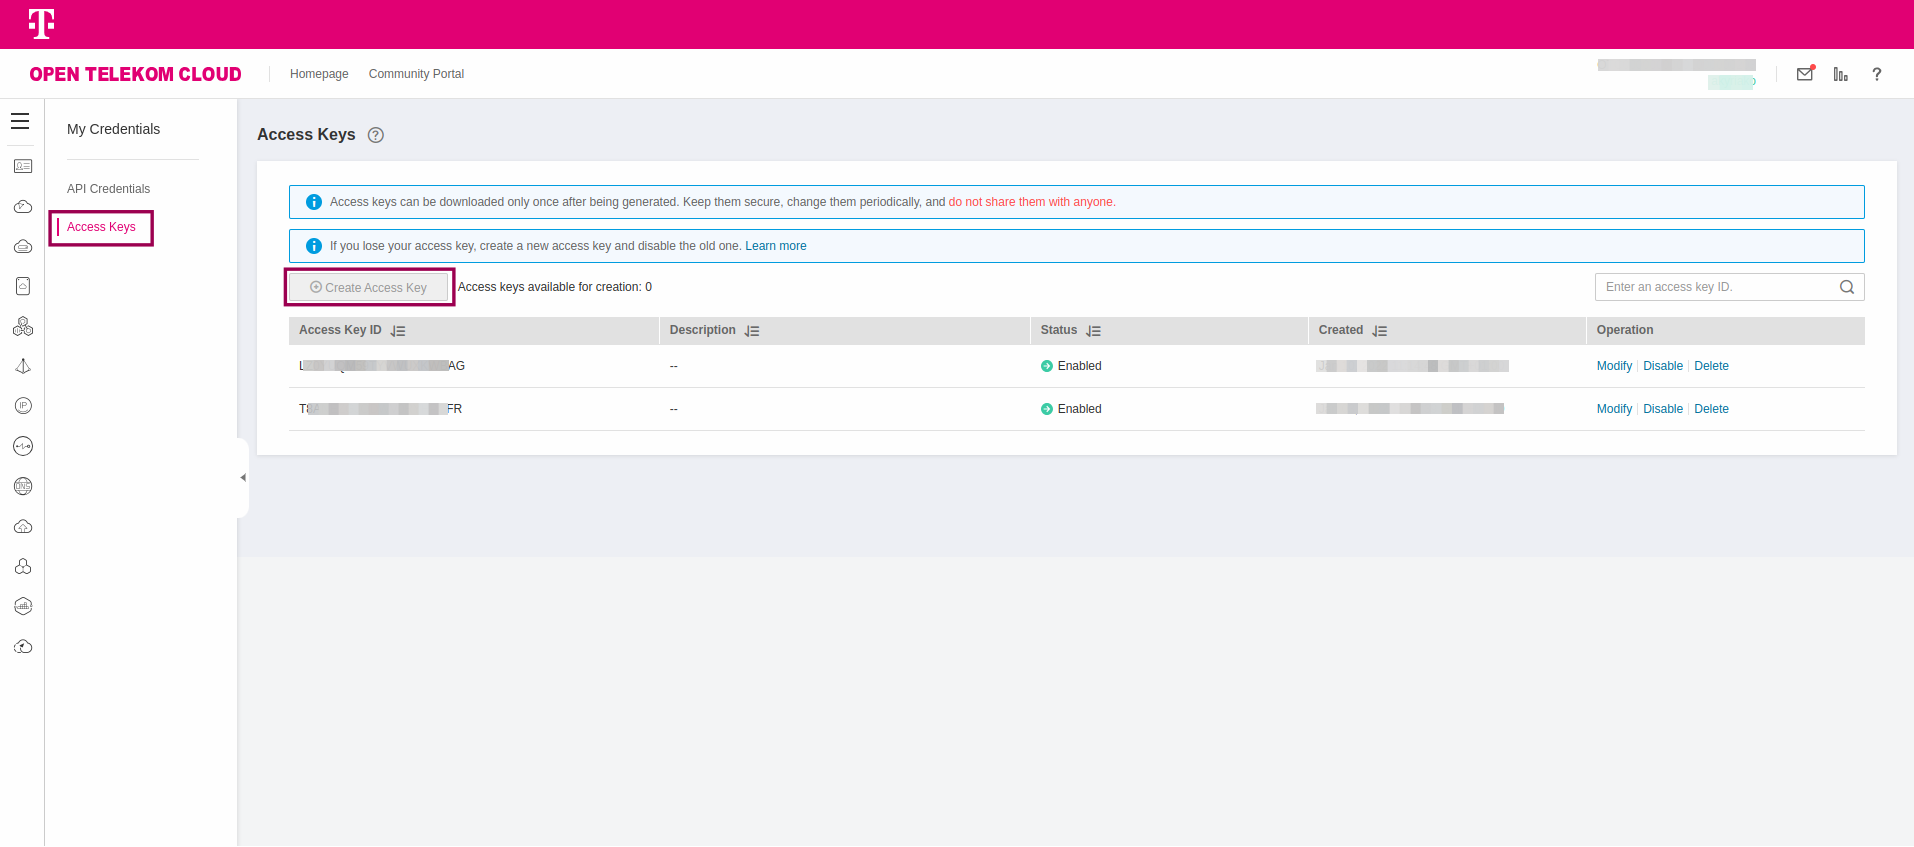
In the console, go to My Credentials -> Access Keys and either pick up an existing pair or create a new one:

Export this pair as environment variables:
export OS_ACCESS_KEY={value}
export OS_SECRET_KEY={value}
Installing the Helm Chart
helm repo add cert-manager-webhook-opentelekomcloud https://akyriako.github.io/cert-manager-webhook-opentelekomcloud/
helm repo update

helm upgrade --install \
    acme-dns cert-manager-webhook-opentelekomcloud/cert-manager-webhook-opentelekomcloud \
  --set opentelekomcloud.accessKey=$OS_ACCESS_KEY \
  --set opentelekomcloud.secretKey=$OS_SECRET_KEY \
  --namespace cert-manager
Installing Cluster Issuers
You are going to need one ClusterIssuer for the production and one for the staging Let's Encrypt endpoint.
cert-manager has a known bug, that prevents custom webhooks to work with an Issuer. For that reason you need to install your issuer as ClusterIssuer.
For Staging
Create and deploy the following manifest:
apiVersion: cert-manager.io/v1
kind: ClusterIssuer
metadata:
  name: opentelekomcloud-letsencrypt-staging
  namespace: cert-manager
spec:
  acme:
    email: user@company.com
    server: https://acme-staging-v02.api.letsencrypt.org/directory
    privateKeySecretRef:
      name: opentelekomcloud-letsencrypt-staging-tls-key
    solvers:
    - dns01:
        webhook:
          groupName: acme.opentelekomcloud.com
          solverName: opentelekomcloud
          config:
            region: "eu-de"
            accessKeySecretRef:
              name: cert-manager-webhook-opentelekomcloud-creds
              key: accessKey
            secretKeySecretRef:
              name: cert-manager-webhook-opentelekomcloud-creds
              key: secretKey
Replace placeholder email value, user@company.com, with the email that will be used for requesting certificates from Let's Encrypt.
kubectl apply -f opentelekomcloud-letsencrypt-staging.yaml
For Production
apiVersion: cert-manager.io/v1
kind: ClusterIssuer
metadata:
  name: opentelekomcloud-letsencrypt
  namespace: cert-manager
spec:
  acme:
    email: user@company.com
    server: https://acme-v02.api.letsencrypt.org/directory
    privateKeySecretRef:
      name: opentelekomcloud-letsencrypt-tls-key
    solvers:
    - dns01:
        webhook:
          groupName: acme.opentelekomcloud.com
          solverName: opentelekomcloud
          config:
            region: "eu-de"
            accessKeySecretRef:
              name: cert-manager-webhook-opentelekomcloud-creds
              key: accessKey
            secretKeySecretRef:
              name: cert-manager-webhook-opentelekomcloud-creds
              key: secretKey
Replace placeholder email value, user@company.com, with the email that will be used for requesting certificates from Let's Encrypt.
kubectl apply -f opentelekomcloud-letsencrypt.yaml
Requesting a Certificate
Create and deploy the following manifest:
apiVersion: cert-manager.io/v1
kind: Certificate
metadata:
  name: certificate-subdomain-example-com
spec:
  dnsNames:
  - '*.subdomain.example.com'
  issuerRef:
    kind: ClusterIssuer
    name: opentelekomcloud-letsencrypt-staging
  secretName: certificate-subdomain-example-com-tls
Replace placeholder DNS name *.subdomain.example.com, with one that you own and will be used to request a certificate from Let's Encrypt.
kubectl apply -f certificate-subdomain-example-com
Using the staging endpoint of Let's Encrypt before moving to the production endpoint is a best practice. Let's Encrypt imposes rate limits on the number of certificates you can request in a given period to prevent abuse. By testing with the staging environment, you avoid hitting these limits during your development and testing phases.
Exposing a workload with Ingress
Create and deploy the following manifest:
apiVersion: networking.k8s.io/v1
kind: Ingress
metadata:
  name: workload-ingress
  labels:
    app: workload
  annotations:
    kubernetes.io/elb.class: union
    kubernetes.io/elb.id: "{value}"
    kubernetes.io/elb.port: 443
spec:
  ingressClassName: cce
  tls:
  - hosts:
      - subdomain.example.com
    secretName: certificate-subdomain-example-com-tls
  rules:
  - host: subdomain.example.com
    http:
      paths:
      - backend:
          service:
            name: workload-svc
            port:
              number: 80
        path: /
        pathType: ImplementationSpecific
You need to have:
- a workload installed in your CCE Cluster (you can experiment with traefik/whoami)
- this workload exposed with a
Service, workload-svc, of typeNodePort - a Shared Elastic Load Balancer
| Parameter | Value |
|---|---|
| kubernetes.io/elb.class | union, if it is a Shared Elastic Load Balancer |
| kubernetes.io/elb.id | Replace placeholder value {value} with the ID of the Elastic Load Balancer |
| kubernetes.io/elb.port | 443 |
| ingressClassName | cce |
| tls.hosts[0] | Replace placeholder value subdomain.example.com with your own |
| tls.secretName | Use the name of the Secret that was created from Certificate |
| rules.host[0] | Replace placeholder value subdomain.example.com with your own |
kubectl apply -f workload-ingress.yaml
If you visit in your browser the address https://subdomain.example.com you will notice that the endpoint is served in HTTPS and is secured by a valid certificate.