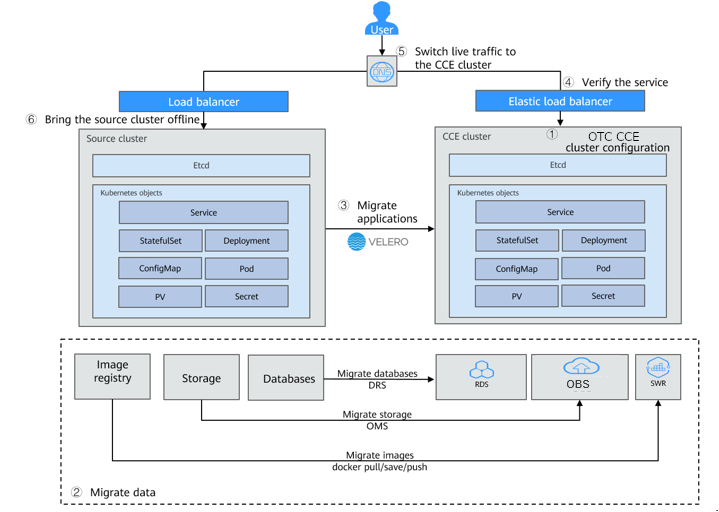
Migrating Clusters from Other Clouds to CCE
This best practices series showcase how to migrate Kubernetes workloads from other cloud or on-premises Kubernetes environments to the Cloud Container Engine (CCE) on T Cloud Public. It highlights the key considerations for moving applications, container images, and persistent data while ensuring compatibility and service continuity. This best practice focuses on leveraging T Cloud Public services such as OBS and SWR, along with established tools like Velero to provide a reliable and structured migration path for Kubernetes workloads.
Prerequisites
- The source and target Kubernetes clusters must run version 1.10 or higher.
- An OBS bucket on T Cloud Public is required and Access credentials (AK/SK) with proper permissions. Same counts if any alternative S3-compliant object-storage instead of OBS.
- Both the source and target clusters need network access to the chosen object storage.
- The source cluster must be healthy, with no abnormal pods running.
- The target CCE cluster must not contain conflicting resources, since Velero will not overwrite existing objects.
- Sufficient storage capacity must be ensured for backups and restores.
- Having Helm and Homebrew installed on your workstation.
- Having kubectl, and optionally k9s, installed on your workstation.
Deploying the necessary tooling (Helm, kubectl, k9s, velero-cli) on your workstation, can be performed both in macOS and in Linux via Homebrew. Another tool to add in your arsenal, is Bold Brew, a Homebrew manager that simplifies your Homebrew package management making installations and updates effortless via a TUI interface.
Preparing an OBS Bucket
For more details on creating a bucket on OBS, see Creating a Bucket. If you use OBS to store backup files, obtain the AK/SK of a user who has the right to operate OBS. For details, see Obtaining Access Keys (AK/SK).
Preparing Container Images (Optional)
If you are going to use exclusively SWR as the source of your container images in CCE, you need to upload the image files to the T Cloud Public container registry. For details, see Uploading an Image Through the Client.
Provisioning the source and target Kubernetes cluster(s) is out of the scope of this best practice article.
Installing Velero
Velero is an open-source tool designed to back up and restore Kubernetes cluster resources and persistent volumes. It works by capturing the state of objects such as Deployments, Services, ConfigMaps, and PersistentVolumes data, and storing them in a remote backend, like an object storage. Velero installs as a set of components within the cluster, including a server that runs as a deployment and a client CLI used for triggering operations. During a backup, Velero communicates with the Kubernetes API to collect resource definitions and with cloud provider plug-ins to handle persistent storage snapshots. For a restore, Velero applies the saved resources to the target cluster and re-attaches storage where possible. This makes it a reliable solution for disaster recovery, cluster migration, and maintaining application consistency across environments.
Velero offers two modes for handling persistent volume backups: CSI and FSB:
- CSI (Container Storage Interface): this mode integrates with storage systems that provide a CSI driver and support the Kubernetes snapshot API. In this setup, Velero creates snapshots at the storage layer, which are typically faster and more efficient since they work directly with the underlying block storage. This approach is well-suited for production environments where the storage system offers native snapshot capabilities and consistency guarantees.
- FSB (File System Backup): this mode, on the other hand, operates at the file level inside the pod. Velero deploys a helper container alongside the application pod, which mounts the same volume and uses a file-copy mechanism to back up or restore data. This method is more flexible because it works even when the storage system does not support snapshots, but it is generally slower and can introduce more load on the pod during the backup process.
In practice, CSI mode is preferred when the underlying infrastructure supports it, while FSB serves as a fallback to ensure Velero can still protect workloads on storage backends without snapshot capabilities.
Preparing Environmental Variables
-
Prepare a file named obs.credentials, and save it in your workstation:
obs.credentials[default]aws_access_key_id=<OBS_ACCESS_KEY>aws_secret_access_key=<OBS_SECRET_KEY>importantReplace OBS_ACCESS_KEY and OBS_SECRET_KEY with the values you obtained by executing the steps in Obtaining Access Keys (AK/SK).
-
Prepare a file named obs.env, and save it in your workstation:
obs.envexport VELERO_S3_REGION=<OBS_REGION>export VELERO_S3_URL=<OBS_URL>export VELERO_S3_BUCKET=veleroexport VELERO_CREDENTIALS=obs.credentialsimportantReplace VELERO_S3_REGION with the T Cloud Public region that your bucket lives, and VELERO_S3_URL with the OBS address. Example for eu-de:
- VELERO_S3_REGION should be
eu-deand - VELERO_S3_URL should be
https://obs.eu-de.otc.t-systems.com.
- VELERO_S3_REGION should be
Creating a Bucket
Navigate to the OBS console and create a bucket named velero as a destination for your backup files. You can use any bucket name, but make sure you set VELERO_S3_BUCKET value in the next steps accordingly.
Installing Velero CLI
The Velero CLI needs to be installed either on your workstation, provided it has access to both clusters, or on each bastion host used to connect to the individual clusters.
You can use Homebrew to install the Velero CLI on macOS or on Linux:
brew install velero
or alternatively directly from the GitHub releases of the project:
tar -xvf velero-v1.16.2-linux-amd64.tar.gz
and then move the extracted binaries to /usr/local/bin.
At the time of writing, the latest Velero CLI version was v1.16.2. To check for the most recent release, always refer to the GitHub releases
page.
Installing Velero with Helm Chart
The installation of Velero has to be performed in both source and target cluster(s), with the identical configuration prepared in the previous step.
-
Load the environment variables you prepared:
source obs.env -
Create a namespace and provision the necessary access and secret keys as a Kubernetes
Secret:kubectl create ns velerokubectl -n velero create secret generic velero-cloud-credentials --from-file=cloud=$VELERO_CREDENTIALS -
Deploy Velero using the Helm Chart:
helm repo add vmware-tanzu https://vmware-tanzu.github.io/helm-chartshelm repo updatehelm upgrade --install velero vmware-tanzu/velero -n velero \--set credentials.existingSecret=velero-cloud-credentials \--set configuration.backupStorageLocation[0].name=default \--set configuration.backupStorageLocation[0].provider=aws \--set configuration.backupStorageLocation[0].bucket=$VELERO_S3_BUCKET \--set configuration.backupStorageLocation[0].config.region=$VELERO_S3_REGION \--set configuration.backupStorageLocation[0].config.s3ForcePathStyle=true \--set configuration.backupStorageLocation[0].config.s3Url=$VELERO_S3_URL \--set deployNodeAgent=true \--set defaultVolumesToFsBackup=true \--set snapshotsEnabled=falsenote-
--set deployNodeAgent=true, ensures that the Velero Node Agent (formerly known as Restic) is deployed to all cluster nodes. The Node Agent runs as a DaemonSet and enables file system–level backups (FSB mode, check for explanation in the previous chapters) of persistent volumes, which is required when snapshot-based backups are not available or not supported by the storage backend. -
--set defaultVolumesToFsBackup=true, configures Velero to use file system backups (FSB) as the default method for all persistent volumes. With this setting, volumes are automatically backed up using the Node Agent without requiring explicit annotations on the pods or volumes, simplifying cluster-wide backup management (although you could find tune which volumes are going to be included in the backup, with annotations either in the StatefulSet or Pod specs). -
--set snapshotsEnabled=false, disables the use of storage-level snapshots through CSI or cloud provider integrations. This is typically done when the target storage does not support snapshot APIs, or when the strategy is to rely solely on file system backups for data protection.
Together, these settings configure Velero to operate entirely with file system–based backups (FSB) using the Node Agent, making the backup process independent of underlying storage snapshot capabilities.
For more details on configuring the helm chart values consult the Velero Helm Chart README.
-
-
Install Velero Plugin for AWS:
The velero/velero-plugin-for-aws is a plugin that enables Velero to interact with AWS S3-compliant object store systems. Since T Cloud Public’s Object Storage Service (OBS) exposes an S3-compatible API, this plugin is required to allow Velero to store and retrieve backups from OBS (or any other S3-compliant object store). Without it, Velero would not be able to communicate with the storage backend, making the plugin a necessary component for backup and restore operations in ours environment.
velero plugin add velero/velero-plugin-for-aws:v1.8.2 -
Verify installation:
After completing the Velero installation, the next step is to verify the setup by checking the configured backup locations. This ensures Velero can properly access the object storage backend before running any backups (and, indirectly, the entire installation).
velero get backup-locationsand if everything went good you should see something like this:
NAME PROVIDER BUCKET/PREFIX PHASE LAST VALIDATED ACCESS MODE DEFAULTdefault aws velero Available 2025-09-10 12:35:50 +0200 CEST ReadWrite true
Installing a Velero Web UI (Optional)
helm repo add otwld https://helm.otwld.com/
helm repo update

helm install velero-ui otwld/velero-ui --namespace velero-ui --create-namespace
and the you can access the it via port-forwarding:
kubectl port-forward service/velero-ui 3000:3000 -n velero-ui
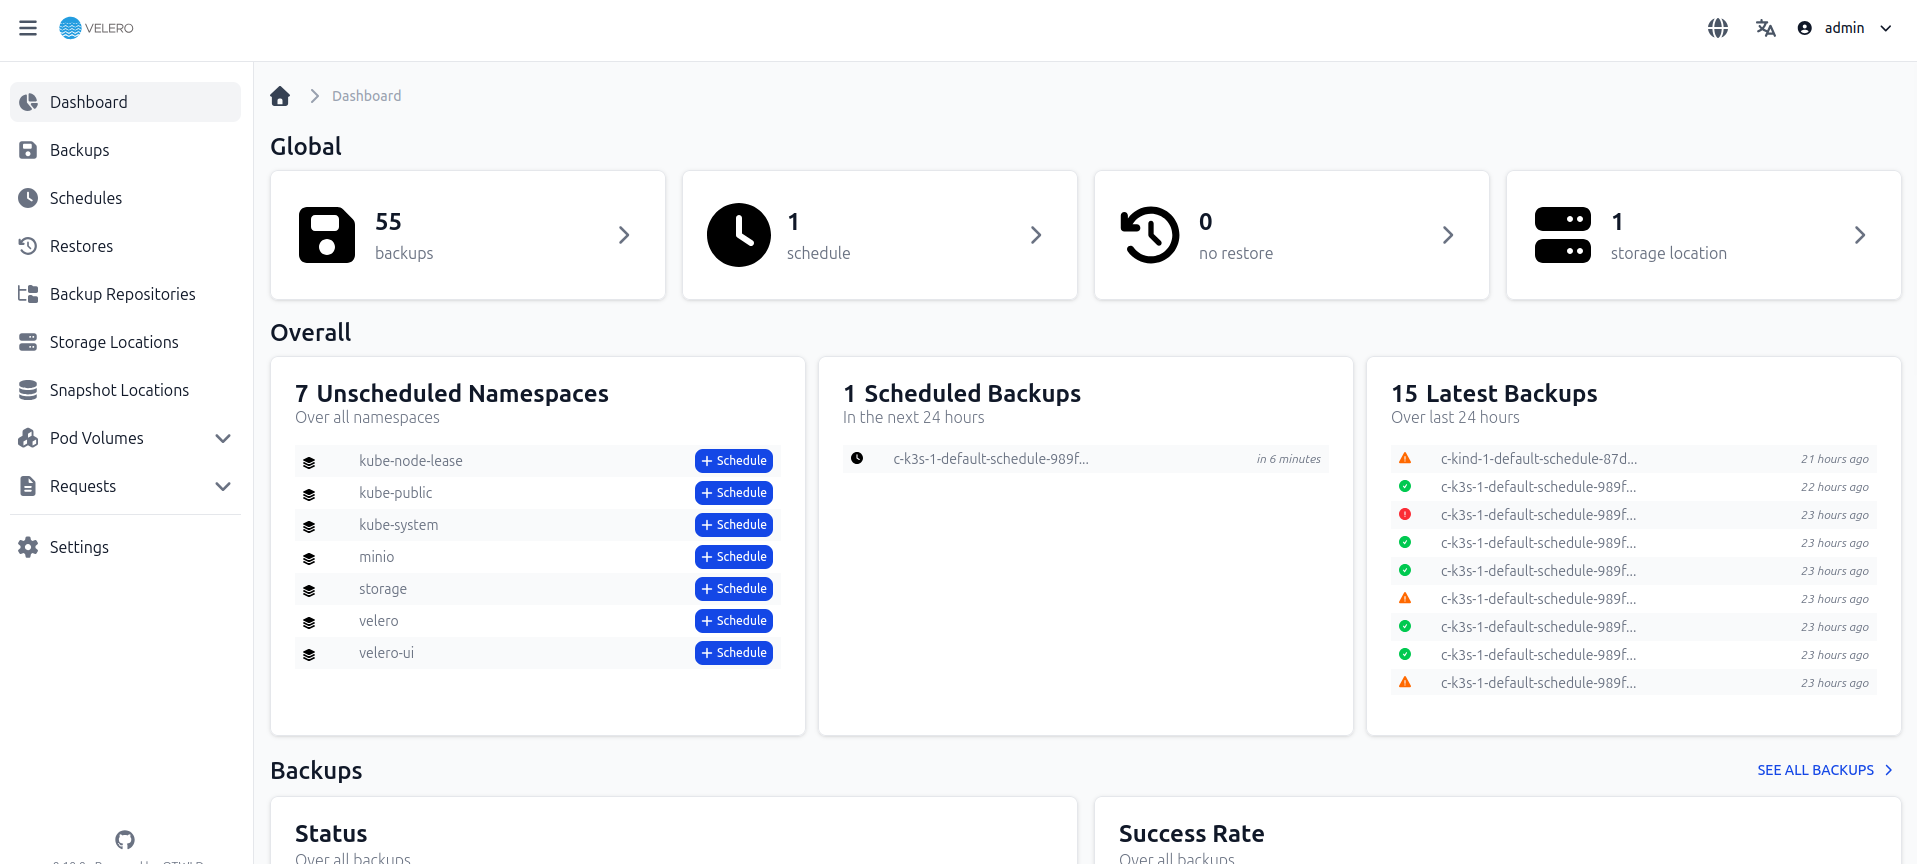
For more details consult the project's documentation.
Pre-Migration Considerations
- Before the migration, clear the abnormal pod resources in the source cluster. If the pod is in the abnormal state and has a PVC mounted, the PVC is in the pending state after the cluster is migrated.
- Ensure that the cluster on the CCE side does not have the same resources as the cluster to be migrated because Velero does not restore the same resources by default.
- To ensure that container images can be properly pulled after cluster migration, migrate the images to SWR, if that's necessary.
- CCE does not support EVS disks of the
ReadWriteManytype. If resources of this type exist in the source cluster, change the storage type toReadWriteOnce. - Velero integrates the Restic tool to back up and restore storage volumes. Currently, the storage volumes of the HostPath type are not supported. For details, see Restic Restrictions. To back up storage volumes of this type, replace the
hostPathvolumes withlocalvolumes.
If a backup task involves storage of the HostPath type, the storage volumes of this type will be automatically skipped and a warning message will be generated. This will not cause a backup failure.
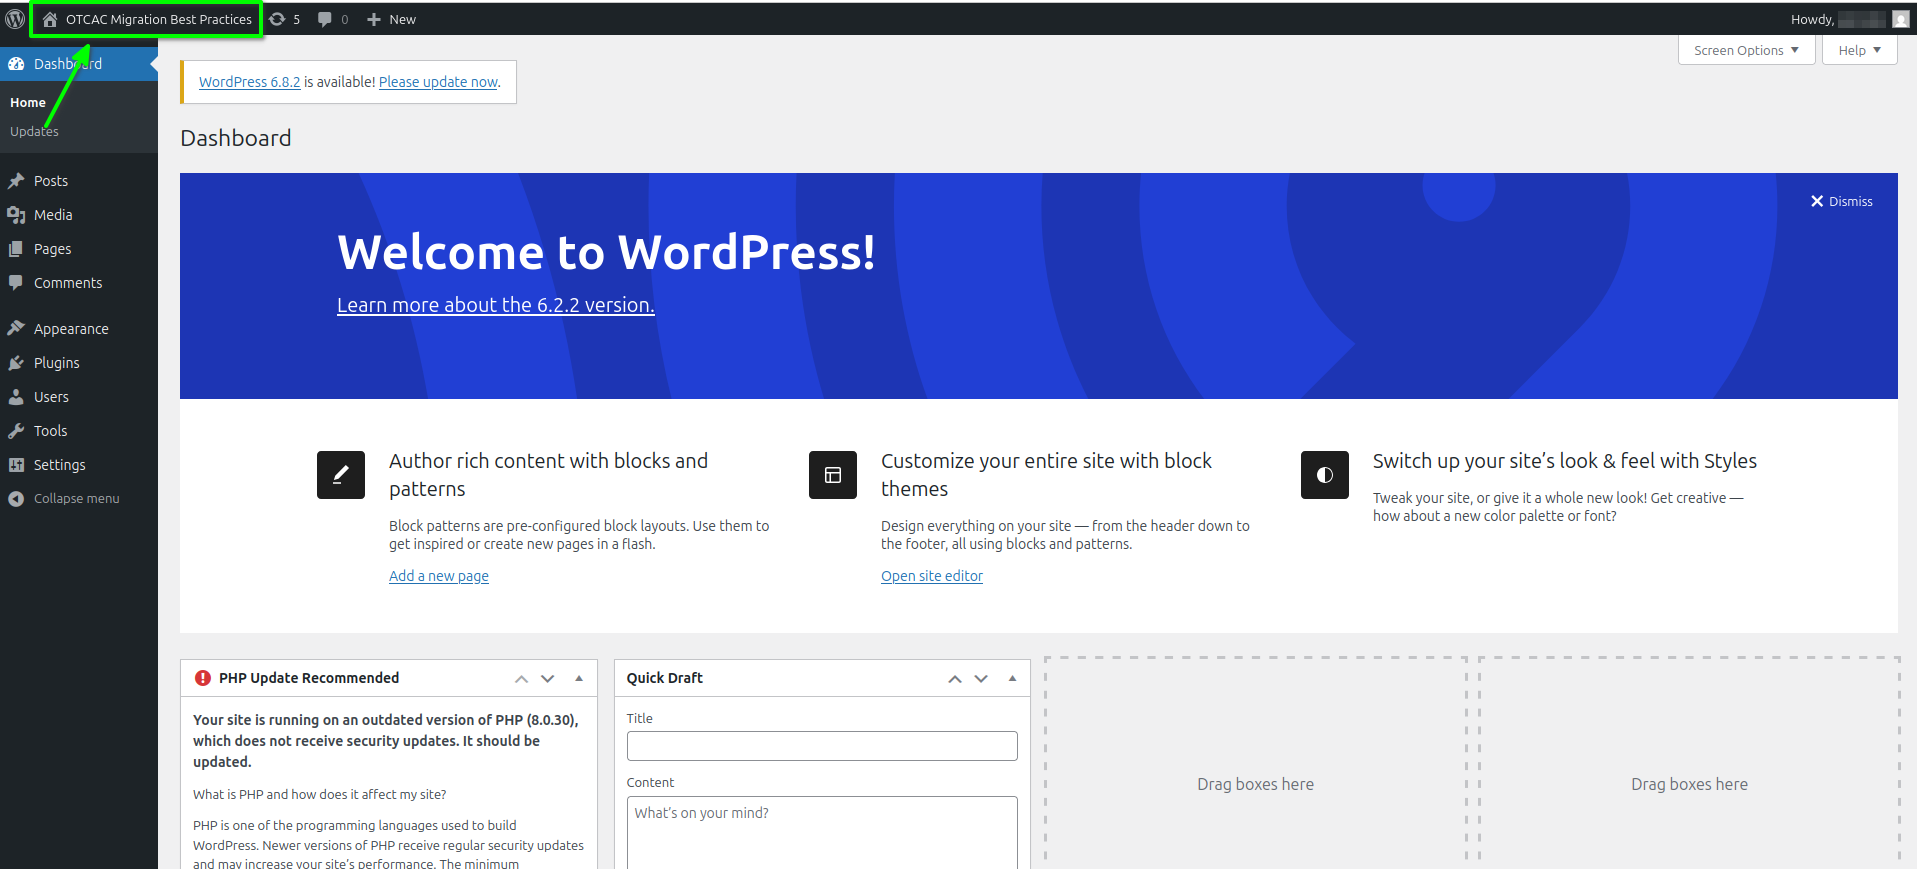
Deploying a Demo Workload on AWS EKS
We will deploy WordPress on an AWS EKS cluster as a demonstration workload to provide a realistic scenario for the migration examples that follow. This deployment serves as a practical workload to showcase how a live application, including its database and persistent data, can be backed up and migrated from AWS EKS to T Cloud Public’s Cloud Container Engine (CCE) using Velero. By using WordPress, we can illustrate key migration concepts such as persistent volume handling, database replication, and service continuity in a controlled lab environment, allowing users to test backup, restore, and migration procedures safely before applying them to production workloads.
This deployment is provided solely for use in a lab context to support migration exercises and should not be considered a production-ready setup.
Prerequisites on AWS EKS
- Ensure the Amazon EBS CSI driver is installed/enabled as an EKS add-on (needed for dynamic PersistentVolumeClaims).
- Confirm your worker nodes have IAM roles allowing EBS provisioning (usually handled automatically if the add-on is installed).
Check your available storage classes with:
kubectl get storageclass
Typically you’ll see gp2 or gp3. We’ll use gp2.
Deploying Namespace and Secrets
apiVersion: v1
kind: Namespace
metadata:
  name: wordpress
---
apiVersion: v1
kind: Secret
metadata:
  name: wp-db-secret
  namespace: wordpress
type: Opaque
stringData:
  mysql-root-password: "<A_SECURE_PASSWORD>"
  mysql-database: "wordpress"
  mysql-user: "wpuser"
  mysql-password: "<A_SECURE_PASSWORD>"
Replace the values of mysql-root-password and mysql-password with a secure, strong, random passwords of your choice. e.g.:
openssl rand -base64 32
and apply:
kubectl apply -f ns-secrets.yaml
Deploying MySQL with EBS PVC
apiVersion: v1
kind: PersistentVolumeClaim
metadata:
  name: mysql-pvc
  namespace: wordpress
spec:
  accessModes:
    - ReadWriteOnce
  resources:
    requests:
      storage: 20Gi
  storageClassName: gp2
---
apiVersion: apps/v1
kind: Deployment
metadata:
  name: mysql
  namespace: wordpress
spec:
  replicas: 1
  selector:
    matchLabels:
      app: mysql
  template:
    metadata:
      labels:
        app: mysql
    spec:
      containers:
      - name: mysql
        image: mysql:8.0
        env:
          - name: MYSQL_ROOT_PASSWORD
            valueFrom:
              secretKeyRef:
                name: wp-db-secret
                key: mysql-root-password
          - name: MYSQL_DATABASE
            valueFrom:
              secretKeyRef:
                name: wp-db-secret
                key: mysql-database
          - name: MYSQL_USER
            valueFrom:
              secretKeyRef:
                name: wp-db-secret
                key: mysql-user
          - name: MYSQL_PASSWORD
            valueFrom:
              secretKeyRef:
                name: wp-db-secret
                key: mysql-password
        ports:
          - containerPort: 3306
        volumeMounts:
          - name: mysql-data
            mountPath: /var/lib/mysql
      volumes:
        - name: mysql-data
          persistentVolumeClaim:
            claimName: mysql-pvc
---
apiVersion: v1
kind: Service
metadata:
  name: mysql
  namespace: wordpress
spec:
  ports:
    - port: 3306
      targetPort: 3306
  selector:
    app: mysql
  clusterIP: None
and apply:
kubectl apply -f deployment-mysql.yaml
Deploying WordPress with EBS PVC
apiVersion: v1
kind: PersistentVolumeClaim
metadata:
  name: wp-pvc
  namespace: wordpress
spec:
  accessModes:
    - ReadWriteOnce
  resources:
    requests:
      storage: 10Gi
  storageClassName: gp2
---
apiVersion: apps/v1
kind: Deployment
metadata:
  name: wordpress
  namespace: wordpress
spec:
  replicas: 1
  selector:
    matchLabels:
      app: wordpress
  template:
    metadata:
      labels:
        app: wordpress
    spec:
      containers:
      - name: wordpress
        image: wordpress:6.2-apache
        env:
          - name: WORDPRESS_DB_HOST
            value: mysql.wordpress.svc.cluster.local:3306
          - name: WORDPRESS_DB_NAME
            valueFrom:
              secretKeyRef:
                name: wp-db-secret
                key: mysql-database
          - name: WORDPRESS_DB_USER
            valueFrom:
              secretKeyRef:
                name: wp-db-secret
                key: mysql-user
          - name: WORDPRESS_DB_PASSWORD
            valueFrom:
              secretKeyRef:
                name: wp-db-secret
                key: mysql-password
        ports:
          - containerPort: 80
        volumeMounts:
          - name: wp-data
            mountPath: /var/www/html/wp-content
      volumes:
        - name: wp-data
          persistentVolumeClaim:
            claimName: wp-pvc
---
apiVersion: v1
kind: Service
metadata:
  name: wordpress
  namespace: wordpress
spec:
  type: ClusterIP
  ports:
    - port: 80
      targetPort: 80
  selector:
    app: wordpress
and apply:
kubectl apply -f deployment-wp.yaml
and the you can access the it via port-forwarding:
kubectl port-forward wordpress/wordpress 3001:80 -n wordpress