Real-Time Communication with Nextcloud Talk
Nextcloud Talk is a web and mobile-based communication app that provides real-time chat, video, and calls. As a privacy-respecting communication solution, it combines chat messaging, video conferencing, webinars, and screen sharing capabilities while maintaining complete control over your data and communications. By deploying Nextcloud Talk, organizations can establish a secure, GDPR-compliant alternative to other popular commercial platforms while ensuring that conversations, calls, and shared content remain under their direct control.
Nextcloud Talk serves as the central communication hub within Nextcloud's ecosystem, offering features such as federated chat capabilities that allow communication with users on other Nextcloud servers, end-to-end encrypted calls for maximum security, and AI-powered chat and call summaries for enhanced productivity. The platform supports both one-on-one conversations and group discussions, with advanced moderation tools for managing large-scale webinars and conferences.
Enabling Talk in Nextcloud
Nextcloud Talk is available as an application within the Nextcloud app store and requires manual installation and configuration. Unlike some other Nextcloud features, Talk is not included in the basic Nextcloud package and must be explicitly enabled.
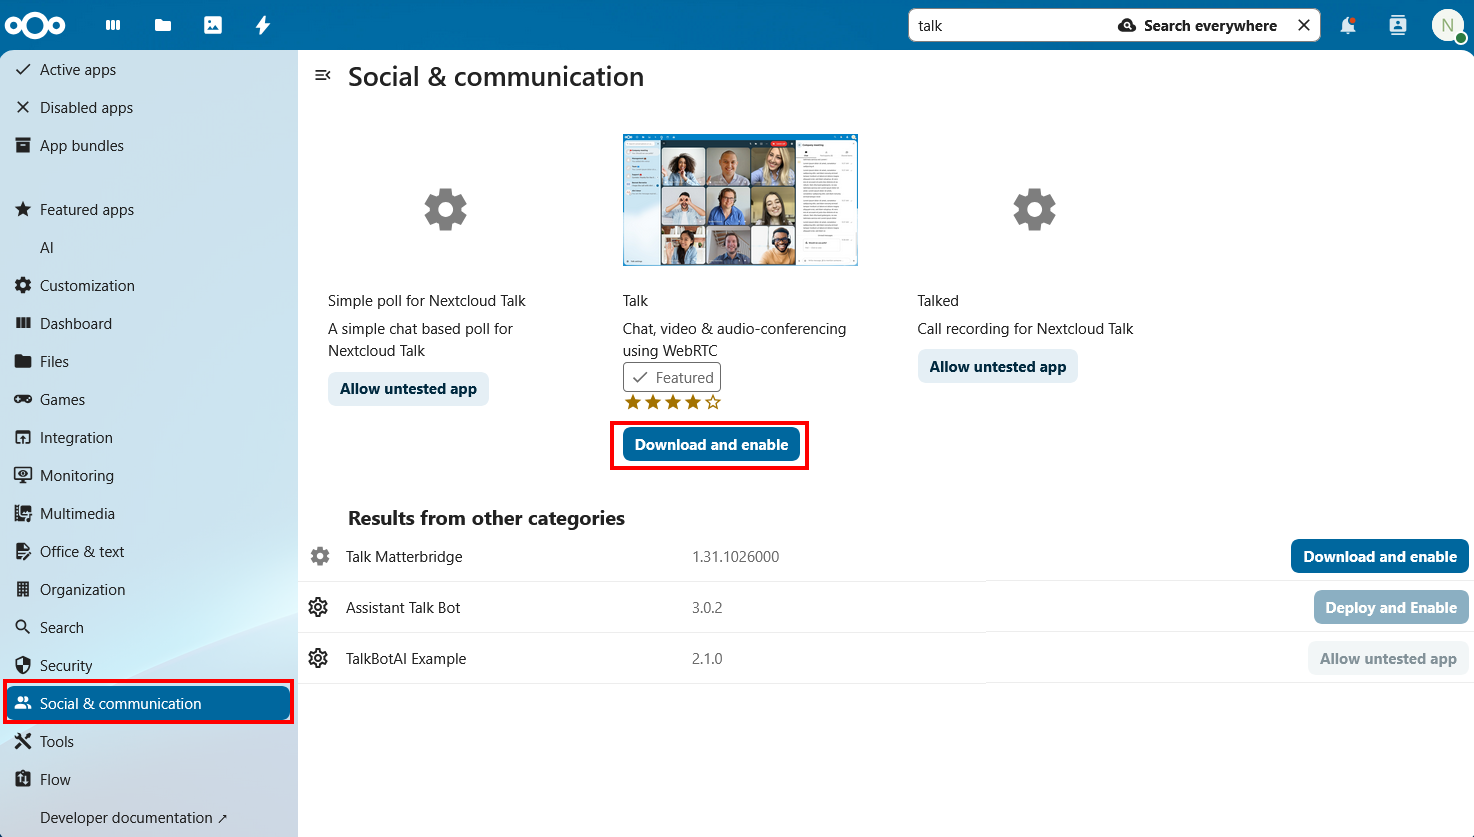
- Log in to your Nextcloud instance as an administrator and click on your user account, then select Apps from the dropdown menu.
- Go to the Social & communication section on the left side menu.
- Search for Talk and click Download and enable to install it.
- Verify Installation: Once installed, you should see a Talk icon in your Nextcloud interface.
Configuring Nextcloud Talk
Click on your user account and select Administration settings. From the left menu under Administration, select Talk.
STUN Server
Nextcloud Talk comes preconfigured with a STUN server (stun.nextcloud.com:443) operated by Nextcloud GmbH, which should handle most basic connectivity scenarios. You can also set up your own STUN server if you have one available.
A STUN (Session Traversal Utilities for NAT) server is a lightweight network service that helps applications—especially real-time voice, video or peer-to-peer data streams to discover the public-facing IP address and port that a NAT (Network Address Translation) device has assigned to them. When an endpoint (for example, a WebRTC client or VoIP phone) sits behind a router or firewall performing NAT, its private address (192.168.x.x, 10.x.x.x, etc.) isn’t directly reachable from the wider internet.
Here’s what happens under the hood:
- The client sends a STUN “binding request” to the server.
- The STUN server sees the request’s source IP and port (as translated by the NAT) and replies with those values.
- Armed with that public address and port, the client can advertise it to peers or to a signaling server, enabling others to initiate or negotiate a direct connection.
Because STUN only reports address mappings—it does not relay media or data—it introduces minimal latency and resource overhead. In practice, STUN is often used in concert with ICE (Interactive Connectivity Establishment): ICE will try gathering candidates via STUN first, and if a direct connection cannot be established, fall back to using a TURN server (which does relay traffic).
A STUN server:
- Listens typically on
UDP/3478(though TCP and TLS variants exist) - Implements the IETF’s RFC 5389 standard
- is stateless by design, making it easy to scale horizontally
In general, out of the scope of Nextcloud, integrating a STUN server into your architecture, you enable robust NAT traversal without heavy infrastructure, ensuring that peer-to-peer or real-time sessions can be set up reliably across the public internet.
TURN Server
A TURN server is a relay server that can help resolve connectivity issues for users who are behind firewalls or NATs. It allows clients to connect to each other even if they cannot communicate directly. You can set up a TURN server if you have one available or use a public TURN server.
If users experience call drops, one-way audio, or difficulty establishing peer-to-peer connections, you should configure a TURN server. It acts as a relay for media streams when direct connections fail.
Using a public TURN server poses security risks regarding data privacy. While the traffic is end-to-end encrypted and a malicious TURN server operator cannot directly decrypt your actual media content, the server owner can still access metadata.
For maximum security, it's recommended to deploy your own TURN server infrastructure rather than relying on public services, especially for sensitive communications.
Federation
Federation in Nextcloud Talk provides a secure way to enable cross-instance communication between different instances of Nextcloud, allowing users to communicate with each other across multiple organizations while maintaining data sovereignty and privacy.
Enabling Federation
Before enabling federation in Nextcloud Talk, ensure that you have the Federation app enabled in your Nextcloud instance. Federation in Talk requires the underlying federation functionality to be available throughout your Nextcloud server.
To enable federated chat capabilities, scroll down in the Talk administration settings until you find the Federation options and enable federation.
Federation permissions should be carefully managed to ensure data privacy and security. Only enable federation if you are certain that it is necessary for your organization's needs.
When enabling federation for Talk, be aware of the current limitations:
- Federated users cannot be appointed as conversation moderators.
- File attachments cannot be sent in federated chats.
- Video calls between federated instances have limited support and may require additional configuration.
Consider configuring Trusted Servers to restrict access. This can help prevent unauthorized federated communication.
Using Federated Chat
After enabling federation, users can add federated participants to conversations by:
- Obtaining the Federated Cloud ID of the remote user (format:
username@nextcloud.domain.com) - Adding this ID in the search field of the Participants tab in any conversation
- The federated user will receive an invitation notification to join the chat
High-Performance Backend
For organizations requiring enterprise-class scalability and performance, Nextcloud offers a High-Performance Backend that includes a signaling server and WebRTC gateway. This backend significantly improves performance for calls with multiple participants and enables additional features like typing indicators.
For more information, see High-Performance Backend.
Verifying Communication
Creating a Conversation
To verify that Talk is functioning correctly, create and test different types of conversations:
- Click on the Talk icon in your Nextcloud interface.
- Search for another user in the search bar and click their name to immediately create a private conversation.
- Or click the plus button next to the search field, then select Create a new conversation. Configure the conversation name, description, and participants.
Testing Chat Functionality
Verify basic messaging capabilities:
- Send Text Messages: Type messages in the conversation interface to test basic chat functionality.
- File Sharing: Use the attachment feature to share files from your Nextcloud Files app or upload from your local device.
- User Mentions: Test the mention functionality by typing
@followed by a username to notify specific participants.
Testing Video and Voice Calls
Validate the core calling features:
- Initiate Video Call: Start a video call within a conversation and verify that participants can see and hear each other.
- Test Audio-Only Calls: Verify voice-only calling functionality, which reduces bandwidth requirements.
- Screen Sharing: Test screen sharing capabilities to ensure participants can share their desktop or specific applications.