Deploy Nextcloud on CCE
This guide walks through deploying a highly available Nextcloud setup on an T Cloud Public Cloud Container Engine (CCE) cluster, using Object Storage Service (OBS) for file storage and Relational Database Service (RDS) for Nextcloud's database. We will use the Nextcloud Helm charts for that matter.
Prerequisites
-
Cloud Container Engine (CCE) cluster
- A CCE cluster with sufficient resources.
kubectlconfigured to access the cluster.- An ingress controller installed on the cluster (we will use Nginx Ingress Controller in this blueprint, see Installing Nginx Ingress Controller).
- DNS entry pointing to the Ingress load balancer and TLS certificate for the Nextcloud domain (e.g., via cert-manager, see Issue an ACME Certificate).
-
Object Storage Service (OBS)
- A bucket created in OBS for Nextcloud primary file storage, see Creating a Bucket.
- OBS credentials (Access Key, Secret Key) with read/write permissions on the bucket, see Obtaining Access Keys (AK/SK).
-
Relational Database Service (RDS)
- A MySQL (or PostgreSQL) instance deployed in RDS, ideally in HA mode across multiple AZs, see Getting Started with RDS for MySQL.
- Network connectivity: Configure RDS security group to allow access from CCE cluster nodes. If RDS is in a different VPC, ensure CCE cluster can access it (via VPC peering).
tipRDS auto-backup is recommended to ensure recovery from any database corruption or data loss.
importantRDS is not scaled via Kubernetes. Ensure that the RDS instance has sufficient storage and CPU resources to handle your workload. For more information read:
Solution Overview
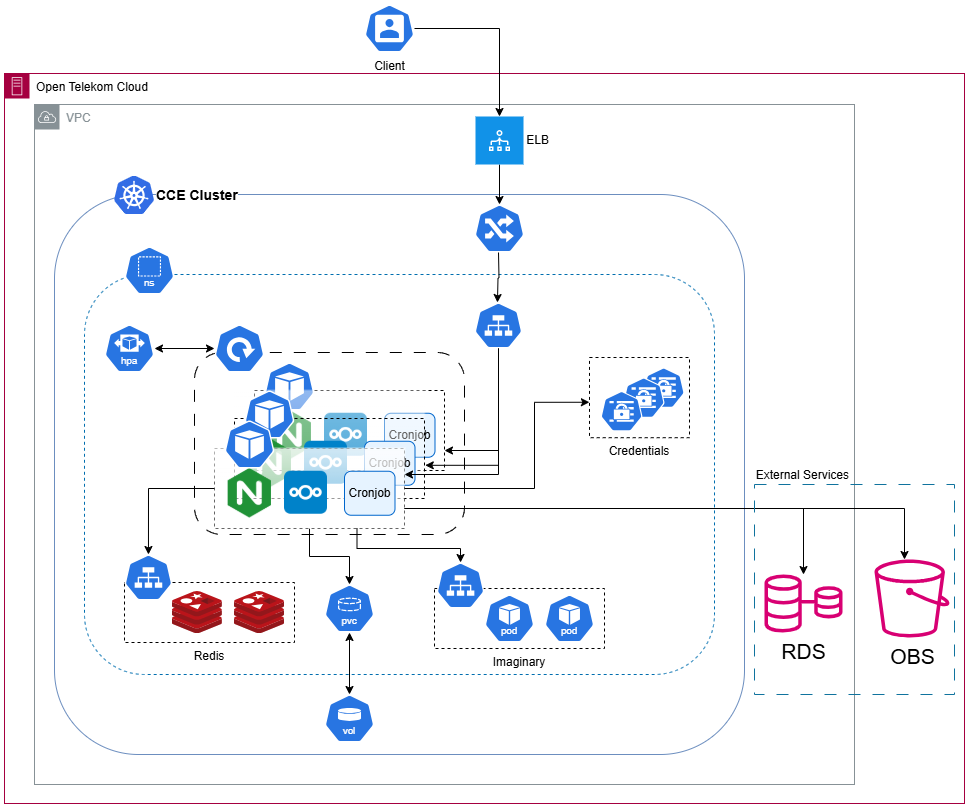
- Nextcloud Application Pods: Scaled horizontally with HPA. This scales pods based on load to ensure high availability.
- Ingress: Nginx Ingress routes HTTPS traffic to Nextcloud Service.
- Object Storage: Nextcloud uses S3-compatible OBS as primary storage for user files.
- Database: External MySQL RDS instance for data storage.
- Cache (optional but recommended): Use Redis for caching to improve performance. You can deploy Redis on CCE or use a managed cache service like Distributed Cache Service (we will use Redis on top of CCE in this blueprint).
Creating a Namespace
Create a dedicated namespace:
kubectl create namespace nextcloud
Creating Kubernetes Secrets
We use Secrets to hold credentials and other configuration, so that Nextcloud pods can retrieve them securely at runtime. The Helm chart references these secrets. By saving configuration in secrets, we avoid hardcoding sensitive data in Helm values or container images, and ensure the deployment remains secure and maintainable. Now create the following secrets:
When creating Secrets, use strong and unique passwords. To generate a random secure password, you can use the openssl command. e.g.:
openssl rand -base64 16
This will output a random base64-encoded string that can be used as a password.
OBS Credentials Secret
This provides credentials for an external S3-compliant Object Storage (in our case OBS) and is used in helm chart values under nextcloud.objectStore.s3.existingSecret. Replace the placeholders with values you obtained in previous steps and run the following command:
kubectl -n nextcloud create secret generic nextcloud-obs \
  --from-literal=accessKey="<OBS_ACCESS_KEY>" \
  --from-literal=secretKey="<OBS_SECRET_KEY>" \
  --from-literal=host="<OBS_Endpoint>" \
  --from-literal=bucket="<OBS_BUCKET>" \
  --from-literal=sse_c_key="<server-side-encryption-key>"
- Host value should be in the format of
obs.{region}.otc.t-systems.com. - If you don't have a server-side encryption key, you can provide an empty string for the
sse_c_keyvalue.
Database Credentials Secret
This provides credentials for an external database (in our case RDS) and is used in helm chart values under externalDatabase.existingSecret. Replace the placeholders with values you obtained in previous steps and run the following command:
kubectl -n nextcloud create secret generic nextcloud-db \
  --from-literal=host="<RDS_HOST>:<PORT>" \
  --from-literal=username="nextcloud" \
  --from-literal=password="<NEXTCLOUD_DB_PASSWORD>" \
  --from-literal=database="nextcloud"
You can find the host and port of the database under the Basic Information page of your RDS instance under Floating IP Address and Database Port fields.
NextCloud Credentials Secret
This provides Nextcloud instance credentials and is used in helm chart values under nextcloud.existingSecret. Replace the placeholders with your own values and run the following command:
kubectl -n nextcloud create secret generic nextcloud \
  --from-literal=nextcloud-password="<NEXTCLOUD_PASSWORD>" \
  --from-literal=nextcloud-username="<NEXTCLOUD_USERNAME>" \
  --from-literal=smtp-host="<SMTP_HOST>" \
  --from-literal=smtp-password="<SMTP_PASSWORD>" \
  --from-literal=smtp-username="<SMTP_USERNAME>" \
  --from-literal=smtpHost="<SMTP_HOST>" \
  --from-literal=token="<METRICS_TOKEN>"
- If you don't want to use a mail server, set all
smtp-*values to empty. - If you are collecting metrics from NextCloud and you are using a token for authentication instead of username/password, you need to provide the token for the Prometheus exporter. The value should be the same as
metrics.tokenin the helm chart values. If you don't want to use a token, set it to empty.
Redis Credentials Secret
This provides credentials for Redis and is used in helm chart values under redis.auth.existingSecret. Replace the placeholders with your own values and run the following command:
kubectl -n nextcloud create secret generic nextcloud-redis \
  --from-literal=redis-password="<REDIS_PASSWORD>"
Configuring Helm Chart Values
In this section, we will configure the values.yaml file used by the Nextcloud Helm chart during installation.
Before proceeding, please note that you need to create a values.yaml file in your project directory and add the values provided below based on your specific needs.
For more information about configuring the Helm chart and available options, we recommend visiting the official Nextcloud Helm Chart GitHub repository.
image.flavor
The image.flavor field determines which image flavor of Nextcloud you want to use. We use fpm for our example as it is better for HA setups.
image:
  flavor: fpm
nginx
If you have used the fpm image flavor, you need to enable the nginx field. This creates an nginx container inside the Nextcloud pod which works as a reverse proxy for the nextcloud-fpm container.
nginx:
  enabled: true
  resources:
    requests:
      cpu: "100m"
      memory: "128Mi"
    limits:
      cpu: "500m"
      memory: "512Mi"
In order to be able to scale the pods with HPA, you need to set resources. Configure the resources to match your requirements (provided values are just examples).
If you don't want to use HPA, you can omit the resources stanza altogether.
ingress
The ingress field determines how Nextcloud should be exposed externally.
ingress:
  enabled: true
  className: nginx
  annotations:
   nginx.ingress.kubernetes.io/affinity: cookie
   nginx.ingress.kubernetes.io/proxy-body-size: 4G
   kubernetes.io/tls-acme: "true"
   cert-manager.io/cluster-issuer: opentelekomcloud-letsencrypt
   nginx.ingress.kubernetes.io/enable-cors: "true"
   nginx.ingress.kubernetes.io/cors-allow-headers: "X-Forwarded-For"
   # Keep this in sync with the README.md file of the Helm Chart (https://github.com/nextcloud/helm/blob/main/charts/nextcloud/README.md):
   nginx.ingress.kubernetes.io/server-snippet: |-
     server_tokens off;
     proxy_hide_header X-Powered-By;
     rewrite ^/.well-known/webfinger /index.php/.well-known/webfinger last;
     rewrite ^/.well-known/nodeinfo /index.php/.well-known/nodeinfo last;
     rewrite ^/.well-known/host-meta /public.php?service=host-meta last;
     rewrite ^/.well-known/host-meta.json /public.php?service=host-meta-json;
     location = /.well-known/carddav {
       return 301 $scheme://$host/remote.php/dav;
     }
     location = /.well-known/caldav {
       return 301 $scheme://$host/remote.php/dav;
     }
     location = /robots.txt {
       allow all;
       log_not_found off;
       access_log off;
     }
     location ~ ^/(?:build|tests|config|lib|3rdparty|templates|data)/ {
       deny all;
     }
     location ~ ^/(?:autotest|occ|issue|indie|db_|console) {
       deny all;
     }
  tls:
    - secretName: nextcloud-tls
      hosts:
        - nextcloud.example.com
  path: /
  pathType: Prefix
Here are some key points to note:
-
Ingress Configuration:
- The Ingress is
enabledand configured to usenginxas the ingress controller. If you have a different ingress controller, you may need to adjust these settings accordingly.
- The Ingress is
-
Annotations Explanation:
nginx.ingress.kubernetes.io/affinity: cookieensures that each user session is routed to the same Nginx pod.nginx.ingress.kubernetes.io/proxy-body-size: 4Glimits the body size of proxied requests, preventing overflow issues.kubernetes.io/tls-acme: "true"enables automatic SSL certificate management by Kubernetes using Let's Encrypt.cert-manager.io/cluster-issuer: opentelekomcloud-letsencryptspecifies the cluster issuer for TLS secrets, integrating with Cert-Manager.nginx.ingress.kubernetes.io/enable-cors: "true"allows Cross-Origin connections.nginx.ingress.kubernetes.io/cors-allow-headers: "X-Forwarded-For"permits necessary headers for client connection handling.nginx.ingress.kubernetes.io/server-snippet:adds custom snippets for service discovery (CalDAV, CardDAV, webfinger, nodeinfo) to work and denies access to several internal directories to enhance security.
cautionMake sure to provide the correct cluster issuer name, or else the TLS certificates will not be generated.
importantServer snippet annotations will not be validated unless specific flags are enabled in the ingress controller configuration. If you're using Nginx as your ingress controller, ensure that the following settings are present in the
ingress-controllerConfigMap'sdatafield:-
allow-snippet-annotations: "true" -
annotations-risk-level: Critical
You may need to restart the nginx-ingress-controller pod after making these changes for them to take effect.
Without these settings, the annotations validation will fail, leading to potential Nextcloud service discovery issues. This is a critical setting that must be configured properly.
User ResponsibilityUsers must understand the impact of these configurations on the ingress controller. Misapplying changes can lead to serious security vulnerabilities and should be handled by users who understand the implications of their actions, so consulting documentation or experienced administrators is recommended.
-
Host Configuration:
- Replace
example.comwith your actual domain.
- Replace
phpClientHttpsFix
The phpClientHttpsFix configures HTTPS settings for PHP clients when using a reverse proxy. Setting enabled: true enables this feature. The protocol: https specifies that a secure protocol is used. By manually overriding automatic detection settings, this configuration prevents potential issues arising from failed hostname, protocol, or webroot detection in reverse proxy setups.
phpClientHttpsFix:
  enabled: true
  protocol: https
If you encounter redirecting issues after login, try enabling this field.
nextcloud
The nextcloud field determines how Nextcloud is configured.
nextcloud:
  host: nextcloud.example.com
  existingSecret:
    enabled: true
    secretName: nextcloud
    usernameKey: nextcloud-username
    passwordKey: nextcloud-password
    tokenKey: token
    smtpUsernameKey: smtp-username
    smtpPasswordKey: smtp-password
    smtpHostKey: smtp-host
  ## SMTP configuration
  mail:
    enabled: false
-
host: Specifies the hostname where Nextcloud will be accessible from. e.g.:
nextcloud.example.com. -
existingSecret:
enabled: trueenables the use of existing secrets for configuration.secretName: nextcloudThe name of the secret to get credentials from. Use the one created earlier (e.g.,nextcloud).usernameKey: nextcloud-usernameKey within the secret used to retrieve the username for Nextcloud authentication.passwordKey: nextcloud-passwordKey within the secret used to retrieve the password for Nextcloud authentication.tokenKey: tokenKey within the secret used to retrieve an authentication token (e.g., for metrics).smtpUsernameKey: smtp-usernameandsmtpPasswordKey: smtp-passwordKeys used if SMTP is enabled, to retrieve credentials for email configurations.smtpHostKey: smtp-hostKey used if SMTP is enabled, to retrieve the SMTP host for outgoing mail.
-
mail:
enabledIf set totrue, enables the use of this configuration block. Enable this section if you want to use email-based features and you have already configured SMTP credentials in thenextcloudsecret.
nextcloud.objectStore
The nextcloud.objectstore.s3 field determines how Nextcloud will interact with an external S3-compatible Object Storage service.
nextcloud:
# ... other fields ...
  # `objectStore` is a subfield of the `nextcloud` field.
  objectStore:
      s3:
        enabled: true
        legacyAuth: false
        ssl: true
        port: "443"
        region: "eu-de"
        bucket: "nextcloud"
        prefix: ""
        usePathStyle: false
        autoCreate: true
        storageClass: "STANDARD"
        existingSecret: "nextcloud-obs"
        secretKeys:
          host: "host"
          accessKey: "accessKey"
          secretKey: "secretKey"
          bucket: "bucket"
          sse_c_key: "sse_c_key"
enabled: trueensures that S3-compatible Object Storage is enabled for Nextcloud.legacyAuth: falsedisables legacy authentication methods. Typically kept as default.ssl: trueenables TLS/SSL for secure connections.port: 443sets the default port, useful if not using the standard port.region: eu-despecifies the region for Object Storage. Can be adjusted based on your setup.bucket: nextcloudsets the name of the bucket used by Nextcloud.prefix: ""defines the object prefix within the bucket.usePathStyle: falseuses path-style URLs for accessing objects in the bucket.autoCreate: trueautomatically creates the bucket if it doesn't exist.storageClass: STANDARDselects the storage class; STANDARD is typical when using S3-compatible Object Storage.existingSecretis set to the name of the secret that contains Object Storage credentials, created earlier (e.g.,nextcloud-obs).secretKeys: contains the key within the secret used to retrieve credentials.
Ensure your OBS AK/SK has the appropriate permissions to allow Nextcloud to write data to the bucket.
nextcloud.defaultConfigs
The nextcloud.defaultConfigs field determines how Nextcloud configures itself.
nextcloud:
# ... other fields ...
  # `defaultConfigs` is a subfield of the `nextcloud` field.
  defaultConfigs:
    # Swift Object Storage as primary storage
    swift.config.php: false
    # -- imaginary support config
    imaginary.config.php: true
Here's an explanation of the fields:
swift.config.php: falseensures that Swift storage is disabled. In this example, we are using OBS as primary storage, so it's set tofalse.imaginary.config.php: trueenables Nextcloud configuration to use imaginary features. This feature is not enabled by default, and if you enable it, you also have to set theimaginary.enabledfield totrue.
Imaginary is a service that enhances Nextcloud's ability to process and manage images efficiently. Visit Imaginary for more information.
nextcloud.configs
The nextcloud.configs field determines how Nextcloud configures itself. You can add additional configs here, but it's not recommended to do so unless you know what you are doing.
nextcloud:
# ... other fields ...
  # `configs` is a subfield of the `nextcloud` field.
  configs:
  # For example, to enable image and text file previews:
    previews.config.php: |-
      <?php
      $CONFIG = array (
        'enable_previews' => true,
        'enabledPreviewProviders' => array (
          'OC\Preview\Movie',
          'OC\Preview\PNG',
          'OC\Preview\JPEG',
          'OC\Preview\GIF',
          'OC\Preview\BMP',
          'OC\Preview\XBitmap',
          'OC\Preview\MP3',
          'OC\Preview\MP4',
          'OC\Preview\TXT',
          'OC\Preview\MarkDown',
          'OC\Preview\PDF'
        ),
      );
    proxy.config.php: |-
      <?php
      $CONFIG = array (
        'trusted_proxies' => array(
          0 => '127.0.0.1',
          1 => '10.0.0.0/8',
        ),
        'forwarded_for_headers' => array('HTTP_X_FORWARDED_FOR'),
      );
previews.config.php:
enable_previews: Enable direct preview functionality for selected file types without conversion.enabledPreviewProviders: Define providers that handle specific file formats (e.g., images, videos, documents).
proxy.config.php:
trusted_proxies: Restrict access to Nextcloud from trusted IP ranges or networks.forwarded_for_headers: Forward client IP information for enhanced logging and security.
nextcloud.strategy
The nextcloud.strategy field determines the deployment strategy for replacing old pods with new ones during upgrades. By default, type is set to Recreate. This means that when a new pod is created, the old one will be immediately removed. However, if you want to maintain High Availability, you should set it to RollingUpdate. This ensures a smooth transition during upgrades.
nextcloud:
# ... other fields ...
  # `strategy` is a subfield of the `nextcloud` field.
  strategy:
    type: RollingUpdate
    rollingUpdate:
      maxSurge: 25%
      maxUnavailable: 10%
Values used in the blueprint for maxSurge and maxUnavailable are for demonstration purposes only. You should set these values according to your requirements and the resources available in your cluster.
internal/externalDatabase
In this section, we will configure the database that supports our installation.
Disabling Internal Database
The internalDatabase.enabled field determines whether to use the internal database or not. If set to false, Nextcloud will not have its own database and will rely on an external database instead. In this example, we will use an RDS instance as an external database.
internalDatabase:
  enabled: false
Enabling External Database
The externalDatabase.enabled field determines whether to use an external database or not. If set to true, Nextcloud will connect to an external database instead of its own internal database.
externalDatabase:
  enabled: true
  ## Supported database engines: mysql or postgresql
  type: mysql
  existingSecret:
    enabled: true
    secretName: nextcloud-db
    usernameKey: username
    passwordKey: password
    hostKey: host
    databaseKey: database
-
enabled: Determines whether to use an external database or not. If set to
true, Nextcloud will connect to an external database instead of its own internal database. In this example, it is set totrue. -
type: Specifies the database engine. Can be mysql or postgresql. In this example, it is set to
mysql. -
existingSecret: Specifies the secret containing the database credentials.
enabled: trueUses existing secrets for database authentication.secretName: nextcloud-dbThe name of the secret to get credentials from. Use the one created earlier (e.g.,nextcloud-db).*Keys: Contains the key within the secret used to retrieve credentials.
redis
The redis field specifies the configuration for Redis as a cache backend in Nextcloud.
redis:
  enabled: true
  auth:
    enabled: true
    existingSecret: "nextcloud-redis"
    existingSecretPasswordKey: "redis-password"
  global:
    storageClass: "csi-disk"
-
enabled: Enables the use of Redis for caching in Nextcloud.
-
auth: Configures Redis authentication using existing secrets instead of plain text passwords.
enabled: trueTurns on Redis authentication.existingSecret: "nextcloud-redis"The name of a secret already created (e.g.,nextcloud-redis).existingSecretPasswordKey: "redis-password"The specific key within the existing secret where the Redis password is stored.
-
global: Provides additional configuration for Redis:
storageClass: "csi-disk"Specifies the storage class to use for persistent storage of Redis data. In this case, we use "csi-disk".
The vanilla CSI Disk storage class is suitable for general-purpose use cases where consistent and reliable storage is sufficient. If your Nextcloud instance requires higher I/O performance for intensive caching, you can consider switching to an I/O intensive storage class.
cronjob
The cronjob field specifies the configuration to use a cron sidecar container in the Nextcloud pod to run cron jobs in the background. Background jobs are important for tasks that do not necessarily need user intervention, but still need to be executed frequently (cleaning up, sending some notifications, pulling RSS feeds, etc.)
cronjob:
  enabled: true
  resources:
    requests:
      cpu: "50m"
      memory: "64Mi"
    limits:
      cpu: "150m"
      memory: "128Mi"
In order to be able to scale the pods with HPA, you need to set resources. Configure the resources field to match your requirements (provided values are just examples).
If you don't want to use HPA, you can omit the resources field.
hpa
The hpa field specifies the configuration for the horizontal pod autoscaler (HPA). The HPA is a Kubernetes feature that automatically scales the number of replicas of a deployment based on the resource utilization metrics.
hpa:
  enabled: true
  cputhreshold: 60
  minPods: 1
  maxPods: 10
In this example, we enable HPA to scale the number of replicas up or down based on CPU utilization.
Values used here for cputhreshold, minPods, and maxPods are for demonstration purposes only. You should set these values according to your requirements and the resources available in your cluster.
When using HPA, make sure that the resources field is specified for each container in your deployment. Otherwise, the horizontal pod autoscaler won't be able to scale up or down based on utilization.
Also, when using persistent storage for Nextcloud containers, you have to specify a persistent volume claim (PVC) with ReadWriteMany access mode, or else new pods will fail to start.
resources
The resources field specifies the CPU and memory limits for the Nextcloud container.
resources:
  requests:
    cpu: "100m"
    memory: "128Mi"
  limits:
    cpu: "500m"
    memory: "512Mi"
In order to be able to scale the pods with HPA, you need to set resources. Configure the resources field to match your requirements (provided values are just examples).
If you don't want to use HPA, you can omit the resources field.
persistence
The persistence field specifies whether Nextcloud internal data should be stored in a persistent volume. If enabled, the Nextcloud container will use the specified values to create the PVC.
persistence:
  enabled: true
  annotations:
    everest.io/volume-as: absolute-path
    everest.io/sfsturbo-share-id: <SFS_TURBO_ID>
    everest.io/path: /nextcloud
    everest.io/reclaim-policy: retain-volume-only
    everest.io/csi.enable-sfsturbo-dir-quota: "true"
  storageClass: "csi-sfsturbo"
  accessMode: ReadWriteMany
  size: 20Gi
If persistence is disabled, Nextcloud will store its data in a temporary directory, and every time it restarts or a new pod is created, it will try to install itself again and the user will see a post-installation page. So it's recommended to enable persistence.
If using HPA or replications, you should specify a PVC with ReadWriteMany access mode so it can be mounted by all pods of Nextcloud which exist on different nodes. Otherwise, the HPA will not work properly and replicas will fail to start.
Because of the way that the Nextcloud image is configured (see issue on Github), when deploying it with NFS-mounted persistent volumes, users may encounter startup failures (see the issue on Github). This is due to NFS latency or delayed availability of file locks that Nextcloud depends on during initialization. As a result, containers can fail the Kubernetes startup probe before the application is ready, causing them to restart repeatedly. The solution is to enable and set a long initialDelaySeconds period under the startupProbe field. This gives the container enough time to initialize correctly with the NFS mount.
startupProbe
The startupProbe field allows you to configure a startup probe for your Nextcloud deployment, which can help prevent containers from restarting repeatedly due to initialization failures.
startupProbe:
  enabled: true
  initialDelaySeconds: 120
If you are using NFS-mounted persistent volumes and encounter startup failures with Nextcloud, enabling startupProbe and setting a long enough initialDelaySeconds can help mitigate this issue.
imaginary
The imaginary field specifies whether to enable imaginary as a backend service for your Nextcloud deployment.
imaginary:
  enabled: true
If you are planning to use imaginary, make sure that the nextcloud.defaultConfigs.imaginary.config.php field is set to true, so that Nextcloud is configured to use imaginary.
Deploying Helm Chart
- Add Nextcloud Helm Repository:
helm repo add nextcloud https://nextcloud.github.io/helm/
helm repo update
- Prepare values: Incorporate the sections above, filling in your domain, secret names, storageClass, endpoints, etc. Here is an example of a values.yaml`**:
image:
  flavor: fpm

nginx:
  enabled: true
  resources:
    requests:
      cpu: "100m"
      memory: "128Mi"
    limits:
      cpu: "500m"
      memory: "512Mi"

ingress:
  enabled: true
  className: nginx
  annotations:
    nginx.ingress.kubernetes.io/affinity: cookie
    nginx.ingress.kubernetes.io/proxy-body-size: 4G
    kubernetes.io/tls-acme: "true"
    cert-manager.io/cluster-issuer: opentelekomcloud-letsencrypt
    nginx.ingress.kubernetes.io/enable-cors: "true"
    nginx.ingress.kubernetes.io/cors-allow-headers: "X-Forwarded-For"
    # Keep this in sync with the README.md file of the Helm Chart (https://github.com/nextcloud/helm/blob/main/charts/nextcloud/README.md):
    nginx.ingress.kubernetes.io/server-snippet: |-
      server_tokens off;
      proxy_hide_header X-Powered-By;
      rewrite ^/.well-known/webfinger /index.php/.well-known/webfinger last;
      rewrite ^/.well-known/nodeinfo /index.php/.well-known/nodeinfo last;
      rewrite ^/.well-known/host-meta /public.php?service=host-meta last;
      rewrite ^/.well-known/host-meta.json /public.php?service=host-meta-json;
      location = /.well-known/carddav {
        return 301 $scheme://$host/remote.php/dav;
      }
      location = /.well-known/caldav {
        return 301 $scheme://$host/remote.php/dav;
      }
      location = /robots.txt {
        allow all;
        log_not_found off;
        access_log off;
      }
      location ~ ^/(?:build|tests|config|lib|3rdparty|templates|data)/ {
        deny all;
      }
      location ~ ^/(?:autotest|occ|issue|indie|db_|console) {
        deny all;
      }
  tls:
    - secretName: nextcloud-tls
      hosts:
        - nextcloud.example.com
  path: /
  pathType: Prefix
phpClientHttpsFix:
  enabled: true
  protocol: https

nextcloud:
  host: nextcloud.example.com
  existingSecret:
    enabled: true
    secretName: nextcloud
    usernameKey: nextcloud-username
    passwordKey: nextcloud-password
    tokenKey: token
    smtpUsernameKey: smtp-username
    smtpPasswordKey: smtp-password
    smtpHostKey: smtp-host
  ## SMTP configuration
  mail:
    enabled: false
  objectStore:
    s3:
      enabled: true
      legacyAuth: false
      ssl: true
      port: "443"
      region: "eu-de"
      bucket: "nextcloud"
      prefix: ""
      usePathStyle: false
      autoCreate: true
      storageClass: "STANDARD"
      existingSecret: "nextcloud-obs"
      secretKeys:
        host: "host"
        accessKey: "accessKey"
        secretKey: "secretKey"
        bucket: "bucket"
        sse_c_key: "sse_c_key"
  defaultConfigs:
    # Swift Object Storage as primary storage
    swift.config.php: false
    # -- imaginary support config
    imaginary.config.php: true
  configs:
    # For example, to enable image and text file previews:
    previews.config.php: |-
      <?php
      $CONFIG = array (
        'enable_previews' => true,
        'enabledPreviewProviders' => array (
          'OC\Preview\Movie',
          'OC\Preview\PNG',
          'OC\Preview\JPEG',
          'OC\Preview\GIF',
          'OC\Preview\BMP',
          'OC\Preview\XBitmap',
          'OC\Preview\MP3',
          'OC\Preview\MP4',
          'OC\Preview\TXT',
          'OC\Preview\MarkDown',
          'OC\Preview\PDF'
        ),
      );
    proxy.config.php: |-
      <?php
      $CONFIG = array (
        'trusted_proxies' => array(
          0 => '127.0.0.1',
          1 => '10.0.0.0/8',
        ),
        'forwarded_for_headers' => array('HTTP_X_FORWARDED_FOR'),
      );

  strategy:
    type: RollingUpdate
    rollingUpdate:
      maxSurge: 25%
      maxUnavailable: 10%

externalDatabase:
  enabled: true
  ## Supported database engines: mysql or postgresql
  type: mysql
  existingSecret:
    enabled: true
    secretName: nextcloud-db
    usernameKey: username
    passwordKey: password
    hostKey: host
    databaseKey: database

redis:
  enabled: true
  auth:
    enabled: true
    existingSecret: "nextcloud-redis"
    existingSecretPasswordKey: "redis-password"
  global:
    storageClass: "csi-disk"

cronjob:
  enabled: true
  resources:
    requests:
      cpu: "50m"
      memory: "64Mi"
    limits:
      cpu: "150m"
      memory: "128Mi"

hpa:
  enabled: true
  cputhreshold: 60
  minPods: 1
  maxPods: 10

resources:
  requests:
    cpu: "100m"
    memory: "128Mi"
  limits:
    cpu: "500m"
    memory: "512Mi"

persistence:
  enabled: true
  annotations:
    everest.io/volume-as: absolute-path
    everest.io/sfsturbo-share-id: <SFS_TURBO_ID>
    everest.io/path: /nextcloud
    everest.io/reclaim-policy: retain-volume-only
    everest.io/csi.enable-sfsturbo-dir-quota: "true"
  storageClass: "csi-sfsturbo"
  accessMode: ReadWriteMany
  size: 20Gi

startupProbe:
  enabled: true
  initialDelaySeconds: 120

imaginary:
  enabled: true
- Install/Upgrade: Run the following command to install/upgrade Nextcloud:
helm -n nextcloud upgrade \
--install nextcloud nextcloud/nextcloud \
-f values.yaml \
--version 6.6.10
- Verify Pods & Services: Run these commands to ensure Nextcloud is ready:
kubectl -n nextcloud get pods
kubectl -n nextcloud get svc,ingress
- Wait until all Nextcloud pods are
RunningandREADY. - Check that Ingress is assigned an external IP and DNS resolves.
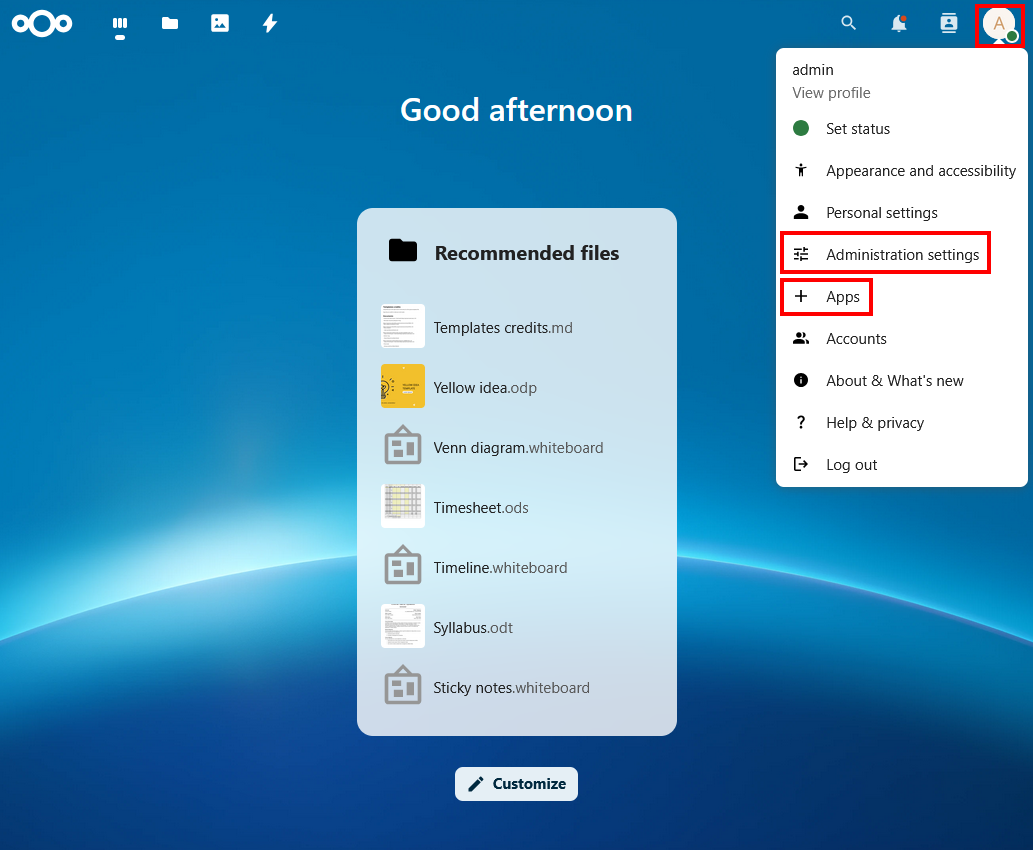
- Initial Setup:
- Access Nextcloud using the URL provided in the Ingress.
- Log in with the credentials provided in the nextcloud secret. Complete the initial setup like installing preferred apps, configuring settings or etc.
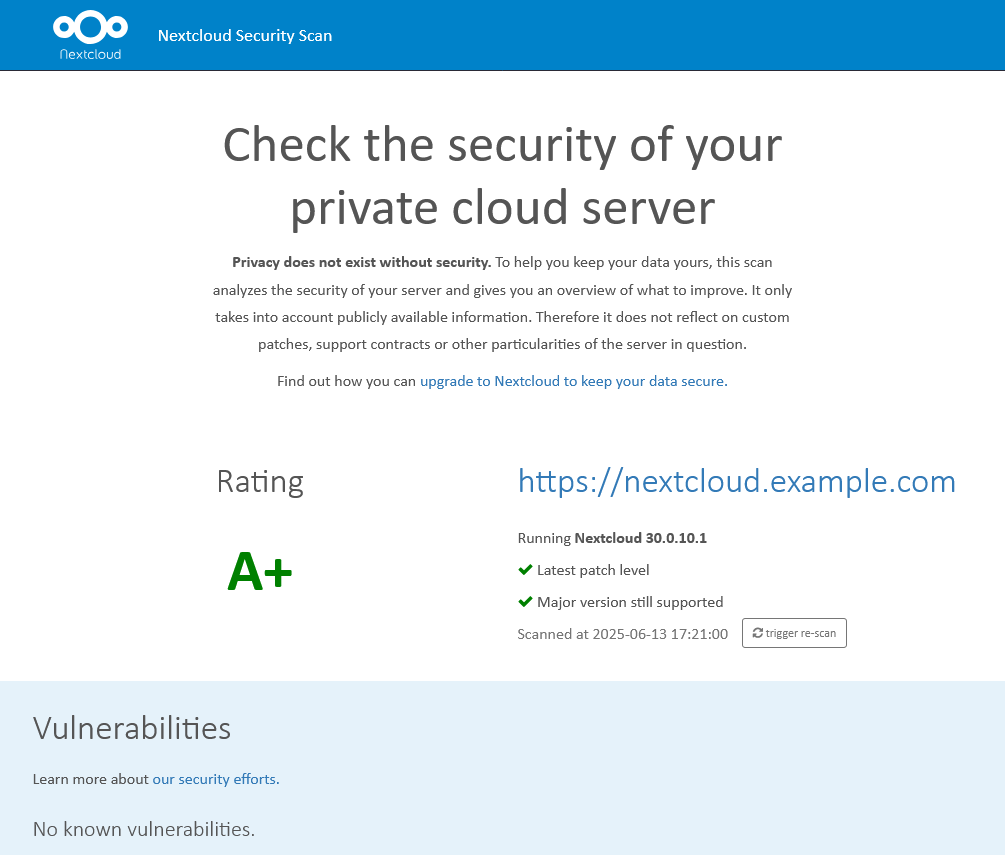
Validation & Testing
You can check the security of your setup with the Nextcloud Security Scan. If everything is secure, you will get an A+ score. If not, you can check the scan results for specific issues.
You can also check the following to make sure your setup is reliable and resilient to failures:
- File Upload/Download: Upload files of various sizes and observe that files end up encrypted in the OBS bucket.
- Database Connectivity: Check RDS metrics to confirm queries.
- Failover Testing:
- Delete one Nextcloud pod and ensure another pod serves traffic normally.
- Test node failure: cordon/drain a node and verify pods reschedule.
- Ingress TLS: Ensure HTTPS works and test redirect from HTTP to HTTPS if desired.