Automate DNS Records Creation from CCE Ingresses with ExternalDNS
ExternalDNS is a Kubernetes component used to manage DNS records for services and applications running in a Kubernetes cluster. It automates the creation, update, and deletion of DNS records based on the state of resources within the cluster. ExternalDNS is typically employed in scenarios where you need to expose services running inside a Kubernetes cluster to the outside world with fully qualified domain names (FQDNs), ensuring they are accessible by external users.
Common Scenarios
The most common use cases that ExternalDNS comes to apply are the following:
| Scenario | Description | Use Case |
|---|---|---|
| Exposing Services via Custom DNS Names | ExternalDNS automates DNS record creation for Kubernetes services, removing the need to manually manage DNS entries in providers like T Cloud Public DNS, AWS Route 53, Google Cloud DNS, or Azure DNS. | You deploy an app and want it reachable at app.example.com. ExternalDNS automatically points the domain to the service’s Elastic IP. |
| Automating DNS for Load Balancers | When using LoadBalancer-type services, the cloud provider assigns an Elastic IP. ExternalDNS creates DNS records that map your chosen FQDN to that IP. | A CCE LoadBalancer service is created, and ExternalDNS generates a DNS record mapping api.example.com to the public Elastic IP. |
| Multi-Cluster or Multi-Region Deployments | ExternalDNS manages DNS records across clusters and regions, enabling routing strategies like geo-routing or latency-based routing. | An app runs in both T Cloud Public regions (eu-de & eu-nl), and DNS automatically directs users to the closest cluster. |
| Managing Dynamic or Short-Lived Services | In environments with frequent scaling or service churn (e.g., microservices or CI/CD), ExternalDNS keeps DNS records up to date. | As microservices scale or new versions roll out, ExternalDNS updates DNS records to reflect the current state. |
| Integrating with Ingress Controllers | ExternalDNS manages DNS for hostnames defined in Ingress resources, ensuring DNS points to the correct Ingress endpoints. | An Ingress exposes blog.example.com, and ExternalDNS creates or updates the DNS record automatically. |
| Cloud-Native DNS Management | Provides automated DNS management integrated with T Cloud Public DNS for scalable, cloud-native Kubernetes workloads. | DNS entries for applications are automatically kept in sync with cluster state. |
| Managing Wildcard DNS Records | ExternalDNS can handle wildcard DNS entries useful for multi-tenant or subdomain-based routing scenarios. | A wildcard DNS entry like *.tenant.example.com routes different tenants based on subdomains, with ExternalDNS maintaining required records. |
Configuring your registar
We have to transfer the management of the NS-Records of your domain to the Domain Name Service of Open Telekom Cloud. Go on the site of your registar and make sure you configure the following:
- Turn off any Dynamic DNS service for the domain or the subdomains you are going to bind with T Cloud Public DNS.
- Change the NS-Records of your domain or the subdomains to point to:
ns1.open-telekom-cloud.comandns2.open-telekom-cloud.com
If those two prerequisites are met, then you are ready to configure a new DNS Public Zone and Record Sets for your domain in Open Telekom Cloud. We do have two mutually exclusive options to do that:
- Create manually from T Cloud Public Console, a new Public DNS Zone that binds to your domain and an A-Record in that zone that points to the EIP of the Elastic Load Balancer.
- Automate everything using ExternalDNS.
Creating a dedicated DNS Service Account
Go to IAM management console, and create a new User that permits programmatic access to T Cloud Public resources:
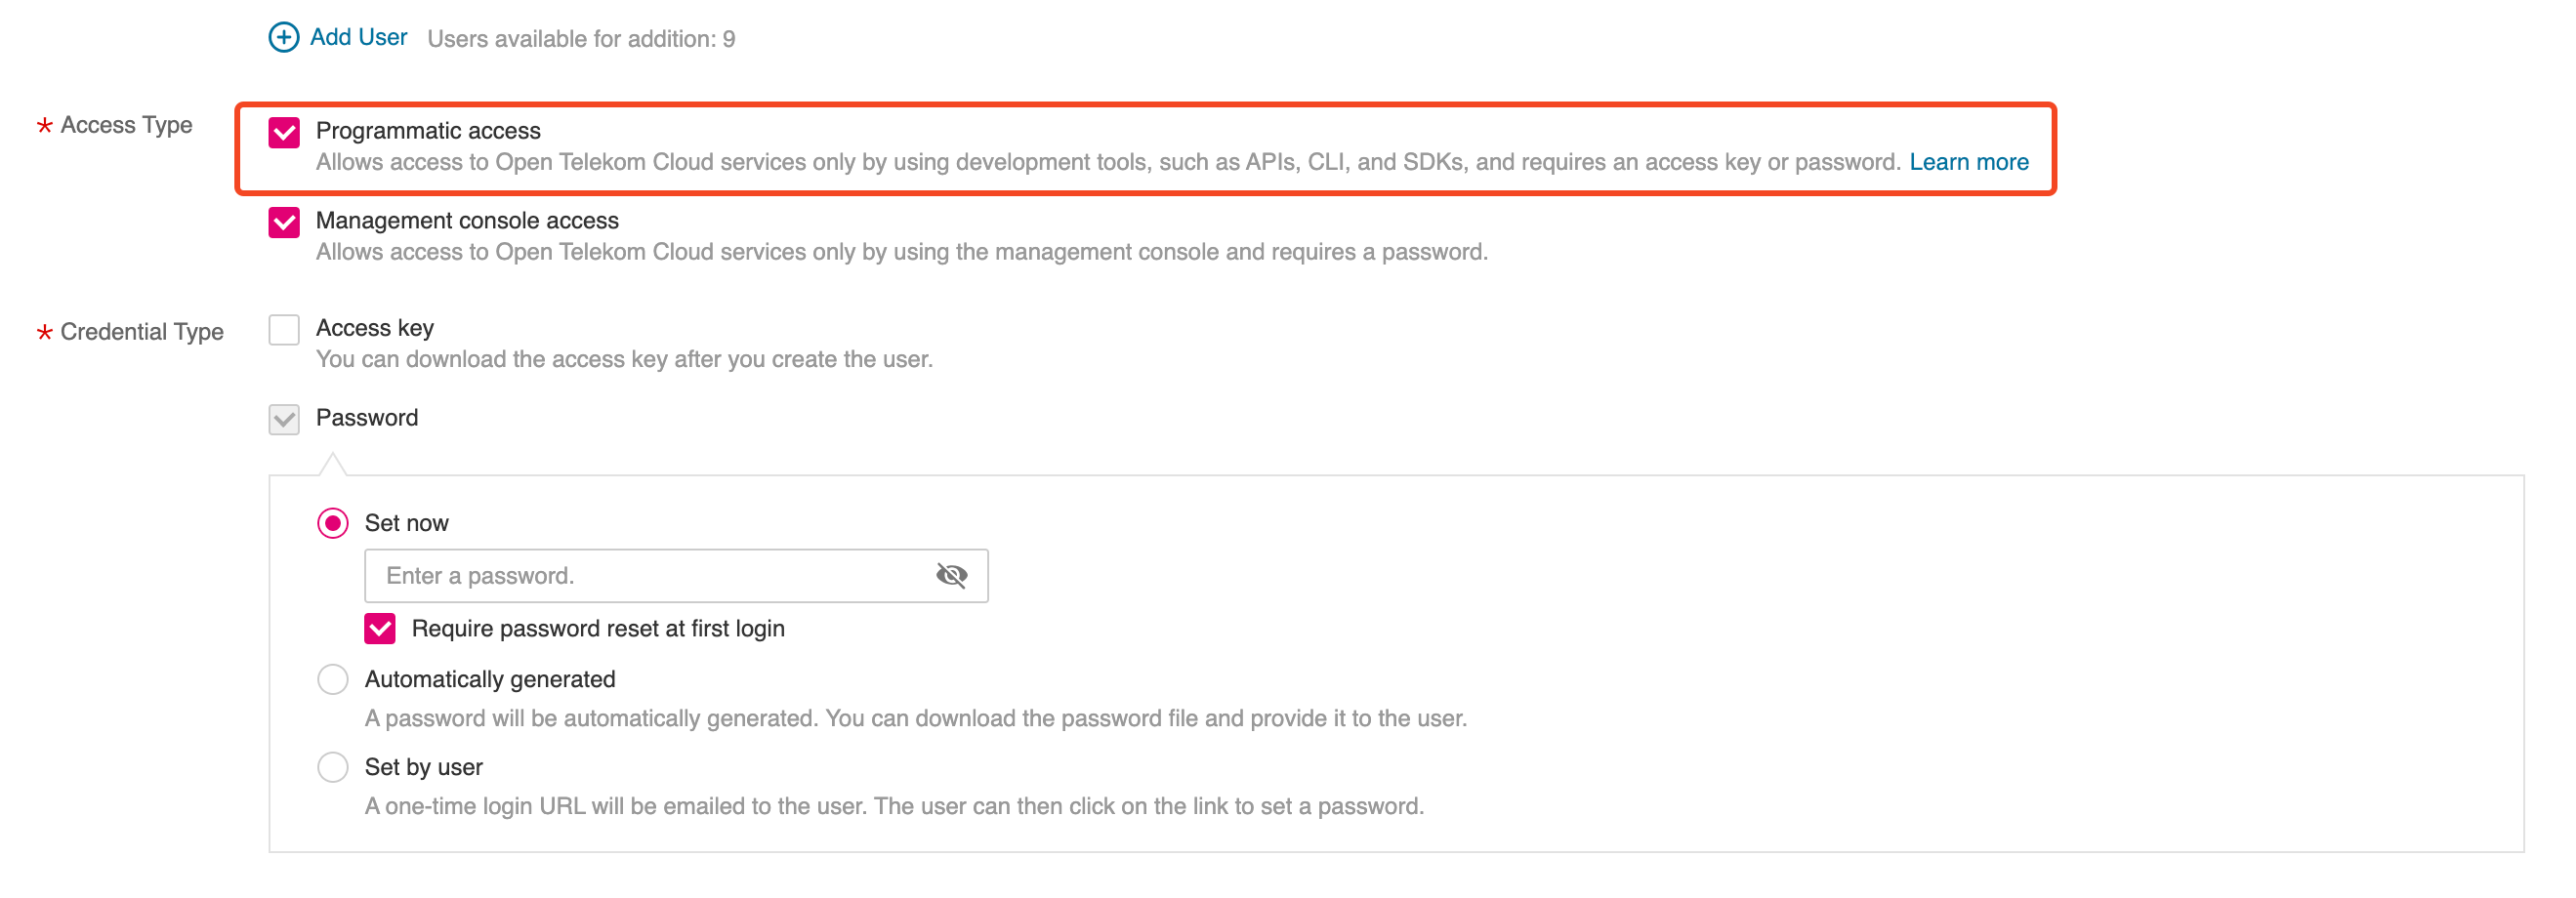
Grant this User the following permissions or add him directly to User
Group dns-admins (if it exists, otherwise create it for a more rigid permissions management but that's completely optional)

Deploying ExternalDNS on CCE
We are going to deploy ExternalDNS with Helm and we are going to specify T Cloud Public DNS Service as the ExternalDNS provider via the designated T Cloud Public out-of-tree webhook.
- Create clouds.yaml in your working directory:
clouds:
  openstack:
    auth:
      auth_url: https://iam.eu-de.otc.t-systems.com:443/v3
      username: "OTCAC_DNS_ServiceAccount"
      password: <OTCAC_DNS_ServiceAccount_PASSWORD>
      user_domain_name: "OTCXXXXXXXXXXXXXXXXXXXX"
      project_name: "eu-de_XXXXXXXXXXX"
    region_name: "eu-de"
    interface: "public"
    auth_type: "password"
Special attention is required here: although DNS is a global service, all changes must be made in the eu-de region.
- Create a namespace to isolate the installation (if it doesn't exist already) and deploy clouds.yaml as a
Secret:
kubectl create namespace external-dns

kubectl create secret generic oscloudsyaml \
   --namespace external-dns --from-file=clouds.yaml
- Create overrides.yaml in your working directory:
policy: sync
registry: txt
txtOwnerId: "cce-blueprints"

ignoreIngressTLSSpec: true

sources:
  - crd
  - service
  - ingress
  - gateway-httproute

provider:
  name: webhook
  webhook:
    image:
      repository: ghcr.io/opentelekomcloud/external-dns-t-cloud-public-webhook
      tag: 1.1.3
    extraVolumeMounts:
      - name: oscloudsyaml
        mountPath: /etc/openstack/
    resources: {}

extraVolumes:
  - name: oscloudsyaml
    secret:
      secretName: oscloudsyaml
By specifying:
sources, we instruct the ExternalDNS controller which resources it should watch and for which it should automatically create or update the corresponding A records.gateway-httprouteundersourcesstanza, we instruct the ExternalDNS controller to work with Gateway APIHttpRouteobjects. You can omit it if you are using only the Ingress API.txtOwnerId, we tell ExternalDNS to only touch records with the matching TXT record, and if that TXT record is missing, it knows to recreate both the A record AND the TXT record as a pair.txtOwnerIdis extremely important because it prevents ExternalDNS from managing DNS records created by other tools or processes or have records deleted or ovewritten by other ExternalDNS instances that might be running in other clusters. Use a different value for each ExternalDNS instance.
- Deploy the helm chart using the above defined overrides:
helm repo add external-dns https://kubernetes-sigs.github.io/external-dns/
helm repo update

helm upgrade --install external-dns external-dns/external-dns \
  --namespace external-dns \
  --create-namespace \
  --values overrides.yaml
Verification
If you completed all these steps on a cluster that already exposes services through NGINX Ingress Controllers, and all components were configured correctly, ExternalDNS will automatically create the corresponding A records in the T Cloud Public DNS service.
Option 1: Creating a DNSEndpoint
We have now prepared everything needed to automatically provision a public DNS zone and a dedicated A record that links the Elastic IP of our Elastic Load Balancer to the FQDN of the subdomain configured earlier. To achieve this, we need to create a custom resource, based on the CRD installed by ExternalDNS, called DNSEndpoint.
apiVersion: externaldns.k8s.io/v1alpha1
kind: DNSEndpoint
metadata:
  name: keycloak
  namespace: keycloak
spec:
  endpoints:
  - dnsName: keycloak.example.de
    recordTTL: 300
    recordType: A
    targets:
    - XXX.XXX.XXX.XXX
Replace the placeholder value XXX.XXX.XXX.XXX of targets with the Elastic IP Address that is
assigned to your Elastic Load Balancer. Additionally, replace the value of dnsName with the FQDN of your (sub)domain.
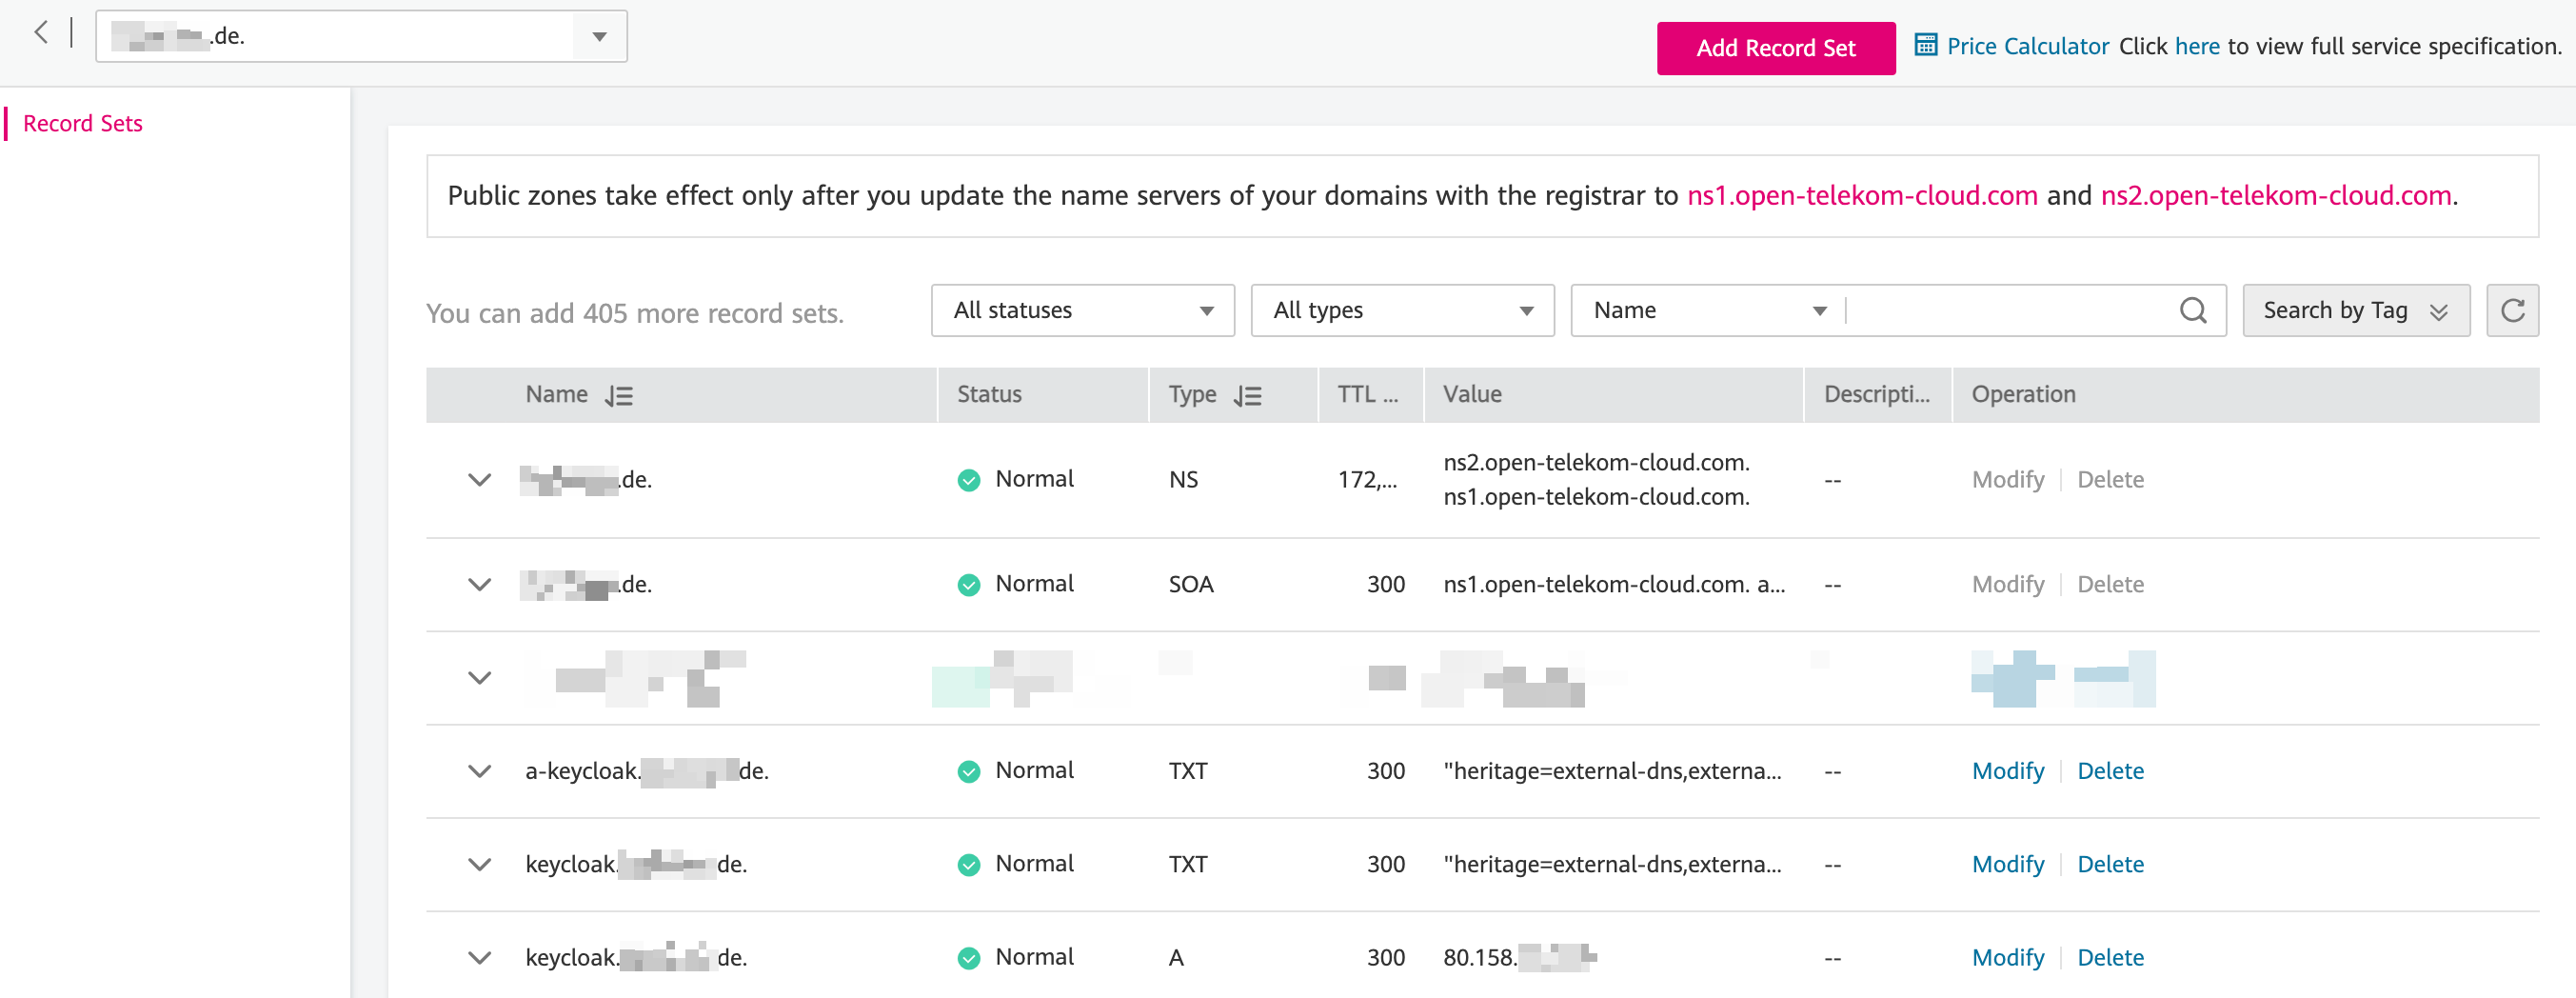
Wait for a couple of seconds, till the reconciliation loop of the ExternalDNS controller is done, and if all went well you should now see the Record Sets of your Public Zone populated with various entries:
Option 2: Configuring an Ingress
- First let's create the manifests to deploy a demo workload based on traefik/whoami:
apiVersion: apps/v1
kind: Deployment
metadata:
  name: whoami
  namespace: demo
spec:
  replicas: 3
  selector:
    matchLabels:
      app: whoami
  template:
    metadata:
      labels:
        app: whoami
    spec:
      containers:
      - name: whoami
        image: traefik/whoami:latest
        ports:
        - containerPort: 80
---
apiVersion: v1
kind: Service
metadata:
  name: whoami-service
  namespace: demo
spec:
  selector:
    app: whoami
  ports:
  - protocol: TCP
    port: 80
    targetPort: 80
  type: NodePort
traefik/whoami is a minimal Go webserver that prints OS information and HTTP request details. It’s often used to quickly inspect requests, debug routing, test load balancers, or expose services in containerized environments.
and deploy it using kubectl:
kubectl create namespace demo
kubectl apply -f whoami.yaml
-
Before proceeding, ensure that the ACME DNS‑01 solver for T Cloud Public is installed, along with the required ClusterIssuer for Let's Encrypt.
-
Next, we’ll expose this workload using an
Ingress:
apiVersion: networking.k8s.io/v1
kind: Ingress
metadata:
  name: whoami-ingress
  namespace: demo
  annotations:
    cert-manager.io/cluster-issuer: opentelekomcloud-letsencrypt
spec:
  ingressClassName: nginx
  tls:
  - hosts:
    - whoami.example.de
    secretName: whoami-example-de-tls
  rules:
  - host: "whoami.example.de"
    http:
      paths:
      - path: /
        pathType: ImplementationSpecific
        backend:
          service:
            name: whoami-service
            port:
              number: 80
Replace the placeholder whoami.example.de with your own FQDN. After completing all steps, you should have the following resources:
✅ A whoami Deployment and Service
✅ A whoami Ingress served by the Ingress Controller with class name nginx
✅ A whoami-example-de-tls certificate automatically created by the T Cloud Public ACME DNS-01 solver
✅ An A record and a TXT record in the public DNS zone for example.de, pointing whoami.example.de to the assigned Elastic IP (EIP)
Option 3: Private DNS Zones Records
We will follow the same steps as in the previous option, but this time the Ingress will be configured to use a private DNS zone. To achieve this, add the following annotation:
external-dns.alpha.kubernetes.io/webhook-zone-type: private
So the ingress manifest should now look like:
apiVersion: networking.k8s.io/v1
kind: Ingress
metadata:
  name: whoami-ingress
  namespace: demo
  annotations:
    cert-manager.io/cluster-issuer: opentelekomcloud-letsencrypt
    external-dns.alpha.kubernetes.io/webhook-zone-type: private
spec:
  ingressClassName: nginx
  tls:
  - hosts:
    - whoami.example.de
    secretName: whoami-example-de-tls
  rules:
  - host: "whoami.example.de"
    http:
      paths:
      - path: /
        pathType: ImplementationSpecific
        backend:
          service:
            name: whoami-service
            port:
              number: 80
Replace the placeholder whoami.example.de with your own FQDN. After completing all steps, you should have the following resources:
✅ A whoami Deployment and Service
✅ A whoami Ingress served by the Ingress Controller with class name nginx
✅ A whoami-example-de-tls certificate automatically created by the T Cloud Public ACME DNS-01 solver
✅ An A record and a TXT record in the private DNS zone this time, for example.de, pointing whoami.example.de to the assigned Elastic IP (EIP)
1️⃣ The external-dns.alpha.kubernetes.io/webhook-zone-type annotation is a custom annotation provided by the T Cloud Public ExternalDNS Webhook. It allows you to explicitly define the DNS zone type that should be used when creating DNS records.
Supported values are:
public: creates records in a public DNS zoneprivate: creates records in a private DNS zone
2️⃣ If the annotation external-dns.alpha.kubernetes.io/webhook-zone-type is not specified, the webhook implicitly defaults to public.
3️⃣ If both a public and a private DNS zone exist with the same domain name, you must explicitly specify which zone should be targeted by adding the external-dns.alpha.kubernetes.io/set-identifier annotation.
For example:
external-dns.alpha.kubernetes.io/set-identifier: private, targets the private DNS zoneexternal-dns.alpha.kubernetes.io/set-identifier: public, targets the public DNS zone
This ensures that the ExternalDNS webhook can correctly distinguish between zones with identical names and create the DNS records in the intended zone.