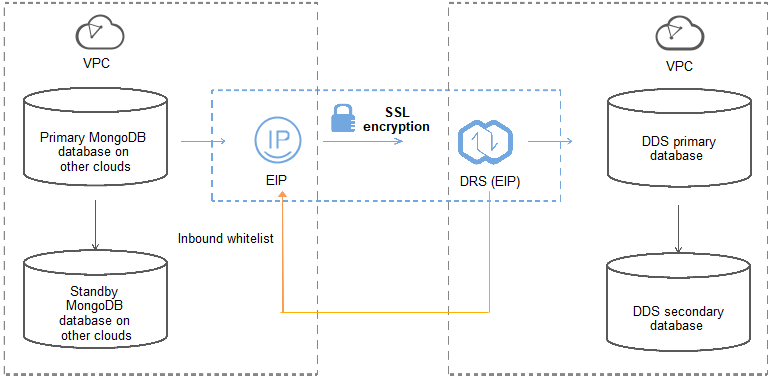
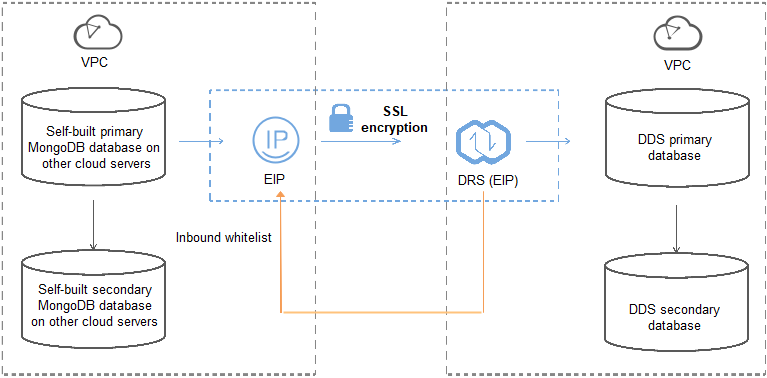
From Other Cloud MongoDB to DDS
DRS helps you migrate MongoDB databases from other cloud platforms to DDS on the current cloud. With DRS, you can migrate databases online with zero downtime and your services and databases can remain operational during migration.
Solution Design
This section describes how to use DRS to migrate MongoDB databases from another cloud to DDS on the current cloud. Migration scenarios include:
Migrating MongoDB databases from another cloud to DDS on the current cloud
Migrating self-built MongoDB databases from servers on another cloud to DDS on the current cloud
Procedure

- Database migration is closely impacted by a wide range of environmental and operational factors. To ensure the migration goes smoothly, perform a test run before the actual migration to help you detect and resolve any potential issues in advance. Recommendations on how to minimize any potential impacts on your data base are provided in this section.
- It is strongly recommended that you start your migration task during off-peak hours. A less active database is easier to migrate successfully. If the data is fairly static, there is less likely to be any severe performance impacts during the migration.
Before creating a migration task, read the migration notes carefully.
For details, see precautions on using specific migration tasks in Data Replication Service Real-Time Migration.
Prerequisites
-
Permissions
Table 1 below, lists the permissions required for the source and destination databases when migrating a MongoDB database from another cloud to DDS on the current cloud.
Database Full Migration Permission Full+Incremental Migration Permission Source Replica set: The source database user must have the read permission for the database to be migrated.
Single node: The source database user must have the read permission for the database to be migrated.
Cluster: The source database user must have the read permission for the databases to be migrated and the config database. To migrate accounts and roles of the source database, the source database user must have the read permission for thesystem.usersandsystem.rolessystem tables of the admin database.Replica set: The source database user must have the read permission for the databases to be migrated and the local database.
Single node: The source database user must have thereadpermission for the databases to be migrated and the local database.
Cluster: The source mongos node user must have thereadAnyDatabasepermission for the databases to be migrated and the config database. The source shard node user must have thereadAnyDatabasepermission for the admin database and thereadpermission for the local database. To migrate accounts and roles of the source database, the source database user must have the read permission for thesystem.usersandsystem.rolessystem tables of the admin database.Destination The destination database user must have the dbAdminAnyDatabasepermission for the admin database and thereadWritepermission for the destination database. If the destination database is a cluster instance, the migration account must have the read permission for the config database.Table 1 Migration permissions
-
Source database permissions:
The source MongoDB database user must have all the required permissions listed in Table 1. If the permissions are insufficient, create a user that has all of the permissions on the source database.
-
Destination database permissions:
If the destination database is a DDS database, the initial account can be used.
-
-
Network settings
Enable public accessibility for the source database.
-
Source database network settings:
Any source database MongoDB instances will need to be accessible from the Internet.
-
Destination database network settings: No settings are required.
-
-
Security rules
-
Source database security group settings:
The replication instance needs to be able to access the source MongoDB instance. That means that the EIP of the replication instance must be on the whitelist of the source MongoDB instance.
Before configuring the network whitelist, you need to obtain the EIP of the replication instance.
-
After creating a replication instance on the DRS console, you can find the EIP on the Configure Source and Destination Databases page as shown in
Figure 4 <dds_0016__en-us_topic_0120558714_fig121513143432>.
You can also add
0.0.0.0/0to the source database whitelist to allow any IP address to access the source database but this action may result in security risks.If you do take this step, then once the migration is complete, you should delete this item from the whitelist or your system will insecure.
-
-
Destination database security group settings:
By default, the destination database and the DRS replication instance are in the same VPC and can communicate with each other. No further configuration is required.
-
-
Other
You need to export the user information of the MongoDB database first and manually add it to the destination DDS DB instance because the user information will not be migrated.
Migration Procedure
-
Create a migration task.
-
Log in to the management console and choose Databases -> Data Replication Service to go to the DRS console.
-
On the Online Migration Management page, click Create Migration Task.
-
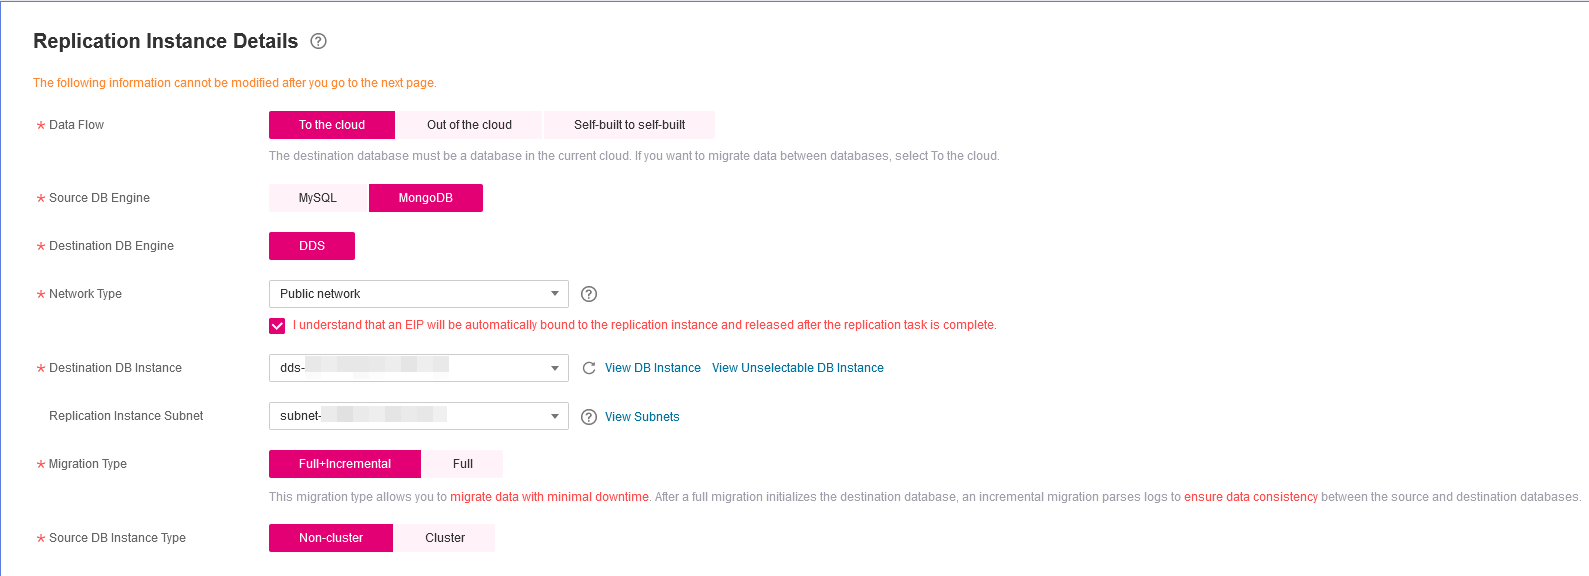
On the Replication Instance Information page, configure the task details, description, and replication instance details and click Next.
-
| Parameter | Description |
|---|---|
| Region | The region where the replication instance is deployed. You can change the region. To reduce latency and improve access speed, select the region closest to your workloads. |
| Project | The project corresponds to the current region and can be changed. |
| Task Name | The task name consists of 4 to 50 characters, starts with a letter, and can contain only letters (case-insensitive), digits, hyphens (-), and underscores (_). |
| Description | The description consists of a maximum of 256 characters and cannot contain the following special characters: =<>&'\" |
Table 2 Task settings
| Parameter | Description |
|---|---|
| Data Flow | To the cloud |
| Source DB Engine | Select MongoDB. |
| Destination DB Engine | Select DDS. |
| Network Type | Select Public network. |
| Destination DB Instance | The DDS DB instance you purchased. |
| Replication Instance Subnet | The subnet where the replication instance resides. You can also click View Subnet to go to the network console to view the subnet where the instance resides. By default, the DRS instance and the destination DB instance are in the same subnet. You need to select the subnet where the DRS instance resides, and there are available IP addresses for the subnet. To ensure that the replication instance is successfully created, only subnets with DHCP enabled are displayed. |
| Migration Type | Full This migration type is suitable for scenarios where service interruption is acceptable. All objects in non-system databases are migrated to the destination database at one time. The objects include collections and indexes. Full+Incremental The full+incremental migration type allows you to migrate data without interrupting services. After a full migration initializes the destination database, an incremental migration parses logs to ensure data consistency between the source and destination databases. |
| Source DB Instance Type | If you select Full+Incremental for Migration Type, set this parameter based on the source database. If the source database is a cluster instance, set this parameter to Cluster. If the source database is a replica set or a single node instance, set this parameter to Non-cluster. |
| Obtain Incremental Data | This parameter is available for configuration if Source DB Instance Type is set to Cluster. You can determine how to capture data changes during the incremental synchronization. oplog: For MongoDB 3.2 or later, DRS directly connects to each shard of the source DB instance to extract data. If you select this mode, you must disable the balancer of the source instance. When testing the connection, you need to enter the connection information of each shard node of the source instance. changeStream: This method is recommended. For MongoDB 4.0 and later, DRS connects to mongos nodes of the source instance to extract data. If you select this method, you must enable the WiredTiger storage engine of the source instance. Note Only whitelisted users can use changeStream. To use this function, submit a service ticket. In the upper right corner of the management console, choose Service Tickets > Create Service Ticket to submit a service ticket. |
| Source Shard Quantity | If Source DB Instance Type is set to Cluster and Obtain Incremental Data is set to oplog, enter the number of source shard nodes. The default minimum number of source DB instances is 2 and the maximum number is 32. You can set this parameter based on the number of source database shards. |
Table 3 Replication instance settings
-
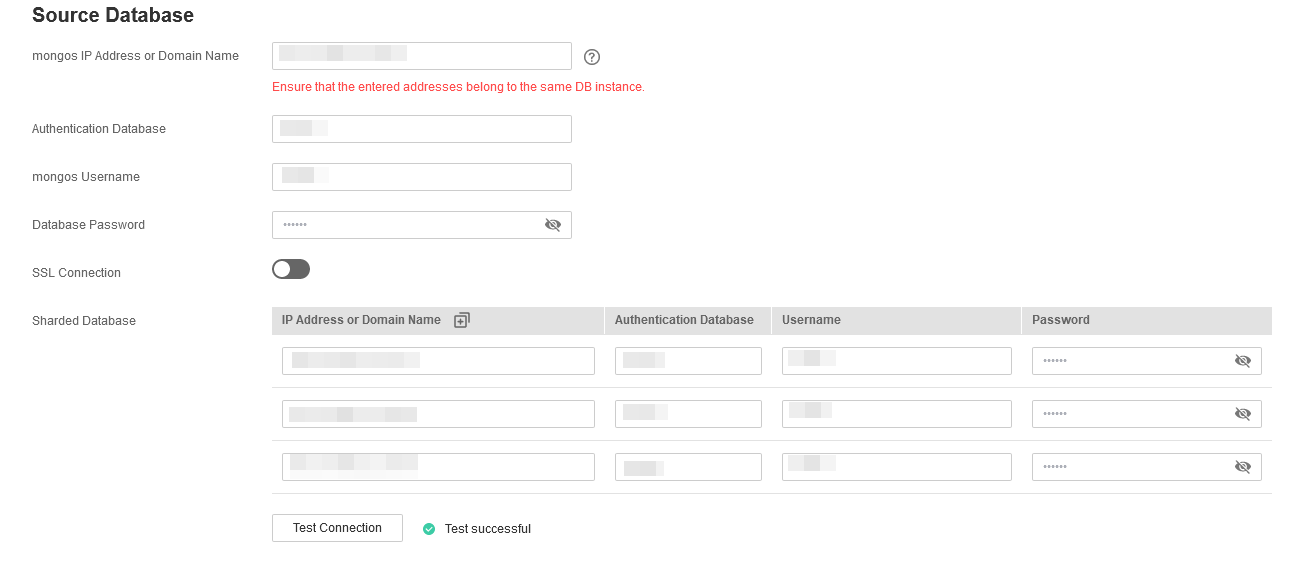
On the Configure Source and Destination Databases page, wait until the replication instance is created. Then, specify source and destination database information and click Test Connection for both the source and destination databases to check whether they have been connected to the replication instance. After the connection tests are successful, select the check box before the agreement and click Next.
-
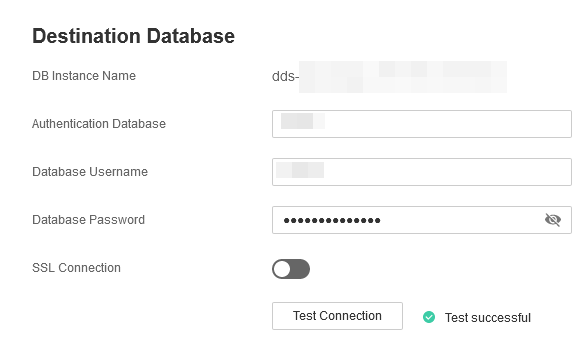
Destination database configuration
Parameter Description mongos Address IP address or domain name of the source database in the IP address/Domain name:Port format. The port of the source database. Range: 1 - 65534 You can enter a maximum of three groups of IP addresses or domain names of the source database. Separate multiple values with commas (,). For example: 192.168.0.1:8080,192.168.0.2:8080. Ensure that the entered IP addresses or domain names belong to the same sharded cluster. Note If multiple IP addresses or domain names are entered, the test connection is successful as long as one IP address or domain name is accessible. Therefore, you must ensure that the IP address or domain name is correct. Authentication Database The name of the authentication database. For example: The default authentication database of T Cloud Public DDS instance is admin. mongos Username A username for the source database. mongos Password The password for the source database username. SSL Connection SSL encrypts the connections between the source and destination databases. If SSL is enabled, upload the SSL CA root certificate. Sharded Database Enter the information about the sharded databases in the source database. Table 4 Source database settings
Parameter Description DB Instance Name The DB instance you selected when creating the migration task and cannot be changed. Database Username The username for accessing the destination database. Database Password The password for the database username. Table 5 Destination database settings
-
-
On the Set Task page, select migration objects and click Next.
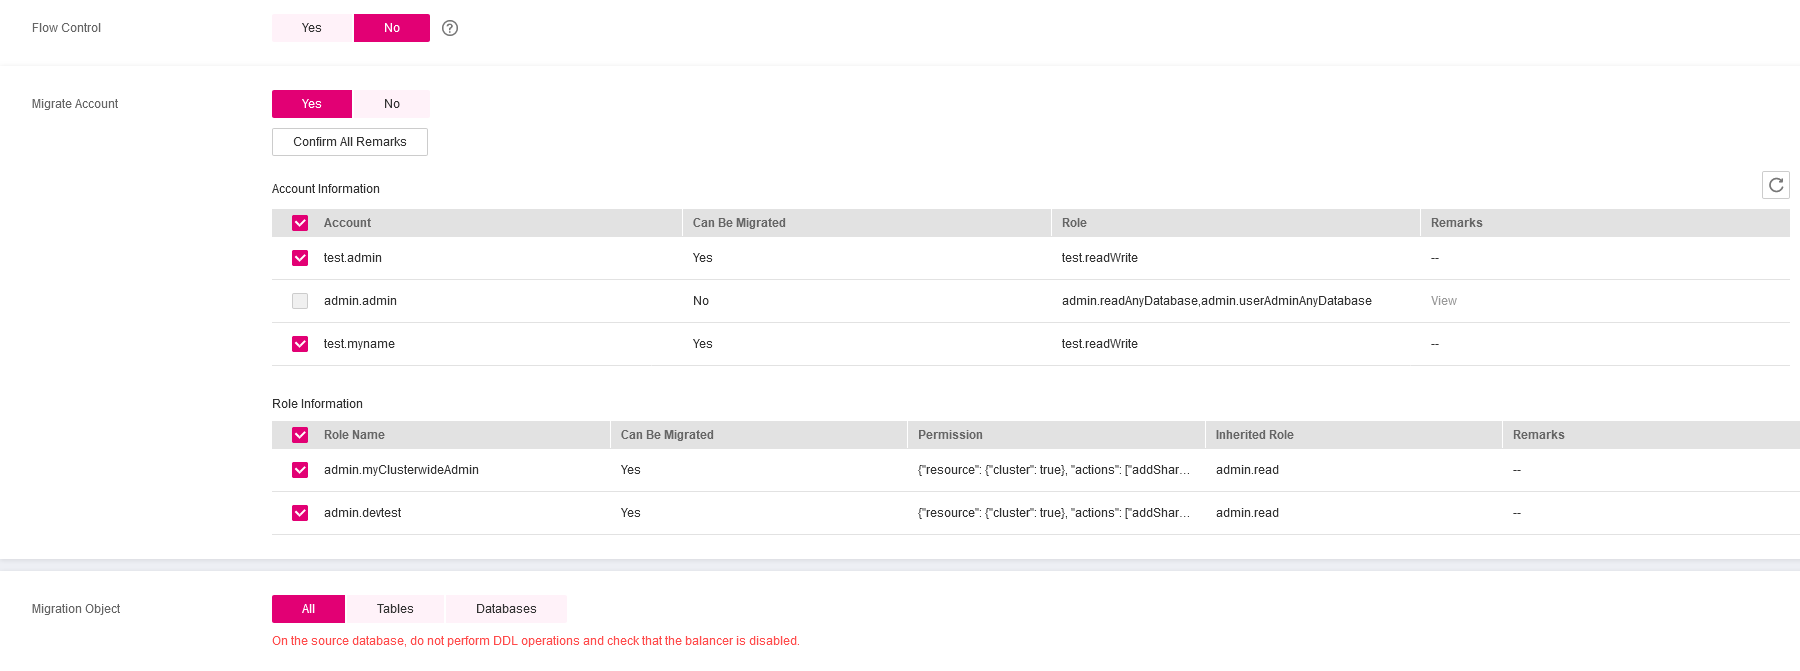
Parameter Description Migrate Account There are accounts that can be migrated completely and accounts that cannot be migrated. You can choose whether to migrate the accounts. Accounts that cannot be migrated or accounts that are not selected will not exist in the destination database. Ensure that your services will not be affected by these accounts. Yes If you choose to migrate accounts, see Migrating Accounts in Data Replication Service User Guide to migrate database users and roles. No During the migration, accounts and roles are not migrated. Migrate Object You can choose to migrate all objects, tables, or databases based on your service requirements. All: All objects in the source database are migrated to the destination database. After the migration, the object names will remain the same as those in the source database and cannot be modified. Tables: The selected table-level objects will be migrated. Databases: The selected database-level objects will be migrated. If the source database is changed, click in the upper right corner before selecting migration objects to ensure that the objects to be selected are from the changed source database. Note If you choose not to migrate all of the databases, the migration may fail because the objects, such as stored procedures and views, in the database to be migrated may have dependencies on other objects that are not migrated. To ensure a successful migration, you are advised to migrate all of the databases. When you select an object, the spaces before and after the object name are not displayed. If there are two or more consecutive spaces in the middle of the object name, only one space is displayed. The search function can help you quickly select the required database objects. Table 6 Migration object
-
On the Check Task page, check the migration task.
-
If any check fails, review the cause and rectify the fault. After the fault is rectified, click Check Again.
For details about how to handle check failures, see Checking Whether the Source Database Is Connected in Data Replication Service User Guide.
-
If all check items are successful, click Next.
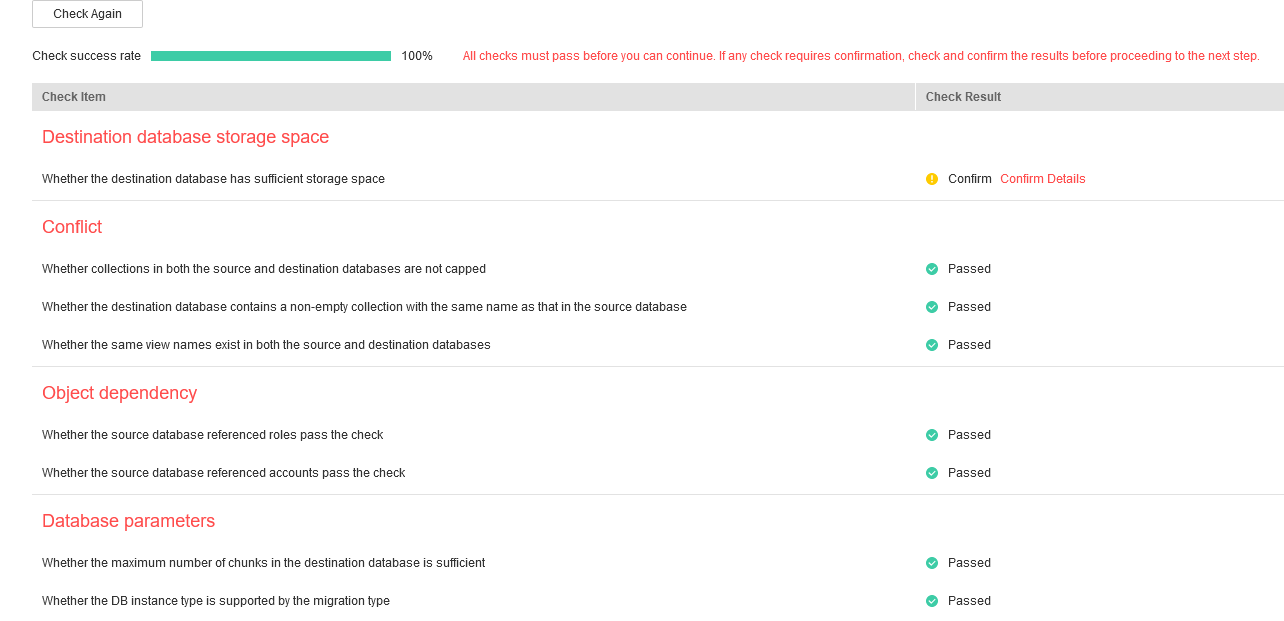
noteYou can proceed to the next step only when all check items are successful. If any alarms are generated, view and confirm the alarm details first before proceeding to the next step.
-
-
On the displayed page, specify Start Time and confirm that the configured information is correct and click Submit to submit the task.
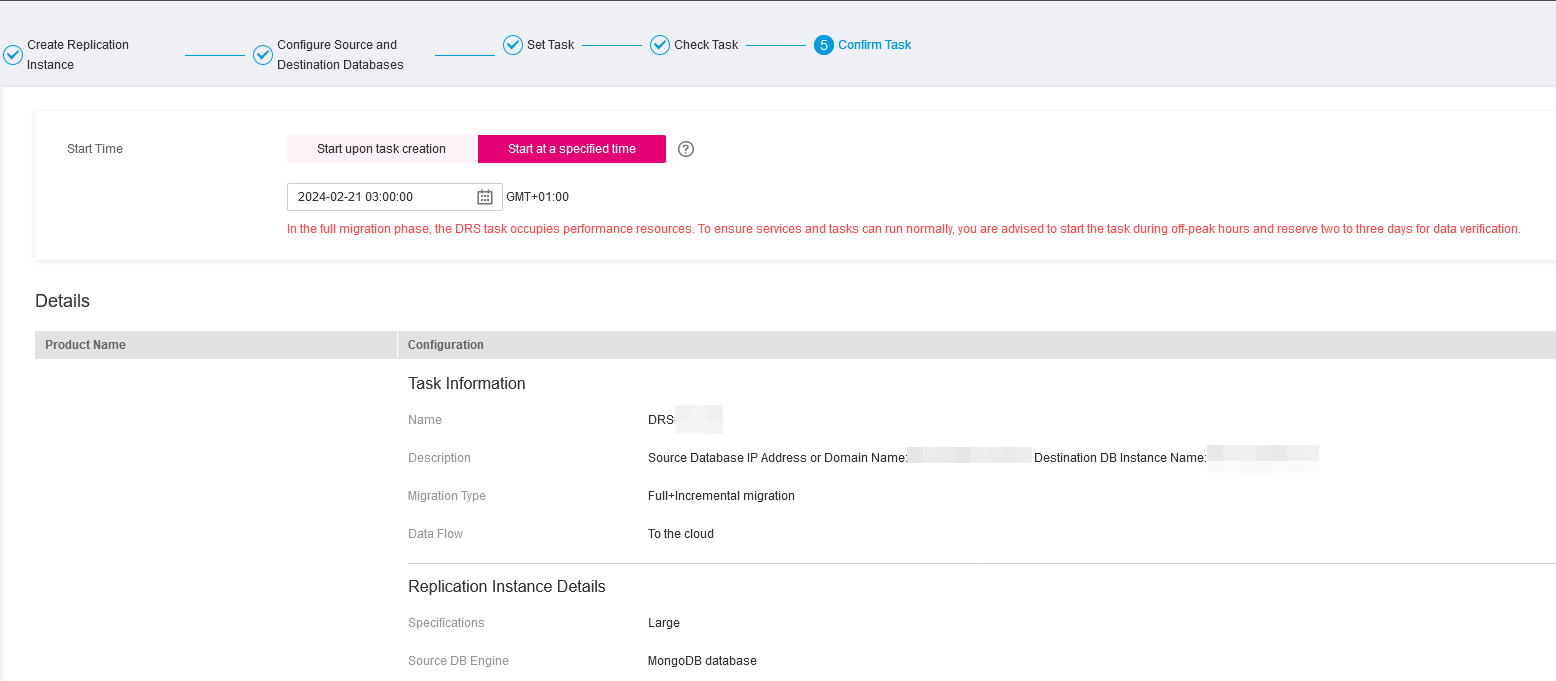
Parameter Description Start Time Set Start Time to Start upon task creation or Start at a specified time based on site requirements. The Start at a specified time option is recommended. Note The migration task may affect the performance of the source and destination databases. You are advised to start the task in off-peak hours and reserve two to three days for data verification. Table 7 Task startup settings
-
After the task is submitted, go back to the Online Migration Management page to view the task status.
-
Manage the migration task.
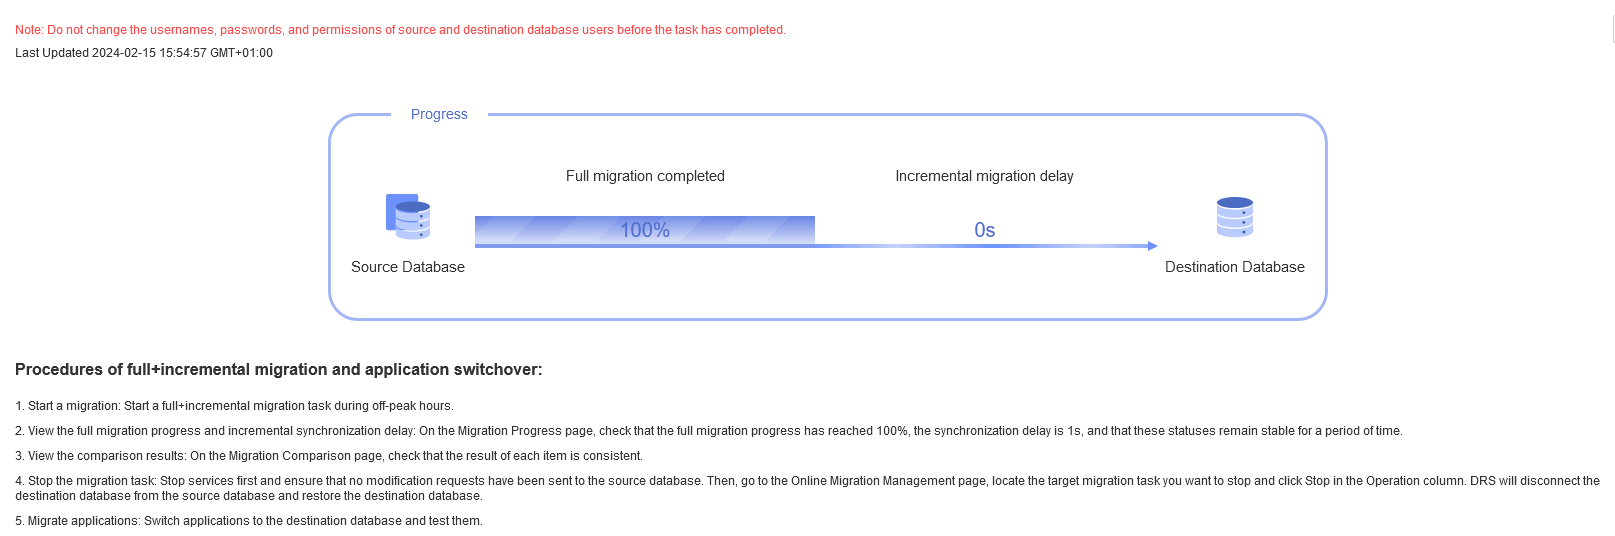
The migration task contains two phases: full migration and incremental migration. You can manage them in different phases.
- Full migration
- Viewing the migration progress: Click the target full migration task, and on the Migration Progress tab, you can see the migration progress of the structure, data, indexes, and migration objects. When the progress reaches 100%, the migration is complete.
- Viewing migration details: In the migration details, you can view the migration progress of a specific object. If the number of objects is the same as that of migrated objects, the migration is complete. You can view the migration progress of each object in detail. Currently, this function is available only to whitelisted users. You can submit a service ticket to apply for this function.
- Incremental Migration Permission
-
Viewing the synchronization delay: After the full migration is complete, an incremental migration starts. On the Online Migration Management page, click the target migration task. On the displayed page, click Migration Progress to view the synchronization delay of the incremental migration. If the synchronization delay is 0s, the destination database is being synchronized with the source database in real time. You can also view the data consistency on the Migration Comparison tab.
-
Viewing the migration results: On the Online Migration Management page, click the target migration task. On the displayed page, click Migration Comparison and perform a migration comparison in accordance with the comparison process, which should help you determine an appropriate time for migration to minimize service downtime.
For details, see Comparing Migration Items in Data Replication Service User Guide.
-
- Full migration
-
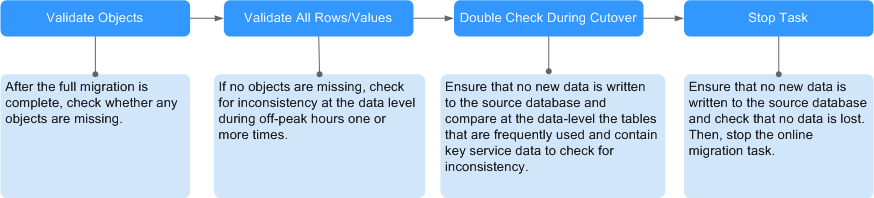
Cut over services.
You are advised to start the cutover process during off-peak hours. At least one complete data comparison is performed during off-peak hours. To obtain accurate comparison results, start data comparison at a specified time point during off-peak hours. If it is needed, select Start at a specified time for Comparison Time. Due to slight time difference and continuous operations on data, inconsistent comparison results may be generated, reducing the reliability and validity of the results.
-
Interrupt services first. If the workload is not heavy, you may not need to interrupt the services.
-
Run the following statement on the source database and check whether any new sessions execute SQL statements within the next 1 to 5 minutes. If there are no new statements executed, the service has been stopped.
db.currentOp()noteThe process list queried by the preceding statement includes the connection of the DRS replication instance. If no additional session executes SQL statements, the service has been stopped.
-
On the Migration Progress page, view the synchronization delay. When the delay is displayed as 0s and remains stable for a period, then you can perform a data-level comparison between the source and destination databases. For details about the time required, refer to the results of the previous comparison.
- If there is enough time, compare all objects.
- If there is not enough time, use the data-level comparison to compare the tables that are frequently used and that contain key business data or inconsistent data.
-
Determine an appropriate time to cut the services over to the destination database. After services are restored and available, the migration is complete.
-
-
Stop or delete the migration task.
- Stopping the migration task. After databases and services are migrated to the destination database, to prevent operations on the source database from being synchronized to the destination database to overwrite data, you can stop the migration task. This operation only deletes the replication instance, and the migration task is still displayed in the task list. You can view or delete the task. DRS will not charge for this task after you stop it.
- Delete the migration task. After the migration task is complete, you can delete it. After the migration task is deleted, it will no longer be displayed in the task list.