Configuring Anti-Crawler Rules to Prevent Crawler Attacks
WAF provides three anti-crawler policies, bot detection by identifying User-Agent, website anti-crawler by checking browser validity, and CC attack protection by limiting the access frequency, to comprehensively mitigate crawler attacks against your websites.
Web crawlers make network information collection and query easy, but they also introduce the following negative impacts:
- Web crawlers always consume too much server bandwidth and increase server load as they use specific policies to browser as much information of high value on a website as possible.
- Bad actors may use web crawlers to launch DoS attacks against websites. As a result, websites may fail to provide normal services due to resource exhaustion.
- Bad actors may use web crawlers to steal mission-critical data on your websites, which will damage your economic interests.
Prerequisites
The domain name has been connected to WAF.
Enabling Robot Detection to Identify User-Agent
If you enable robot detection, WAF can detect and block threats such as malicious crawlers, scanners, and web shells.
-
Log in to the management console.
-
Click
 in
the upper left corner of the management console and select a region
or project.
in
the upper left corner of the management console and select a region
or project. -
Click
 in
the upper left corner and choose Web Application Firewall under
Security.
in
the upper left corner and choose Web Application Firewall under
Security. -
In the navigation pane on the left, choose Policies.
-
Click on Create Policy, type in a Policy Name and then click on the created Policy after its been created.
-
Ensure that Basic Web Protection is enabled (status:
 ).
).
-
In Basic Web Protection click Advanced Settings and enable General Check and Webshell Detection.
-
Enable Anti-Crawler protection functions based on your business needs.
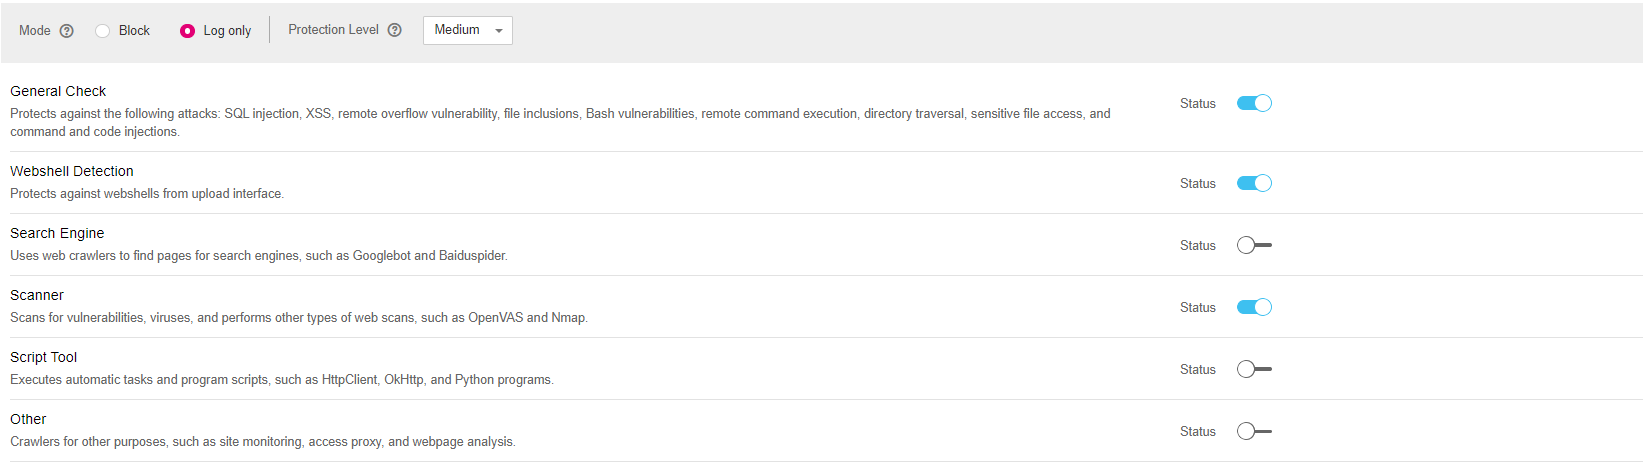
If WAF detects that a malicious crawler or scanner is crawling your website, WAF immediately blocks it and logs the event. You can view the crawler protection logs on the Events page.

Enabling Anti-Crawler Protection to Verify Browser Validity
If you enable anti-crawler protection, WAF dynamically analyzes website service models and accurately identifies crawler behavior based on data risk control and bot identification approaches.
-
Log in to the management console.
-
Click
in
the upper left corner of the management console and select a region
or project. -
Click
in
the upper left corner and choose Web Application Firewall under
Security & Compliance. -
In the navigation pane on the left, choose Policies.
-
Click on Create Policy, type in a Policy Name and then click on the created Policy after its been created.
-
Select the JavaScript tab and change Status if needed.
JavaScript anti-crawler is disabled by default. To enable it, click
 and
then click Confirm in the displayed dialog box to toggle on
and
then click Confirm in the displayed dialog box to toggle on
 .
.Protective Action: Block, Verification code, and Log only.
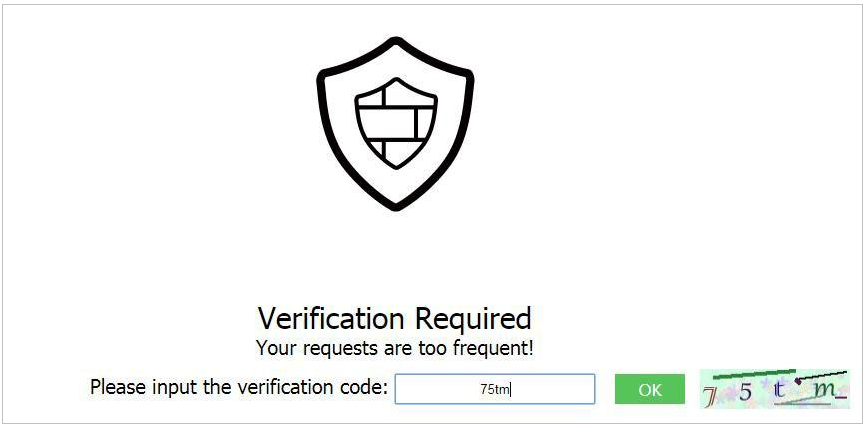
noteVerification code: If the JavaScript challenge fails, a verification code is required. Requests will be blocked unless the visitor enters a correct verification code.
important-
Cookies must be enabled and JavaScript supported by any browser used to access a website protected by anti-crawler protection rules.
-
If your service is connected to CDN, exercise caution when using the JS anti-crawler function. CDN caching may impact JS anti-crawler performance and page accessibility.
-
-
Configure a JavaScript-based anti-crawler rule by referring to the table below.
Two protective actions are provided: Protect all requests and Protect specified requests.
-
To protect all requests except requests that hit a specified rule
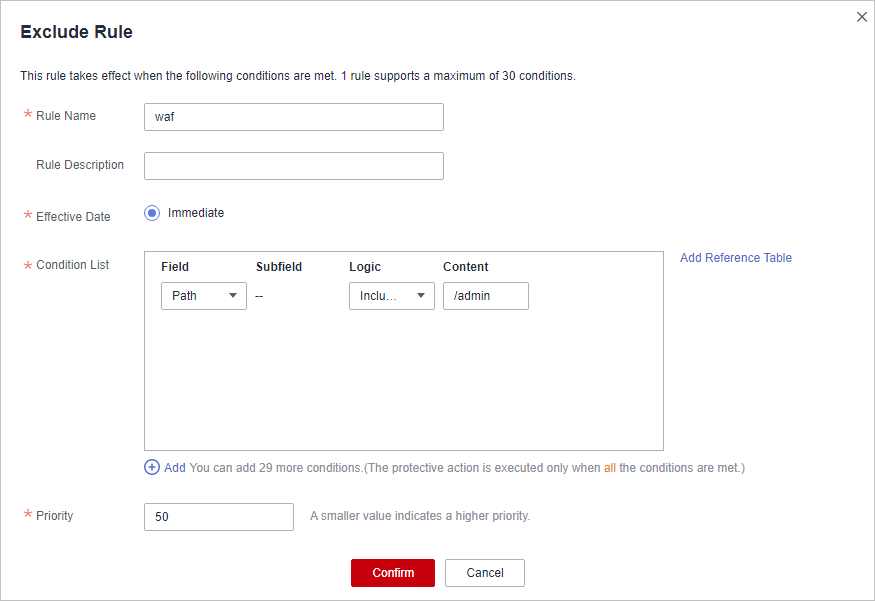
Set Protection Mode to Protect all requests. Then, click Exclude Rule, configure the request exclusion rule, and click Confirm.
-
To protect a specified request only
Set Protection Mode to Protect specified requests, click Add Rule, configure the request rule, and click Confirm.
Parameter Description Example Value Rule Name Name of the rule waf Rule Description A brief description of the rule. This parameter is optional. -Effective Date Time the rule takes effect. Immediate Condition List Parameters for configuring a condition are as follows: Field: Select the field you want to protect from the drop-down list. Currently, only Path and User Agent are included. Subfield Logic: Select a logical relationship from the drop-down list. Note If you set Logic to Include any value, Exclude any value, Equal to any value, Not equal to any value, Prefix is any value, Prefix is not any of them, Suffix is any value, or Suffix is not any of them, you need to select a reference table. Content: Enter or select the content that matches the condition. Path Include /admin Priority Rule priority. If you have added multiple rules, rules are matched by priority. The smaller the value you set, the higher the priority. 5 Table 1 Parameters of a JavaScript-based anti-crawler protection rule
-
If you enable anti-crawler, web visitors can only access web pages through a browser.
Configuring CC Attack Protection to Limit Access Frequency
A CC attack protection rule uses a specific IP address, cookie, or referer to limit the access to a specific path (URL), mitigating the impact of CC attacks on web services.
-
Log in to the management
-
Click
in the upper left corner of the management console and select a
region or project. -
Click
in the upper left corner and choose Web Application Firewall
under Security & Compliance. -
In the navigation pane on the left, choose Policies.
-
Click on the Policy and ofn the displayed page,, keep the
Status toggle on () for
CC Attack Protection.
-
In CC Attack Protection below Status , click Customize Rule and then Add rule. The following uses IP address-based rate limiting and human-machine verification as examples to describe how to add an IP address-based rate limiting rule, as shown in the figue below:
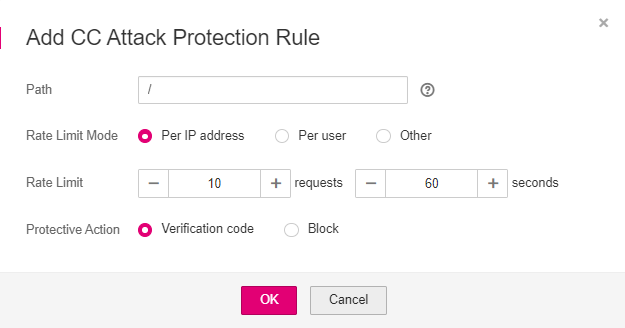
If the number of access requests exceeds the configured rate limit, the visitors are required to enter a verification code to continue the access.