Build a CI/CD Pipeline with Devtron, SWR and CCE
This blueprint covers integrating Devtron with T Cloud Public Container Engine (CCE) for efficient CI/CD pipelines. It details installing Devtron in CCE clusters, emphasizing using containerized Masters and dynamic Agents managed by Kubernetes for optimal resource utilization and self-healing. The Master schedules jobs, which Agents execute within Kubernetes pods. This setup enhances security and maintenance efficiency.
What is Devtron?
Devtron is an open-source software delivery workflow automation platform designed to streamline the DevOps lifecycle. It provides tools for continuous integration and continuous deployment (CI/CD), infrastructure management, application lifecycle management, and monitoring, specifically tailored for Kubernetes-based applications.
Key Features
- CI/CD Pipelines: Automated pipelines for building, testing, and deploying applications.
- Kubernetes Integration: Native support for Kubernetes, enabling easy management of Kubernetes clusters and deployments.
- Application Management: Tools for managing applications throughout their lifecycle, including versioning, rollback, and updates.
- Infrastructure Management: Automation of infrastructure provisioning and management, supporting Infrastructure as Code (IaC) practices.
- Monitoring and Logging: Built-in monitoring and logging capabilities to track application performance and troubleshoot issues.
- Collaboration: Features that facilitate team collaboration, including role-based access control and audit trails.
Devtron is particularly useful for teams adopting Kubernetes and microservices architectures, offering a unified platform to manage the entire software delivery pipeline.
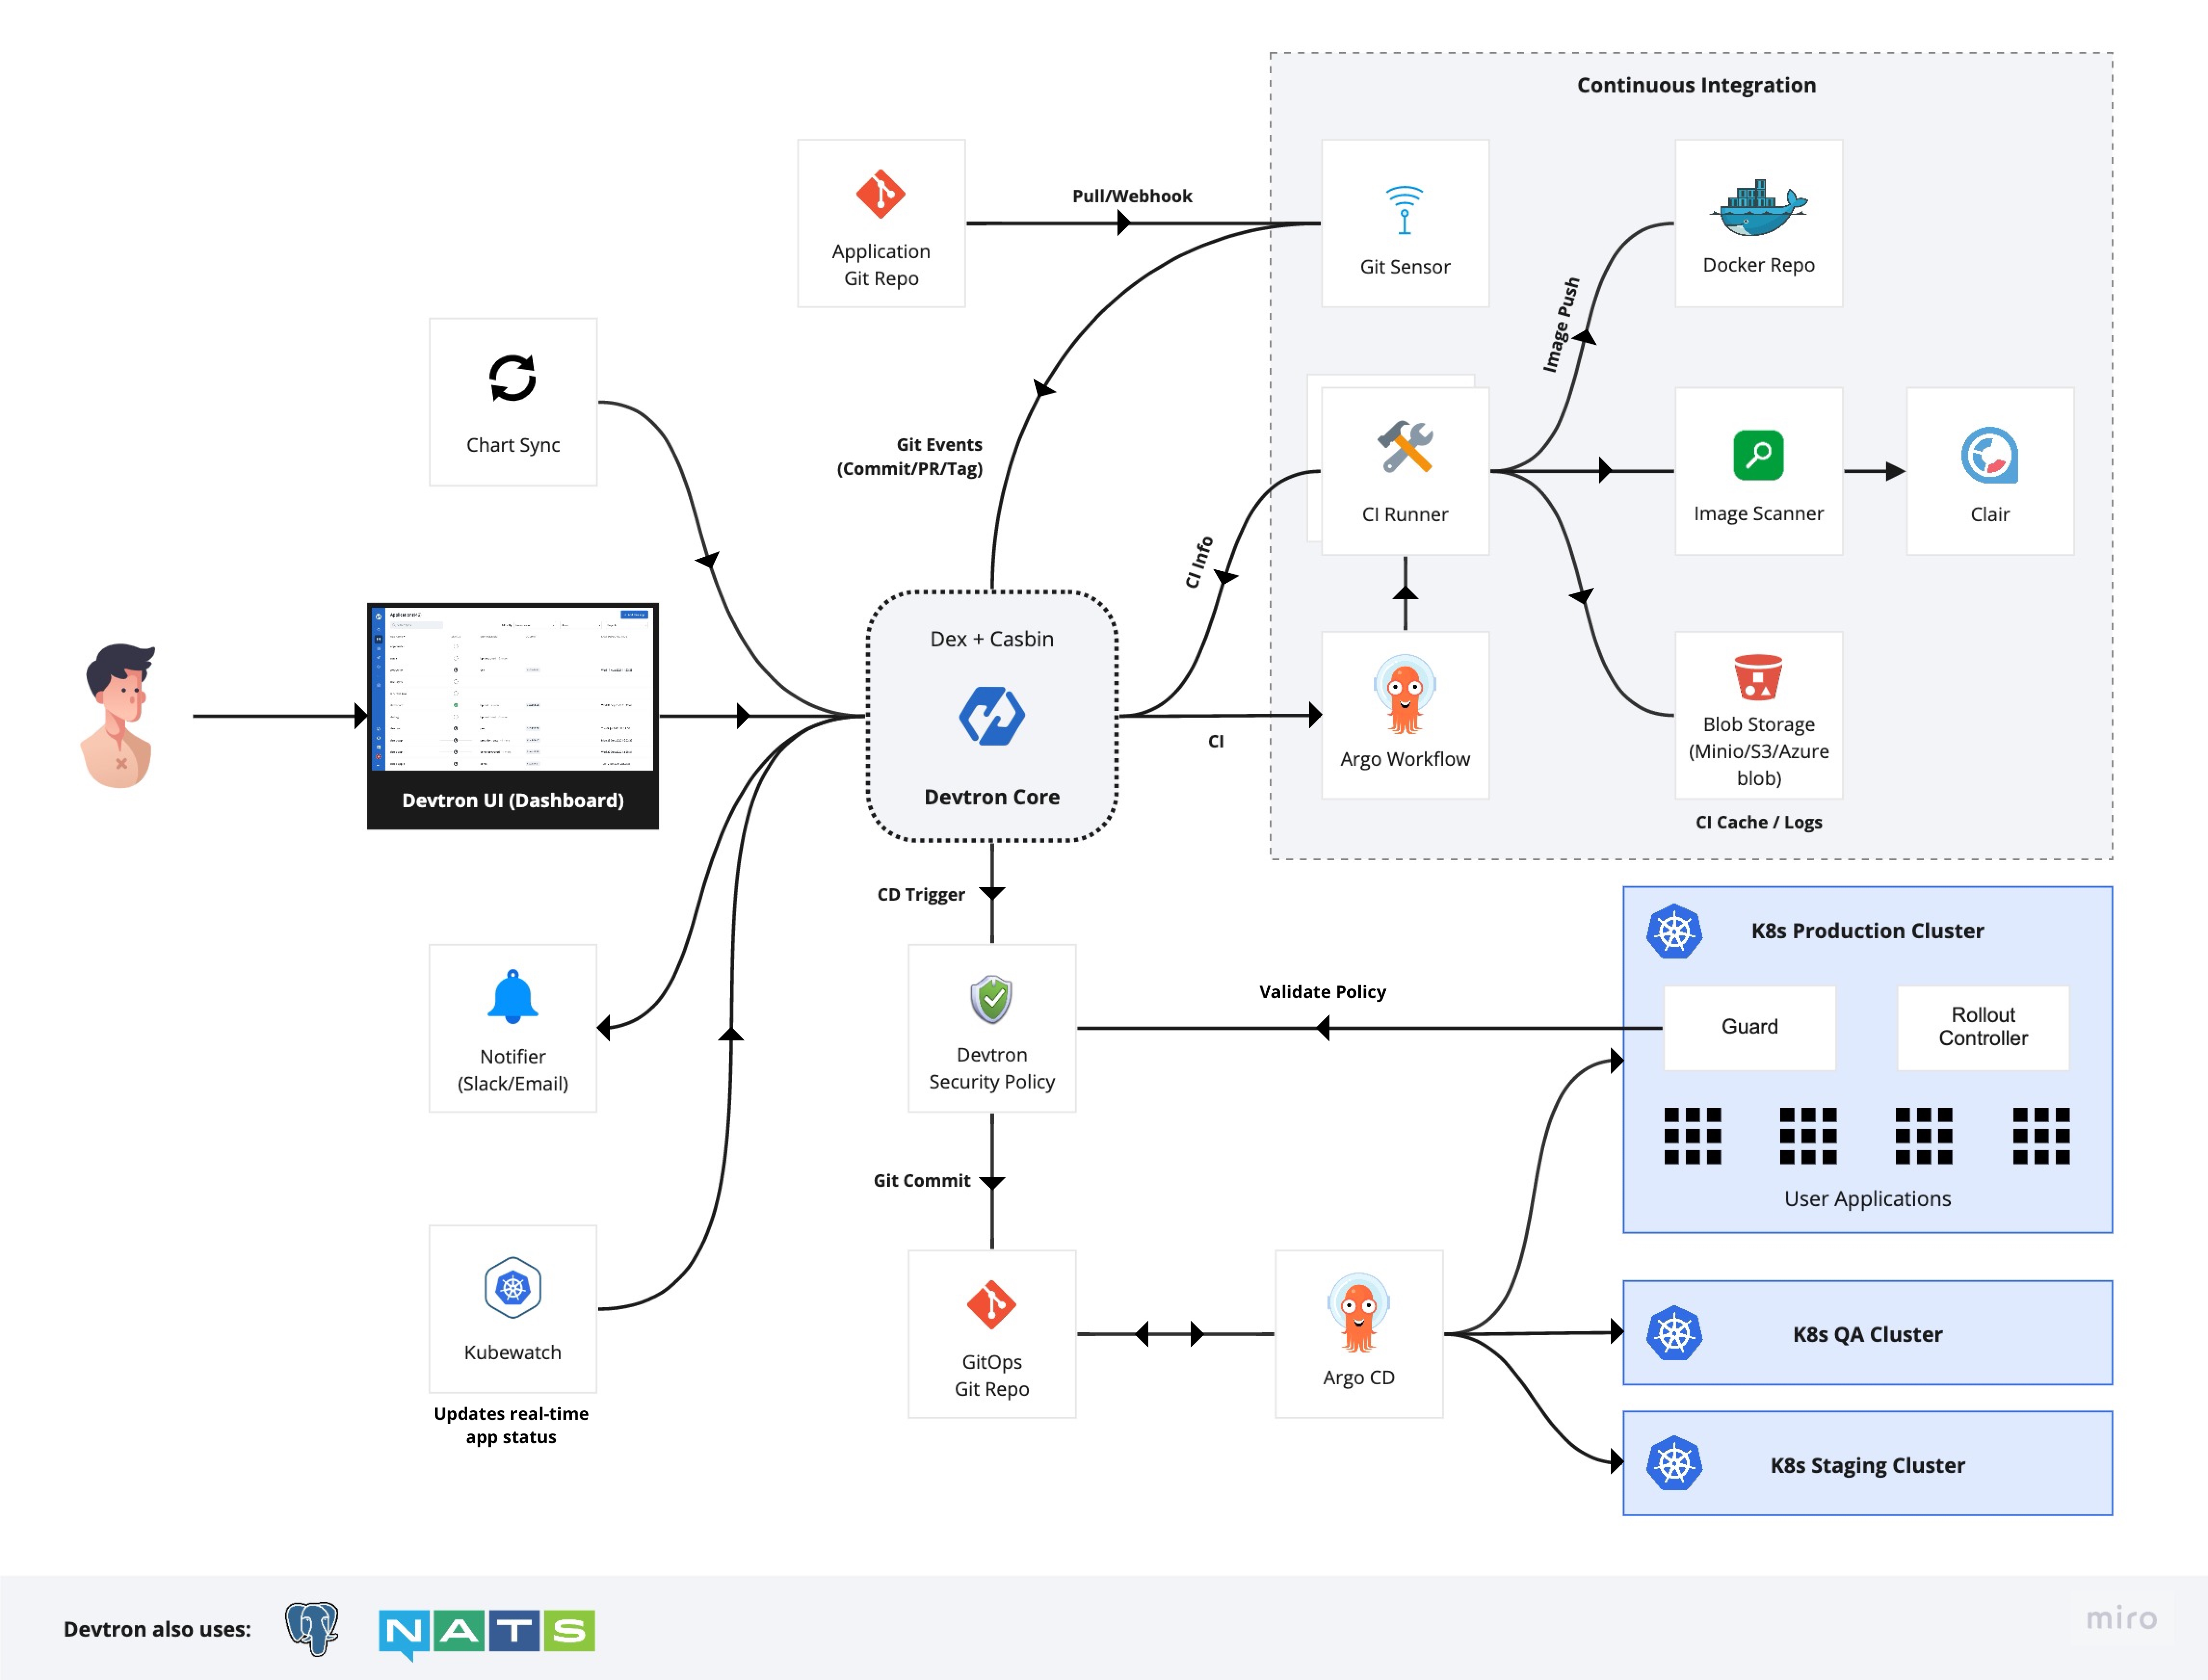
Architecture
The architecture of Devtron is designed to be highly modular and extensible, integrating seamlessly with Kubernetes and various CI/CD tools. Below are the primary components of Devtron:
- Devtron Dashboard: The user interface for managing applications, CI/CD pipelines, and infrastructure.
- CI/CD Integration: Connects with CI/CD tools like Jenkins, GitLab CI, and others to automate the build, test, and deployment processes.
- Kubernetes Agents: Deployed within Kubernetes clusters to manage and orchestrate deployments, scaling, and monitoring.
- Devtron API: Provides RESTful APIs for integrating with other tools and services, enabling automation and custom workflows.
- Devtron Plugins: Extensible plugins that add functionalities such as security scanning, GitOps, and more.
T Cloud Public, and CCE in its extent, do not provide official maintenance and support for Devtron. The maintenance is provided exclusively by the developers of the Devtron. You can read more in the documentation of the platform here.
Prerequisites
Before installing Devtron, ensure that your environment meets the following minimum requirements:
-
Kubernetes version 1.16 or higher is recommended.
-
Ensure Helm is installed on your Kubernetes cluster. Follow the official Helm installation guide for setup instructions.
-
The minimum resources required for installing Devtron vary based on the number of applications you plan to manage:
For Managing Up to 5 Applications:
Integration CPU Memory Devtron with CI/CD 2 6 GB Helm Dashboard by Devtron 1 1 GB For Managing More Than 5 Applications:
Integration CPU Memory Devtron with CI/CD 6 13 GB Helm Dashboard by Devtron 2 3 GB
- Ensure that the recommended resources are available on your Kubernetes cluster before proceeding with the Devtron installation.
- It is NOT recommended to use burstable CPU VMs for Devtron installation to ensure consistent performance.
Installing Devtron on CCE
This guide provides a step-by-step process to install Devtron, including selecting the appropriate installation repository, installing with Helm charts, accessing the dashboard via port forwarding, and logging in with an overview of the dashboard.
Choosing the Right Installation Option
Devtron offers different installation options based on your requirements. Here's how to decide which option to use:
- Devtron with CI/CD: Use this if you need comprehensive CI/CD integration, security scanning, GitOps, debugging, and observability.
- Helm Dashboard by Devtron: Choose this if you need a standalone installation focused on deploying, observing, managing, and debugging existing Helm applications across multiple clusters.
- Devtron with CI/CD and GitOps (Argo CD): Opt for this if you want CI/CD with GitOps capabilities enabled during installation.
Installing Devtron with Helm Charts
Follow these steps to install Devtron using Helm charts: In this instruction we use the first option Devtron with CI/CD.
-
Add Devtron Helm Repository: Add Devtron Helm repository to your local Helm client:
helm repo add devtron https://helm.devtron.aihelm repo update -
Install Devtron: Install Devtron using the Helm chart:
helm install devtron devtron/devtron-operator \--create-namespace --namespace devtroncd \--set installer.modules={cicd} -
Install Devtron: Check the status of the installation:
kubectl get pods -n devtroncd
Connecting Devtron to OBS for logging and caching
Follow these steps to connect the OBS blob storage to Devtron:
-
Create a bucket in OBS: You can create two different buckets one for log storage and another one for cache storage. In this example we make one bucket named
devtronfor both purposes. -
Updating Devtron: Update Devtron configuration using the following command:
helm upgrade devtron devtron/devtron-operator --namespace devtroncd --reuse-values \--set configs.BLOB_STORAGE_PROVIDER=S3 \--set configs.DEFAULT_CACHE_BUCKET=devtron \--set configs.DEFAULT_CACHE_BUCKET_REGION=eu-de \--set configs.DEFAULT_BUILD_LOGS_BUCKET=devtron \--set configs.DEFAULT_CD_LOGS_BUCKET_REGION=eu-de \--set secrets.BLOB_STORAGE_S3_ACCESS_KEY=<access-key\--set secrets.BLOB_STORAGE_S3_SECRET_KEY=<secret-key\--set configs.BLOB_STORAGE_S3_ENDPOINT=https://obs.eu-de.otc.t-systems.comnoteTo obtain access-key and secret-key for OBS check Accessing OBS Using Permanent Access Keys.
Accessing the Devtron Dashboard
By default, the Devtron service is exposed internally through a NodePort. This makes Devtron available on any Kubernetes node IP.
Alternatively, a dedicated external IP can be assigned by switching the service type to LoadBalancer. This will provision a cloud load balancer that handles routing external traffic to Jenkins. For details, see Creating a LoadBalancer Service.
To access the Devtron dashboard, you need to use port forwarding. Follow these steps:
-
Port Forward to Access the Dashboard: Forward the port to access the Devtron dashboard from your local machine:
kubectl port-forward svc/devtron-service -n devtroncd 8080:8080 -
Visit the Dashboard: Open your web browser and visit http://localhost:8080 to access the Devtron dashboard.
-
Credentials:
-
UserName:
admin -
Password: Run the following command to get the admin password for Devtron:
kubectl -n devtroncd get secret devtron-secret -o jsonpath='{.data.ADMIN_PASSWORD}' | base64 -d
-
Connecting Devtron to SWR or other private Registries
Devtron allows you to configure a private image repository to securely store and manage your container images and other artifacts. This guide provides a step-by-step process to add a SWR to Devtron.
Adding a Container Registry
-
Go to Global Configurations -> Container/OCI Registry from the left sidebar.

-
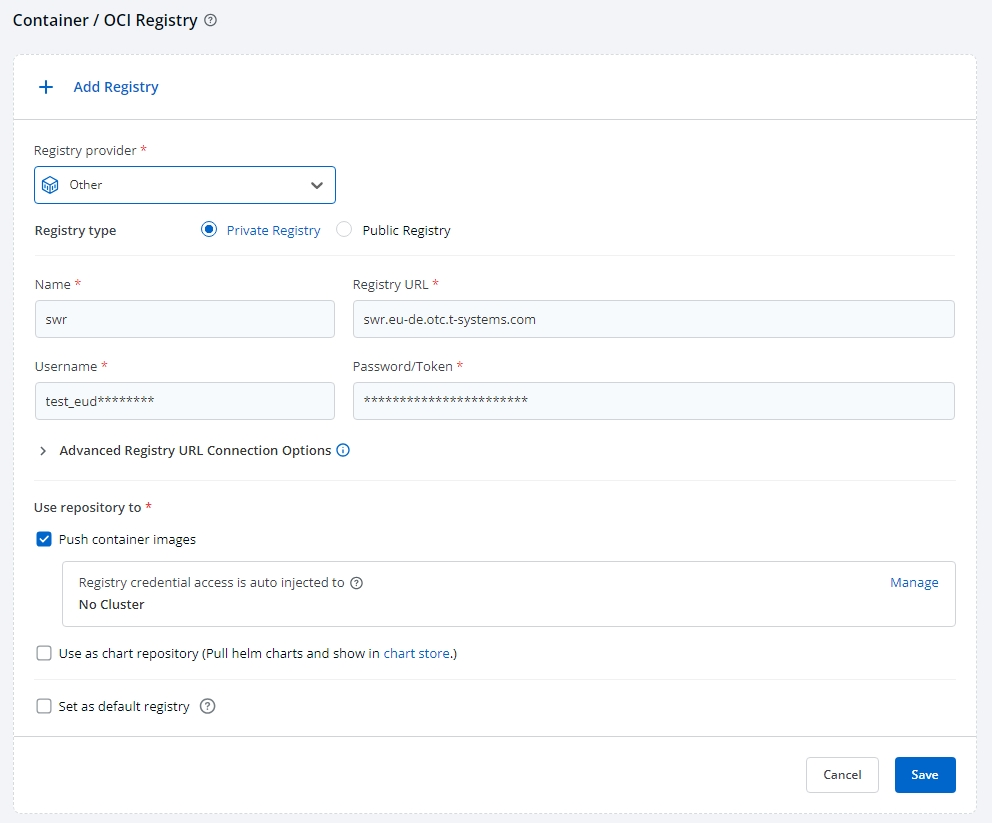
Click Add Registry.
-
From the Registry provider dropdown, select your desired provider. Select other for SWR.
-
Choose the appropriate registry type:
- Private Registry: For authenticated access, requiring credentials. Use this for SWR.
- Public Registry: For open access, no credentials needed.
-
Fill in the following fields:
Field Description Registry URL URL of your registry. swr.{region}.otc.t-systems.comUsername Account username. Password/Token Account password or token. Advanced Registry URL Connection Options Options for secure/insecure connections. noteIf you are in region
eu-dethen the Registry URL isswr.eu-de.otc.t-systems.com. To obtain an Username and Password/Token for accessing SWR, see Obtaining a Long-Term Valid Login Command.and here is a recap of available options:
Field Description Name Provide a name for your registry. This will appear in the Container Registry dropdown in the Build Configuration section of your application. Registry URL Enter the registry URL Authentication Type Select based on your registry provider. Push container images Enable if you plan to push container images to this repository. Push helm packages Enable if you plan to push Helm charts to this repository. Use as chart repository Enable if you want Devtron to pull Helm charts from this registry. Set as default registry Enable to set this registry as the default for your images or artifacts. -
Click Save and continue.
Managing Registry Credentials
Manage registry credentials for deploying images from private registries. Super-admins can choose to auto-inject credentials or use a secret.
-
Click Manage to configure registry credential access.
Option Description *Do not inject credentials to clusters Select clusters to exclude from auto-injection. Auto-inject credentials to clusters Select clusters for auto-injection. -
Define credentials, choose between:
- Use Registry Credentials or Specify Image Pull Secret
Use Registry Credentials
If you use this option selected clusters will be auto-injected with registry credentials.

Specify Image Pull Secret
If you use this option selected clusters will be injected with the credentials provided by the secret specified on that cluster. You can create a Secret by providing credentials on the command line.

Create this Secret and name it regcred:
kubectl create -n ${namespace} secret docker-registry regcred \
--docker-server=${your-registry-server} \
--docker-username=${your-name} \
--docker-password=${your-pword} \
--docker-email=${your-email}
where,
namespaceis your sub-cluster, e.g.,devtron-demoyour-registry-serveris your Private Registry. Useswr.${region}.otc.t-systems.comtemplate for SWR.your-nameis your usernameyour-pwordis your passwordyour-emailis your email
You have successfully set your credentials in the cluster as a Secret
called regcred:
Typing secrets on the command line may store them in your shell history unprotected, and those secrets might also be visible to other users on your PC during the time when kubectl is running.
Enter the Secret name in the field and click Save.
Deploying a Sample Application on Devtron and Building a CI/CD Pipeline
This tutorial will guide you through deploying a Node.js sample application on Devtron and setting up a CI/CD pipeline.
Testing locally (Optional)
First, clone the sample application repository and navigate into the directory:
git clone https://github.com/devtron-labs/getting-started-nodejs
cd getting-started-nodejs
To run the sample application locally, execute:
node app.js
Now, open your browser and go to http://localhost:8080. You should see the following output:
{"cities":["Amsterdam","Berlin","New York","San Francisco","Tokyo"]}
Deploying the Application with Devtron
Let's deploy this Node.js application using Devtron. Ensure that your global configurations are successfully saved and validated before proceeding.
Creating a new Application
- Login into your Devtron Dashboard.
- Navigate to Applications and click on Create and select Custom app.
- Provide an appropriate name for the application,
sample-appfor example, select the project in which you want your app to reside, and create it.
Configuring the Git Repository
After creating the app, set up the configurations.
- Select Github Public as the Git Account.
- Copy the repository URL https://github.com/devtron-labs/getting-started-nodejs and paste it into the Git repo section of your application.
- Click Save and proceed to the next configuration.
Configuring Docker Build
- Select the repository where you want to store your CI build image. Select either SWR which you configured in Connecting Devtron to SWR or provide other image repository.
- Choose the build configuration. We use Dockerfile because this repository provides a default Dockerfile on this path ./Dockerfile.
- Click Save & Next and proceed to the next configuration.
You can also use Buildpacks if your selected repository doesn't provide any Dockerfile or if you prefer them. For more information about Buildpacks visit Cloud Native Buildpacks.
Configuring the Deployment Template
-
Set the container Port: The Node.js application runs on port
8080. -
Set the resource limits and requests:
cpu: "0.5"andmemory: 50Mi -
Click Save & Next and proceed to the next configuration.
Creating a CI/CD Workflow
- Click on New workflow to create a CI/CD workflow to deploy the application.
- Select Build and Deploy from Source Code for the type of pipeline.
- Configure Code Source. For Source type select Branch Fixed and
for Branch Name enter the branch which you want to pull form here e.g.
main. - Click Create Pipeline.
- Add your CD pipeline, choosing the environment where you want to deploy the app.


Adding Secrets and/or ConfigMaps
- Add or create secrets or configmaps as required.
- These values will be automatically mounted with pods and made available as volumes or environment variables, based on your selection.
Triggering the CI Pipeline
- Trigger your CI pipeline by selecting the latest image.
- Deploy it on your chosen project.
Fetching the LoadBalancer URL
- After a successful deployment, check the service manifest.
- Fetch the LoadBalancer URL from the dashboard present in the App Details section.
Verifying the Deployment
-
Use the LoadBalancer URL in your browser.
-
You should see the following output:
{"cities":["Amsterdam","Berlin","New York","San Francisco","Tokyo"]}
Conclusion
By following these steps, you have successfully deployed a Node.js application using Devtron and set up a CI/CD pipeline to automate the process.
For more detailed documentation about the configurations, refer to the Devtron User Guide.
Appendix (Review of Advanced Options)
Build and Deploy from Source Code
Build and Deploy from Source Code workflow allows you to build the container image from a source code repository.
- From the Applications menu, select your application.
- On the App Configuration page, select Workflow Editor.
- Select + New Workflow.
- Select Build and Deploy from Source Code.
- Enter the following fields on the Create build pipeline window:

Advanced Options
The Advanced CI Pipeline includes the following stages:
- Pre-build stage: The tasks in this stage are executed before the image is built.
- Build stage: In this stage, the build is triggered from the source code that you provide.
- Post-build stage: The tasks in this stage will be triggered once the build is complete.

The Pre-build and Post-build stages allow you to create Pre/Post-Build CI tasks.
Build Stage
Go to the Build stage tab.

| Field Name | Required/Optional | Description |
|---|---|---|
| Pipeline Name | Required | A name for the pipeline |
| Source type | Required | Select the source type to build the CI pipeline: Branch Fixed, Branch Regex, Pull Request, Tag Creation |
| Branch Name | Required | Branch that triggers the CI build |
| Docker build arguments | Optional | Override docker build configurations for this pipeline. Key: Field name Value: Field value |
Source type
Branch Fixed
This allows you to trigger a CI build whenever there is a code change on the specified branch. Enter the Branch Name of your code repository.
Branch Regex
Branch Regex allows users to easily switch between branches matching the configured Regex before triggering the build pipeline.

For example, if the user sets the Branch Regex as feature-\*, then users can trigger from branches such as feature-1450, feature-hot-fix etc.
Pull Request
This allows you to trigger the CI build when a pull request is created in your repository.
Configure the webhook for either GitHub or Bitbucket.
The Pull Request source type feature only works for the host GitHub
or Bitbucket Cloud.

To trigger the build from specific PRs, you can filter the PRs based on the following keys:
| Filter key | Description |
|---|---|
| Author | Author of the PR |
| Source branch name | Branch from which the Pull Request is generated |
| Target branch name | Branch to which the Pull request will be merged |
| Title | Title of the Pull Request |
| State | State of the PR. Default is "open" and cannot be changed |

Select the appropriate filter and pass the matching condition as a regular expression (regex).
Devtron uses regexp library, view regexp cheatsheet. You can test your custom regex from here regex101.
Select Create Pipeline.
Tag Creation
This allows you to trigger the CI build whenever a new tag is created.
Configure the webhook for either GitHub or Bitbucket.

To trigger the build from specific tags, you can filter the tags based
on the author and/or the tag name.
| Filter key | Description |
|---|---|
| Author | The one who created the tag |
| Tag name | Name of the tag for which the webhook will be triggered |
Select the appropriate filter and pass the matching condition as a regular expression (regex).
Select Create Pipeline.
The total timeout for the execution of the CI pipeline is by default set as 3600 seconds. This default timeout is configurable according to the use case.
Scan for Vulnerabilities
To perform the security scan after the container image is built, enable the Scan for vulnerabilities toggle in the build stage.

Custom Image Tag Pattern
This feature helps you apply custom tags (e.g., v1.0.0) to readily distinguish container images within your repository.
-
Enable the toggle button as shown below.

-
You can write an alphanumeric pattern for your image tag, e.g.,
test-v1.0.{x}. Here,xis a mandatory variable whose value will incrementally increase with every build. You can also define the value ofxfor the next build trigger in case you want to change it. warning
Ensure your custom tag does not start or end with a period (.) or comma (,)
-
Click Update Pipeline.
-
Now, go to the Build & Deploy tab of your application, and click Select Material in the CI pipeline.

-
Choose the git commit you wish to use for building the container image. Click Start Build.

-
The build will initiate and once it is successful, the image tag would reflect at all relevant screens:
-
Build History

-
CD Pipeline (Image Selection)

-
Build will fail if the resulting image tag has already been built in the
past. This means if there is an existing image with tag test-v1.0.0, you cannot build another image
having the same tag test-v1.0.0 in the
same CI pipeline. This error might occur when you reset the value of the
variable x or when you disable/enable the
toggle button for Custom image tag
pattern.