Host GitHub Runners on CCE
Self-hosted GitHub Runners provide a powerful solution for organizations looking to optimize their CI/CD pipelines while maintaining control over their infrastructure. This blueprint outlines how to self-host and manage GitHub Actions runners using the Actions Runner Controller (ARC) on CCE.
Solution Overview
The Actions Runner Controller (ARC) is a Kubernetes operator that orchestrates and scales self-hosted runners for GitHub Actions. ARC creates several custom resource definitions (CRDs) to manage and monitor runners.
For a quick overview of the architecture, please watch this video:
Benefits of Self-Hosting GitHub Runners
Cost Optimization
GitHub-hosted runners can become costly for high-volume workflows. Organizations with significant CI/CD workloads can see major savings by switching to self-hosted options.
Enhanced Security and Compliance
Self-hosted runners provide several security advantages:
- Network Isolation: Runners can access private databases and other internal resources during CI processes.
- Compliance Requirements: Organizations in regulated industries can maintain strict data protection and access controls.
Custom Hardware Requirements
Self-hosted runners support specialized hardware needs such as:
- Dedicated GPU instances for machine learning workloads
- Specific CPU architectures
- Custom memory configurations
- Specialized development tools and environments
Prerequisites
Before implementing self-hosted GitHub runners on CCE, ensure you have:
- CCE Cluster: Version 1.16 or higher is recommended.
- Helm: Installed and configured for package management.
- cert-manager: Required for SSL certificate management.
- kubectl: Command-line access to your Kubernetes cluster.
- GitHub Organization: Access for configuring GitHub Apps and webhooks in your GitHub Organization.
Configuring GitHub Authentication
ARC supports multiple authentication methods. The recommended approach uses GitHub Apps for enhanced security and functionality.
Creating a GitHub App
-
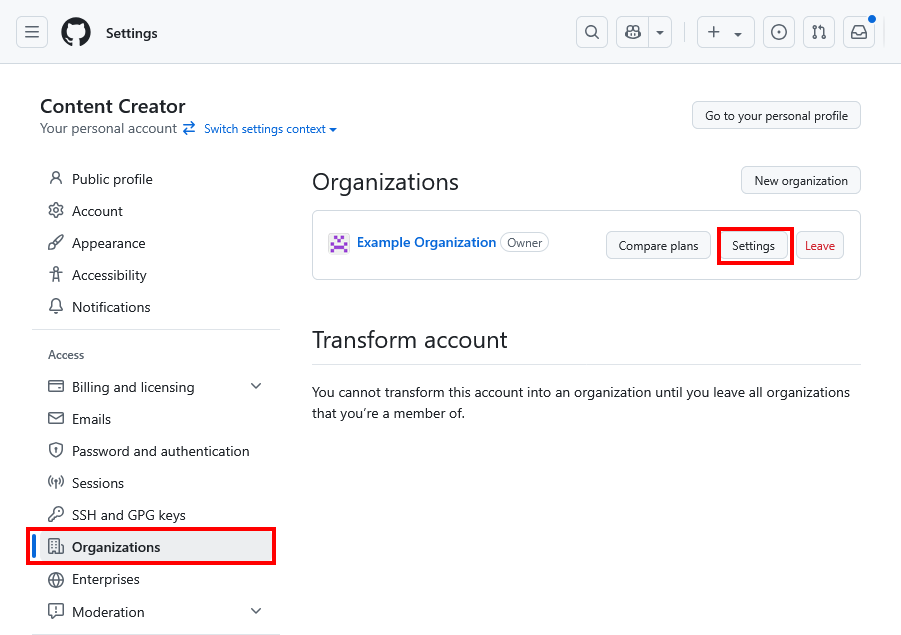
Navigate to your GitHub organization settings.
-
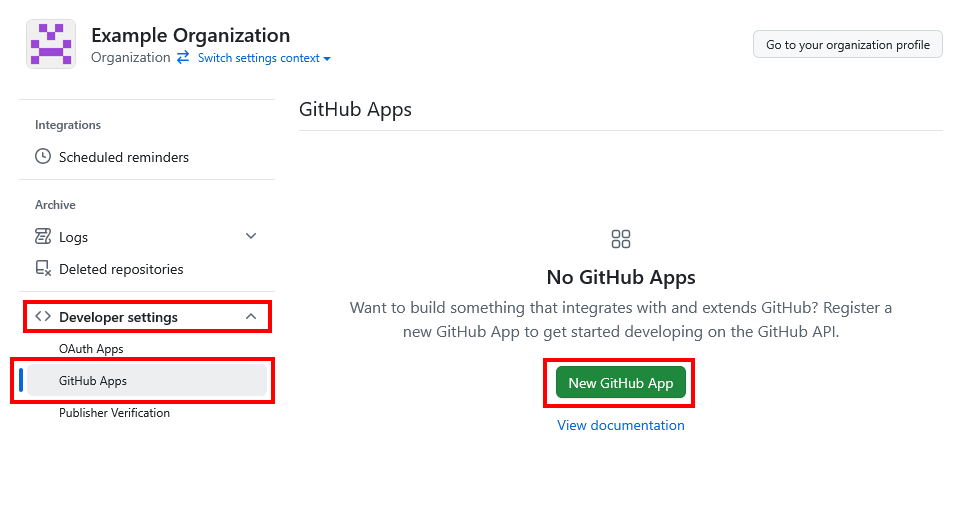
On the left-hand sidebar click Developer settings -> GitHub Apps.
-
Click New GitHub app to create a new app owned by your organization, and provide the following details:
- GitHub App name: Choose a name for the app.
- Description: Briefly describe what your app does (e.g., GitHub runners on CCE).
- Homepage URL: Enter the ARC URL:
https://github.com/actions/actions-runner-controller - Webhook URL: Should be disabled. Later, you will create a repository or organization-wide webhook for autoscaling the runners.
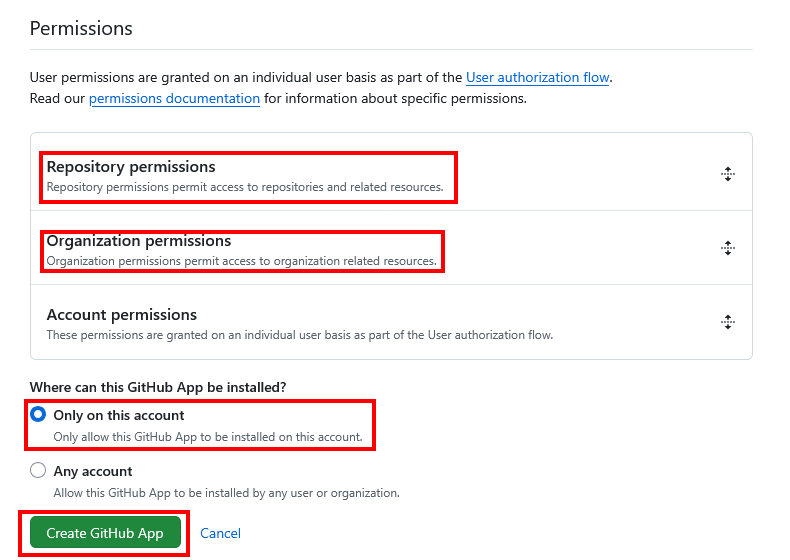
- Permissions: Select the following required permissions for the app to work properly:
- Under Repository permissions:
- Administration: Read and write
- Metadata: Read-only
- Under Organization permissions:
- Self-hosted runners: Read and write
- Under Repository permissions:
- Where can this GitHub App be installed?: Set to Only on this account.
-
Click Create GitHub App to create the app.
Generating a Private Key
After creating your GitHub App, you need to generate a private key to enable secure authentication for API requests. Follow these steps:
- Navigate to your GitHub App page (Go to Organization settings -> Developer settings -> GitHub Apps, and click on your newly created app).
- Scroll down and under Private keys, click Generate a private key.
- The private key will be generated and downloaded to your local machine.
Installing the GitHub App
Once your app and private key are ready, install the app to your organization:
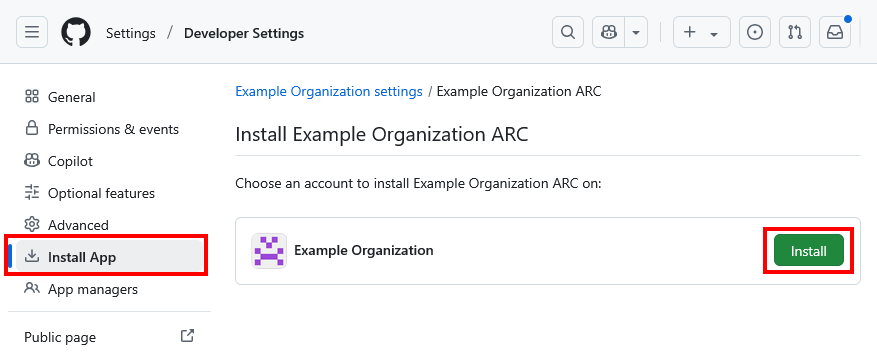
- Navigate to your GitHub App page (Go to Organization settings -> Developer settings -> GitHub Apps, and click on your newly created app).
- On the left panel, select Install App and click the Install button to install the app for all repositories or specific ones based on your needs.
- After confirming the installation permissions for your organization, save the app installation ID. You will use it later. You can find the app installation ID on the app installation page, which has the following URL format:
https://HOSTNAME/organizations/ORGANIZATION/settings/installations/INSTALLATION_ID
Storing GitHub App Credentials
Create a namespace for GitHub ARC, if you don't have one already:
kubectl create namespace github-actions
Create a Kubernetes secret with your GitHub App credentials:
- GitHub App ID: The app's unique identifier. You can find it under the General section on the GitHub App page.
- Installation ID: The installation ID of your organization, collected in the previous step.
- Private Key: The private key of your GitHub App, downloaded in earlier steps.
kubectl create secret generic controller-manager \
  --namespace github-actions \
  --from-literal=github_app_id=GITHUB_APP_ID \
  --from-literal=github_app_installation_id=INSTALLATION_ID \
  --from-literal=github_app_private_key='PRIVATE_KEY'
Installing Actions Runner Controller
Create a values.yaml manifest in your project directory and add the values provided below.
replicaCount: 1

authSecret:
  enabled: true
  create: false
  name: "controller-manager"

serviceAccount:
  create: true

service:
  type: ClusterIP
  port: 443

certManagerEnabled: true

logFormat: text

githubWebhookServer:
  enabled: true
  replicaCount: 1
  useRunnerGroupsVisibility: false
  logFormat: text
  secret:
    enabled: true
    create: false
    name: github-selfhosted-webhook-token
  serviceAccount:
    create: true
  ingress:
    enabled: true
    annotations:
      nginx.ingress.kubernetes.io/backend-protocol: "HTTP"
      kubernetes.io/tls-acme: "true"
      cert-manager.io/cluster-issuer: opentelekomcloud-letsencrypt
    ingressClassName: nginx
    tls:
     - secretName: github-webhook-tls
       hosts:
         - github-webhook.example.com
    hosts:
      - host: github-webhook.example.com
        paths:
        - path: /
          pathType: Prefix
- Replace the
example.comdomain with your own domain. - To enable the Runner Autoscaling feature, githubWebhookServer must be enabled.
The provided annotations for nginx and cert-manager are required to obtain a TLS certificate for your webhook domain (e.g., github-webhook.example.com).
kubernetes.io/tls-acme: "true"
cert-manager.io/cluster-issuer: opentelekomcloud-letsencrypt
Follow the instructions from Best Practice: Issue an ACME Certificate with DNS01 Solver in CCE, to prepare your cluster properly.
After creating the values.yaml file, you can install the controller with Helm by running the following command:
helm repo add actions-runner-controller https://actions-runner-controller.github.io/actions-runner-controller

helm upgrade --install actions-runner-controller \
  actions-runner-controller/actions-runner-controller \
  --namespace github-actions \
  --create-namespace \
  --version 0.23.7 \
  -f values.yaml
After installing the controller, verify that it is running by checking the status of the pods:
kubectl get pods --namespace github-actions
You should see an output similar to:
NAME                                                              READY   STATUS    RESTARTS   AGE
actions-runner-controller-699df99f7-96h96                         2/2     Running   0          40s
actions-runner-controller-github-webhook-server-8649f6764fsxq49   2/2     Running   0          40s
Configuring Runner Deployments
A RunnerDeployment is a Kubernetes custom resource that automates the management of GitHub Actions runners. An important part of this configuration is defining the runner's scope, which dictates which workflows are permitted to use it. This ensures that runners are available exactly where they are needed.
Organization-level runners create a centralized, shared pool of runners available to all repositories within your GitHub organization. In contrast, Repository-level runners are dedicated to a single, specific repository. This provides strong isolation and is the ideal choice for projects with specialized needs, such as unique software requirements or access to sensitive credentials, providing a secure and controlled environment for specific jobs.
Create a manifest to deploy a RunnerDeployment for your desired scope (repository or organization):
- Organization-Level Runners
- Repository-Level Runners
apiVersion: actions.summerwind.dev/v1alpha1
kind: RunnerDeployment
metadata:
  name: org-runners
  namespace: github-actions
spec:
  template:
    spec:
      labels:
        - cce-runner
      organization: your-organization-name
apiVersion: actions.summerwind.dev/v1alpha1
kind: RunnerDeployment
metadata:
  name: repo-runners
  namespace: github-actions
spec:
  template:
    spec:
      labels:
        - cce-runner
      repository: your-org/your-repo
You can further customize your RunnerDeployment by specifying additional fields such as resource requests/limits, a custom runner image, or binding Persistent Volume Claims (PVCs) for data persistence. You can also provide specific environment variables for various use cases, such as allowing your runner to access internal resources or services securely.
Make sure the labels assigned to your runner match exactly the labels specified in your workflow's runs-on field. If they do not match,
your workflow jobs will not run on the designated runner.
Finally, apply the runner-deployment.yaml using the following command:
kubectl apply -f runner-deployment.yaml
Auto-scaling Runners
To ensure efficient resource utilization and responsive scaling of GitHub Actions runners, implement webhook-driven autoscaling. This enables your runners to scale up rapidly in response to workflow demand and scale down when idle, optimizing both performance and cost.
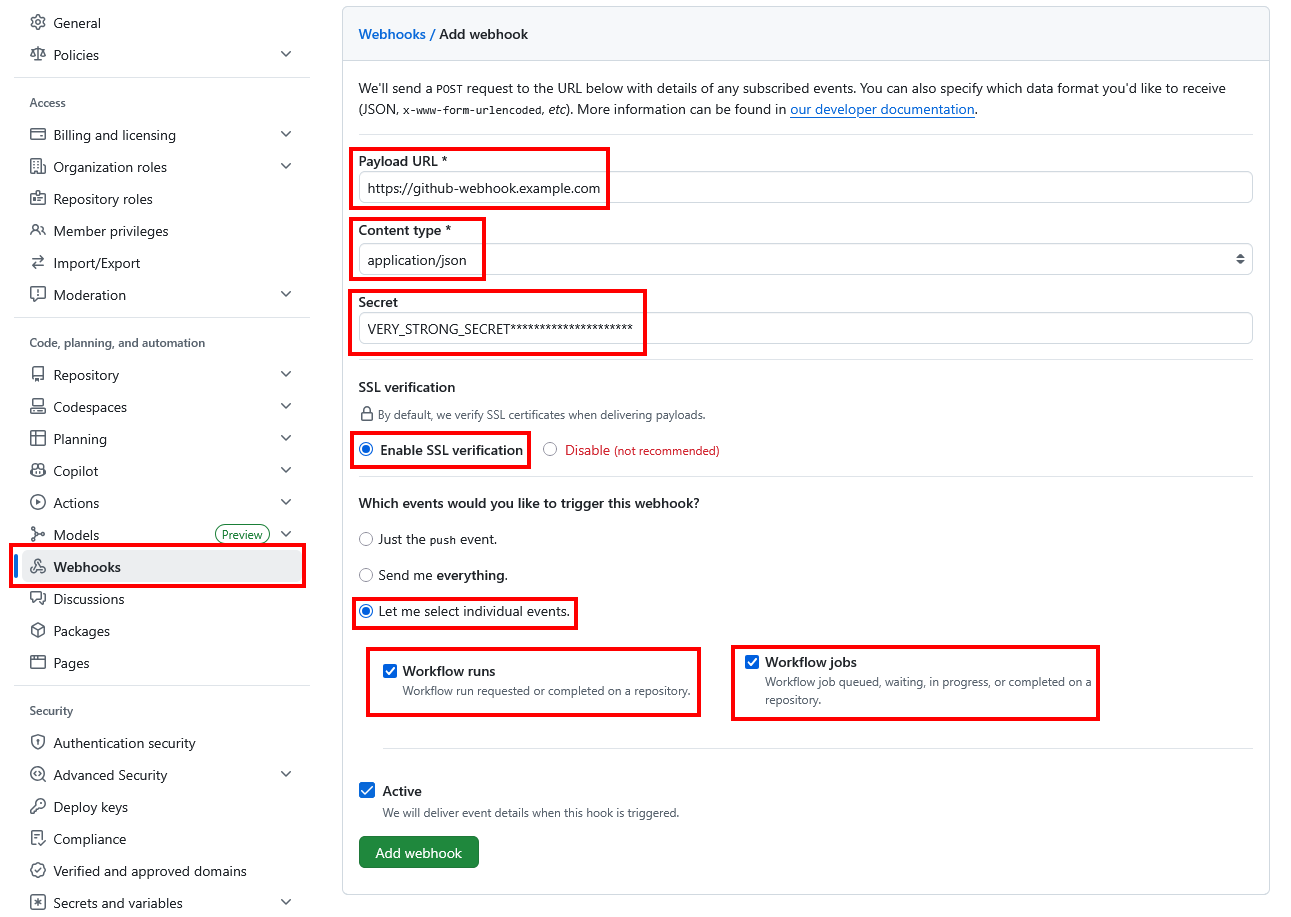
Registering Webhook in GitHub
- Go to your GitHub organization's Settings.
- Select Webhooks from the sidebar.
- Click Add webhook.
- Payload URL: Enter the endpoint that will receive webhook events (which you provided earlier, e.g.,
https://github-webhook.example.com). - Content type: Choose
application/json. - Secret: Set a strong secret token (you'll use this in your Kubernetes secret).
- Events to send: Select Let me select individual events and check:
workflow_jobworkflow_run
- Payload URL: Enter the endpoint that will receive webhook events (which you provided earlier, e.g.,
- Click Add webhook.
Creating the Webhook Secret in Kubernetes
Store the webhook secret, that will be used by your webhook receiver, as a Kubernetes secret:
kubectl create secret generic github-webhook-token \
  --namespace github-actions \
  --from-literal=GITHUB_WEBHOOK_SECRET_TOKEN=WEBHOOK_SECRET
Replace WEBHOOK_SECRET with the exact secret set in the previous step.
Configuring a HorizontalRunnerAutoscaler
Create a manifest to deploy a HorizontalRunnerAutoscaler, in order to automatically scale your runners based on workflow job events:
apiVersion: actions.summerwind.dev/v1alpha1
kind: HorizontalRunnerAutoscaler
metadata:
  name: org-runners-autoscaler
  namespace: github-actions
spec:
  minReplicas: 0
  maxReplicas: 30
  scaleTargetRef:
    kind: RunnerDeployment
    name: org-runners
  scaleUpTriggers:
    - duration: 30m
      githubEvent:
        workflowJob: {}
Key configuration points:
minReplicasandmaxReplicasdefine the scaling range.scaleTargetRefshould reference theRunnerDeploymentresource managing your runners.scaleUpTriggerslistens for incomingworkflow_jobevents and scales up runners based on the specified duration after an event is received.
Runners may experience cold start periods when minimum replicas is set to 0. If that's problematic for your setup,
consider setting minReplicas to 1 for critical workflows.
Apply horizontal-runner-autoscaler.yaml using the following command:
kubectl apply -f horizontal-runner-autoscaler.yaml
Verification
To ensure your self-hosted runners are properly configured and executing workflows as expected, follow these verification steps to monitor and validate runner behavior.
Checking Runner Registration Status
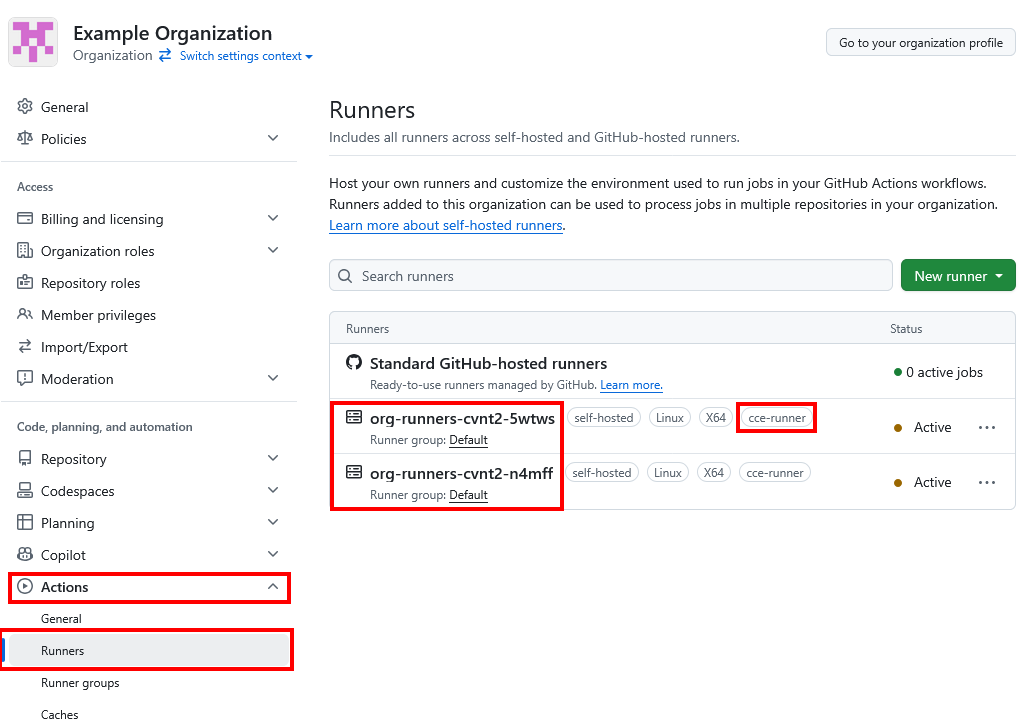
First, verify that your runners are successfully registered with GitHub:
- Navigate to your GitHub organization Settings
- Click Actions and then select Runners
- Confirm your self-hosted runners appear in the list with "Idle" or "Active" status
- Note the runner labels (e.g.,
self-hosted,linux,cce-runner)
If the HorizontalRunnerAutoscaler is scaling the runner replicas down to 0, the runners will be removed from the pool and are not visible here.
Make sure that you have at least one runner pod running on your cluster by changing the minReplicas of the HorizontalPodAutoscaler.
Note that tags like Linux and X64 are generated by GitHub and are not associated with the runners unless you explicitly set them
in the RunnerDeployment manifest. If a workflow uses labels that are not set in the RunnerDeployment manifest, their jobs will not be
picked up by the runners or the HorizontalRunnerAutoscaler, and no runner scaling will happen.
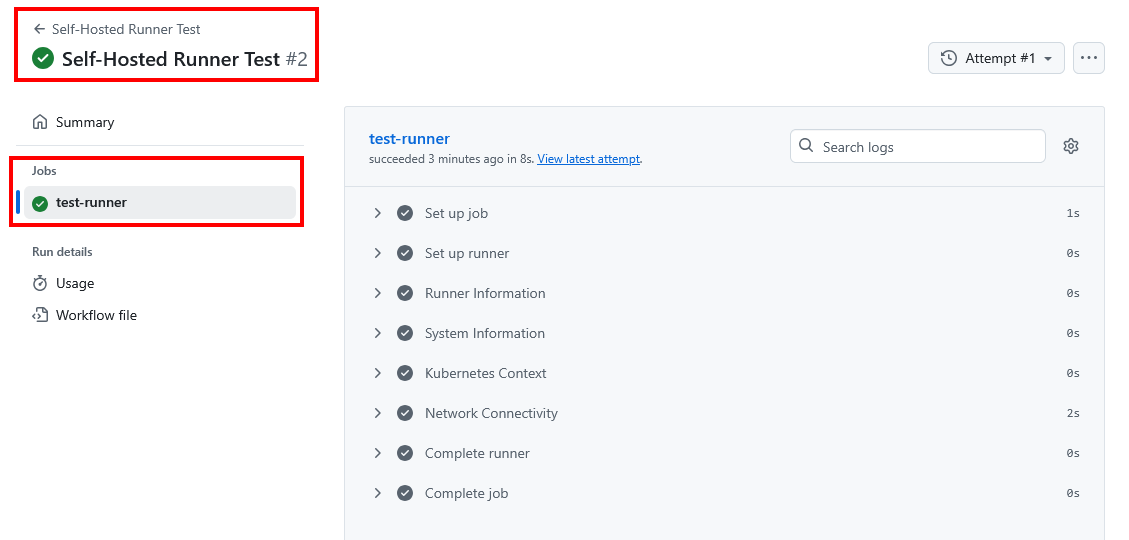
Creating a Test Workflow
Create a workflow file in your repository (e.g., .github/workflows/self-hosted-test.yml) to validate your self-hosted runners.
This workflow tests basic functionality, system information, and network connectivity.
name: Self-Hosted Runner Test
on:
  workflow_dispatch:
  push:
    branches: [main]

jobs:
  test-runner:
    runs-on: [cce-runner]
    steps:
      - name: Runner Information
        run: |
          echo "Runner name: $RUNNER_NAME"
          echo "Runner OS: $RUNNER_OS"
          echo "Runner architecture: $RUNNER_ARCH"
          echo "Workspace: $GITHUB_WORKSPACE"

      - name: System Information
        run: |
          echo "=== System Info ==="
          uname -a
          echo "=== CPU Info ==="
          nproc
          echo "=== Memory Info ==="
          free -h
          echo "=== Disk Space ==="
          df -h

      - name: Kubernetes Context
        run: |
          echo "=== Pod Information ==="
          echo "Hostname: $(hostname)"
          echo "Pod IP: $(hostname -I)"
          if command -v kubectl &> /dev/null; then
            echo "Kubectl available"
            kubectl version --client
          fi

      - name: Network Connectivity
        run: |
          echo "=== Network Tests ==="
          ping -c 3 google.com
          curl -I https://api.github.com
Run the workflow by navigating to Actions -> Self-Hosted Runner Test in your repository and clicking on the Run workflow button. Then monitor runners in real-time during workflow execution:
kubectl get pods -n github-actions -w
You can also check the Jobs under Actions -> Self-Hosted Runner Test in your repository.
Validating Auto-scaling Behavior
Test auto-scaling by creating multiple concurrent workflow runs. This tests if your HorizontalRunnerAutoscaler responds correctly to increased demand.
Check its status by running:
kubectl get hra -n github-actions

# Output:
# NAME                     MIN   MAX   DESIRED   SCHEDULE
# org-runners-autoscaler   0     30    3
You should see the number of pods increase as the number of concurrent workflows increases.
Security Best Practices
✅ Isolate Runners: Deploy runners in dedicated namespaces with network policies.
✅ Egress Controls: Configure allow-list policies for outbound connections.
✅ Repository Restrictions: Limit self-hosted runners to specific repositories.
✅ Ephemeral Runners: Use ephemeral runners that are destroyed after each job.
Troubleshooting Common Issues
When runners aren't receiving jobs, check registration tokens, labels, and webhook configuration.
Runner Not Picking Up Jobs:
-
Check runner registration credentials are correct:
kubectl get secret controller-manager -n github-actions -o json | jq '.data | map_values(@base64d)' -
Verify runner labels match workflow requirements:
kubectl describe runnerdeployment org-runners -n github-actions -
Check webhook delivery in Organization Settings -> Webhooks
Scaling Issues:
-
Check webhook secret is correct:
kubectl get secret github-webhook-token -n github-actions -o json | jq '.data | map_values(@base64d)' -
Verify webhook server is running:
curl https://github-webhook.example.com/health