Build a CI Pipeline with Jenkins, SWR and CCE
This blueprint covers integrating Jenkins with T Cloud Public Container Engine (CCE) for efficient CI/CD pipelines. It details installing Jenkins in CCE clusters, emphasizing using containerized Masters and dynamic Agents managed by Kubernetes for optimal resource utilization and self-healing. The Master schedules jobs, which Agents execute within Kubernetes pods. This setup enhances security and maintenance efficiency.
Solution Design
Jenkins is an open source continuous integration (CI) tool that provides user-friendly GUIs. It originates from Hudson and is used to automate all sorts of tasks related to building, testing, and delivering or deploying software.
Jenkins is written in Java and can run in popular servlet containers such as Tomcat, or run independently. It is usually used together with the version control tools (or SCM tools) and build tools. Jenkins supports various languages and is compatible with third-party build tools, such as Maven, Ant, and Gradle. It seamlessly integrates with common version control tools, such as SVN and Git, and can directly connect to source code hosting services, such as GitHub.
- This solution can be deployed only in CCE clusters. It is not supported in DeC.
- CCE does not provide maintenance and support for Jenkins. The maintenance is provided by the developers.
You can install Jenkins using one of the following methods:
- You can use a single Master to install Jenkins. The Master handles jobs and builds and releases services. However, security risks may exist.
- or use Master & Agents. Master schedules build jobs to Agents for execution, and monitors the Agent(s) status. Agents execute the build jobs dispatched by the Master and return the job progress and result. You can install the Master and Agents on VMs, containers, or combination of the two.
In this blueprint, Jenkins is installed with a containerized Master and Agents. Kubernetes schedules the dynamic Agents:
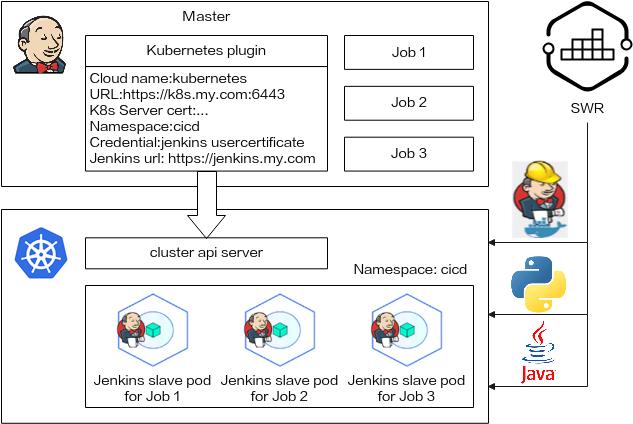
- The Master handles jobs. Install Kubernetes add-ons on the Master to use the Kubernetes platform resources.
- The Kubernetes platform generates pods for Agents to execute jobs. When a job is scheduled on the Master, the Master sends a request to the Kubernetes platform using the Kubernetes add-on. After receiving the request, Kubernetes builds a pod using the pod template to send requests to the Master. After the Master is successfully connected, you can execute the job on the pod.
Installing and Deploying Jenkins Master
Select an image from Docker Hub. For this test, jenkins/jenkins:latest was selected, which is the official jenkins image with
all add-ons and functions. For details, see Installing Jenkins.
It is not advised to use latest images on production, choose a specific version!
Prerequisites
- Before creating a containerized workload, create a cluster (the cluster must contain at least one node with 4 vCPUs and 8 GB memory). For details, see Creating a CCE Cluster.
- In order to manage your CCE cluster through
kubectl, you need to configure kubectl so that it can communicate with the cluster. This involves obtaining the cluster's credentials from CCE and setting up akubeconfigfile that kubectl will use to connect. For details, see Connecting to a Cluster Using kubectl. - To enable access to a workload from a public network, ensure that an elastic IP address (EIP) has been bound to or a load balancer has been configured for at least one node in the cluster.
Installing Jenkins on CCE
-
The first step is to create a dedicated Kubernetes namespace for Jenkins using:
kubectl create namespace jenkins -
Create service account. Jenkins needs access to the Kubernetes API to manage resources. The sa.yaml file defines a ClusterRole to grant admin access, a ServiceAccount, and a ClusterRoleBinding to link them. This is created with:
sa.yamlapiVersion: rbac.authorization.k8s.io/v1kind: ClusterRolemetadata:name: jenkins-adminrules:- apiGroups: [""]resources: ["*"]verbs: ["*"]---apiVersion: v1kind: ServiceAccountmetadata:name: jenkins-adminnamespace: jenkins---apiVersion: rbac.authorization.k8s.io/v1kind: ClusterRoleBindingmetadata:name: jenkins-adminroleRef:apiGroup: rbac.authorization.k8s.iokind: ClusterRolename: jenkins-adminsubjects:- kind: ServiceAccountname: jenkins-adminnamespace: jenkinsand apply with:
kubectl create -f sa.yaml --namespace jenkins -
Create persistent volume claim. To persist Jenkins data, a
PersistentVolumeClaimis defined in storage.yaml. An available10Givolume will be dynamically provisioned when the claim is created:storage.yamlapiVersion: v1kind: PersistentVolumeClaimmetadata:name: jenkins-pv-claimnamespace: jenkinsannotations:everest.io/disk-volume-type: SSDspec:accessModes:- ReadWriteOnceresources:requests:storage: 10GistorageClassName: csi-diskand apply with:
kubectl create -f storage.yaml --namespace jenkins -
Create Jenkins deployment. The deployment.yaml defines a Jenkins
Deploymentand associated Kubernetes objects likeServicesandProbes. This spins up the Jenkins pod with the persistent volume mounted:deployment.yamlapiVersion: apps/v1kind: Deploymentmetadata:name: jenkinsnamespace: jenkinsspec:replicas: 1selector:matchLabels:app: jenkinstemplate:metadata:labels:app: jenkinsspec:securityContext:fsGroup: 1000runAsUser: 1000serviceAccountName: jenkins-admincontainers:- name: jenkinsimage: jenkins/jenkins:ltsresources:limits:memory: "2Gi"cpu: "1000m"requests:memory: "500Mi"cpu: "500m"ports:- name: httpportcontainerPort: 8080- name: jnlpportcontainerPort: 50000livenessProbe:httpGet:path: "/login"port: 8080initialDelaySeconds: 90periodSeconds: 10timeoutSeconds: 5failureThreshold: 5readinessProbe:httpGet:path: "/login"port: 8080initialDelaySeconds: 60periodSeconds: 10timeoutSeconds: 5failureThreshold: 3volumeMounts:- name: jenkins-datamountPath: /var/jenkins_homevolumes:- name: jenkins-datapersistentVolumeClaim:claimName: jenkins-pv-claimand apply with:
kubectl create -f deployment.yaml --namespace jenkins -
Create Jenkins service. The Jenkins service exposes Jenkins on a
NodePort:By default, the Jenkins service is exposed internally through a
NodePort. This makes Jenkins available of any Kubernetes node IP.Alternatively, a dedicated external IP can be assigned by switching the service type to
LoadBalancer. This will provision a cloud load balancer that handles routing external traffic to Jenkins. For details, see Creating a LoadBalancer Service.service.yamlapiVersion: v1kind: Servicemetadata:name: jenkins-servicenamespace: jenkinsannotations:prometheus.io/scrape: 'true'prometheus.io/path: /prometheus.io/port: '8080'spec:selector:app: jenkinstype: NodePortports:- name: httpportport: 8080targetPort: 8080nodePort: 32000- name: jnlpportport: 50000targetPort: 50000and apply with:
$ kubectl create -f service.yaml --namespace jenkins
Logging In and Initializing Jenkins
-
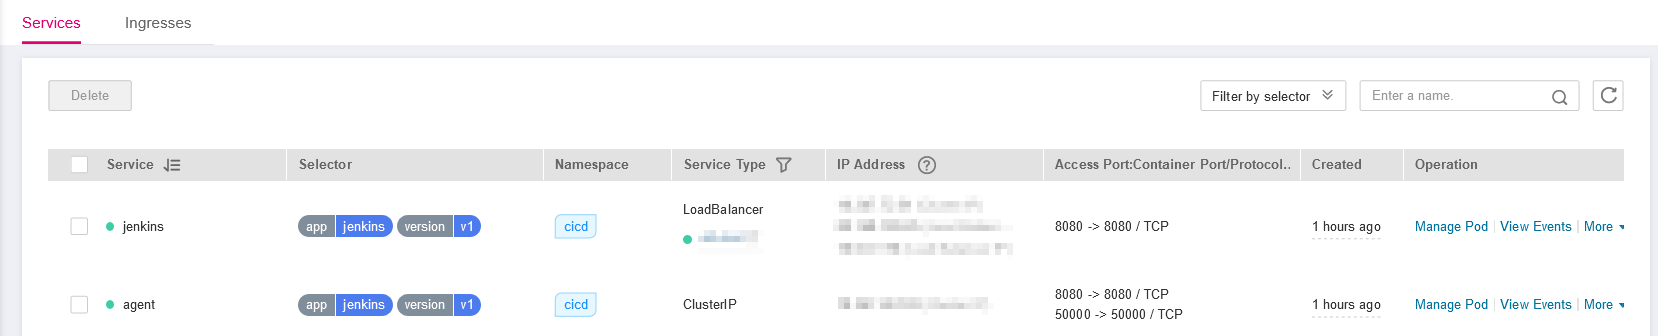
On the CCE console, click the target cluster. Choose Networking in the navigation pane. On the Services tab , view the Jenkins access mode.
-
Enter
http://<ElasticLoadBalancerIPv4Address>:8080in the browser address box to visit the Jenkins configuration page.When you visit the page for the first time, you are prompted to obtain the initial administrator password. You can obtain the password from the Jenkins pod. Before running the following commands, connect to the cluster using
kubectl. For details, see Connecting to a Cluster Using kubectl.# kubectl get pod -n cicdNAME READY STATUS RESTARTS AGEjenkins-544d9765c4-pqgd8 1/1 Running 0 1h# kubectl exec -it jenkins-544d9765c4-pqgd8 -n cicd -- /bin/sh# cat /var/jenkins_home/secrets/initialAdminPasswordb10eabe29a9f427c9b54c01a9c3383ae -
The system prompts you to select the default recommended add-on and create an administrator upon the first login. After the initial configuration is complete, the Jenkins page is displayed.
Modifying the number of Concurrent Build Jobs
-
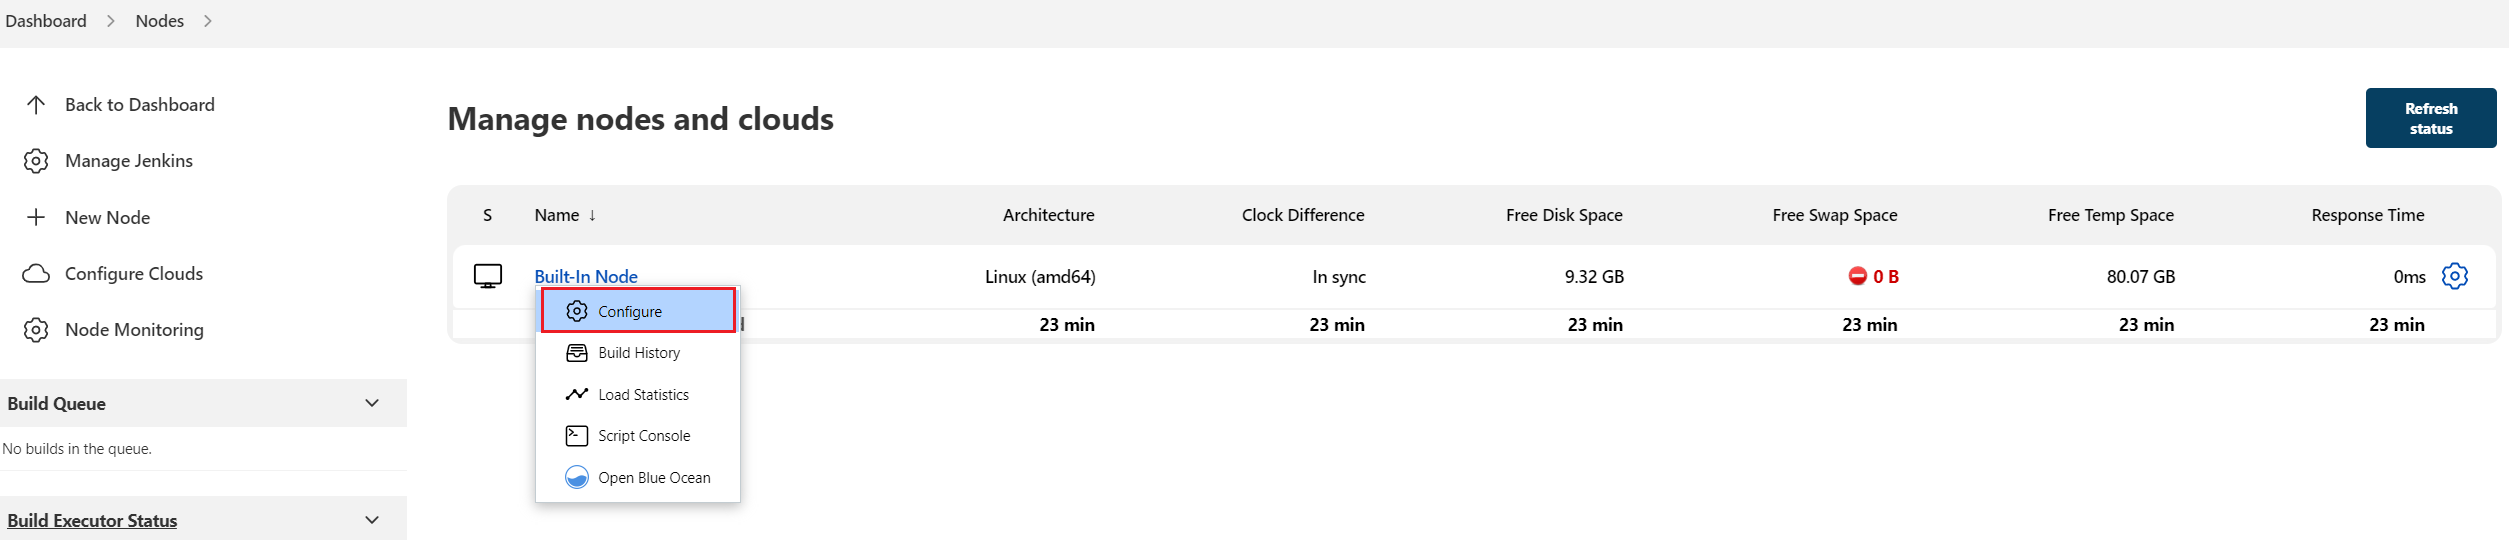
On the Jenkins dashboard page, click Manage Jenkins on the left, choose System Configuration -> Manage nodes and clouds, and select Configure from the drop-down list of the target node.
- You can modify the number of concurrent build jobs on both Master and Agent. The following uses Master as an example.
- If the Master is used with Agents, you are advised to set the number of concurrent
build jobs of Master to
0. That is, all build jobs are performed using Agents. If a single Master is used, you do not need to change the value to0.
-
Modify the maximum number of concurrent build jobs. In this example, the value is changed to
2. You can change the value as required.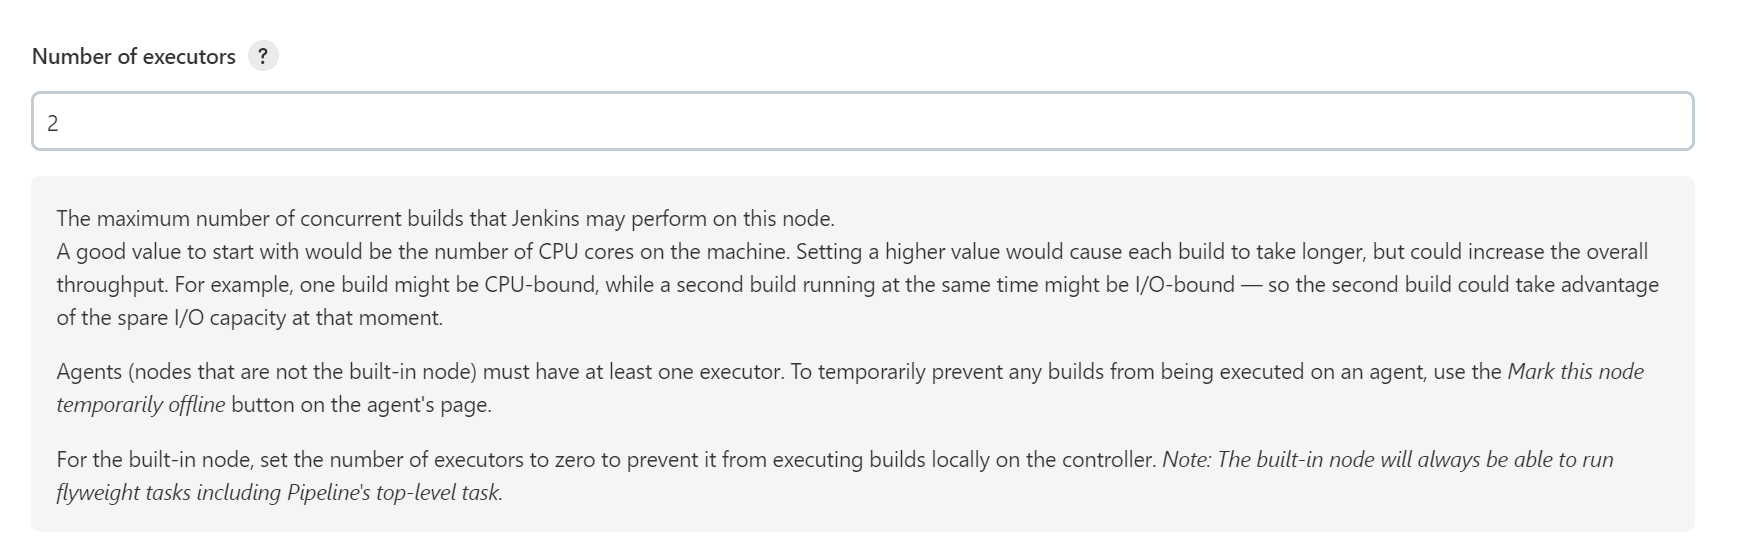
Configuring Jenkins Agent
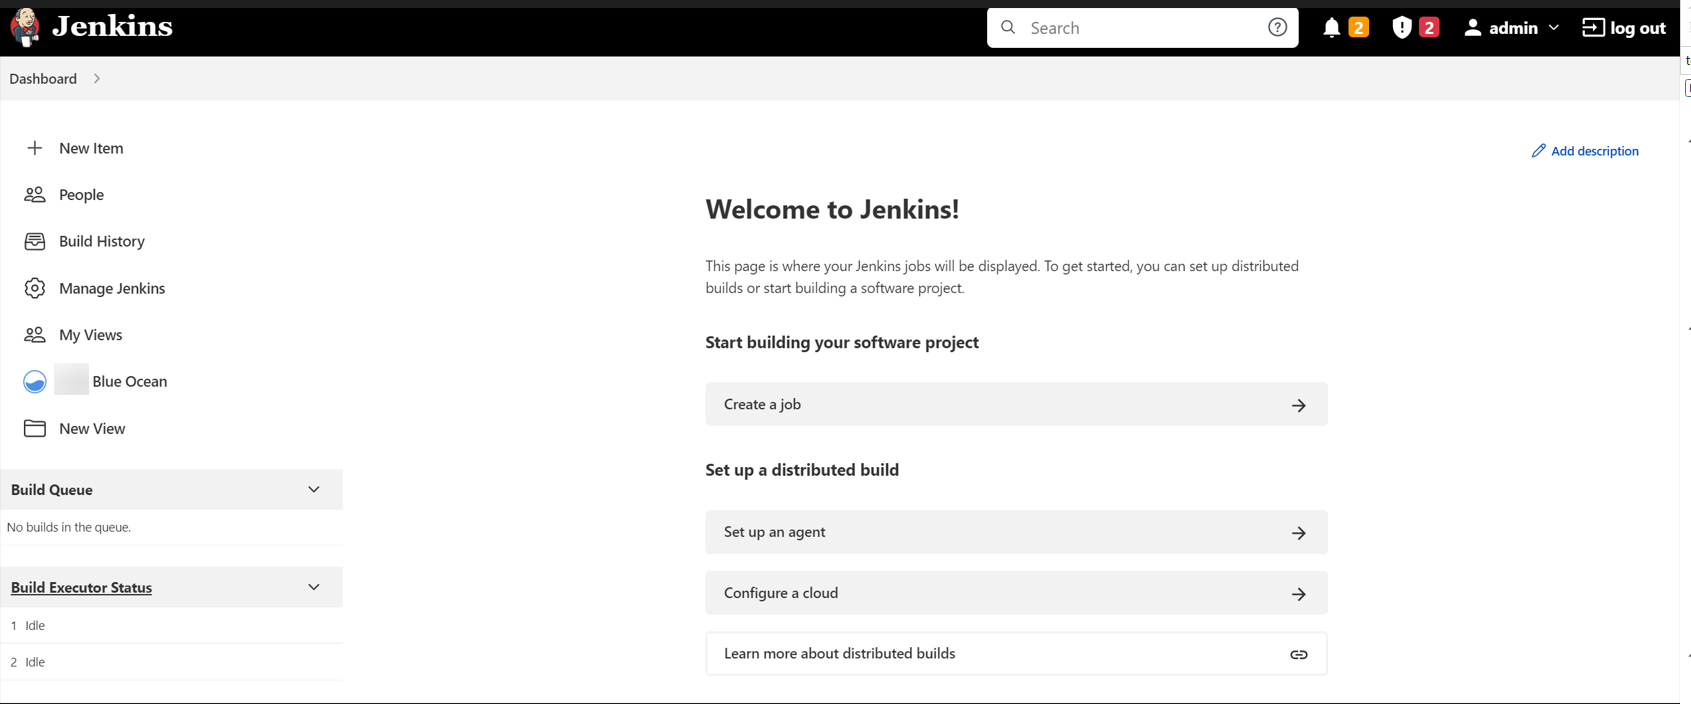
After Jenkins is installed, the following information may display, indicating that Jenkins uses a Master for local build and Agents are not configured.

If you install Jenkins using a Master, you can build a pipeline after performing operations in Installing and Deploying Jenkins Master. For details, see Using Jenkins to Build a Pipeline.
Setting a Dynamic Agent for Jenkins
-
Install the plug-in
On the Jenkins dashboard page, click Manage Jenkins on the left and choose System Configuration -> Manage Plugins. On the Available tab page, filter and install Kubernetes Plugin and Kubernetes CLI Plugin.

The plug-in version may change with time. Select a plug-in version as required:
-
Kubernetes Plugin:
3734.v562b_b_a_627ea_cIt is used to run dynamic Agents in the Kubernetes cluster, create a Kubernetes pod for each started Agent, and stop the pod after each build is complete.
-
Kubernetes CLI Plugin:
1.10.3
kubectlcan be configured for jobs to interact with Kubernetes clusters. -
The Jenkins plug-ins are provided by the plug-in maintainer and may be iterated due to security risks.
-
Add cluster access credentials to Jenkins
Add cluster access credentials to Jenkins in advance. For details, see Setting Cluster Access Credentials.
-
Configure basic cluster information
On the Jenkins dashboard page, click Manage Jenkins on the left and choose System Configuration -> Manage nodes and clouds. Click Configure Clouds on the left to configure the cluster. Click Add a new cloud and select Kubernetes. The cluster name can be customized.
-
Enter Kubernetes Cloud details
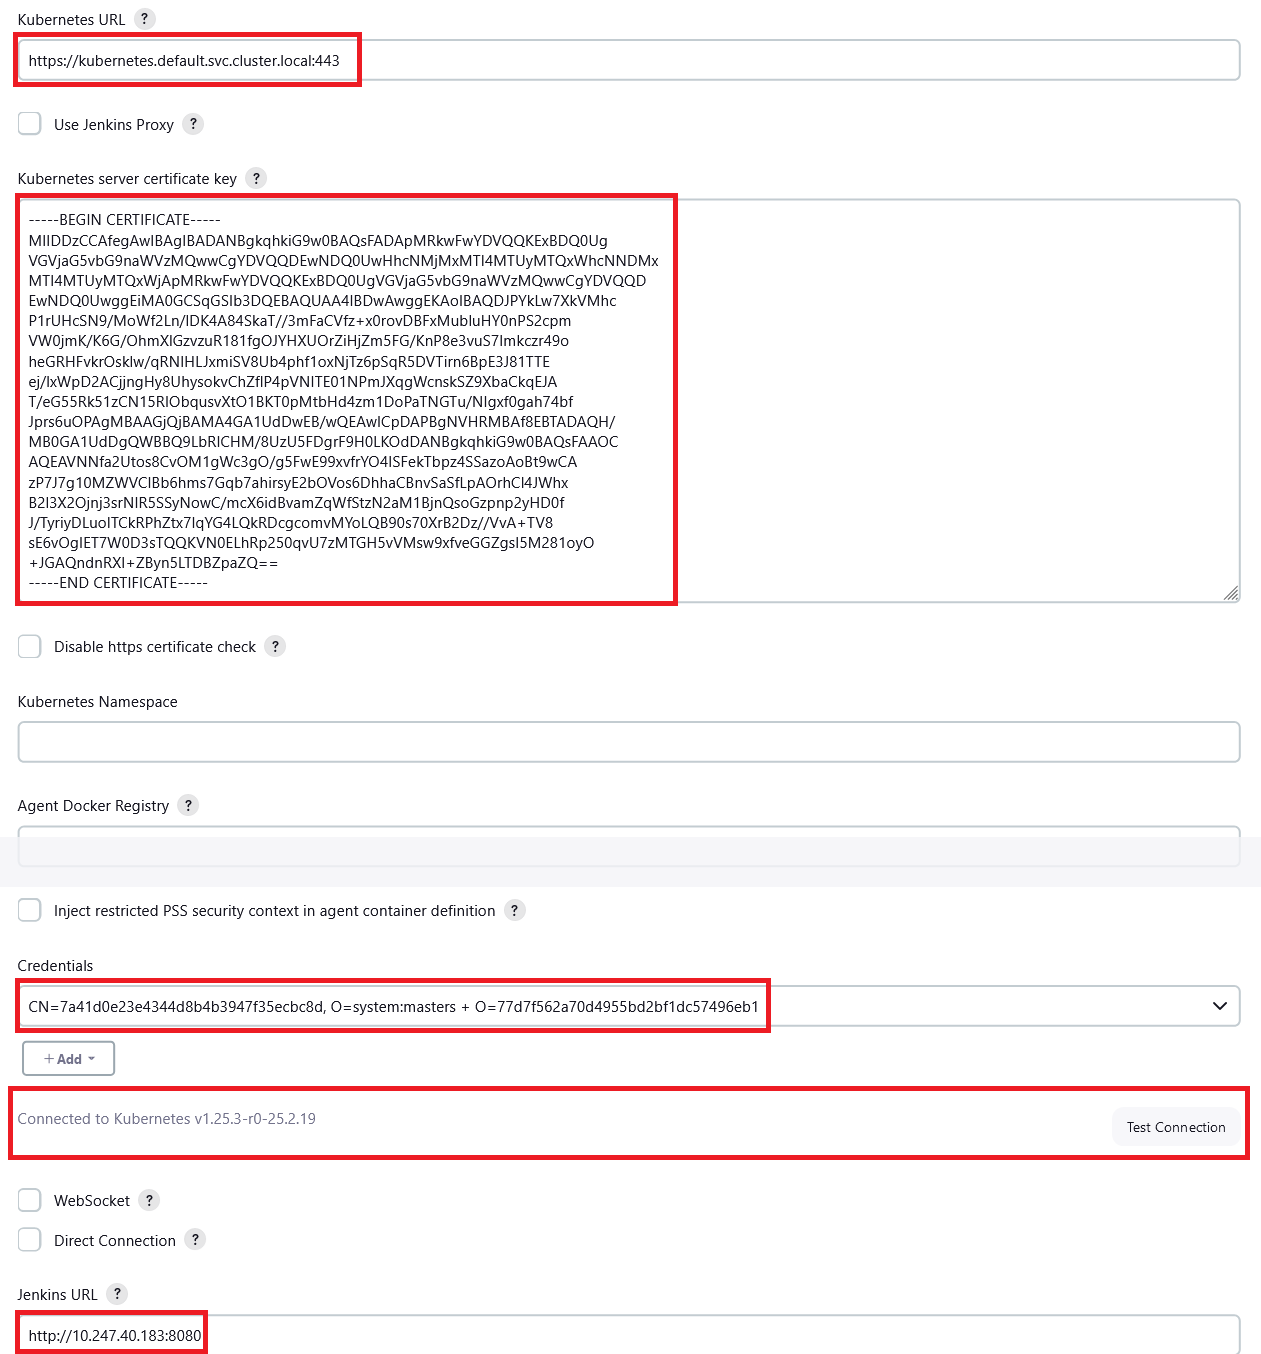
Set the following cluster parameters and retain the values for other parameters:
- Kubernetes URL: cluster API server address. You can enter
https://kubernetes.default.svc.cluster.local:443. - Kubernetes server certificate key: your cluster CA certificate.
- Credentials: Select the cluster credential added in. You can click Test Connection to check whether the cluster is connected.
- Jenkins URL: Jenkins access path. Enter the IP address of port 8080 set in installing process (ports 8080 and 50000 must
be enabled for the IP address, that is, the intra-cluster access
address), for example,
http://10.247.222.254:8080.
- Kubernetes URL: cluster API server address. You can enter
-
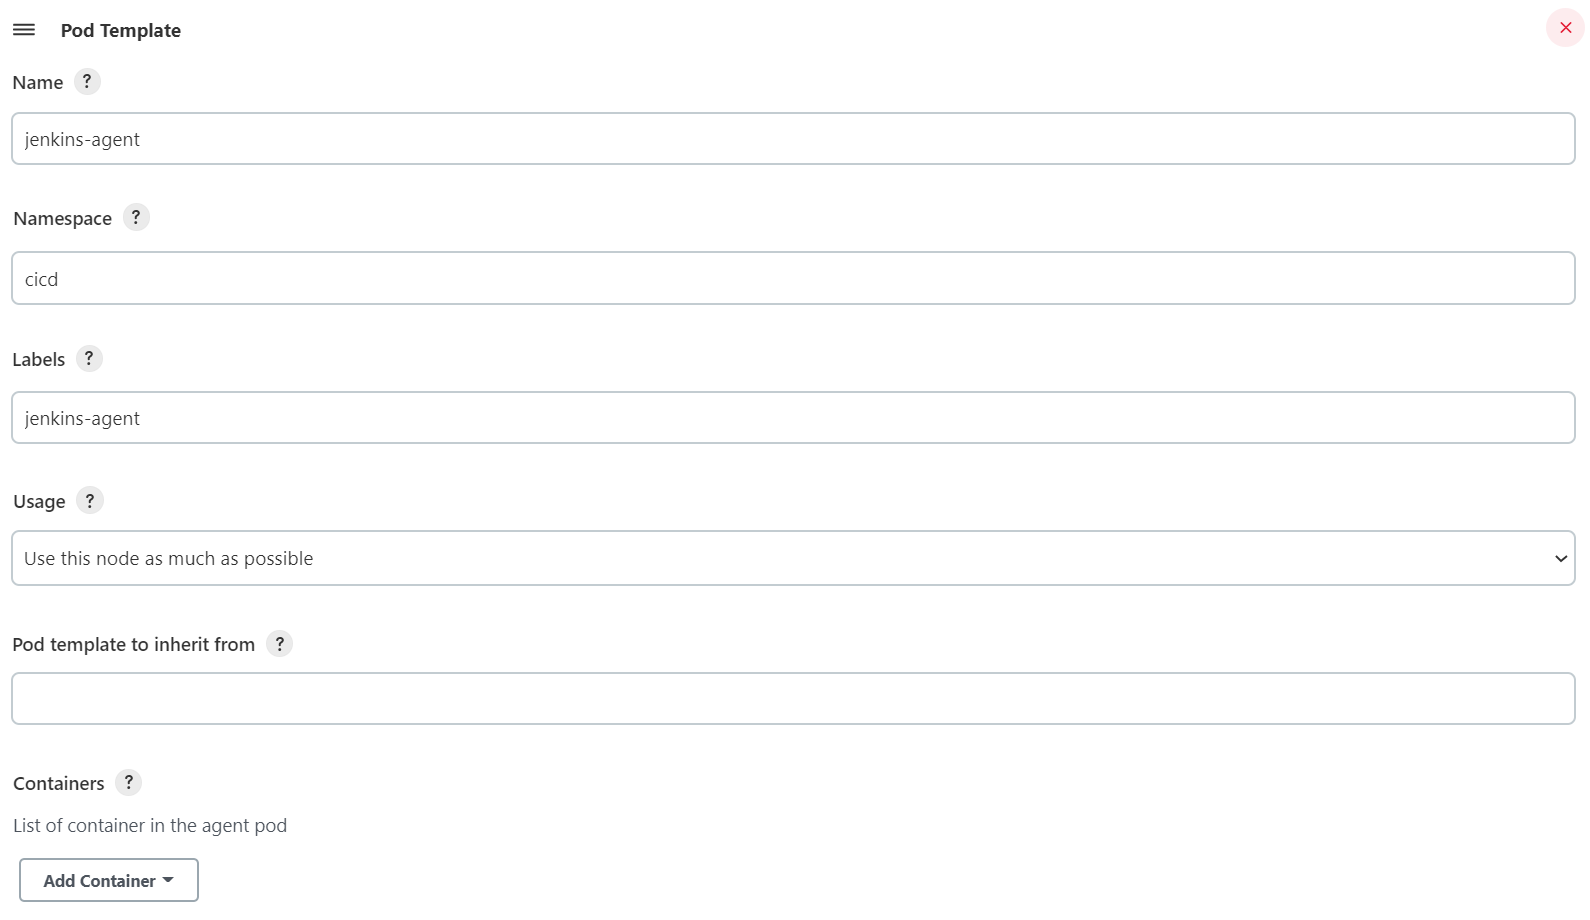
Pod Template: Click Add Pod Template -> Pod Template details and set the pod template parameters:
- Name:
jenkins-agent - Namespace:
cicd - Labels:
jenkins-agent - Usage: Select
Use this node as much as possible.
-
Add a container. Click Add Container -> Container Template.
- Name: The value must be
jnlp. - Docker image:
jenkins/inbound-agent:4.13.3-1. The image version may change with time. Select an image version as required or use the latest version. - Working directory:
/home/jenkins/agentis selected by default. - Command to run/Arguments to pass to the command: Delete the existing default values and leave these two parameters empty.
- Enable Allocate pseudo-TTY.
- Enable Run in privileged mode and set Run As User ID
to
0(root user).

- Name: The value must be
- Name:
-
Click Save
Setting Cluster Access Credentials
The certificate file that can be identified in Jenkins is in PKCS#12 format. Therefore, convert the cluster certificate to a PFX certificate file in PKCS#12 format.
-
Log in to the CCE console and go to the cluster console. Choose Cluster Information -> Connection Information to download the cluster certificate. The downloaded certificate contains three files: ca.crt, client.crt, and client.key.
-
Log in to a Linux host, place the three certificate files in the same directory, and use OpenSSL to convert the certificate into a cert.pfx certificate. After the certificate is generated, the system prompts you to enter a custom password.
openssl pkcs12 -export -out cert.pfx -inkey client.key -in client.crt -certfile ca.crt -
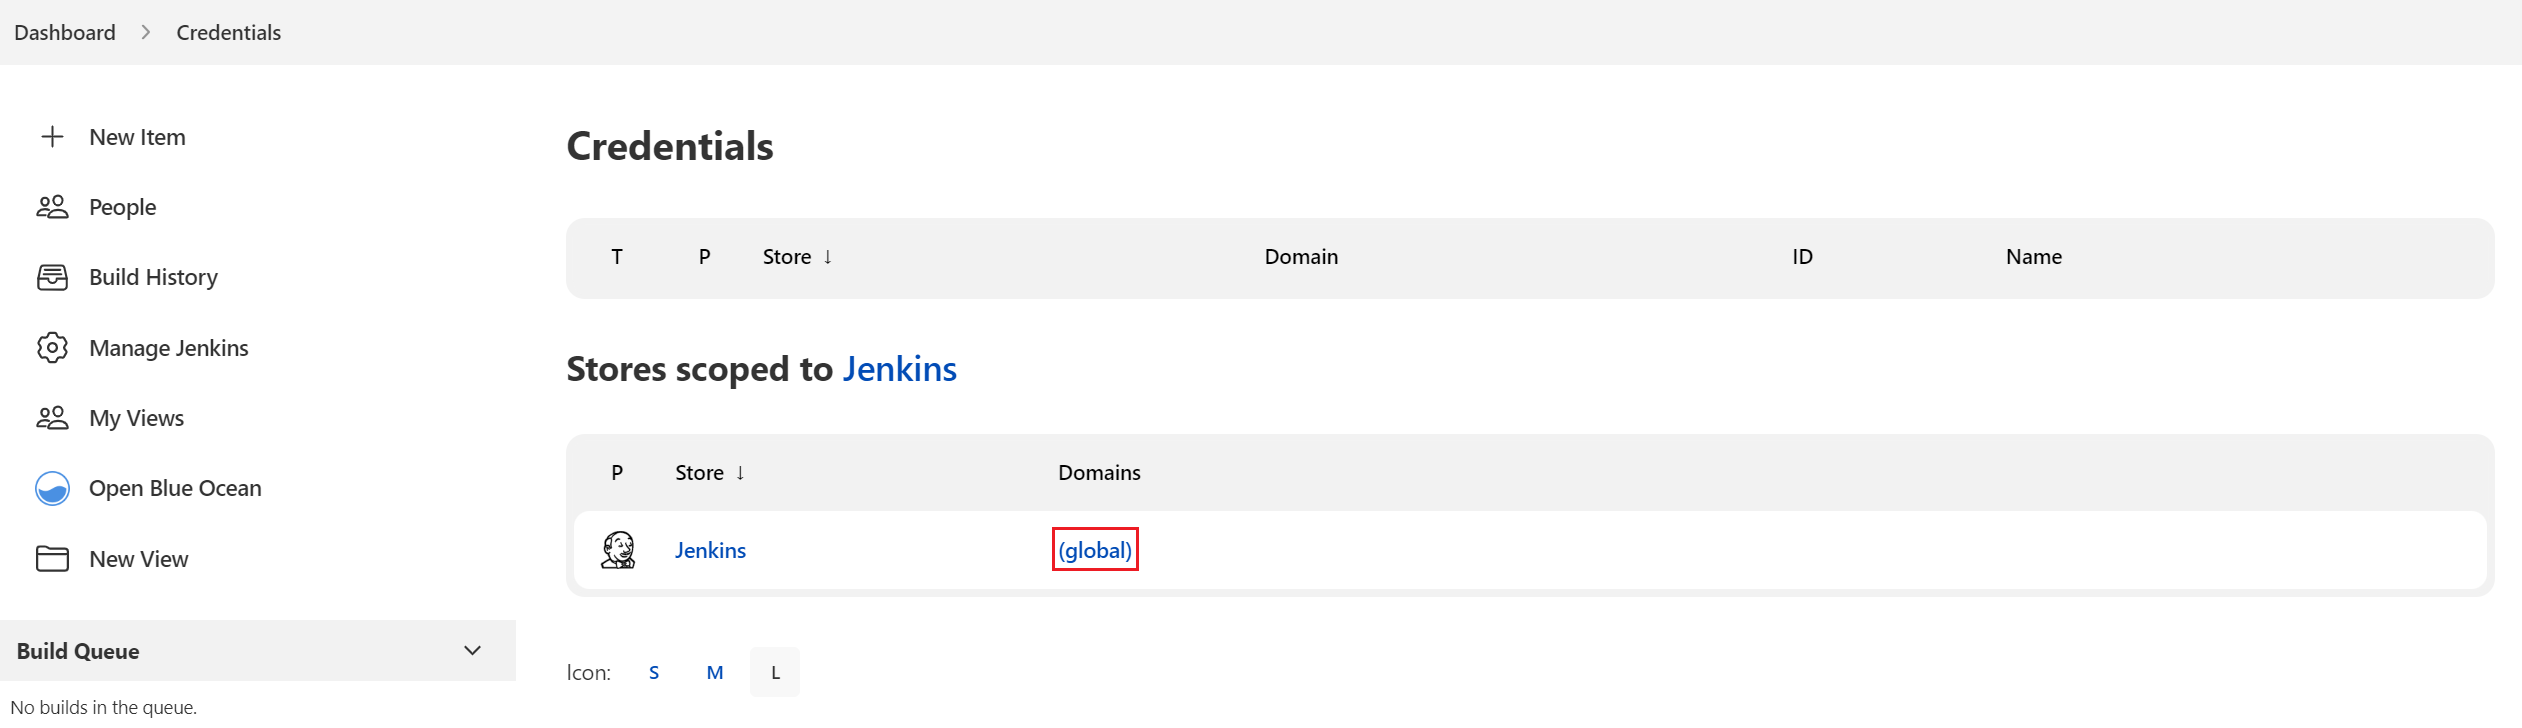
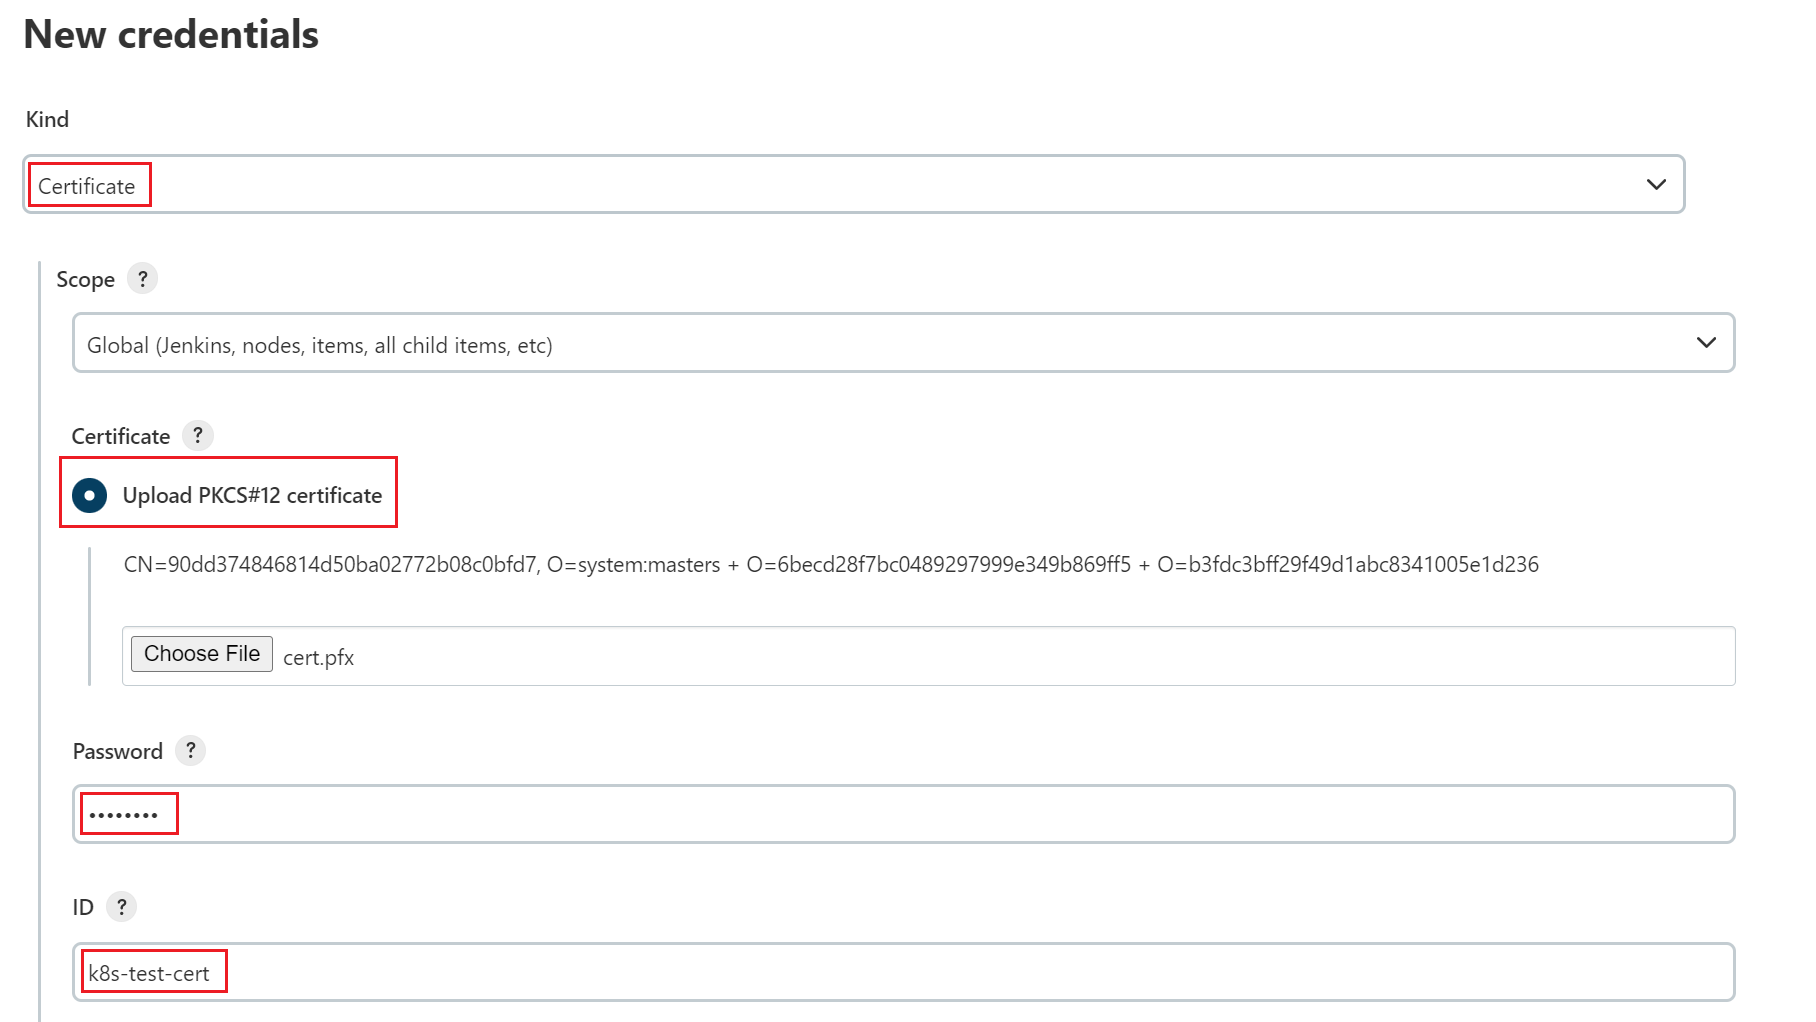
On the Jenkins console, choose Manage Jenkins -> Manage Credentials and click Global. You can also create a domain.
-
Click Add Credential:
- Kind: Select
Certificate. - Scope: Select
Global. - Certificate: Select Upload PKCS#12 certificate and upload the cert.pfx file generated in.
- Password: The password customized during cert.pfx conversion.
- ID: Set this parameter to
k8s-test-cert, which can be customized.
- Kind: Select
Using Jenkins to Build a Pipeline
Obtaining a long-term SWR Login Command
During Jenkins installation and deployment, the Docker commands have been configured in the container. Therefore, no additional configuration is required for interconnecting Jenkins with SWR. You can directly run the Docker commands. You only need to obtain a long-term valid SWR login command. For details, see Obtaining a Long-Term Valid Login Command.
For example, the command of this account is as follows:
docker login -u eu-de_otcxxxxx@xxxxx -p xxxxx swr.eu-de.otc.t-systems.com
Creating a Pipeline to Build and Push Images
In this example, Jenkins is used to build a pipeline to pull code from the code repository, package the code into an image, and push the image to SWR.
The pipeline creation procedure is as follows:
-
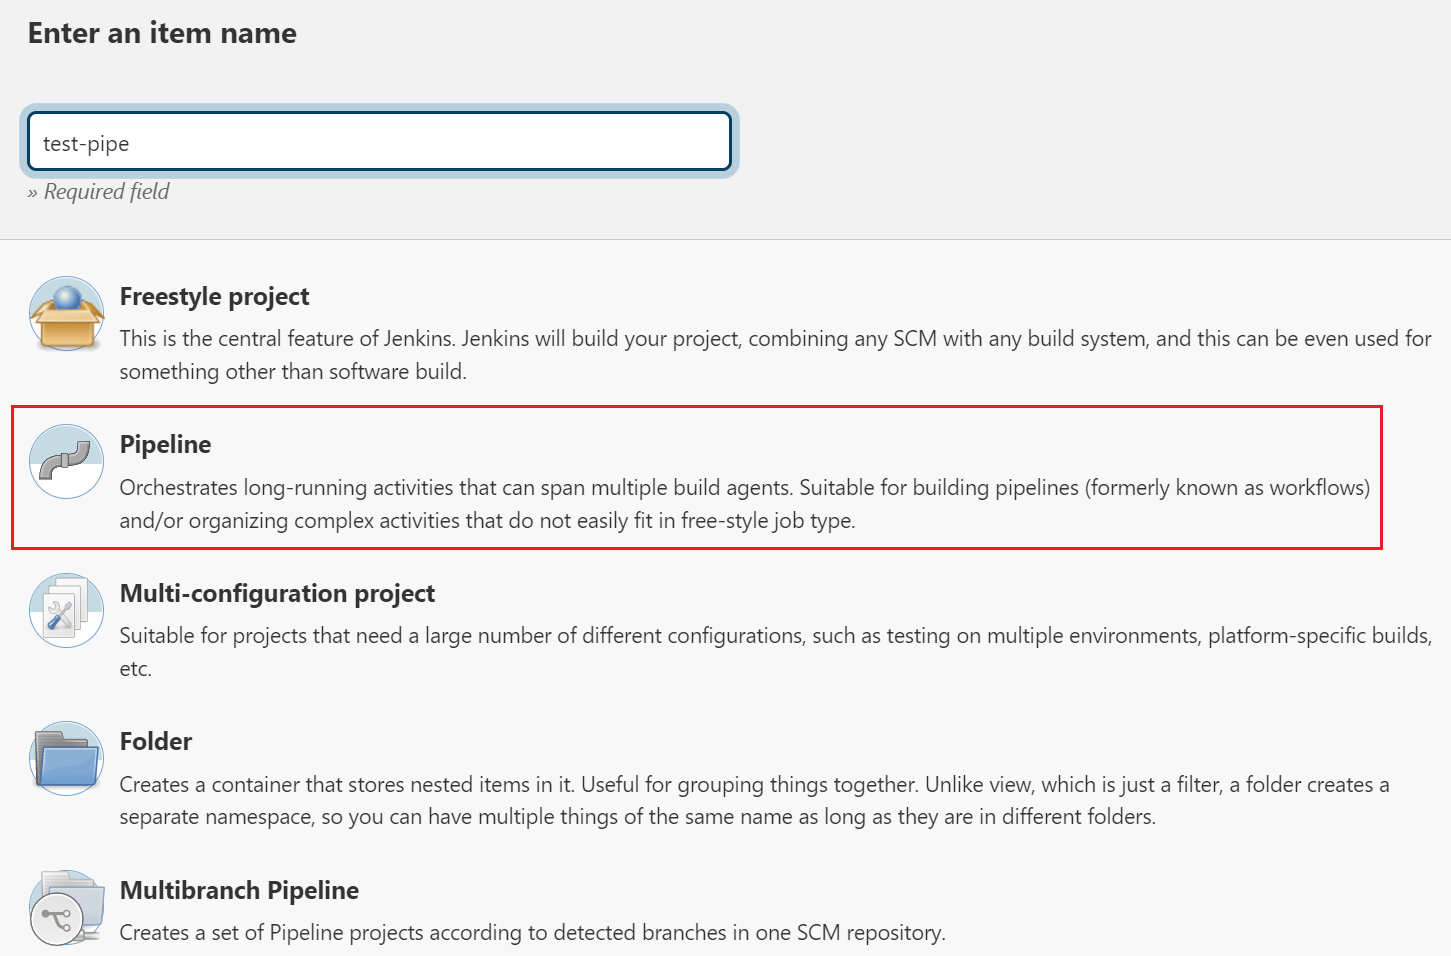
Click New Item on the Jenkins page.
-
Enter a task name and select Create Pipeline.
-
Configure only the pipeline script.
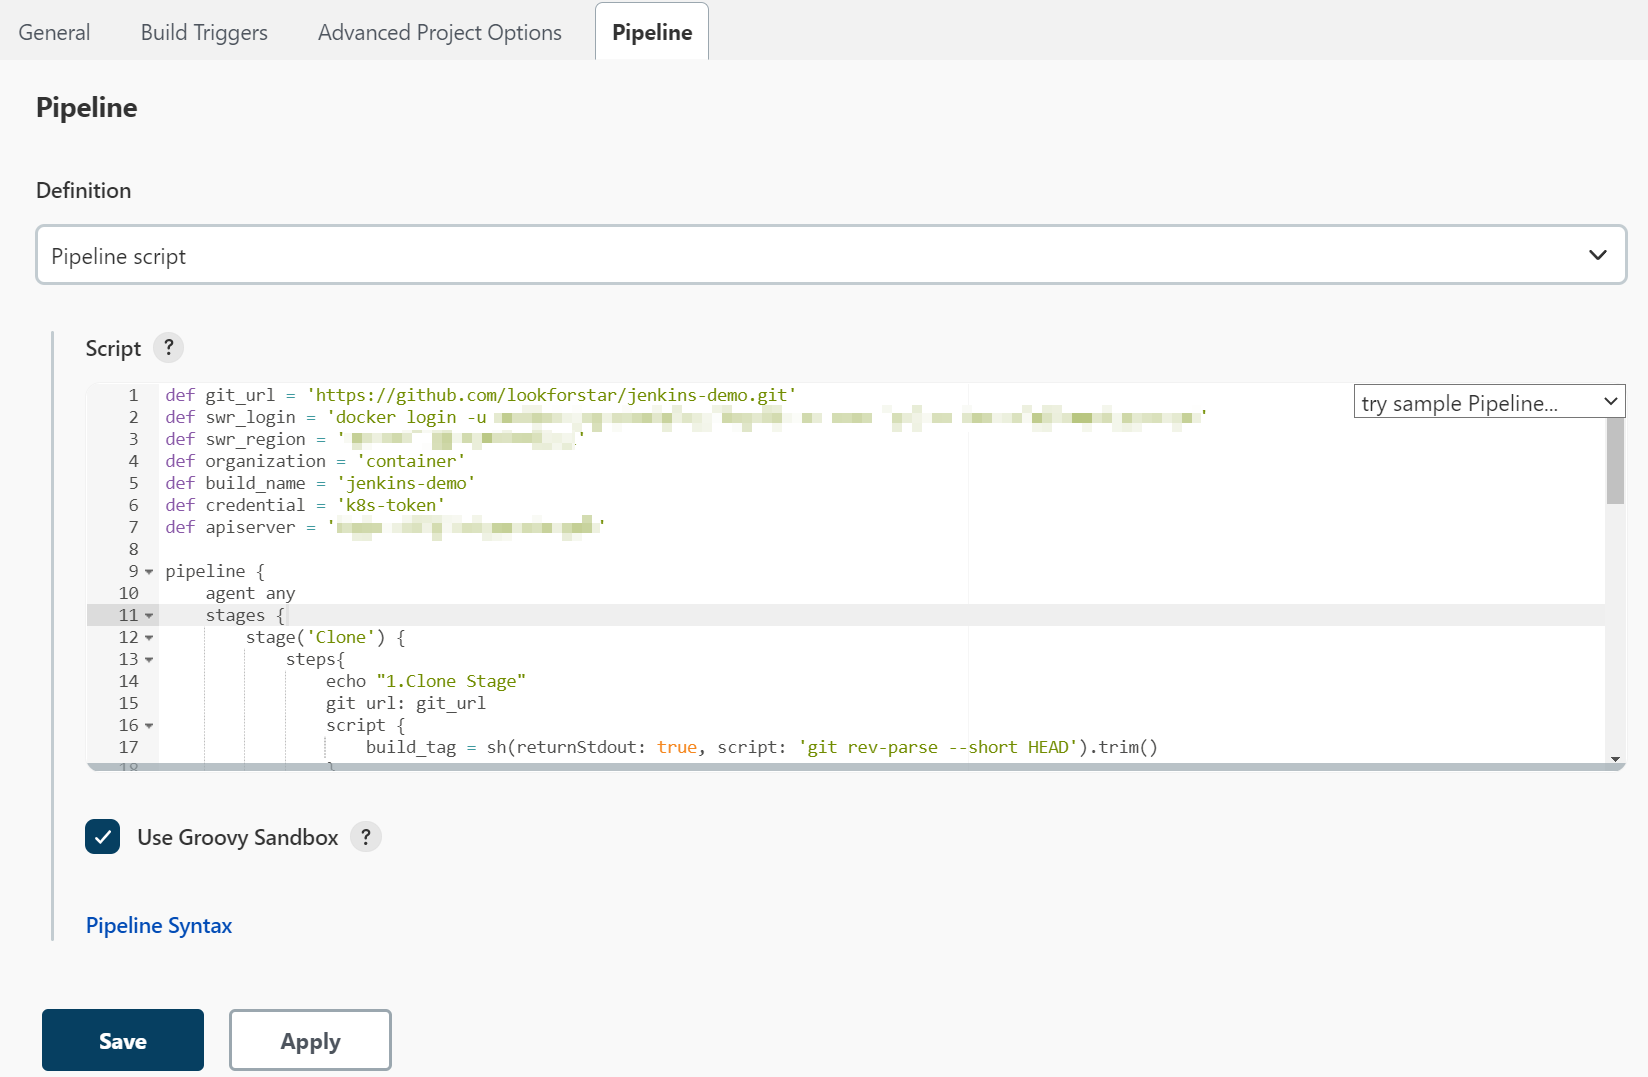
The following pipeline scripts are for reference only. You can customize the script. For details about the syntax, see Pipeline.
Some parameters in the example need to be modified:
- git_url: Address of your code repository. Replace it with the actual address.
- swr_login: The login command obtained in Obtaining a long-term SWR Login Command
- swr_region: SWR region.
- organization: The actual organization name in SWR.
- build_name: Name of the created image.
- credential The cluster credential added to Jenkins. Enter the credential ID. If you want to deploy the service in another cluster, add the access credential of the cluster to Jenkins again. For details, see Setting Cluster Access Credentials
- apiserver: IP address of the API server where the application cluster is deployed. Ensure that the IP address can be accessed from the Jenkins cluster.
//Define the code repository address.def git_url = 'https://github.com/cnych/jenkins-demo.git'//Define the SWR login command.def swr_login = 'docker login -u eu-dexxxx@xxxxxxx -p xxxxxxxxxxxx swr.eu-de.otc.t-systems.com'//Define the SWR region.def swr_region = 'eu-de'//Define the name of the SWR organization to be uploaded.def organization = 'batch'//Define the image name.def build_name = 'jenkins-demo'//Certificate ID of the cluster to be deployeddef credential = 'k8s-token'//API server address of the cluster. Ensure that the address can be accessed from the Jenkins cluster.def apiserver = 'https://kubernetes.default.svc.cluster.local:443'pipeline {agent anystages {stage('Clone') {steps{echo "1.Clone Stage"git url: git_urlscript {build_tag = sh(returnStdout: true, script: 'git rev-parse --short HEAD').trim()}}}stage('Test') {steps{echo "2.Test Stage"}}stage('Build') {steps{echo "3.Build Docker Image Stage"sh "docker build -t swr.${swr_region}.otc.t-systems.com/${organization}/${build_name}:${build_tag} ."//${build_tag} indicates that the build_tag variable is obtained as the image tag. It is the return value of the git rev-parse --short HEAD command, that is, commit ID.}}stage('Push') {steps{echo "4.Push Docker Image Stage"sh swr_loginsh "docker push swr.${swr_region}.otc.t-systems.com/${organization}/${build_name}:${build_tag}"}}stage('Deploy') {steps{echo "5. Deploy Stage"script {try {withKubeConfig([credentialsId: credential, serverUrl: apiserver]) {sh "sed -i 's/<BUILD_TAG>/${build_tag}/' k8s.yaml"sh "kubectl apply -f k8s.yaml --record"//The YAML file is stored in the code repository. The following is only an example. Replace it as required.}} catch (e) {println "oh no! Deployment failed! "println e}}}}}} -
Save the settings and execute the Jenkins job.