Establish a Point-to-Site VPN Connection between your Development Machine and a VPC
Establishing a Point-to-Site (P2S) VPN connection between your development machine and a Virtual Private Cloud (VPC) offers several advantages for developers. This setup allows you to securely access resources within the VPC from your local environment as if they were part of your private network, without exposing them on the public internet.
One key reason to set up such a connection is to enhance security. By using a P2S VPN, all data exchanged between your development machine and the VPC travels through an encrypted tunnel, protecting sensitive information from potential interception. This secure pathway is crucial for developers working with proprietary or confidential projects that require robust protection measures. Additionally, this configuration is convenient as it enables remote access to resources within the VPC without the need for a dedicated on-premises server. Developers can work seamlessly across different locations while maintaining direct and private connectivity to their cloud environments. It also facilitates collaboration among team members who may be distributed geographically but need consistent access to shared development resources. Moreover, setting up a P2S VPN minimizes latency issues compared to accessing the VPC through public internet routes, ensuring smoother interactions with cloud-hosted applications or databases. This setup not only optimizes performance but also allows for more efficient debugging and testing of applications within their intended deployment environment. Overall, establishing this type of connection is an effective way to bolster security, improve accessibility, and streamline development workflows in a cloud-centric architecture.
Prerequisites
Before we begin setting up a Point-to-Site (P2S) VPN connection between your development machine and an T Cloud Public Virtual Private Cloud (VPC), we are going to need:
- an ECS Server (Ubuntu 22.04): A General-purpose (1 vCPU, 2 GiB)
s3.medium.2instance will suffice. - an OpenVPN server: You need to install OpenVPN on the ECS server. OpenVPN serves as the backbone for setting up the P2S VPN by allowing secure encrypted communication between your development machine and the VPC.
Creating an ECS Server
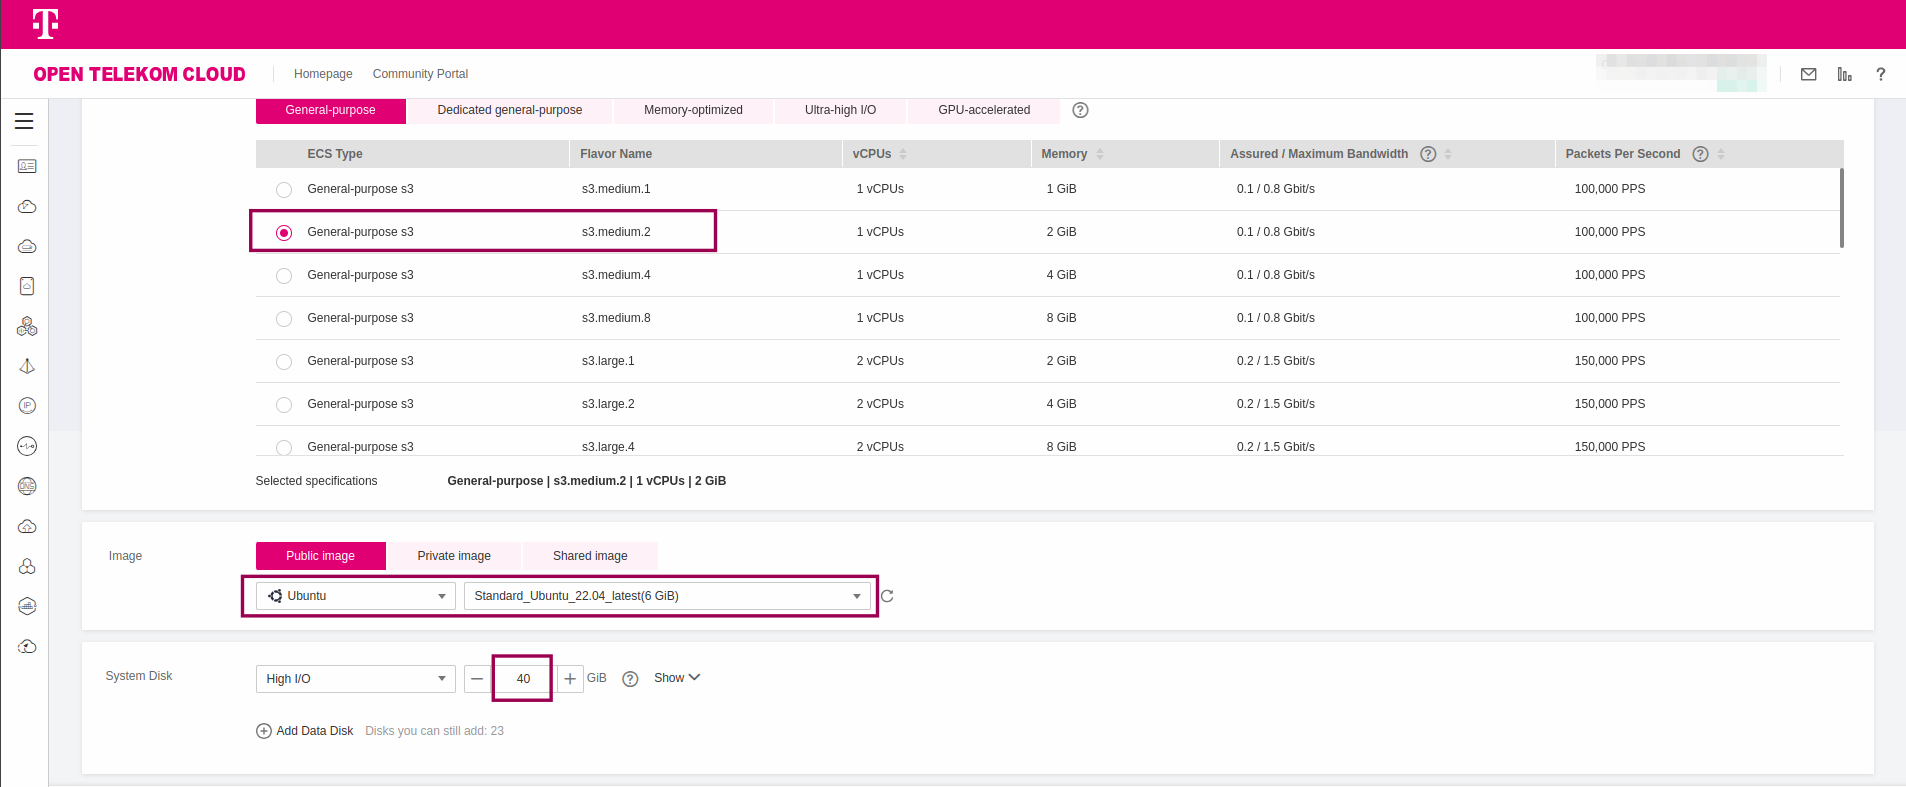
- In T Cloud Public Console -> Elastic Cloud Server, click Create ECS. Choose the Flavor and Image as depicted below and assign a
40GBas the System Disk size.
Click Next: Configure Network.
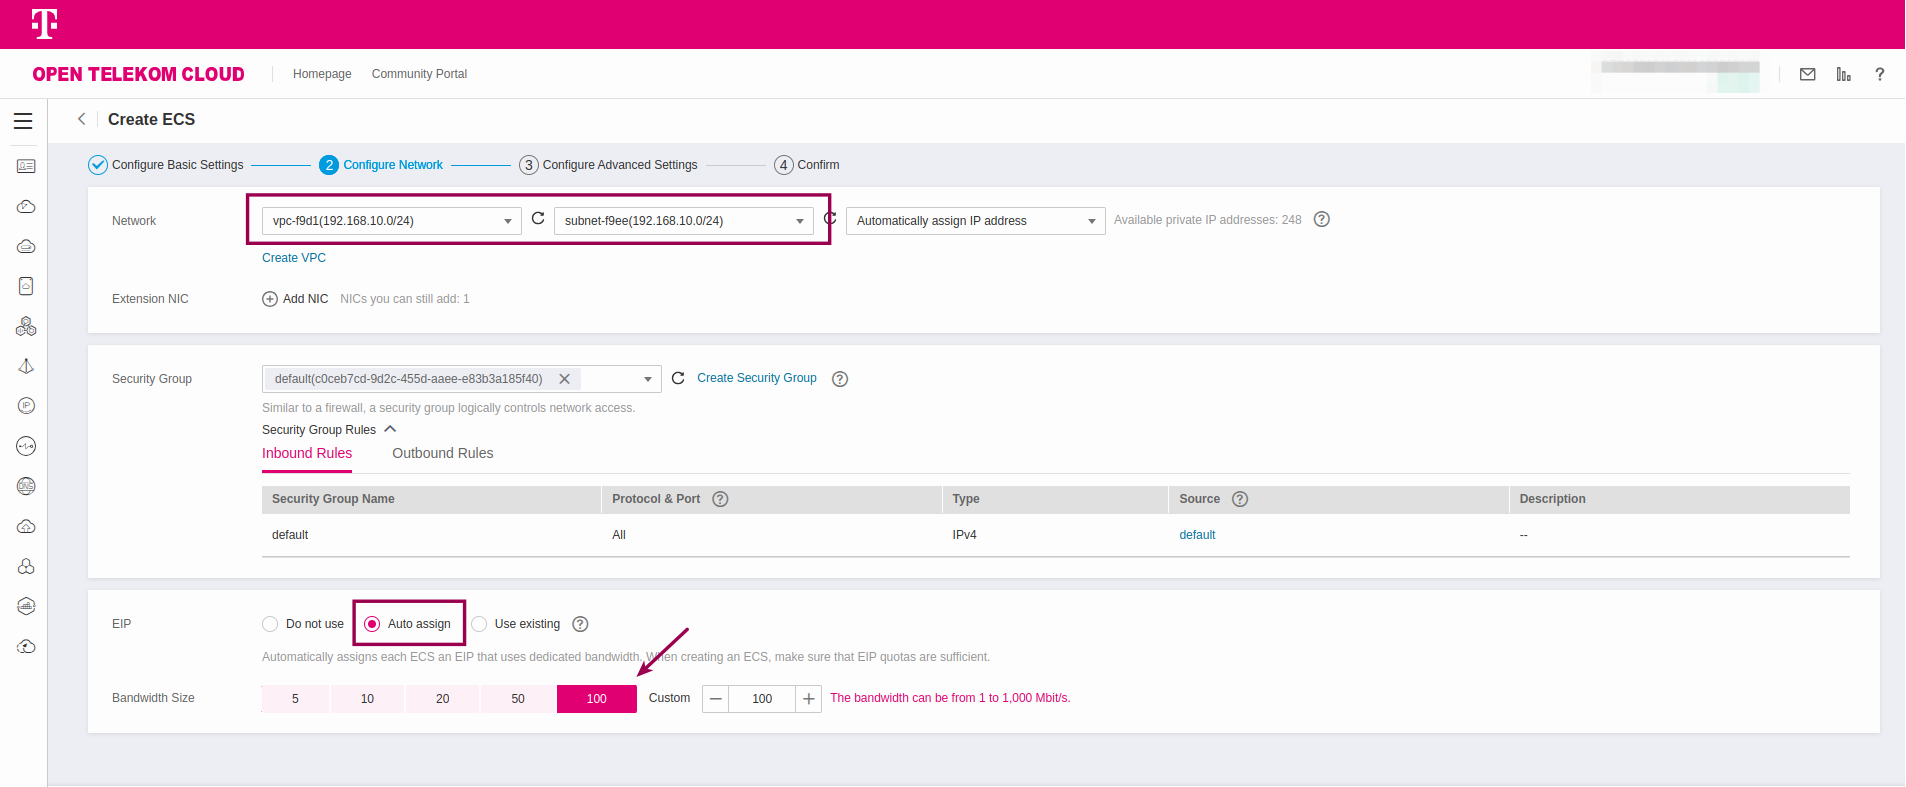
- Choose the VPC you want to establish a connection with, let OTC Auto assign an EIP to the ECS instance and set Bandwidth Size to
100Mbit/s:
-
Follow the remaining steps of the wizard and wait until the ECS instance is provisioned.
-
Go to Network Console -> Security Groups and click Create Security Group. Add two new Inbound Rules:
- Protocol:
TCP - Port:
22 - Source:
0.0.0.0/0
--- - Protocol:
ICMP - Port:
all - Source:
0.0.0.0/0
- Protocol:
-
Add the new Security Group to the Security Groups of the ECS Server
Installing & Configuring an OpenVPN Server
-
Establish an SSH connection to the ECS server using its Elastic IP.
-
In order to install OpenVPN in an easy and streamlined fashion, we are going to utilize the script provided by openvpn-install project.
Download the script and make it executable:
curl -O https://raw.githubusercontent.com/angristan/openvpn-install/master/openvpn-install.sh
chmod +x openvpn-install.sh
Execute the script & follow the wizard:
sudo ./openvpn-install.sh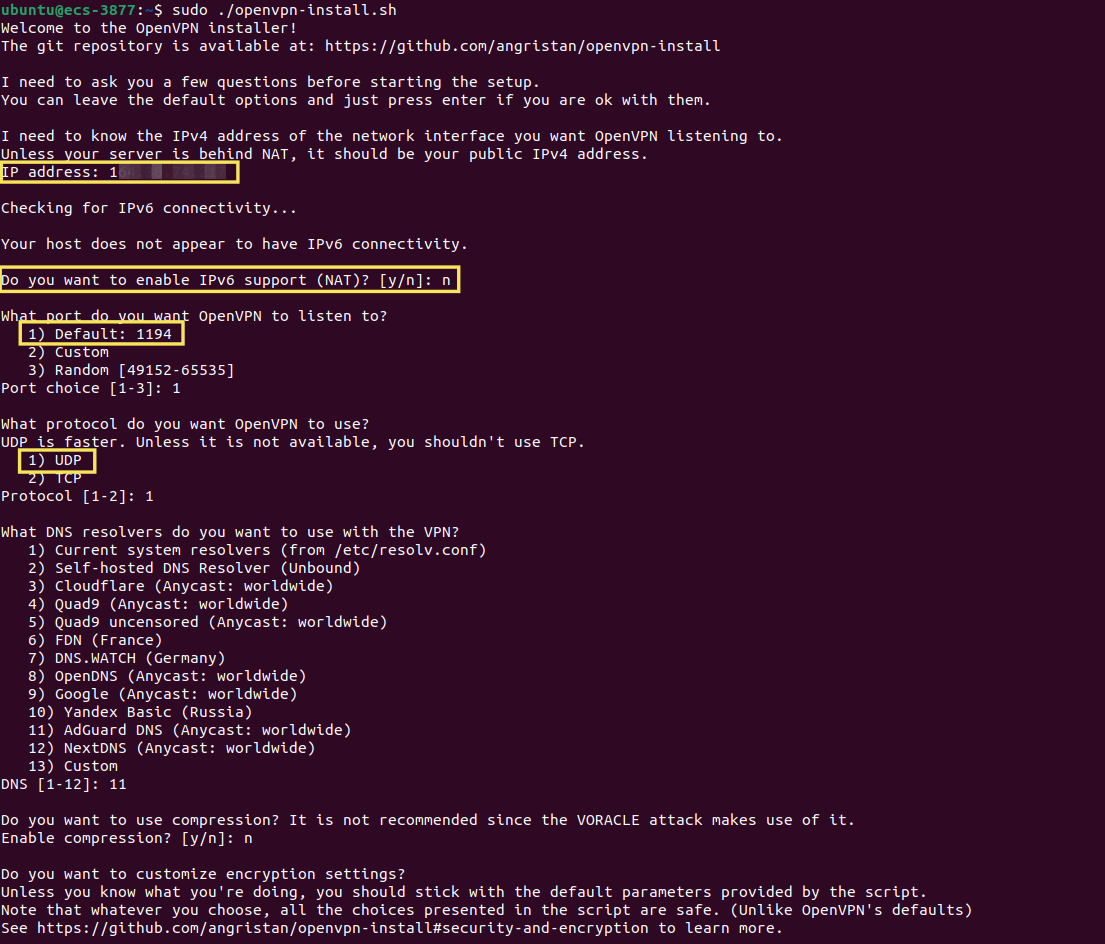 Make sure:
-
you declare as IP address the EIP of the ECS Server. If you don't know the EIP, either look it up in the T Cloud Public Console or simply run the following command in the terminal:
curl ifconfig.me -
write down the port you set OpenVPN to listen to (unless you left the default
1194). -
choose
UDPas the protocol
Let the wizard create a client (that would be your development machine):
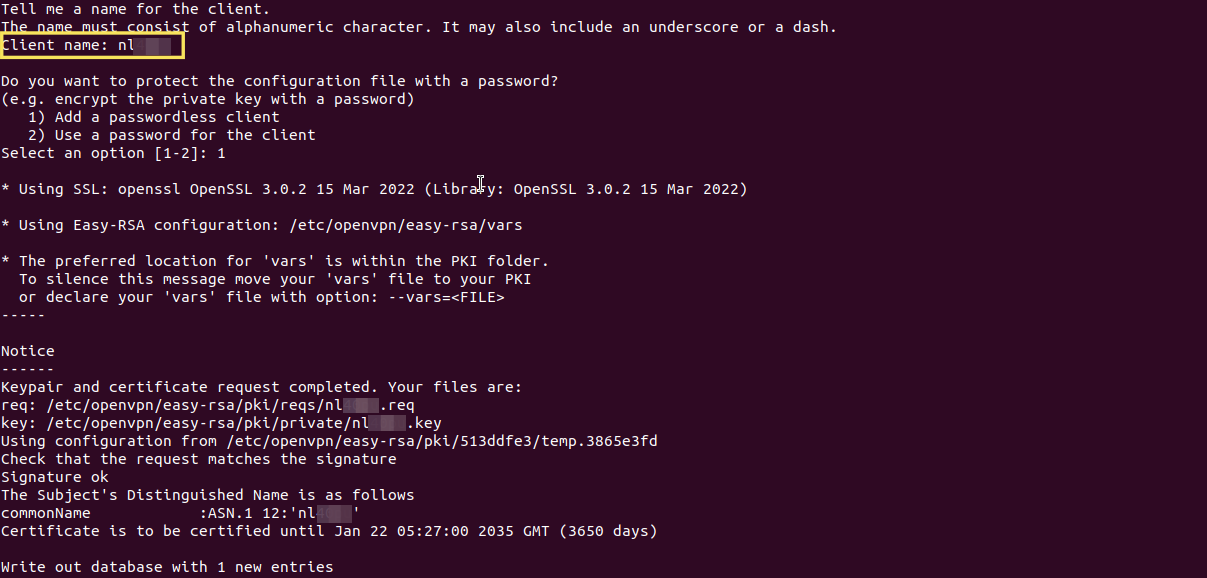 note
noteYou will find the configuration file for the client in ~/client_name.ovpn. Copy that file to your development machine.
-
-
Go to Network Console -> Security Groups, and click Create Security Group. Add a new Inbound Rule:
- Protocol:
UDP - Port:
1194(or the custom port you set OpenVPN to listen to during the wizard) - Source:
0.0.0.0/0
- Protocol:
-
Attach the new security group to the ECS server.
Validating the OpenVPN Server
Let's inspect the network interfaces and their configuration using ip a:
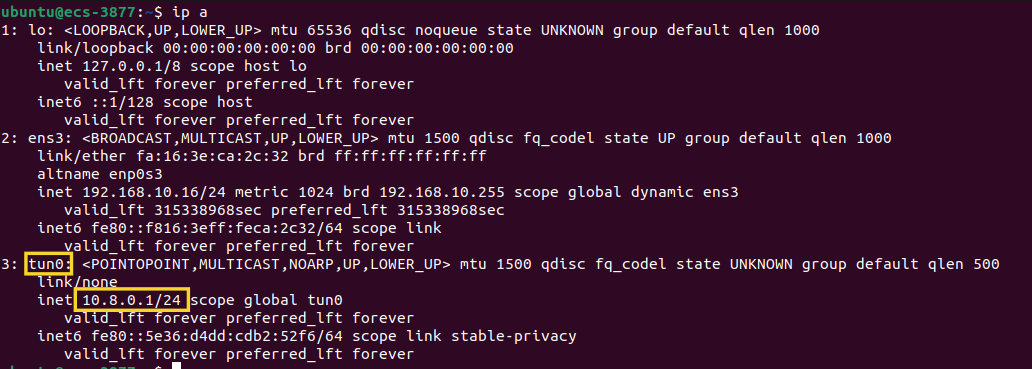
As you can observe, we have a new tunnel interface, tun0, with IPv4 address 10.8.0.1/24 which is up and running.
Lastly, let's list all listening TCP and UDP sockets associated with OpenVPN processes on this system, displaying their addresses, port numbers, and related process information by running the following command in the terminal:
sudo ss -tupln | grep openvpn

udp   UNCONN 0   0   0.0.0.0:1194   0.0.0.0:*   users:(("openvpn",pid=3431,fd=7))
That means we are good to go and configure our client.
Installing & Configuring an OpenVPN Client
In this blueprint, we will demonstrate how to configure an OpenVPN client specifically in a Linux/GNOME environment. Please note that terminal-based configuration methods or setups for other operating systems are not covered in this document.
Go to Settings -> Network -> VPN, click the add symbol and then select Import from file...:
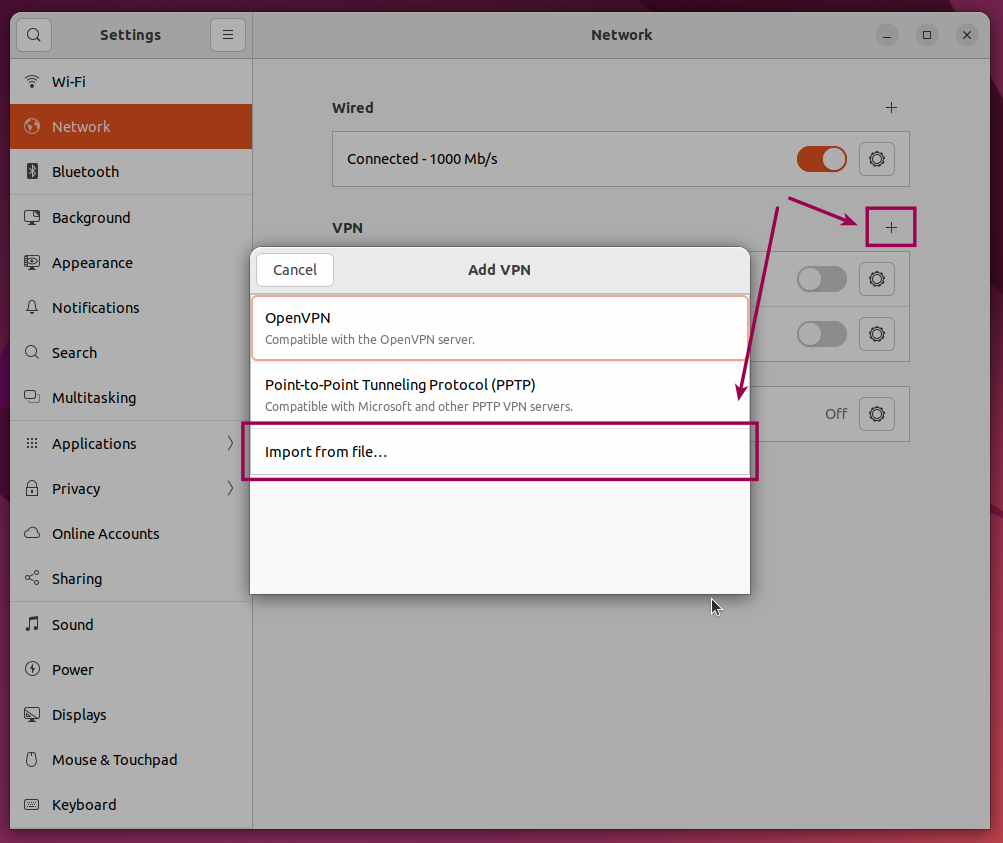
and import the client_name.ovpn file we copied from the ECS Server in the previous step.
Validating the OpenVPN Client
Establish the VPN connection and then inspect, on your development machine the network interfaces and their configuration with ip a:
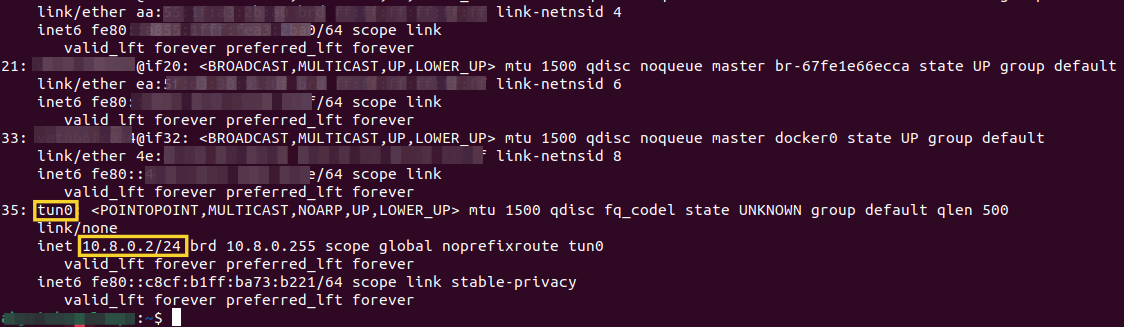
As you can observe we have a new tunnel interface, tun0, with IPv4 address 10.8.0.2/24 which is up and running. If you inquire for the public IP address of your development machine now, with curl ifconfig.me, you will notice it returns the EIP that is assigned to OpenVPN instance running on the ECS server.
Validating Connectivity
-
Ping
10.8.0.1from your development machine; this test should succeed, otherwise make sure you have allowed inbound ICMP traffic to your ECS Server. -
Create, an additional ECS server in the same VPC with the OpenVPN Server and allow inbound ICMP traffic via a security group. Ping the private IP address of the new ECS server from your development machine. This test should succeed as well, otherwise ensure that inbound ICMP traffic is allowed to the ECS server.
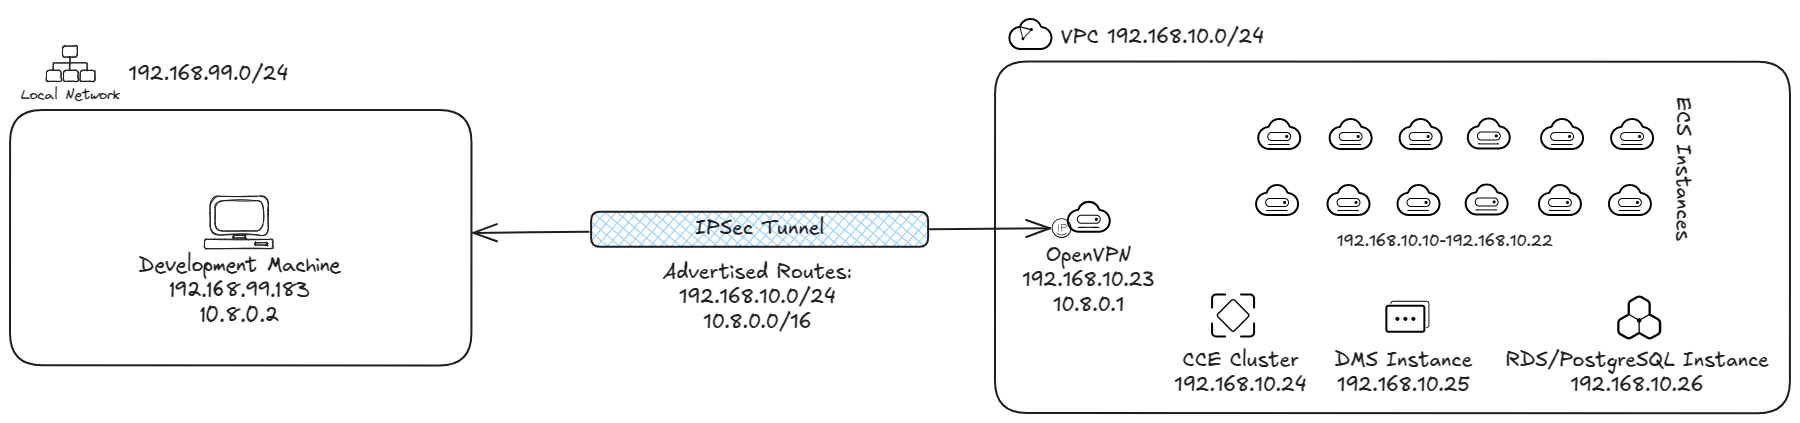
tipe.g., in our lab, the VPC has the following CIDR
192.168.10.0/24and the new ECS server got assigned the IP address192.168.10.183while the OpenVPN Server has been assigned the IP address192.168.10.16. In our case we are going to ping192.168.10.183from our development machine. Adjust accordingly to your VPC CIDR.