Establish a Point-to-Site VPN Connection between your Development Machine and a VPC using Terraform and Ansible
Engineers access sites from almost anywhere, earning the nickname road warriors. In order to make sure, access is as secure as possible, VPNs are a good choice. The goal of this blueprint is to deliver an easy way to setup, configure and manage an OpenVPN Server and its users. The OpenVPN Server will push a default route to its clients to make sure all traffic is routed through the VPN.
Please be aware that all traffic that will be routed through the VPN creates additional costs!
We are going to accomplish and automate this by using Terraform and Ansible.
Prerequisites
- A computer running Linux with git (e.g. your Laptop)
- SSH key (private and public)
- otc-auth >=2.2.1 https://github.com/iits-consulting/otc-auth
- Terraform Version v1.5.7 (T Cloud Public Provider >= v1.36.31)
- Install Terraform: https://developer.hashicorp.com/terraform/tutorials/aws-get-started/install-cli
- or use tfenv instead: https://github.com/tfutils/tfenv
- Ansible >= 10.7.0 (ansible-core >= 2.17.8)
Creating SSH Key
If you don't have a SSH key yet, create one:
ssh-keygen -t rsa -C "user@example.com" -b 4096 -f ~/.ssh/ssh-private-key
chmod 600 ~/.ssh/ssh-private-key
Installing Terraform
You can use tfenv project to maintain your Terraform installation, or refer to the Terraform website on how to install Terraform.
git clone --depth=1 https://github.com/tfutils/tfenv.git ~/.tfenv
echo 'export PATH=$PATH:$HOME/.tfenv/bin' >> ~/.bashrc
export PATH=$PATH:$HOME/.tfenv/bin
tfenv install 1.5.7
Authenticating with otc-auth
Example on how to install otc-auth:
mkdir otc-auth
cd otc-auth
curl -OL https://github.com/iits-consulting/otc-auth/releases/download/v2.2.4/otc-auth-2.2.4-1-x86_64.pkg.tar.zst
tar -xfz otc-auth-2.2.4-1-x86_64.pkg.tar.zst
export PATH=$PATH:$HOME/otc-auth/usr/bin/
echo 'export PATH=$PATH:$HOME/otc-auth/usr/bin/' >> ~/.bashrc
otc-auth --version
Storing Terraform state file in OBS
You can ignore this step if you want to store your state file locally.
It is recommended to use an OBS S3 Bucket to store your Terraform state file. You can follow this guide in our Community Portal on how to create an OBS bucket. After that, edit and adjust terraform_otc/settings.tf accordingly.
Installing Ansible
You can refer to the Ansible website on how to install Ansible, or apply the following steps:
python3 -m pip install --upgrade pip
pip install --upgrade ansible==10.7.0
Configuring & Applying Terraform Plan
Initially you need to clone https://github.com/opentelekomcloud-blueprints/ovpn.git (or fork and clone depending on your needs):
git clone --branch main --single-branch https://github.com/opentelekomcloud-blueprints/ovpn.git
cd ovpn
and provide the necessary configuration values:
- The main configuration is done in a JSON file, use the template ./config.json, e.g. copy it to a new file like
cp config.json otc-backend.config.jsonbefore editing. - Place your SSH public key string in the variable
SSH_PUBLIC_KEY. - Make sure the VPC/Subnet IP network does not have any overlapping with existing VPCs/Subnets you'd like to create a peering with, or with the usual private networks used by your users.
Creating a temporary token
Create a file on your system, or in the root of this repository, e.g. named otc-backend.auth with the following content:
export ENV_OTC_DOMAIN="OTCxxxxxxxxxxxxxxxxxxxxxx"
export ENV_OTC_DOMAIN_ID="*** a.k.a. Account ID ***"
export ENV_OTC_REGION="e.g. eu-de"
export ENV_OTC_PROJECT_NAME="e.g. eu-de_MyProjectName"
export ENV_OTC_PROJECT_ID="***"
export ENV_OTC_USERNAME="IAM username"
export ENV_OTC_PASSWORD="IAM password"
export ENV_OTC_AUTH_URL="https://iam.eu-de.otc.t-systems.com/v3"
- Please make sure that the credentials are not accessed by unauthorized people.
- Make sure you never commit and push credentials to the repository (adding the file above to .gitignore is the easiest and safest choice).
The token will be valid for 4 hours. You can renew it using the script get_token.sh:
source ./otc-backend.auth
source ./get_token.sh
Initializing Terraform
terraform -chdir=./terraform_otc init
Planning and Applying Terraform Configuration
terraform -chdir=./terraform_otc plan -var-file=../otc-backend.config.json
terraform -chdir=./terraform_otc apply -var-file=../otc-backend.config.json
-
If you need to login to the ECS Server using SSH you can use the following command:
ssh -i ~/.ssh/ssh-private-key ubuntu@$(cat otc-backend.ovpn_host_eip) -
If you need to remove all the artifacts provisioned by Terraform, use the following command:
terraform -chdir=./terraform_otc destroy -var-file=../otc-backend.config.jsonThat will destroy everything, so use with CAUTION!
Installing OpenVPN Server
- The Ansible playbook was tested with Ansible 10.7.0 (ansible-core 2.17.8)
- Please install
community.generalusing the commandansible-galaxy collection install community.general - Make sure you have your SSH private key accessible, e.g.
... --private-key ~/.ssh/ssh-private-key ...
Initial Installation & Configuration
- Please login to the OpenVPN host and reboot after the initial installation!
- Please change the password for the default user ubuntu (and store that safely)! E.g.
sudo passwd ubuntu - Please create a reminder to run this step again on regular basis to apply any security updates available at the time!
ansible-playbook -i otc-backend.ansible_inventory ansible/openvpn.yml \
 --private-key ~/.ssh/ssh-private-key \
 -t base_configuration
Installing Easy-RSA, OpenVPN & Firewall
ansible-playbook -i otc-backend.ansible_inventory ansible/openvpn.yml \
 --private-key ~/.ssh/ssh-private-key \
 -t easy-rsa,openvpn,firewall
Check Status
This task will always run.
ansible-playbook -i otc-backend.ansible_inventory ansible/openvpn.yml \
 --private-key ~/.ssh/ssh-private-key
Managing OpenVPN Server Users
Creating Users
Create users, and/or download ZIP archive(s) with user configuration(s). Pass archives to the users.
- Users are listed in the file
./ansible/vars/main.ymlin the variablevpn_users. - Make sure Users are not listed twice, or also listed in the variable
vpn_users_to_revoke! - The zip archive will be downloaded to
../otc-backend.vpns/ - If users already exist, only the zip archive will be downloaded
...
vpn_users:
  - user1
  - user2
...
ansible-playbook -i otc-backend.ansible_inventory ansible/openvpn.yml \
 --private-key ~/.ssh/ssh-private-key \
 -t create_users
You can overwrite the variable vpn_users during a create_users call, in order to speed things up, when you have a lot of users;
but make sure putting every user into ./ansible/vars/main.yml:vpn_users as well, in order to keep track of your users.
ansible-playbook -i otc-backend.ansible_inventory ansible/openvpn.yml \
 --private-key ~/.ssh/ssh-private-key \
 -t create_users \
 --extra-vars "vpn_users=USERNAME"
or a bunch of them:
ansible-playbook -i otc-backend.ansible_inventory ansible/openvpn.yml \
 --private-key ~/.ssh/ssh-private-key \
 -t create_users \
 --extra-vars='{"vpn_users": [USER1,USER2,USER3]}'
Revoking Users
- Revoked Users are listed in the file
./ansible/vars/main.ymlin the variablevpn_users_to_revoke. - Make sure Revoked Users are not listed twice, or also listed in the variable
vpn_users!
...
vpn_users_to_revoke:
  - user3
  - user4
...
ansible-playbook -i otc-backend.ansible_inventory ansible/openvpn.yml \
 --private-key ~/.ssh/ssh-private-key \
 -t revoke_users
Checking EasyRSA Index
Check the EasyRSA Index, in order to compare and track users being created, or revoked:
ansible-playbook -i otc-backend.ansible_inventory ansible/openvpn.yml \
 --private-key ~/.ssh/ssh-private-key \
 -t easyrsa_index
Managing OpenVPN Server Backups
Creating a Backup
This Ansible Playbook will create a backup (tgz archive) of the /etc/openvpn directory and it will stored it in HOME/ovpn_backup/ovpn<iso8601_basic>.tgz and locally under otc-backend.backups/ovpn.<iso8601_basic>.tgz.
ansible-playbook -i otc-backend.ansible_inventory ansible/openvpn.yml \
 --private-key ~/.ssh/ssh-private-key \
 -t backup
Restoring from a Backup
- This Ansible Playbook will upload a backup archive to the OpenVPN server
HOME/ovpn_restoreand restore/etc/openvpndirectory. - A fresh Backup will be created prior restore.
- Files will be overwritten, but files not existing in the archive will remain in the destination directory untouched (no prior purge).
- You will be prompted to confirm before the restore will start.
- You will have to enter the local path to the backup archive that should be used to restore, e.g.
... --extra-vars backup=/path/to/otc-backend.backups/ovpn.<iso8601_basic>.tgz. - The OpenVPN service will be restarted after restore.
ansible-playbook -i otc-backend.ansible_inventory ansible/openvpn.yml \
 --private-key ~/.ssh/ssh-private-key \
 -t restore \
 --extra-vars backup=/path/to/otc-backend.backups/ovpn.<iso8601_basic>.tgz
Installing & Configuring an OpenVPN Client
MS Windows 11 64bit OpenVPN Client
- Download OpenVPN Community Client from https://openvpn.net/community-downloads/
- Tests were carried out using OpenVPN GUI Version 2.6.12 and Windows 11 Pro 64bit (24H2)
- Install OpenVPN Client, follow the instructions of the installer
- Check the taskbar settings and enable the visibility of OpenVPN GUI taskbar icon

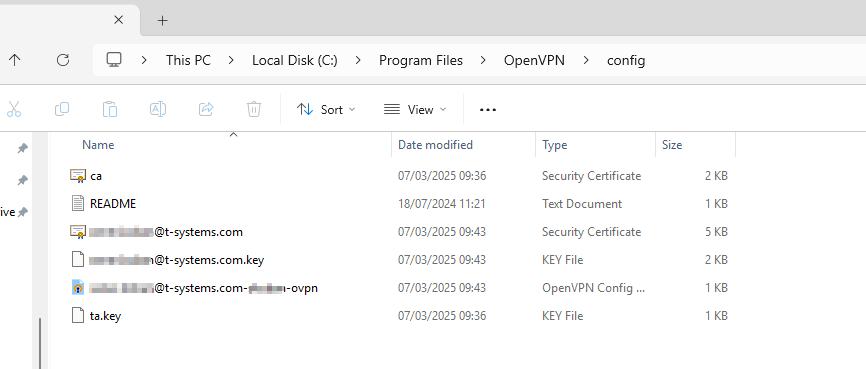
- Unzip the ZIP archive containing your client configuration and certificates into
C:\Program Files\OpenVPN\config(files only, no subdirectories!)
- Right click on the OpenVPN GUI icon in the taskbar and click connect
![]()
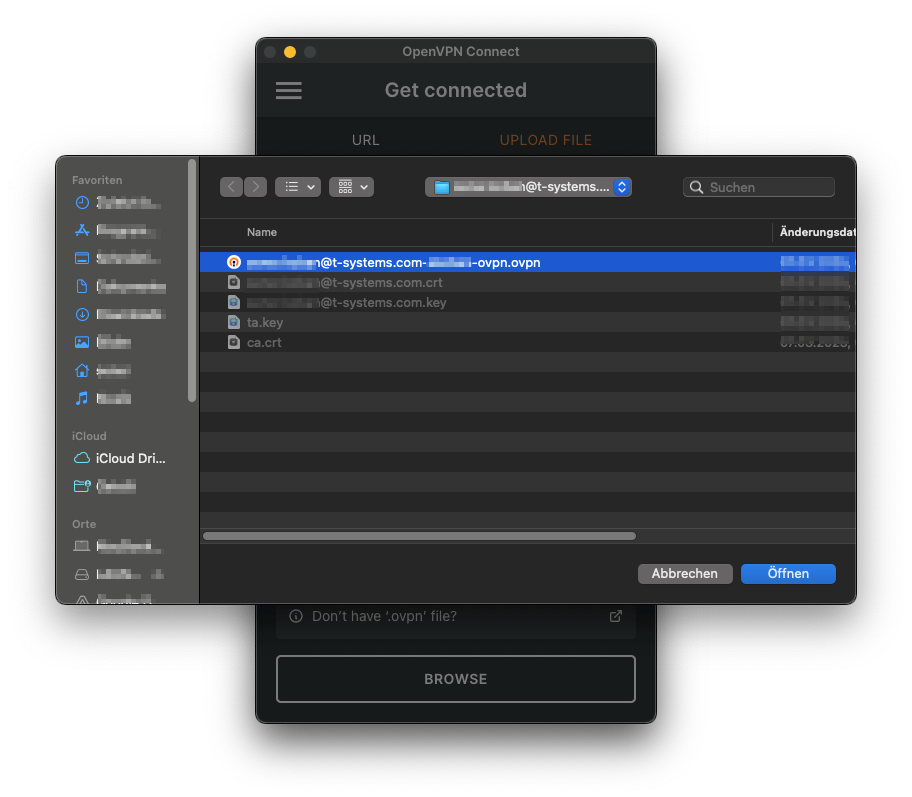
MacOS OpenVPN Connect
- Download the OpenVPN Connect v3 from https://openvpn.net/client-connect-vpn-for-mac-os/
- Tests were carried out using OpenVPN Connect Version 3.7.0 (5510) on macOS Sequoia Version 15.3.2
- Install OpenVPN Client, follow the instructions of the installer
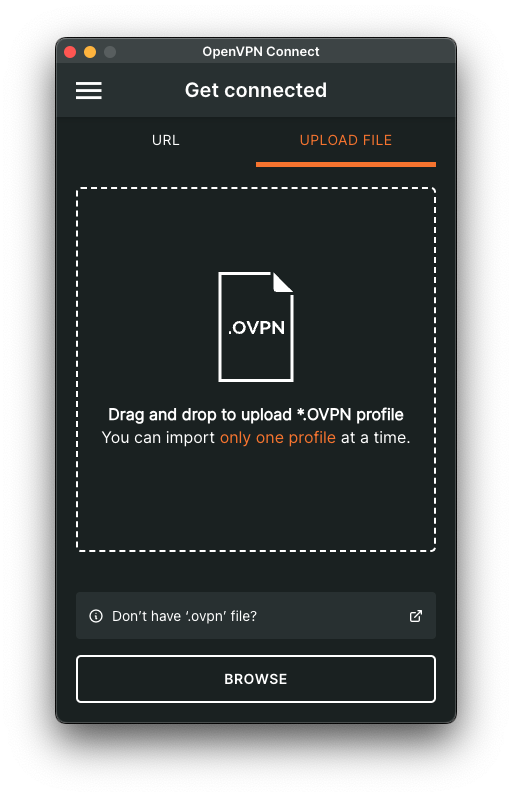
- Unzip the ZIP archive containing your client configuration and certificates on your local disk (e.g. Documents/VPN)
- Start OpenVPN Connect, click on UPLOAD FILE, navigate to the unarchived contents of your ZIP archive, and choose your
*.ovpnfile and then Click on CONNECT

Validating Connectivity
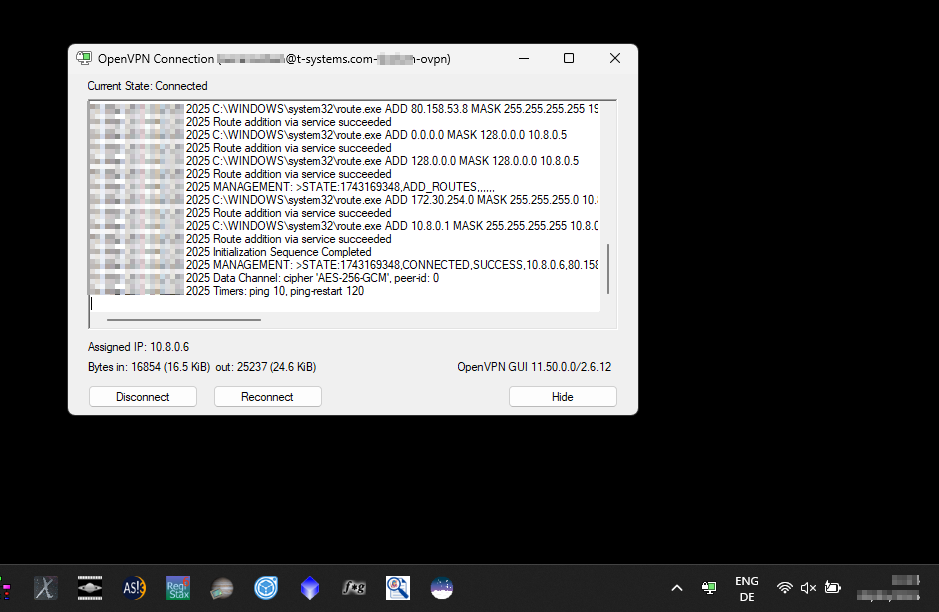
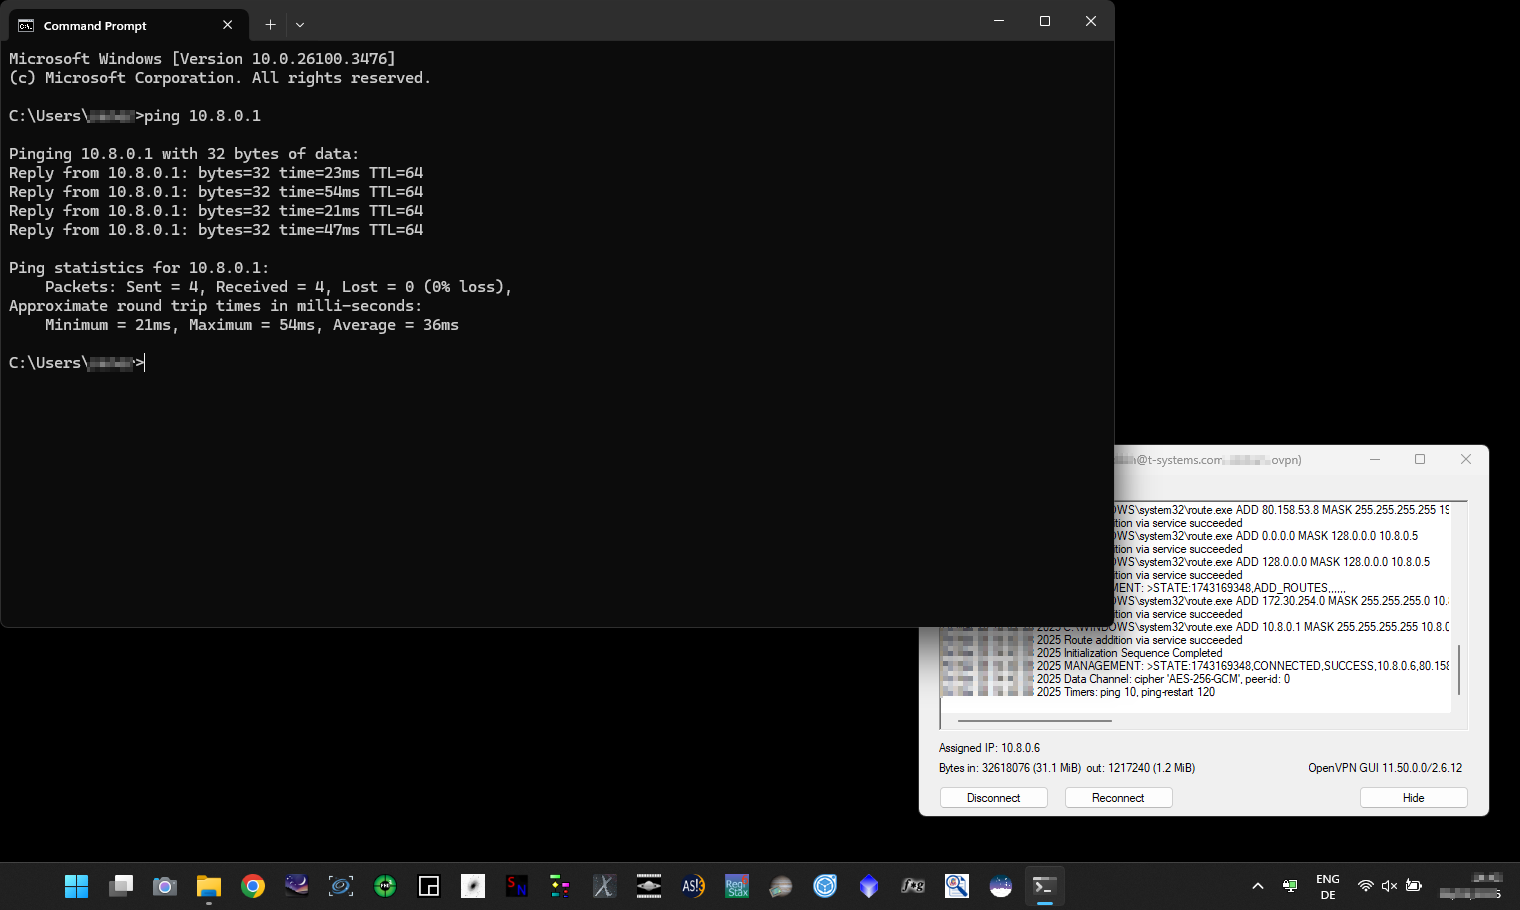
Connectivity check on MS Windows 11 64bit
- On your Windows Client after establishing the VPN connecting
- Double-click on the OpenVPN GUI icon in the taskbar
- You should see "Current State: Connected" above the logs
![]()
- Hit the Windows button on your keyboard, type cmd and hit enter
- In the cmd Window type
ping 10.8.0.1and hit enter, you should get 4 replies
- In the cmd Window type
Connectivity check on MacOS
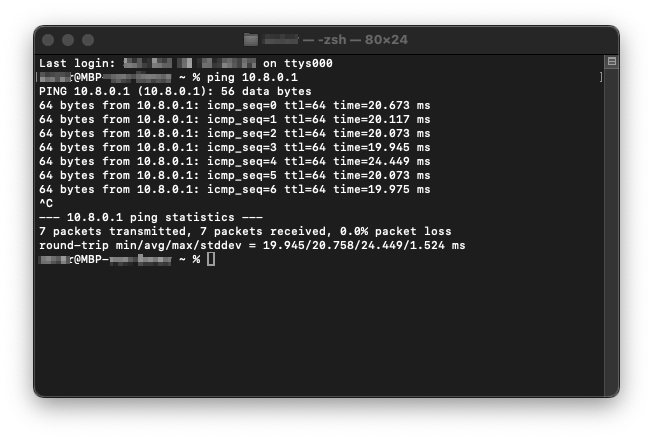
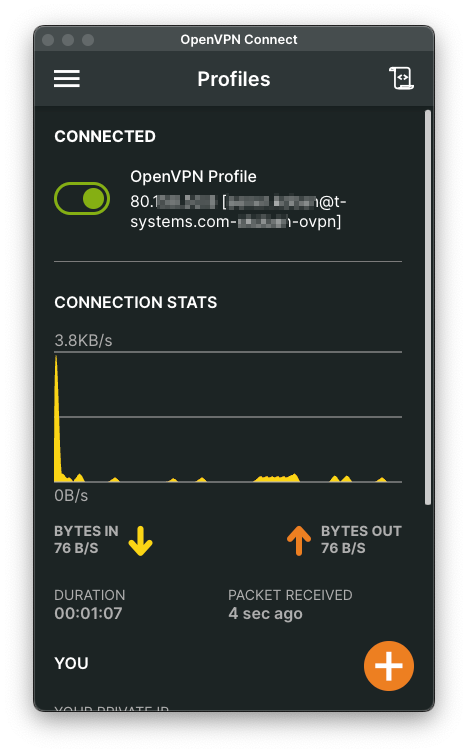
- On your MacOS Client after establishing the VPN connecting
- Open a Terminal Window, type
ping 10.8.0.1, and hit enter. You should see replies coming in, until you enter Control+c