Establish a Site-to-Site VPN from T Cloud Public to AWS using Enterprise Router and BGP Routing
This article shows the process of establishing a Site-to-Site Virtual Private Network (VPN) between T Cloud Public and Amazon Web Services (AWS) using BGP routing for dynamic and efficient network connectivity. The setup is designed to provide high availability, redundancy, and security features essential for enterprise environments where data integrity and seamless communication are paramount.
Solution Overview
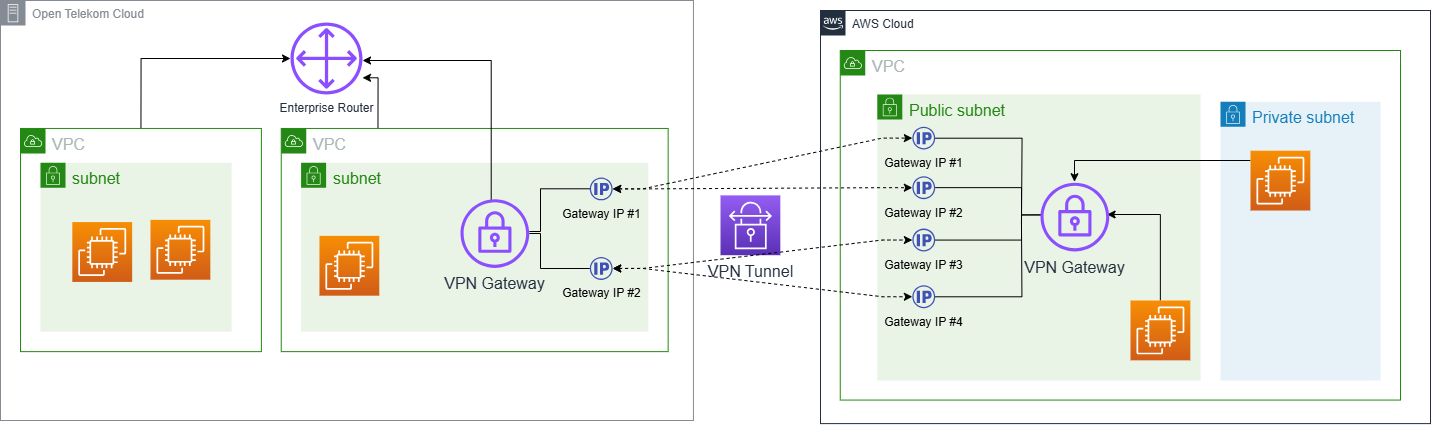
This setup connects different Virtual Private Clouds (VPCs) in T Cloud Public to a specified VPC in AWS.
- Establishment of VPN Tunnels: Four VPN tunnels are created between T Cloud Public and AWS, each configured with distinct peer IP addresses and pre-shared keys. These tunnels serve as the secure channels through which data is transmitted between the two networks.
- BGP Routing Protocol: Once the customer gateways and VPN tunnels are established, BGP sessions are initiated on both ends using the respective ASNs (Autonomous System Numbers). This allows for dynamic routing of network traffic across the connection, optimizing path selection based on performance metrics such as latency and bandwidth utilization.
- High Availability and Failover: To maintain high availability and ensure minimal disruption in case one or more tunnels fail, four VPN tunnels are created between T Cloud Public and AWS.
Concepts and Terminology
- VPN Gateway is a managed gateway that makes it easy to set up and scale Virtual Private Networks (VPNs). It functions as a target network gateway through which all traffic destined for the connected network will pass.
- Customer Gateway is a physical or software device that represents your side of a network connection. A Customer Gateway is configured with an external IP address and a BGP ASN; both are provided by the other side of the connection (e.g., AWS if you are creating it on T Cloud Public). This provides the necessary information to the VPN connection.
- VPN Connection refers to the network connection that is established between two networks over an encrypted link facilitated by a VPN Gateway and customer gateway. It includes all configurations related to encryption (using AES 256-bit encryption as standard), authentication mechanisms, and monitoring tools that track health status and performance metrics.
You can find more information about Site-to-Site VPN and its related components here:
Prerequisites
Before setting up VPN tunnels between T Cloud Public and AWS, you must configure an Enterprise Router on the T Cloud Public side, to be able to bind the VPN Gateway to it and also manage Virtual Private Cloud (VPC) traffic. This section will guide you through creating a basic configuration of such a router and attaching necessary VPCs for VPN connectivity.
If you already have an Enterprise Router set up and the VPC that you want to share with the AWS side is attached to it, then skip this section.
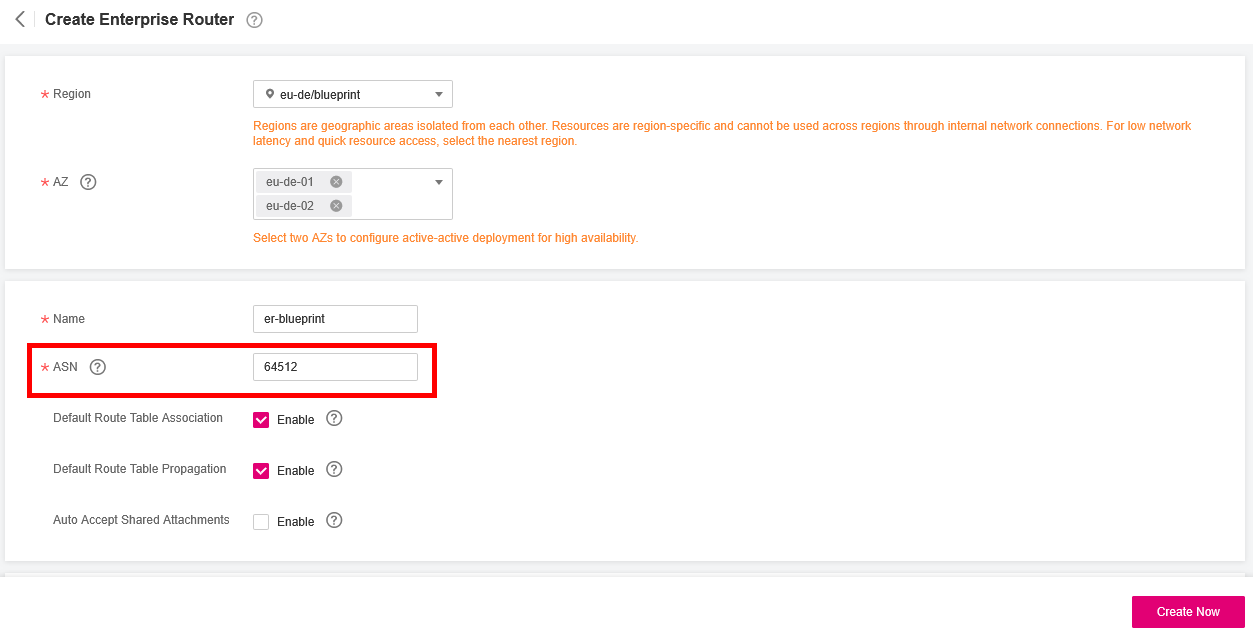
Make sure that the ASN of your Enterprise Router matches the ASN of the VPN Gateway that is attached to the router.
Creating an Enterprise Router on T Cloud Public
- Log in to the Open Telekom Management Console.
- Navigate to Network -> Enterprise Router.
- Click on Create Enterprise Router and create a new router with the following details:
- Name: Enter a name for your Enterprise Router.
- ASN: Specify the Autonomous System Number (ASN) of your Enterprise Router.
- Region: Choose the region where you want to create the router.
- Availability Zone: Select the availability zone(s) where you want to place your Enterprise Router. For high availability and redundancy, select multiple availability zones.
- The Default Route Table Association and Default Route Table Propagation should be set to Enabled.
- Click on Create Now to finalize the creation process.
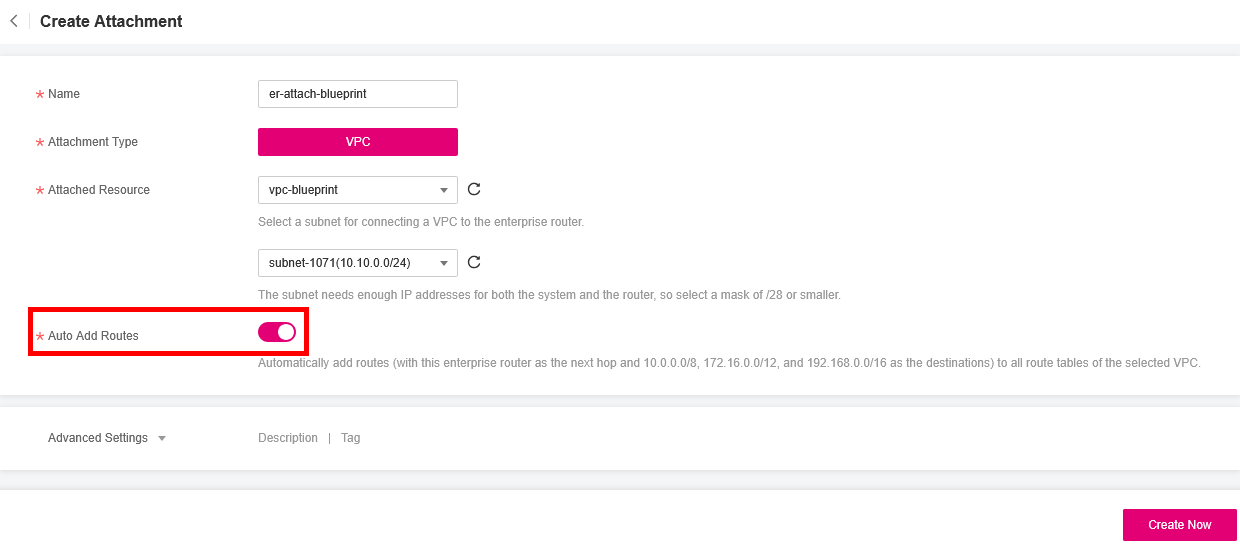
Attaching a VPC to the Enterprise Router
- Navigate to Network -> Enterprise Router.
- Select your Enterprise Router from the list of available routers.
- Go to the Attachments tab and click on Create Attachment.
- Choose the VPC you want to attach to your Enterprise Router.
- Ensure that the Auto Add Routes option is checked; otherwise, the routes will not be automatically added to the VPC's default route table, and you will have to do it manually.
- Click on Create Now to finalize the attachment process.
Configuring VPN Gateways
On T Cloud Public
- Navigate to Network -> Virtual Private Network.
- In the right panel of the page, expand Virtual Private Network, click on Enterprise – VPN Gateways, and then click on Create VPN Gateway to create a new VPN Gateway with the following details:
- Name: Enter a name for your VPN Gateway.
- Network Type: Should be Public Network.
- Associate With: Select Enterprise Router and choose the Enterprise Router you want to attach to this VPN Gateway.
- Access VPC and Access Subnet: Specify the network subnet where you want to attach this VPN Gateway.
- BGP ASN: Specify the Autonomous System Number (ASN) of your Enterprise Router.
- Configure the rest of the fields as needed, and click on Create Now.
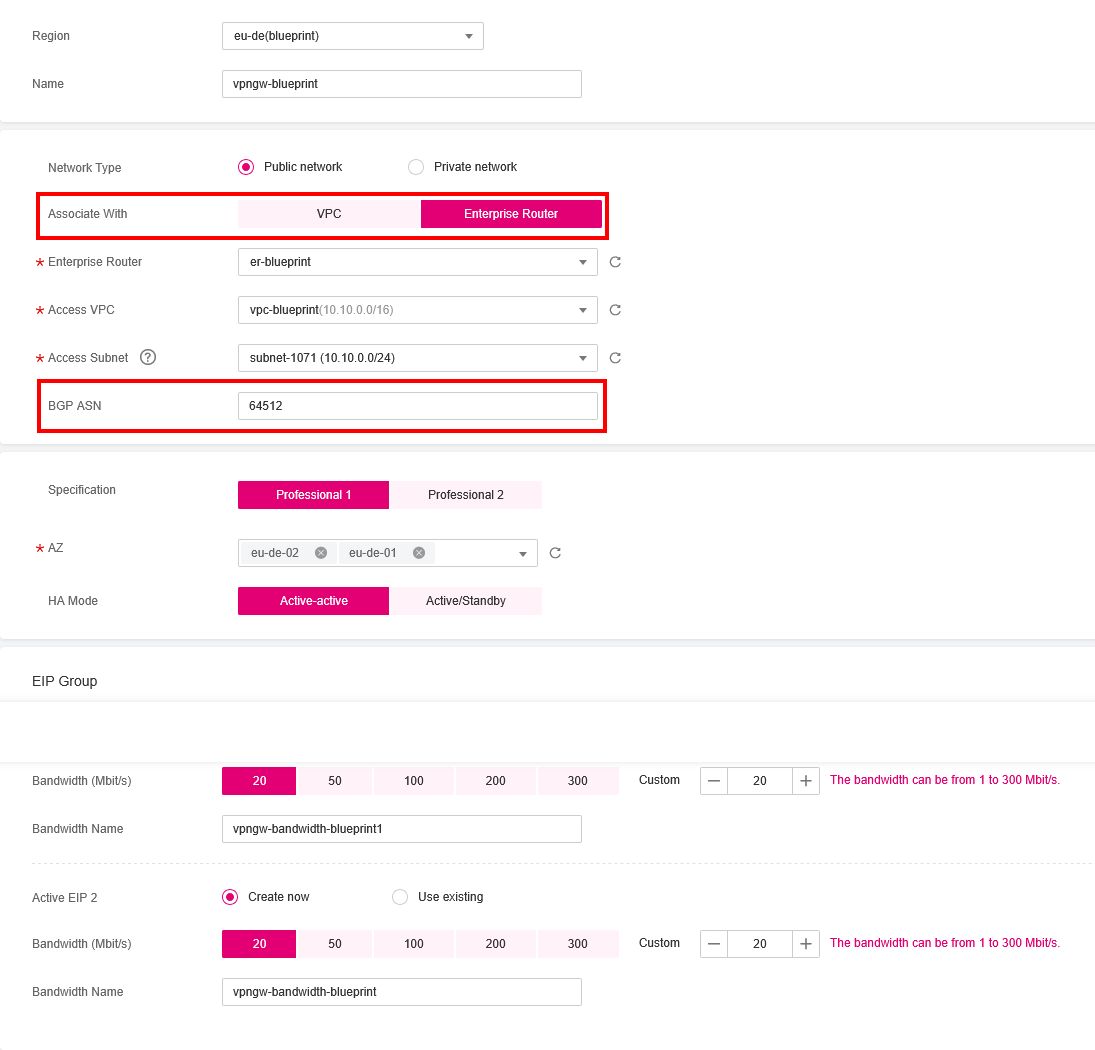
Make sure that the ASN of the VPN Gateway matches the ASN of the Enterprise Router associated with this VPN Gateway; otherwise, BGP routing will not work.
- Once the VPN Gateway has been created, you can create the respective Customer Gateways on the AWS side using the provided Gateway IP Address:

On AWS
- Log in to your AWS account and navigate to VPC -> Virtual Private Network (VPN) -> Virtual Private Gateways.
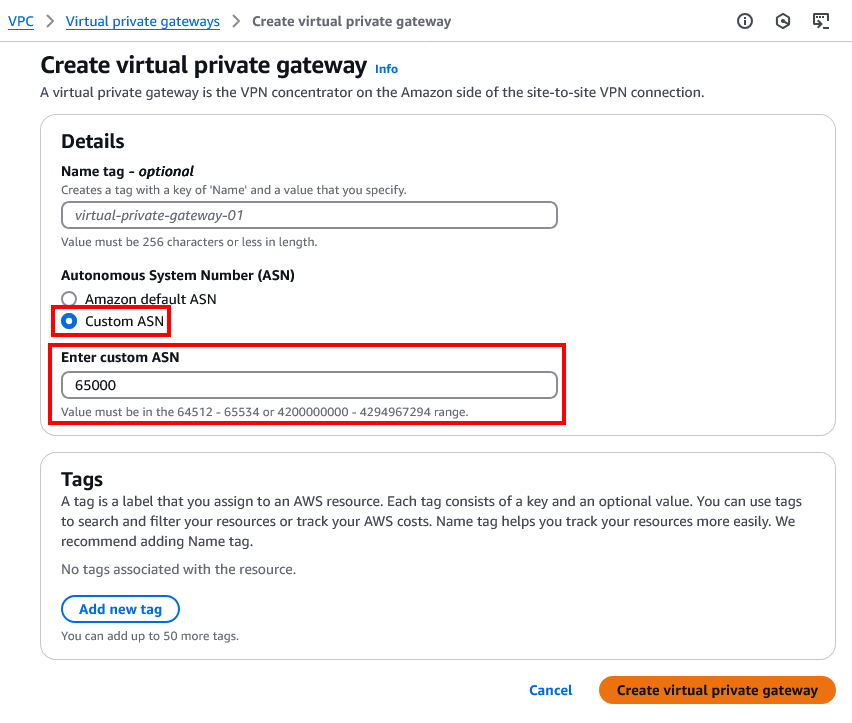
- Click on Create virtual private gateway and create a new VPN Gateway with the following details:
- Name: Name of your VPN Gateway.
- Autonomous System Number (ASN): Configure this as Custom ASN. The value should be different from what is configured in T Cloud Public (e.g., 65000).
- Click on Create virtual private gateway.
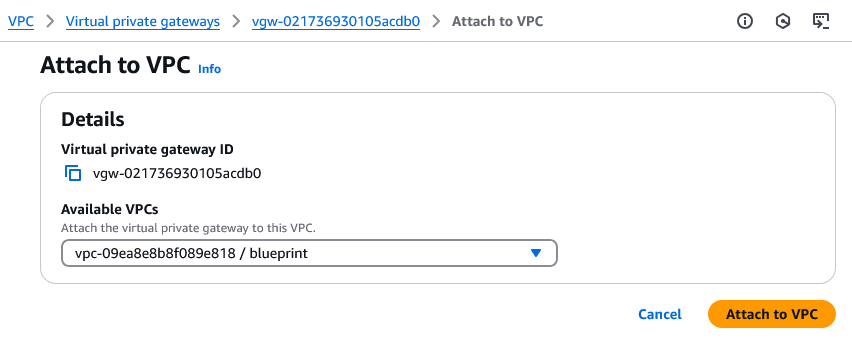
- Now select the VPN Gateway you just created and click on Actions -> Attach to VPC.
- Attach the VPN Gateway to your target VPC and click on Attach to VPC.
Configuring Customer Gateways
On AWS
- Navigate to VPC -> Virtual Private Network (VPN) -> Customer Gateways.
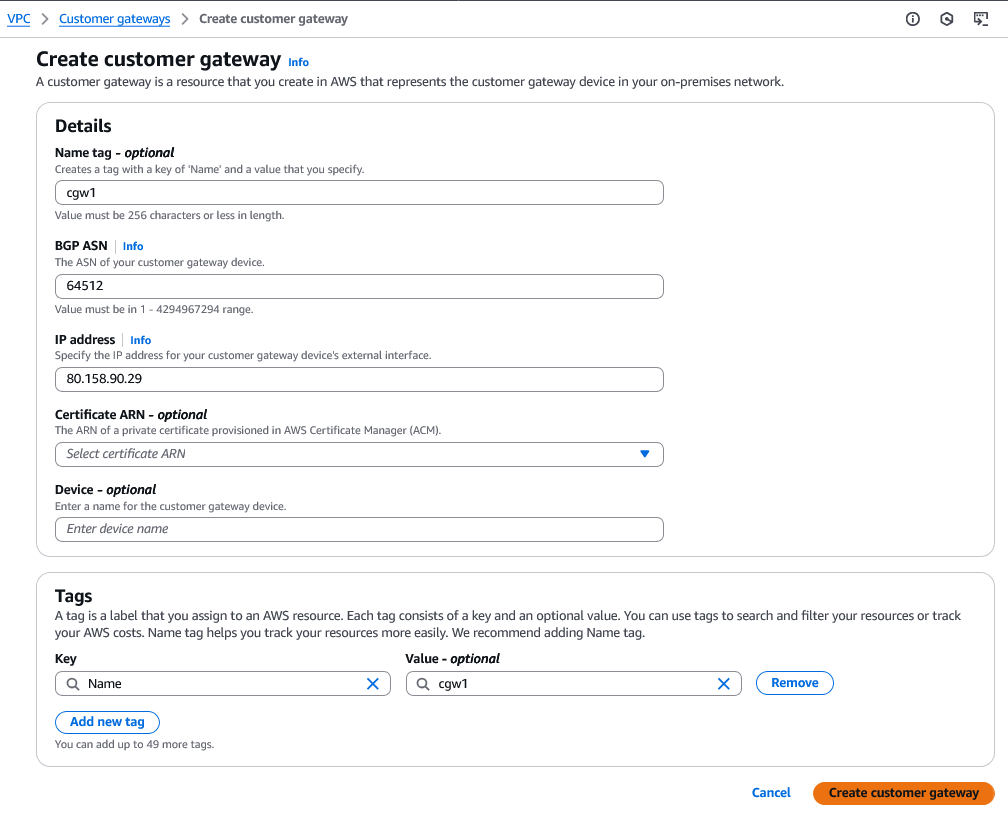
- Click on Create customer gateway and for each public Gateway IP Address generated for the created VPN Gateway in T Cloud Public, create a Customer Gateway with the following details:
- Name: Name of your customer gateway.
- BGP ASN: The BGP ASN configured in the VPN Gateway in T Cloud Public.
- IP Address: The public IP address of the VPN Gateway in T Cloud Public.
On T Cloud Public
This step should be done after the Site-to-Site VPN connections in AWS are created (visit Configuring VPN Connections on AWS).
- Navigate to Network -> Virtual Private Network.
- In the right panel of the page, expand Virtual Private Network, click on Enterprise – VPN Gateways, and then click on Create Customer Gateway. Create a customer gateway for each tunnel public IP address generated for the Site-to-Site VPN Connections in AWS.
- Name: Enter a name for your customer gateway.
- Routing Mode: Should be Dynamic (BGP).
- BGP ASN: Specify the Autonomous System Number (ASN) of the VPN Gateway in AWS.
- Gateway IP Address: Enter the public IP address of the tunnels created for the Site-to-Site VPN Connections in AWS.
- Click on Create Now.

Configuring VPN Connections
On AWS
- Navigate to VPC -> Virtual Private Network (VPN) -> Site-to-Site VPN connections.
- Click on Create VPN connection and for each Customer Gateway created earlier in AWS, create a VPN Connection with the following details:
- Name: Name of the connection.
- Target gateway type: Should be Virtual private gateway.
- Virtual private gateway: Select the Virtual Private Gateway created earlier.
- Customer gateway ID: Choose Existing and select the Customer Gateway created earlier.
- Routing options: Should be Dynamic (requires BGP).
- Let the Local IPv4 network CIDR and Remote IPv4 network CIDR be configured automatically.
- Configure Tunnel options for each tunnel as required, but to ensure that the connections are re-established after an interruption, apply the following for each tunnel:
- DPD timeout action: Should be Restart.
- Startup action: Should be Start.

- Click Create VPN connection.
- Click on each VPN connection and download the configuration, with Vendor set to Generic.
On T Cloud Public
- Navigate to Network -> Virtual Private Network.
- In the right panel of the page, expand Virtual Private Network, click on Enterprise – VPN Connection, and then click on Create VPN Connection. Create a VPN connection for each Customer Gateway created in T Cloud Public. Use the downloaded configuration file from the last step to configure the VPN connections:
- Name: Name of the connection.
- VPN Gateway: Select the VPN Gateway created earlier.
- Gateway IP Address: Enter the value of the
Outside IP Addresses -> Customer Gatewayfield from the configuration file. - Customer Gateway: Should match the value of the
Outside IP Addresses -> Virtual Private Gatewayfield from the configuration file. - VPN Type: Should be BGP routing.
- For Interface IP Address Assignment, select Manually specify and configure the IP address as follows:
- Local Tunnel Interface Address: Enter the value of the
Inside IP Addresses -> Customer Gatewayfield from the configuration file. - Customer Tunnel Interface Address: Enter the value of the
Inside IP Addresses -> Virtual Private Gatewayfield from the configuration file.
- Local Tunnel Interface Address: Enter the value of the
- Configure PSK and Policy Settings based on the downloaded configuration file.
- Click on Create Now.
Inspecting the Connections
After a few minutes, you should be able to see connections established, and their status should be normal on both sides.
On T Cloud Public
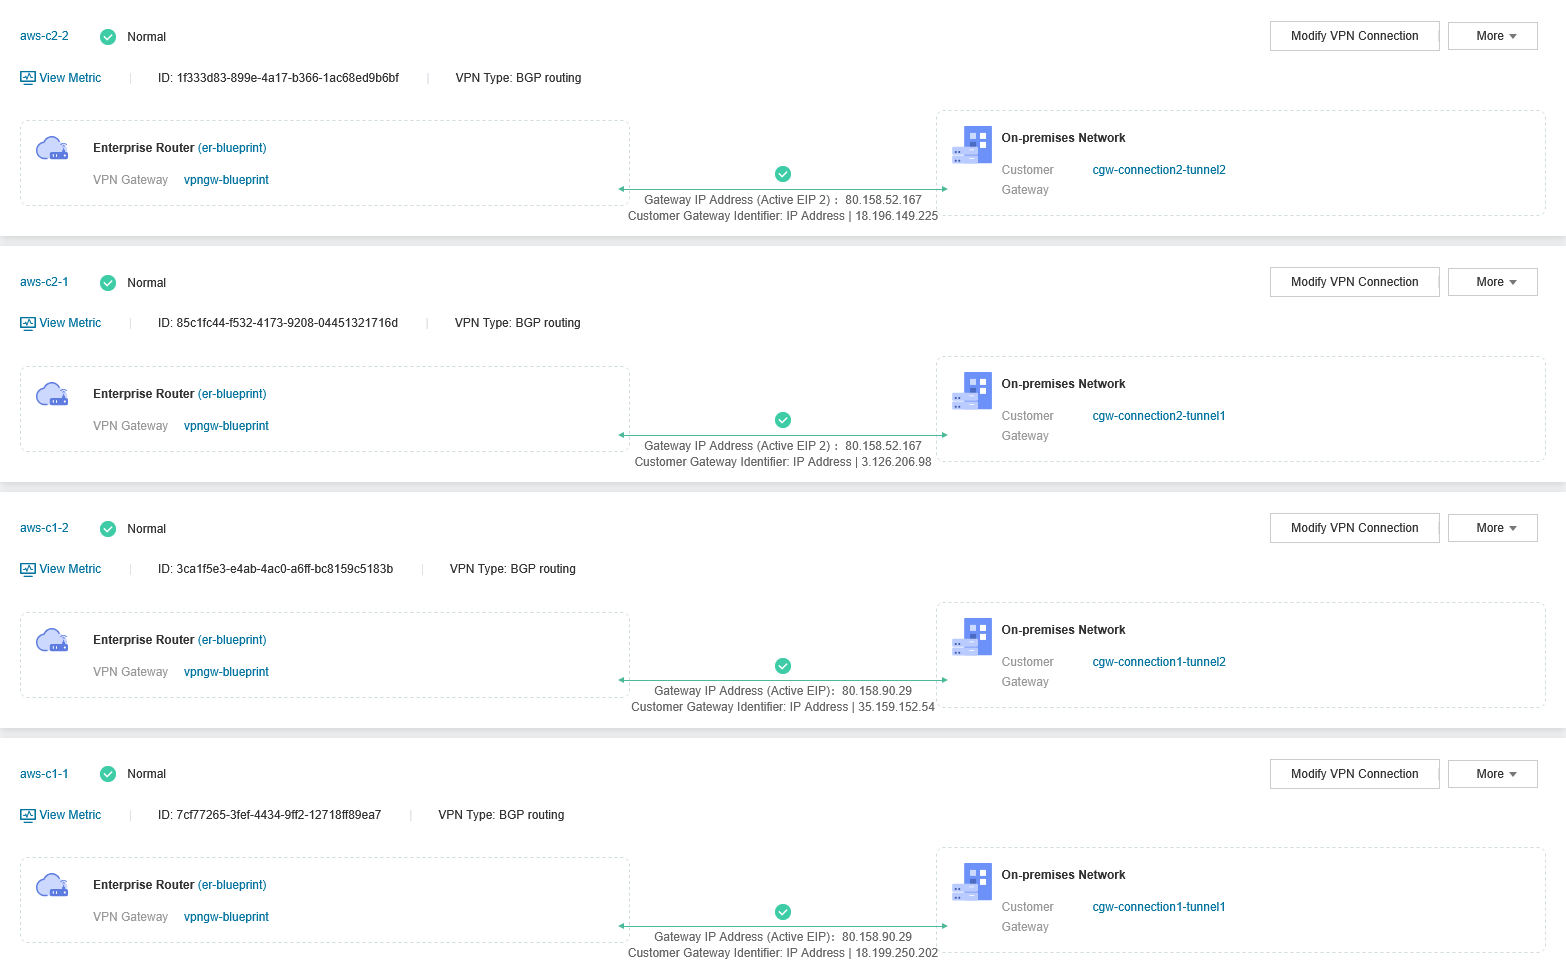
On AWS
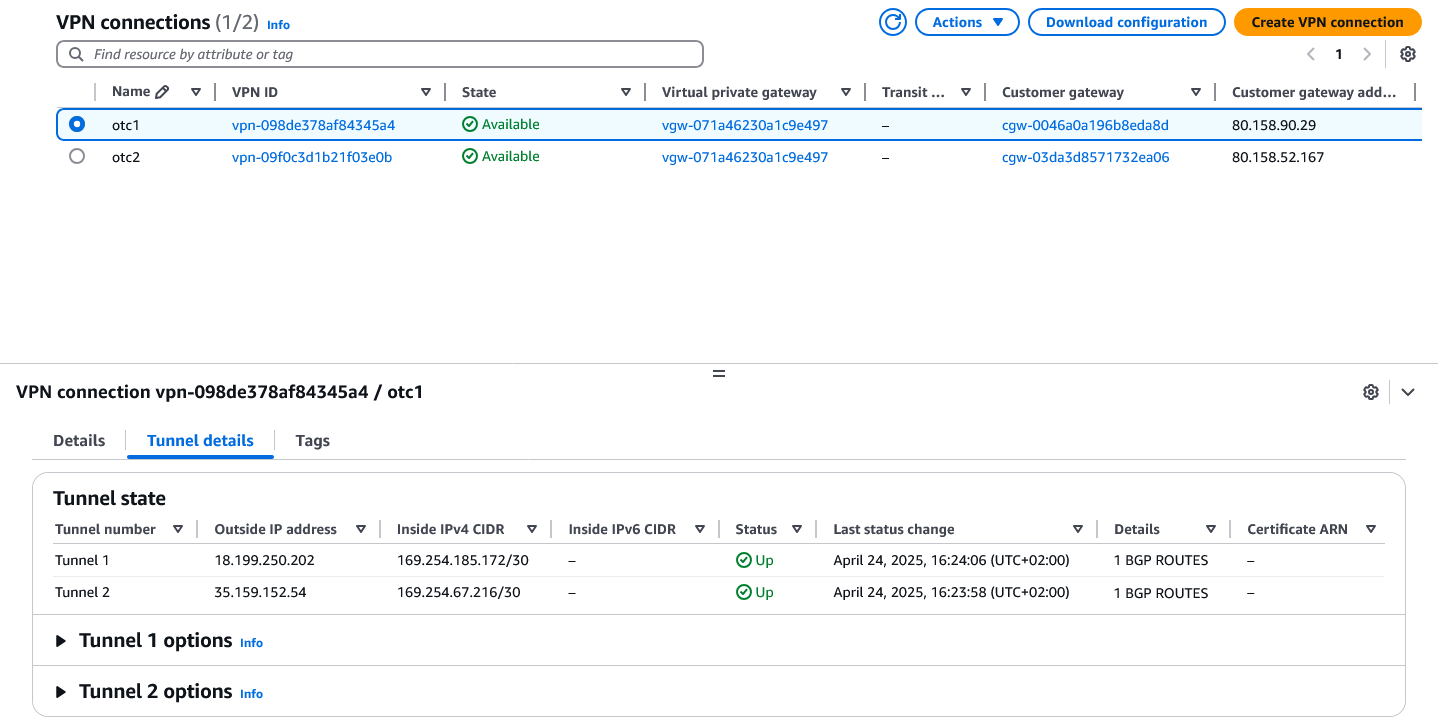
Note that under Details we see 1 BGP ROUTES are propagated, but in the routing table of the VPC no route is added. That's because we have to enable BGP propagation on the routing table associated with the VPC on the AWS side.
Enable BGP Propagation
On AWS
- Navigate to VPC and select your VPC that is associated with the VPN Gateway created earlier.
- Click on the routing table associated with this VPC to view its properties.
- Select the Route propagation tab and click the Edit Route Propagation button.
- Check the Propagation to be Enabled checkbox, then click on the Save button to save changes.
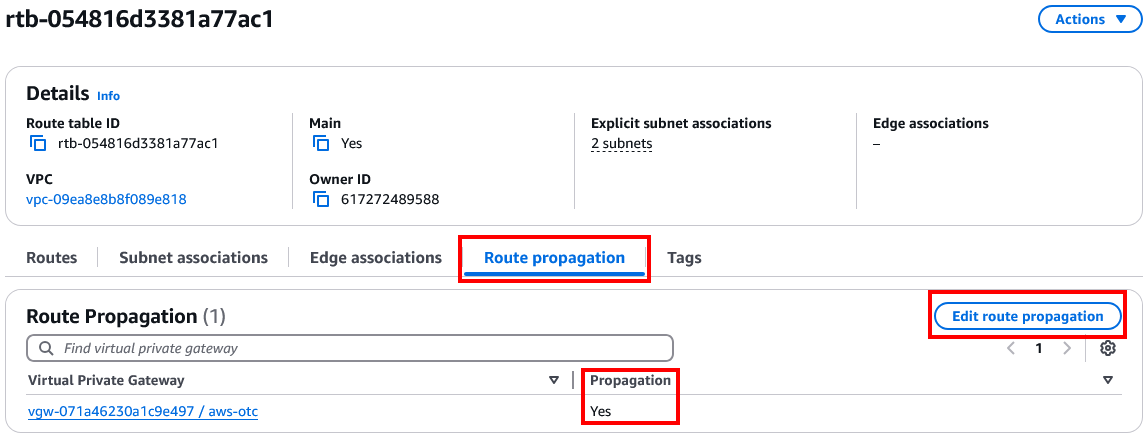
- Select the Routes tab and in the table, you can see the propagated routes.

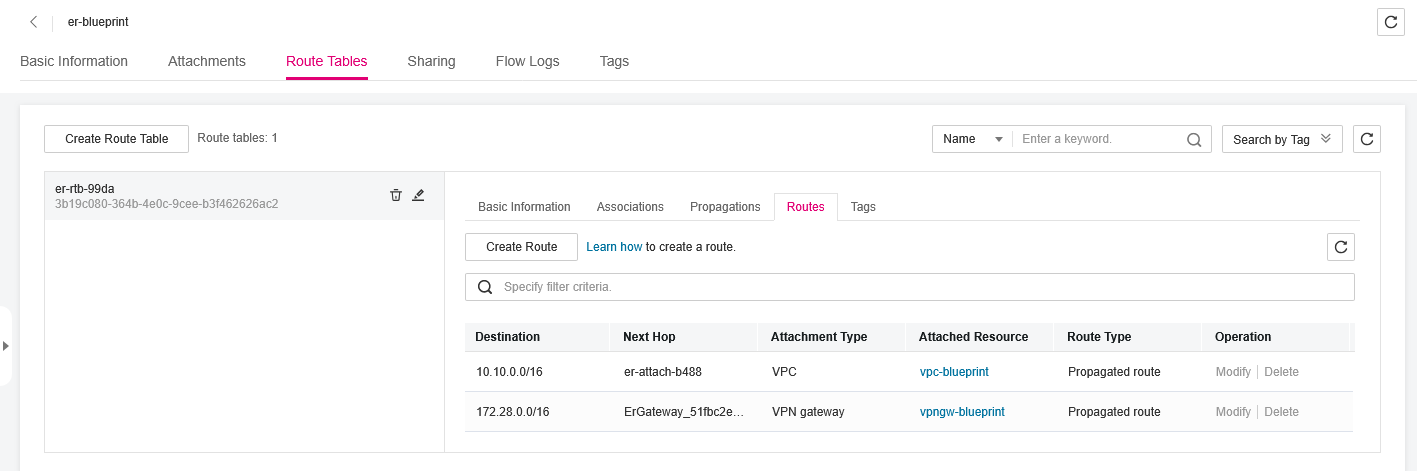
On T Cloud Public
- Navigate to Network -> Enterprise Router and click on Manage Route Table of the router you created.
- Select the Route Tables tab and select the default route table, then select the Routes tab.
- In the table, you can see the propagated routes.
Verification
To verify the Site-to-Site VPN connection, you'll need to create two virtual machines, one in each cloud provider. These virtual machines should be connected via the Site-to-Site VPN tunnel. The purpose of creating these VMs is to test connectivity across the VPN tunnel by attempting to ping one endpoint from the other side. This step ensures that your configuration and setup are correct, and you can successfully transmit data between your connected networks.
Creating the Virtual Machines
- Create VMs: On each cloud provider, create a VM within the same VPC where the VPN Gateway is attached or the VPC that is attached to the Enterprise Router, depending on the cloud provider.
- Access the VM: Gain access to the terminal of your newly created VM.
Verifying Connectivity
Once you've created and configured both sets of VMs:
- Attempt Ping from AWS to OTC: From one of the AWS-side VMs, try to ping the internal IP address of the OTC-side VM using the
pingcommand. - Attempt Ping from OTC to AWS: Similarly, from one of the OTC-side VMs, attempt to ping the public IP address of the AWS-side VM.
On AWS
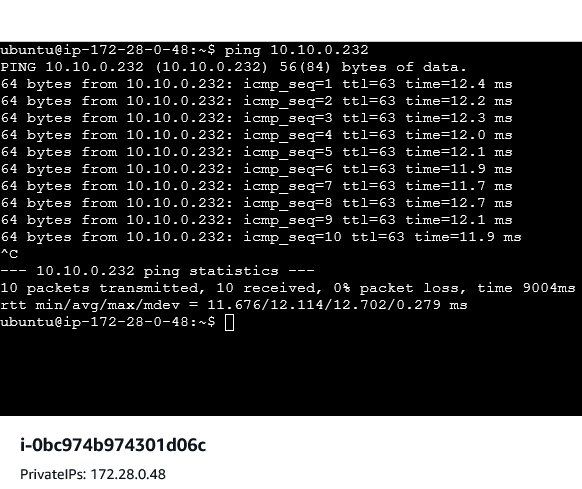
On T Cloud Public
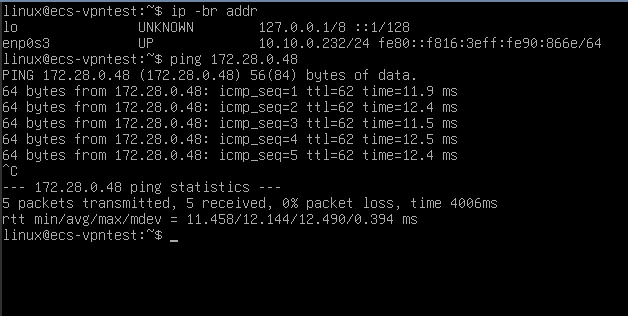
By successfully pinging between these two endpoints, you'll confirm that your site-to-site VPN connection is operational and functioning as expected.