Azure Entra ID as Identity Provider for IAM
In this guide, we'll walk you through the implemention of an Identity Provider (IdP) on T Cloud Public, in order to enable authentication via Azure Entra ID. This allows users managed in Entra ID to access T Cloud Public resources through federated login, without requiring separate user accounts on T Cloud Public.
In order to achieve this:
- We need to register the necessary applications in Azure Entra ID, enabling OpenID Connect (OIDC) as the protocol for identity and token exchange with the T Cloud Public environment.
- We need to use group assignments in Entra ID to control access: Entra ID groups are mapped to corresponding groups in T Cloud Public, allowing fine-grained, role-based access control.
- We are not going to need local users in T Cloud Public. Instead, virtual users (also called federated or transient users) are going to be used, derived from the identity and group claims in the OIDC tokens issued by Entra ID.
This approach ensures centralized user management via Entra ID, reduces administrative overhead, and provides a secure and scalable identity integration between Azure and T Cloud Public.
Prerequisites
Before starting with the implementation of this blueprint, make sure you have:
- An Azure Subscription/Tenant.
- Administrative privileges on both Azure Entra ID of your tenant and your T Cloud Public IAM system.
- Basic understanding of OpenID Connect concepts and flows.
Registering an Application in Entra ID
Creating a new Application
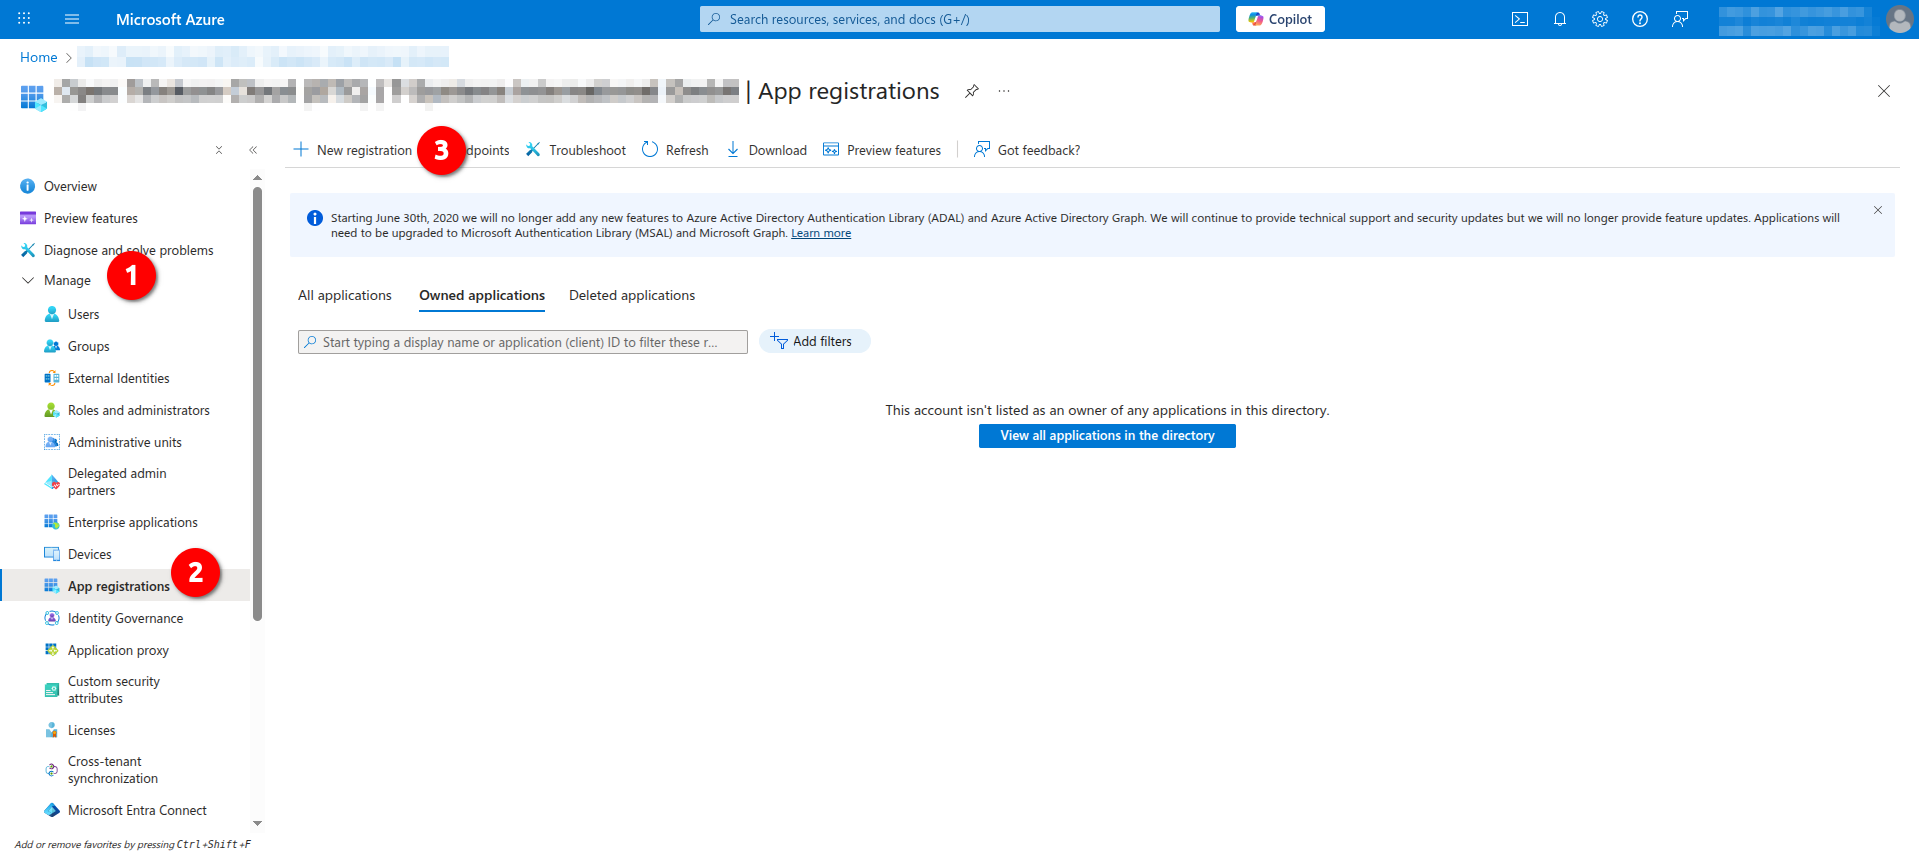
- Open Azure Portal and navigate to Microsoft Entra ID -> Manage -> App Registrations and click New Registration:
- Create a new application, e.g. with Name
OTC-FEDERATION-OIDC, and as Support account types choose Accounts in this organization directory only. Click Register to continue.

Configuring Redirect URIs
On the pane of the new registered application click Manage -> Authentication -> Add Redirect URI and choose the option Single-page Application:
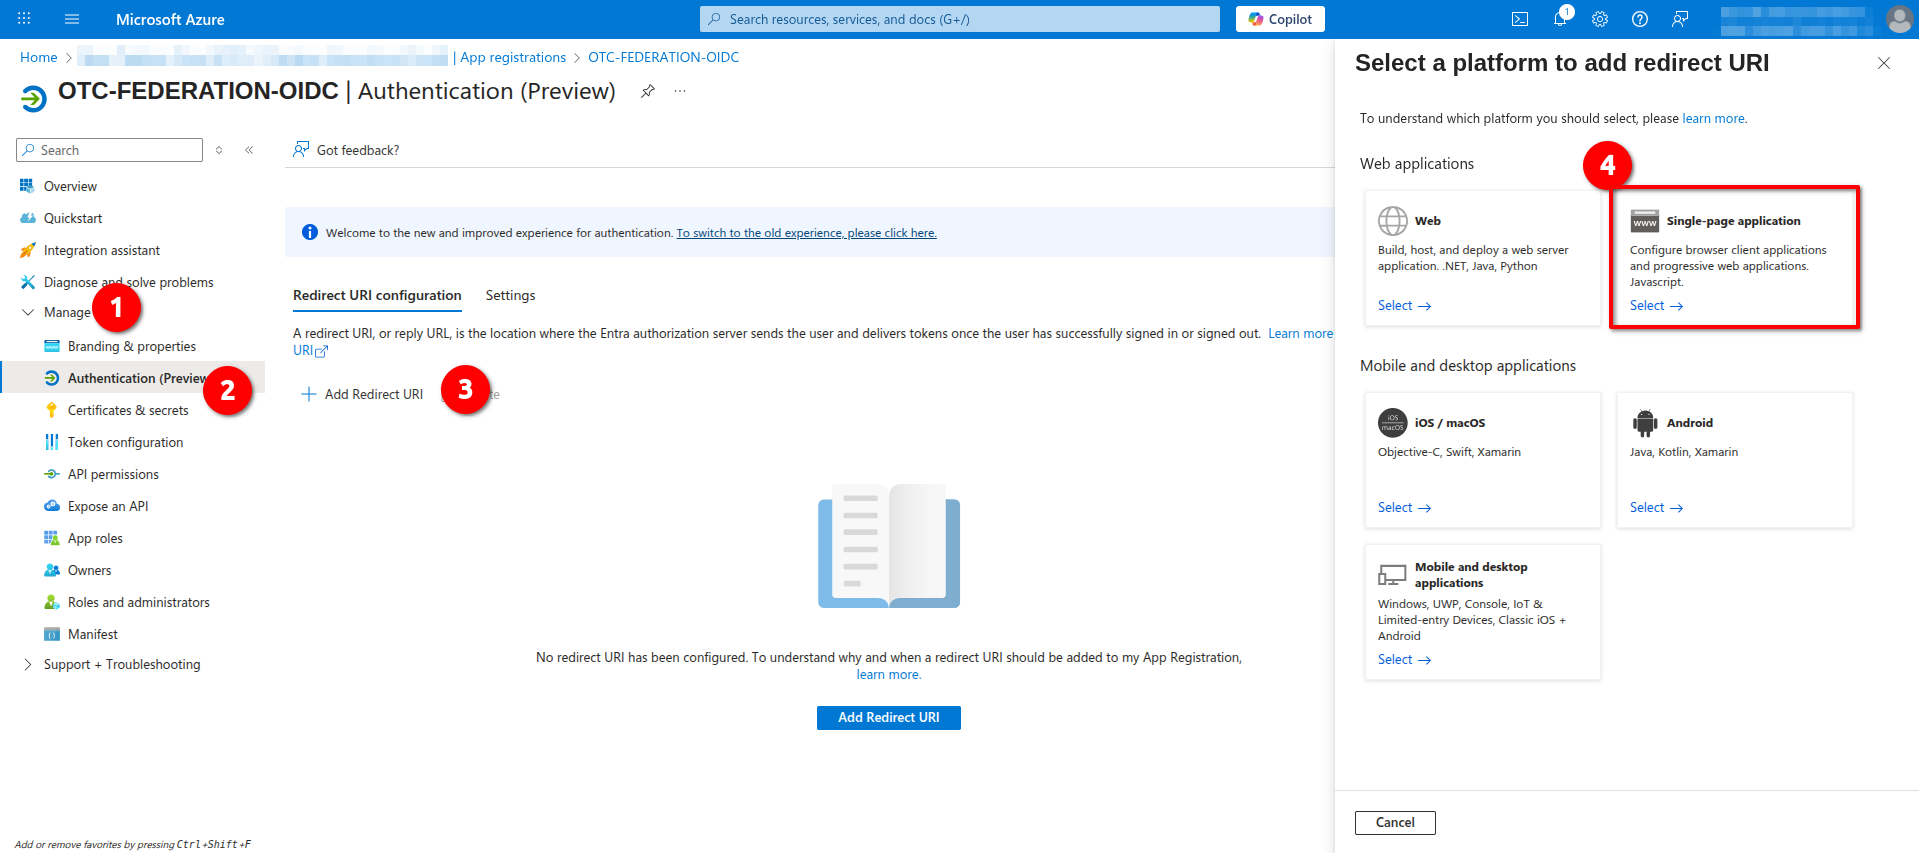
Add the following URLs as Redirect URIs:
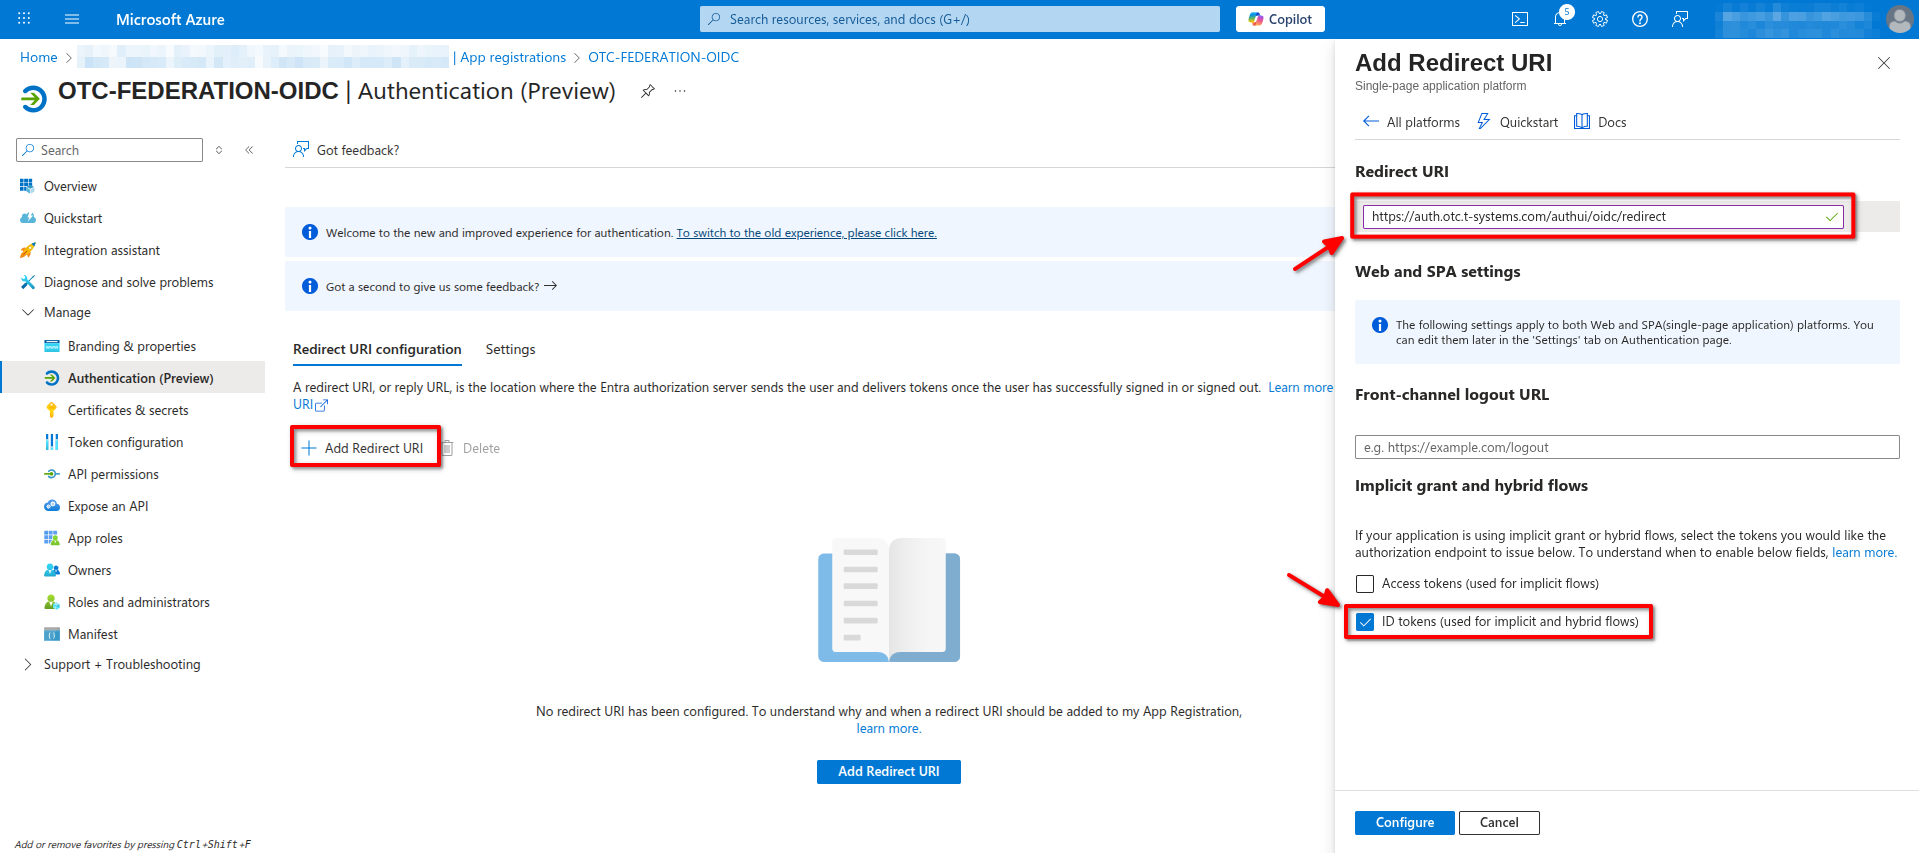
https://auth.otc.t-systems.com/authui/oidc/redirecthttps://auth.otc.t-systems.com/authui/oidc/post
and enable ID Tokens under Implicit grand and hybrid flows.
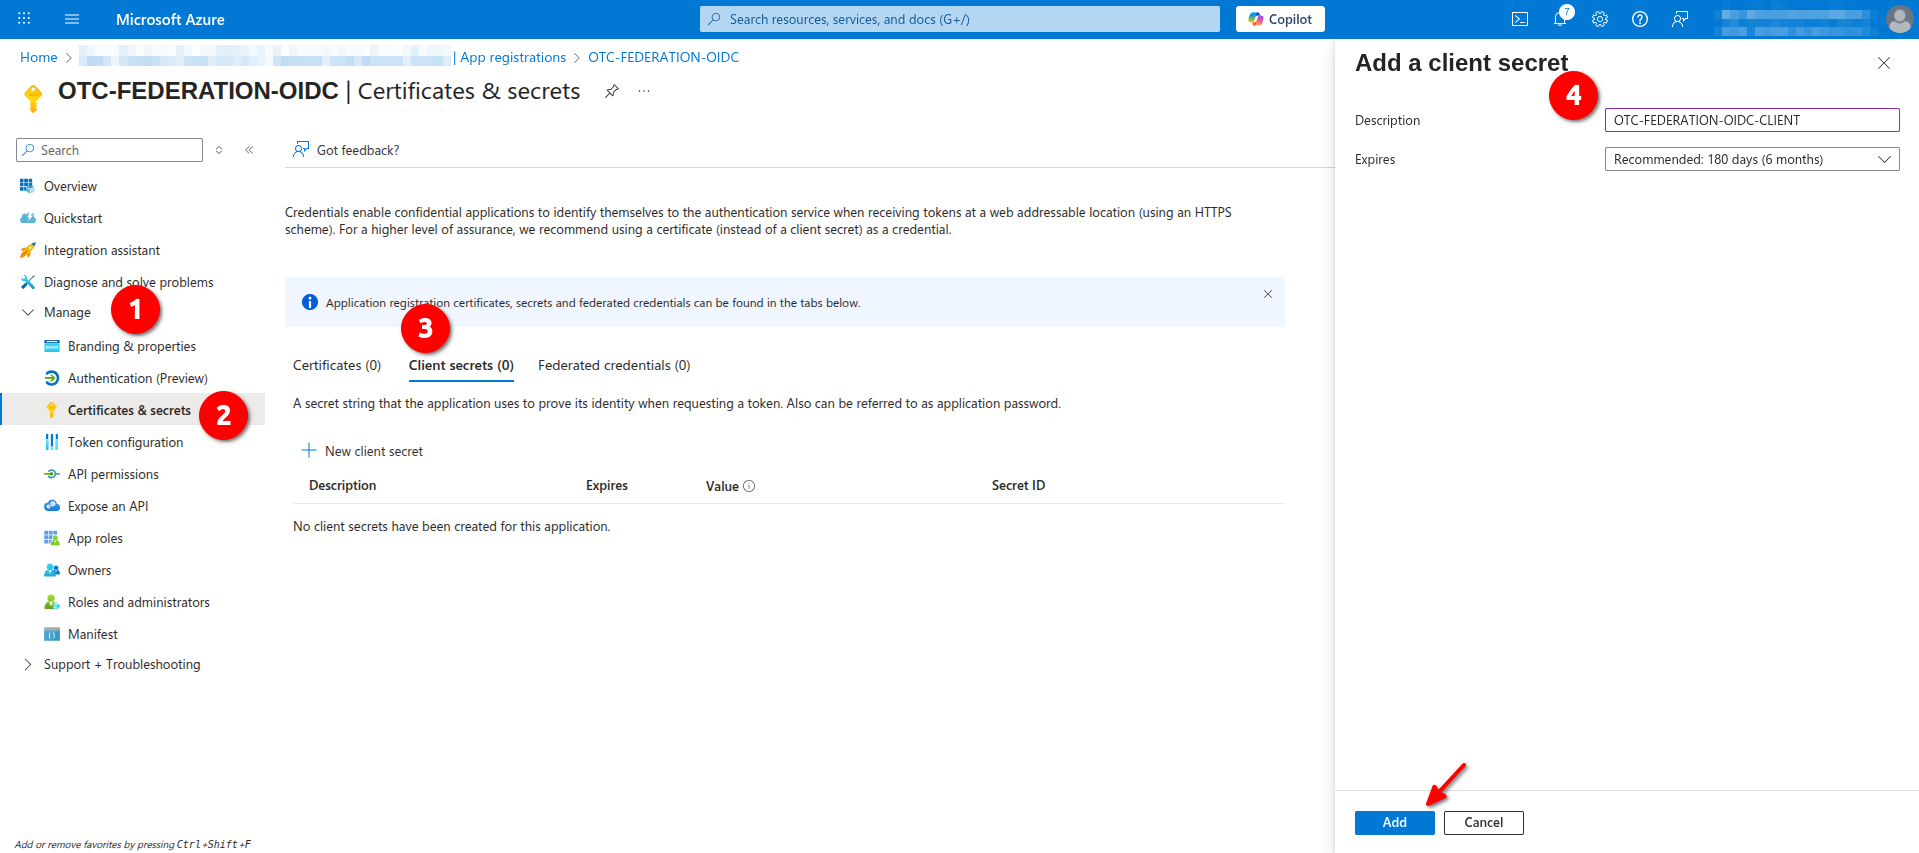
Creating a Client Secret
On the application pane navigate to Manage -> Certificates & secrets -> Client secrets and click New client secret, give it a name e.g. OTC-FEDERATION-OIDC-CLIENT and click Add.
Configuring Token Claims
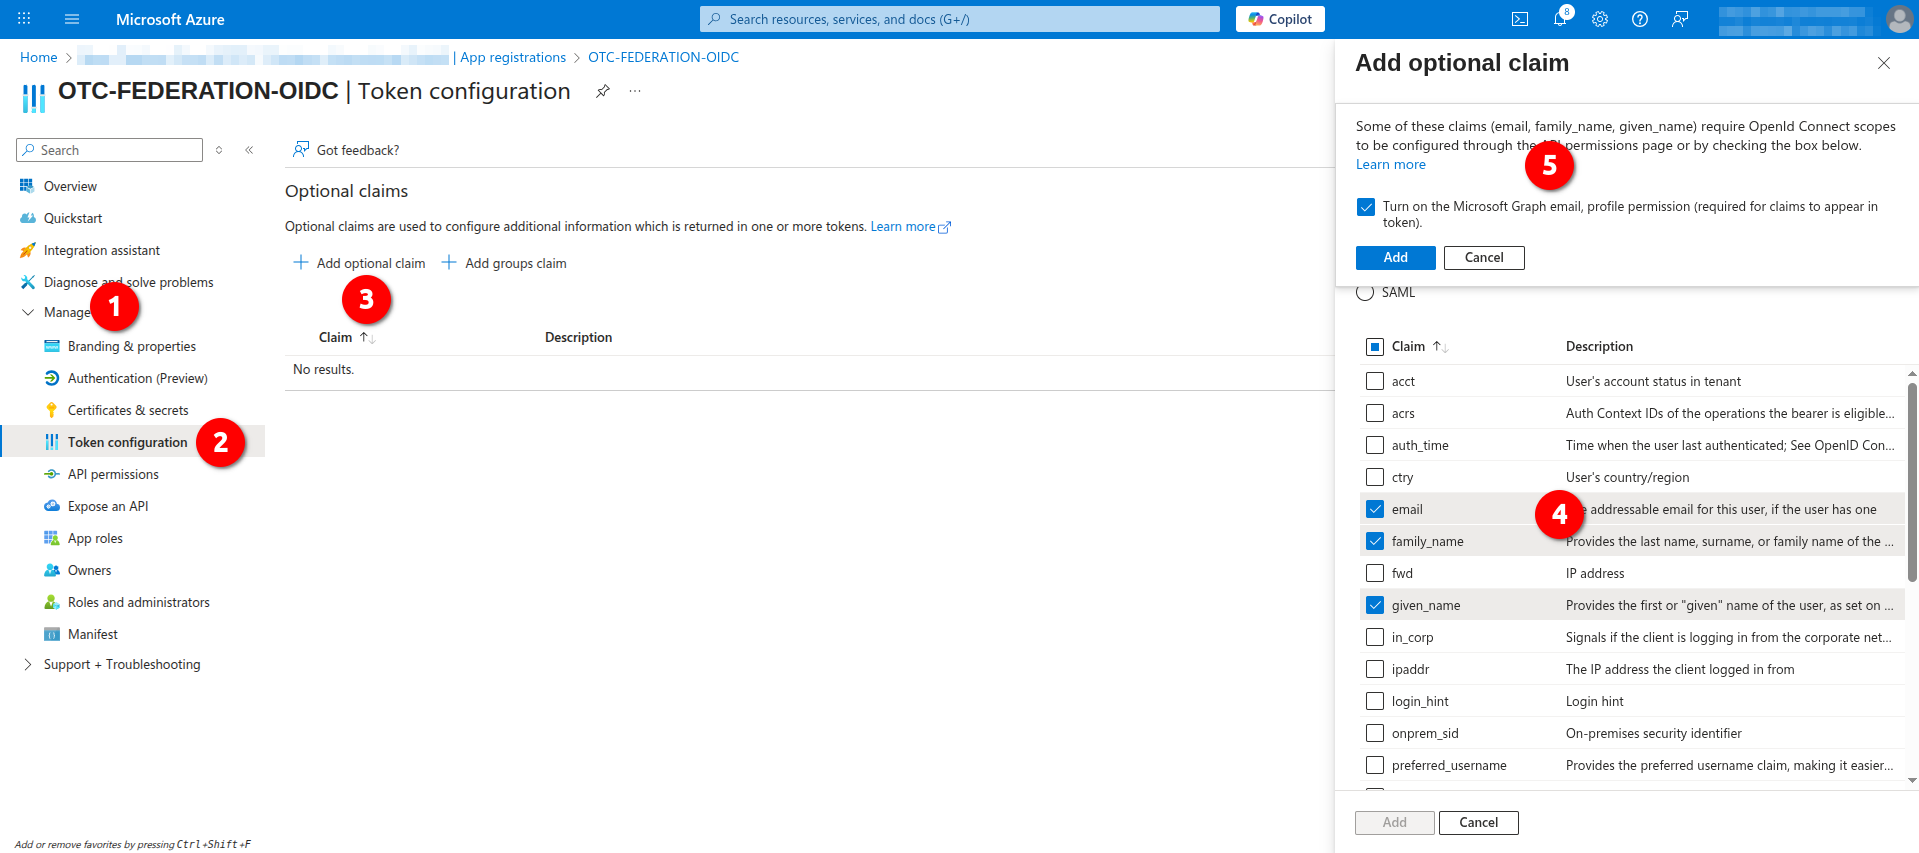
- Navigate to Manage -> Token configuration -> Optional claims and click Add optional claim. From the given list choose an ID as Token type and select the claims email, family_name, given_name and click Add, enable Turn on the Microsoft Graph[...] option and click again Add:
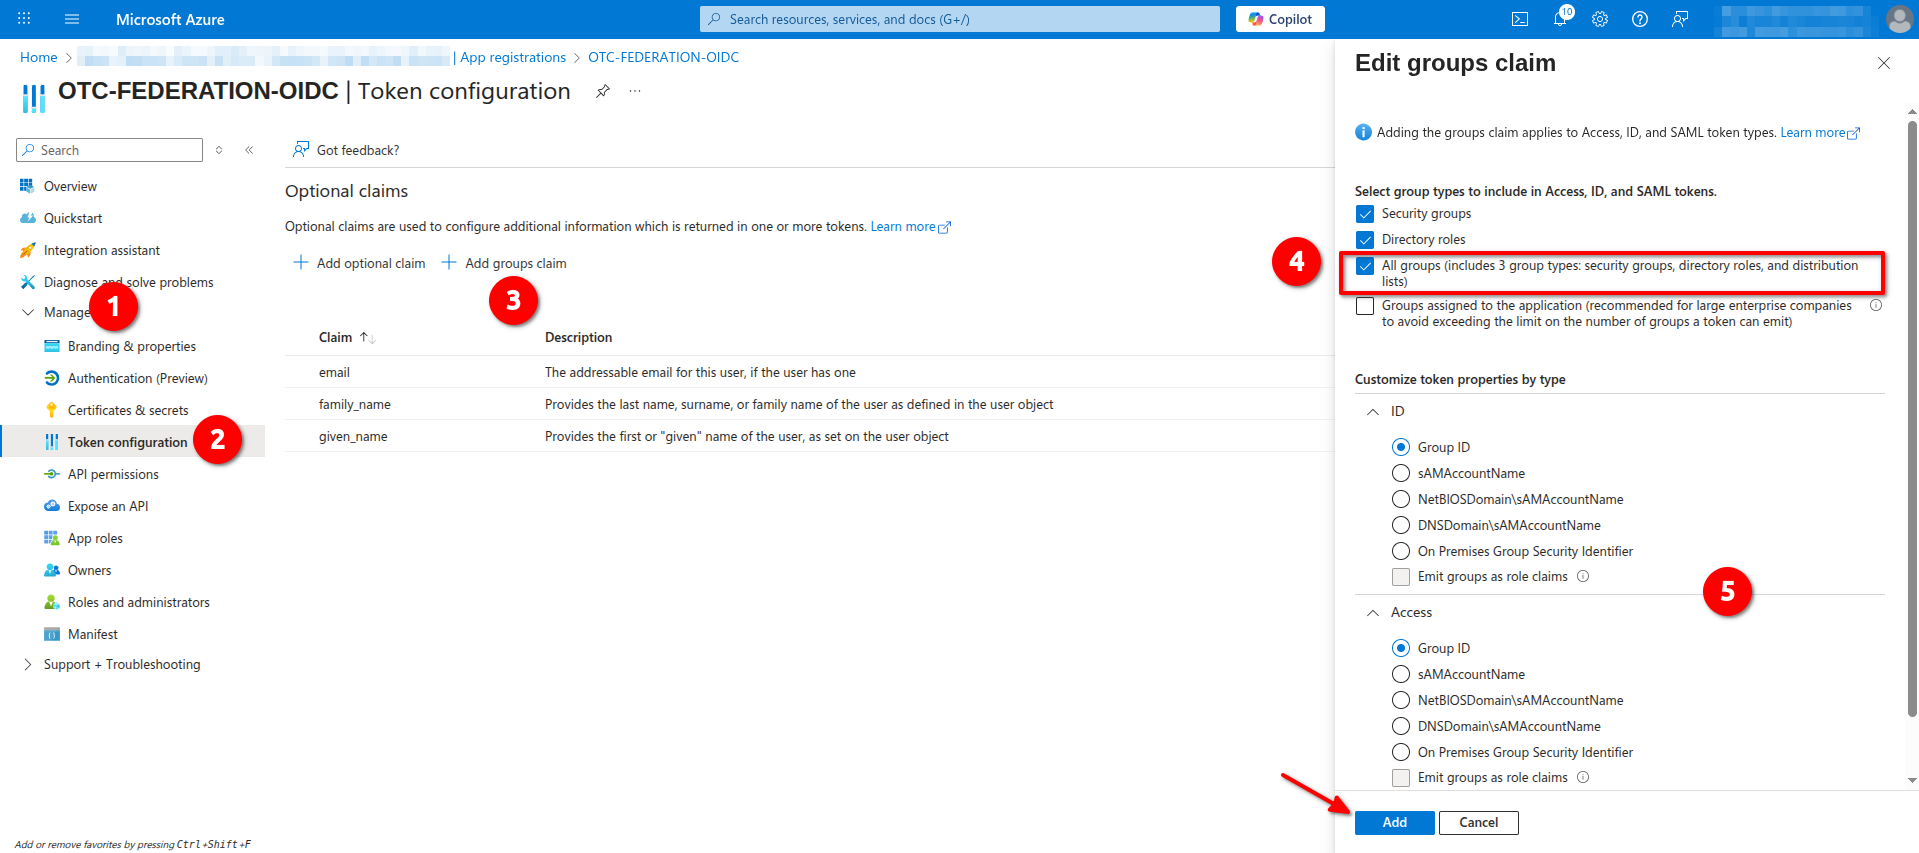
- Navigate to Manage -> Token configuration -> Optional claims and click Add groups claim. From the group type choose an All groups (it will auto-enable the consequently Security groups and Directory Roles) and then make sure that for all tokens (ID, Access, SAML) Group ID is selected. Click Add to continue:
Configuring Permissions and Scopes
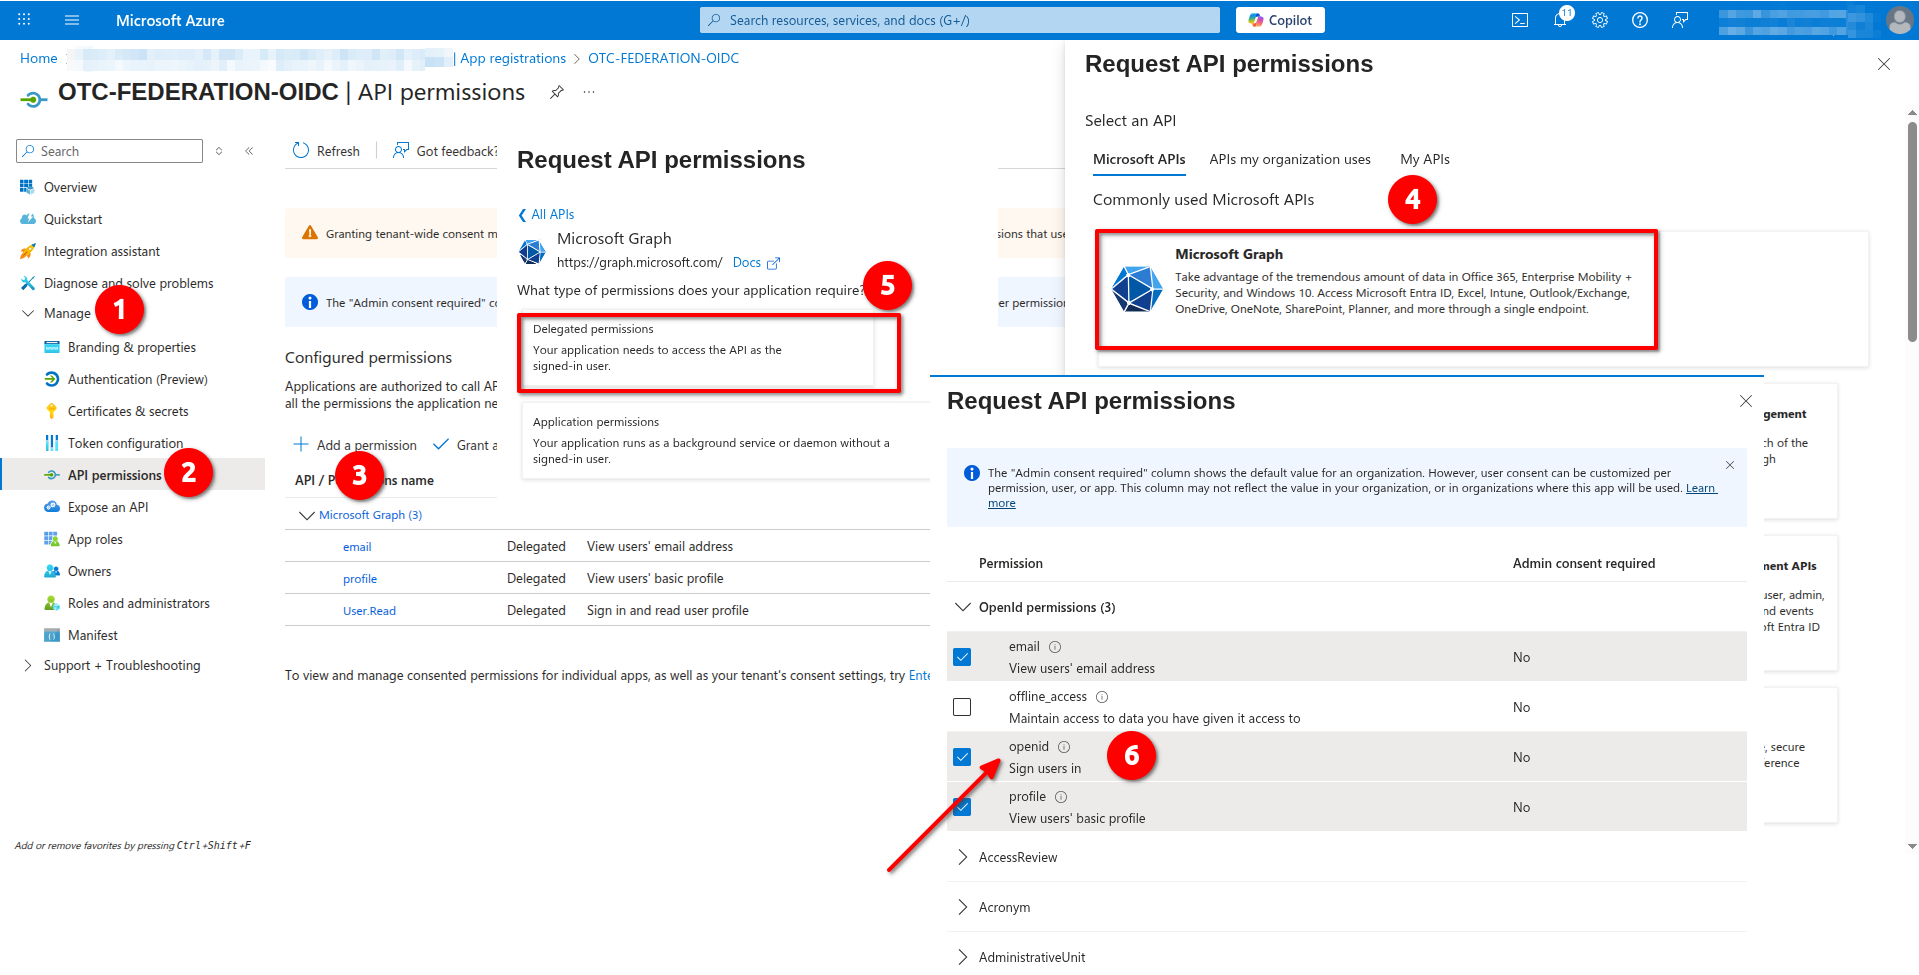
- Navigate to Manage -> API permissions -> Configured permissions and click Add permission. Choose Microsoft Graph and then Delegated permissions. Enable openid in OpenId permissions and click Add:
- Navigate to Manage -> Expose an API -> Configured permissions and click Add a scope. Set Who can consent to Admins and users and User consent display name to
given_nameand click Add scope:

Creating App Roles and Owners
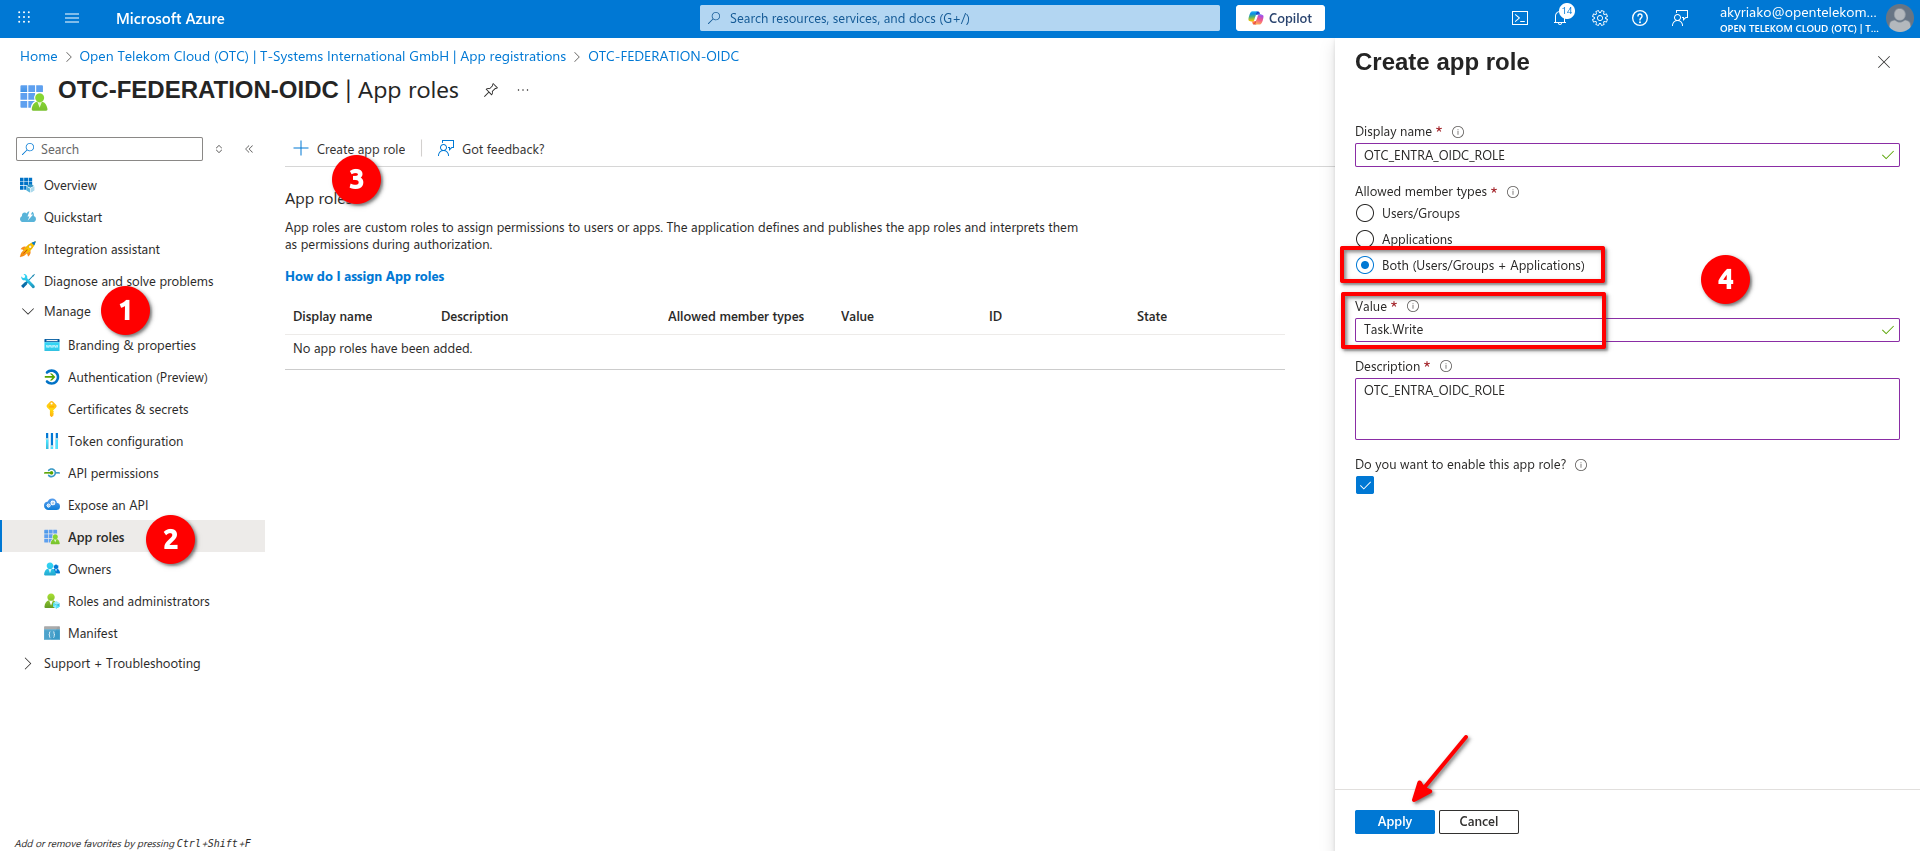
- Navigate to Manage -> App roles and click Create app role. Give it a Display name and Description of your preference, set Allowed member types to Both, Value as
Task.Writeand click Apply:
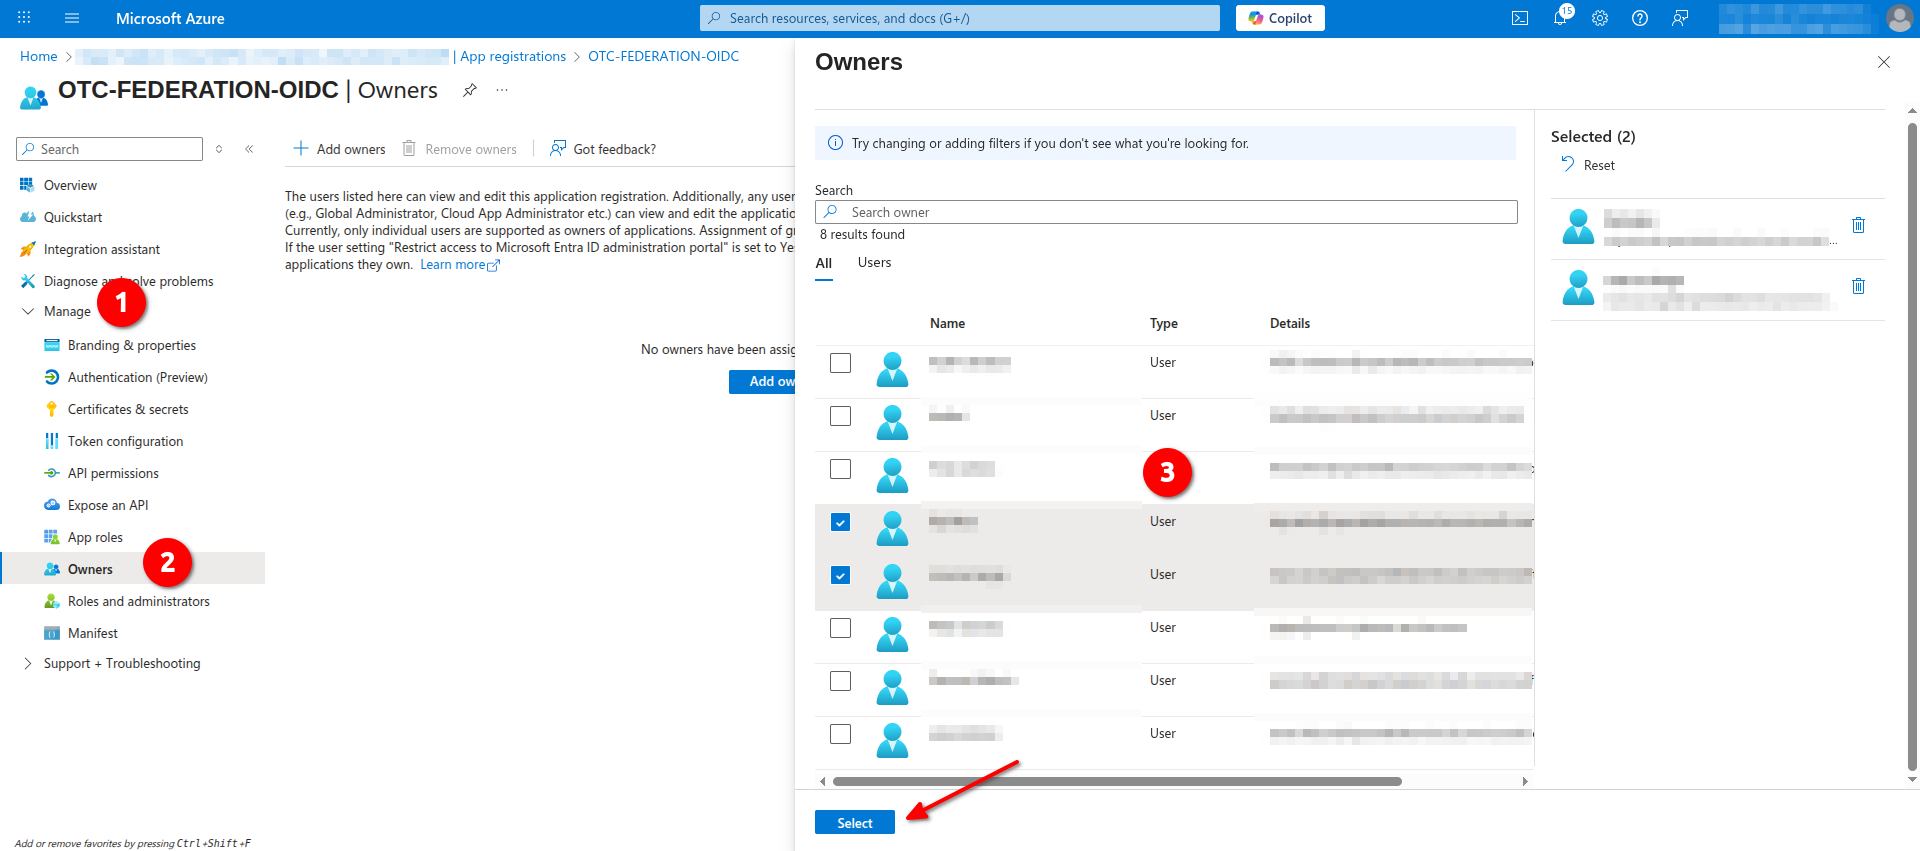
- Navigate to Manage -> Owners and select the users (or groups) that can administer this application.
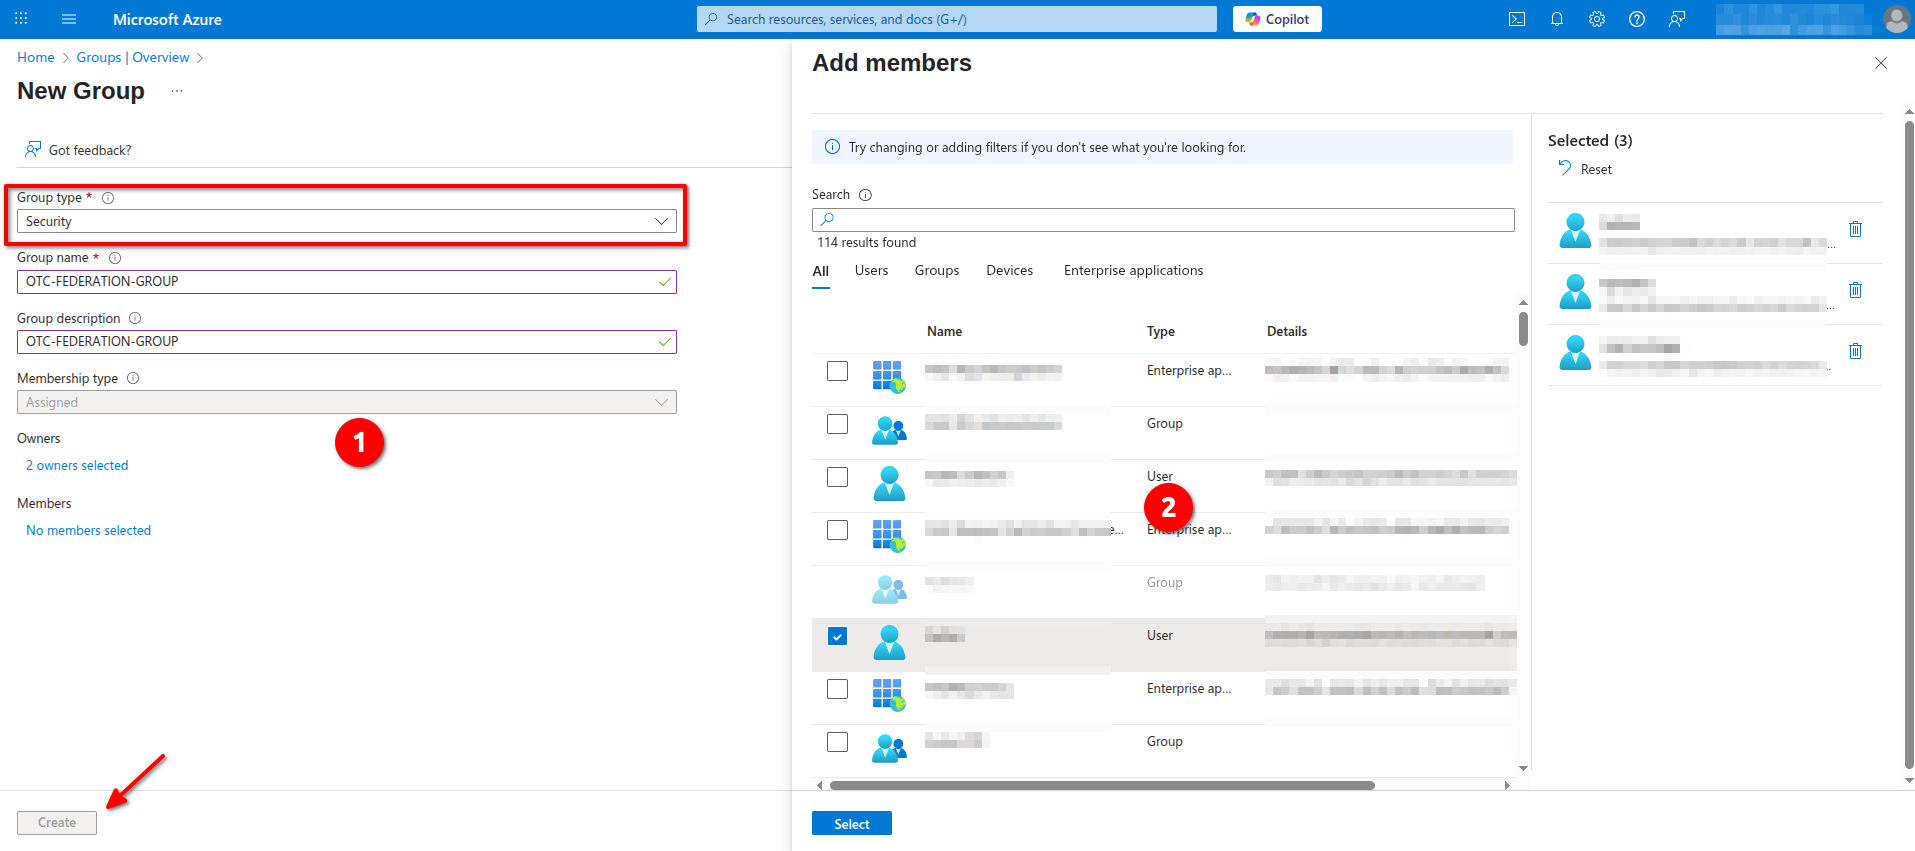
Creating a new Group
Navigate to Manage -> Groups -> Overview and click New group. Set Group Type as Security and fill in the rest of the information. Add Owners and Members to the group and click Create to continue:
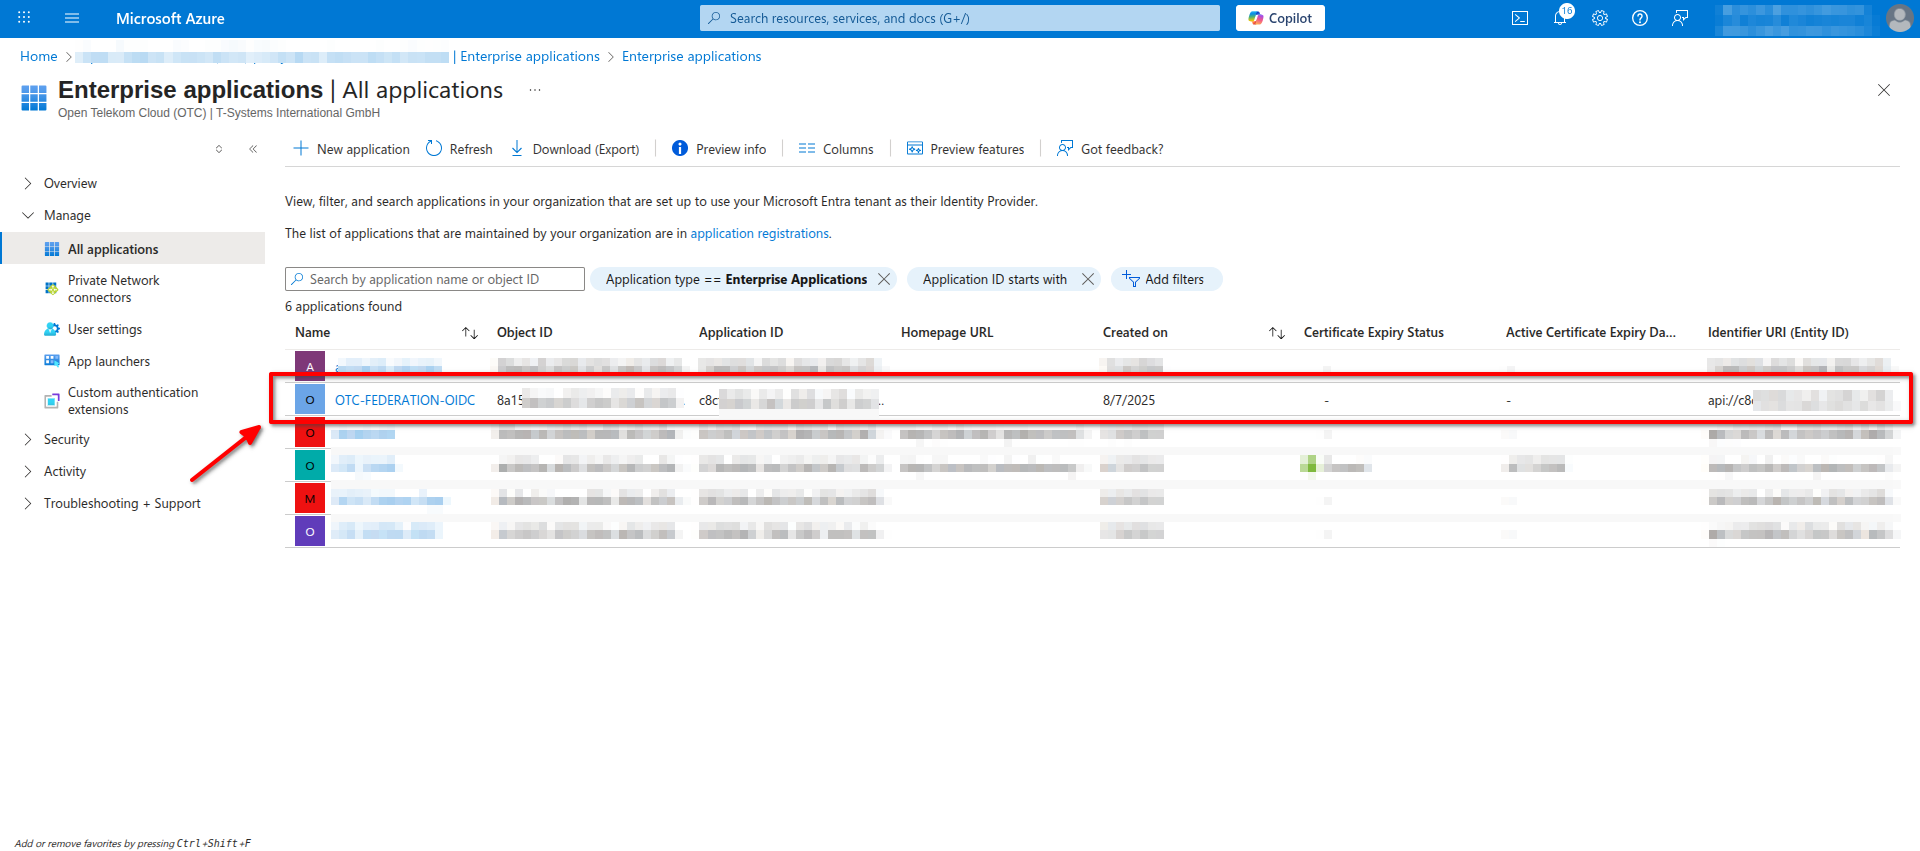
Configuring the Enterprise Application
Open Azure Portal and navigate to Microsoft Entra ID -> Manage -> Enterprise applications -> All applications and find the application we created in the previous steps in the list:
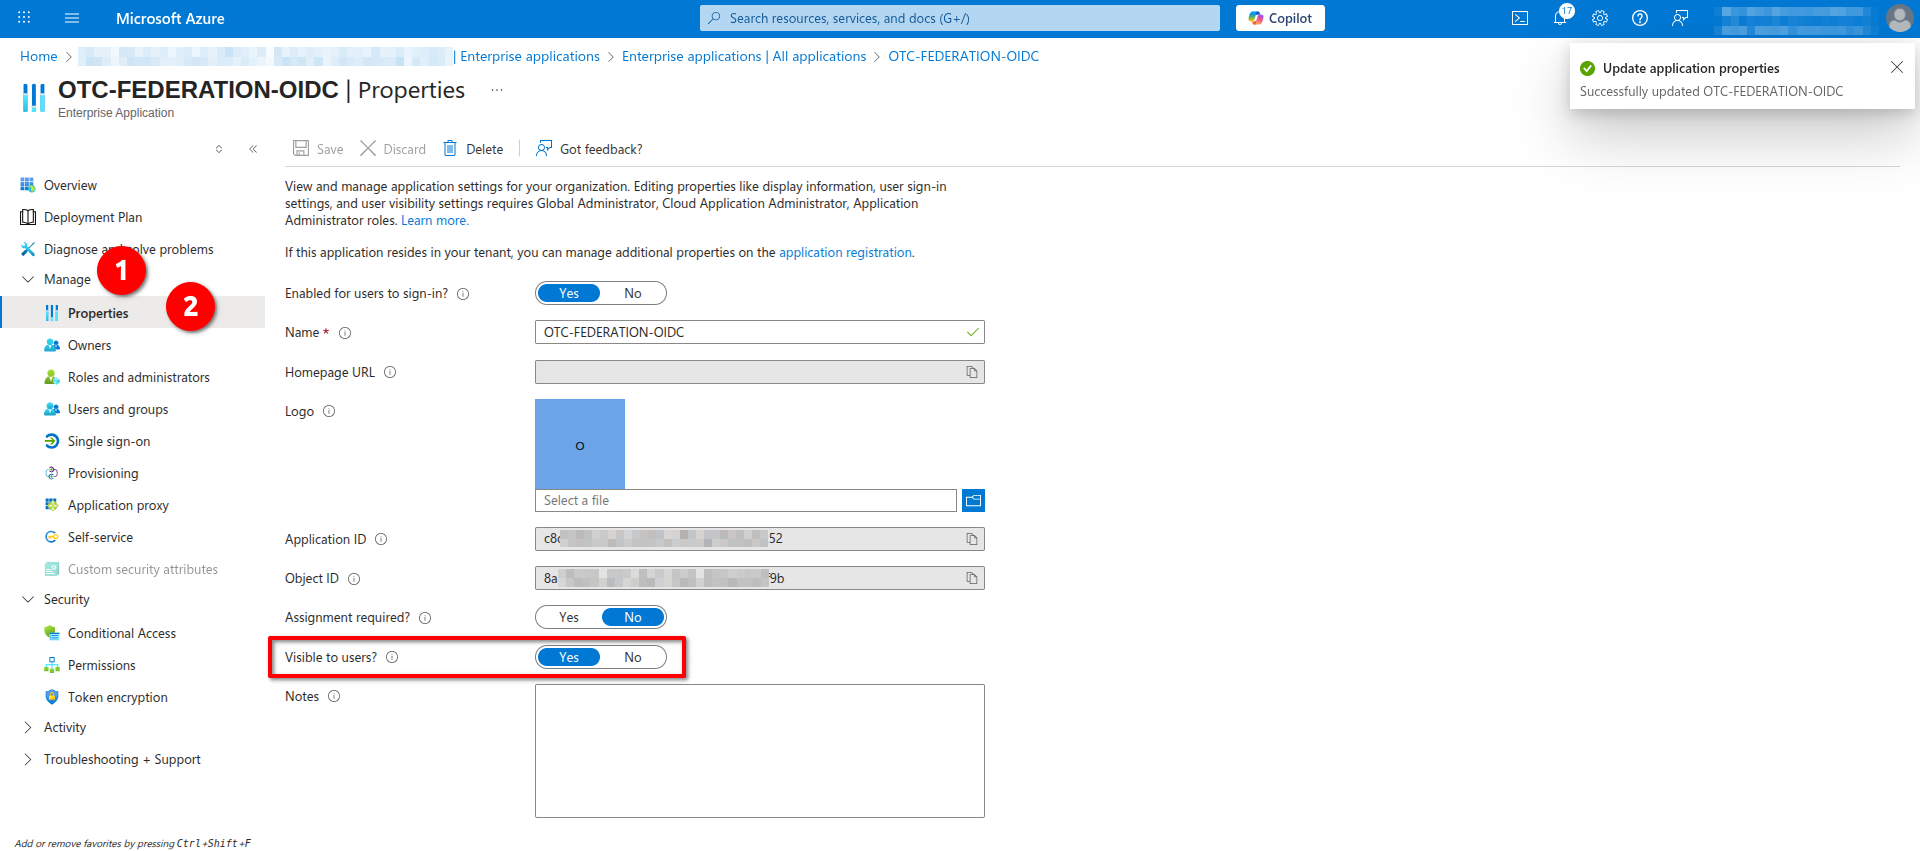
- Navigate to Manage -> Properties and and set Visible to users to Yes. Click Save to apply the changes:
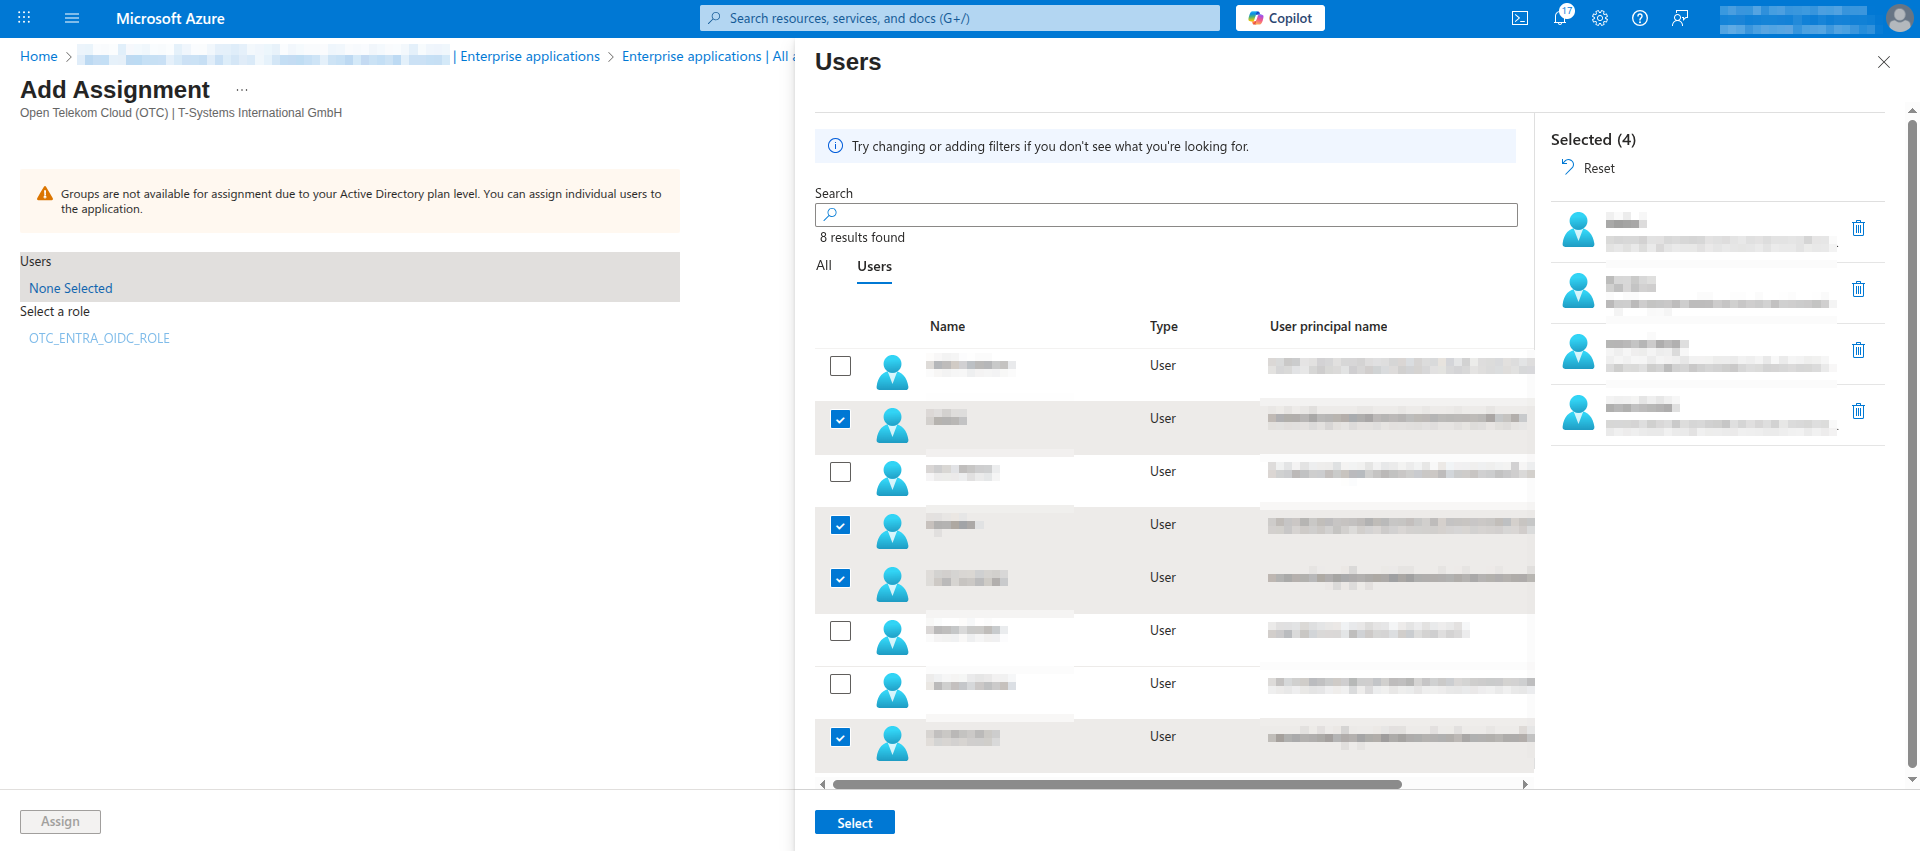
- Navigate to Manage -> Users and groups and choose the group you created in the previous step (or, though not recommended as can quickly become unmanageable, individual users) that will have access to this application:
Configuring IAM
Creating a new Identity Provider
Go to T Cloud Public Console -> IAM -> Identity Providers and click Create Identity Provider:
Set the following parameters and click OK.
- Protocol:
OpenID Connect - SSO Type:
Virtual user - Status:
Enabled
Configuring the new Identity Provider
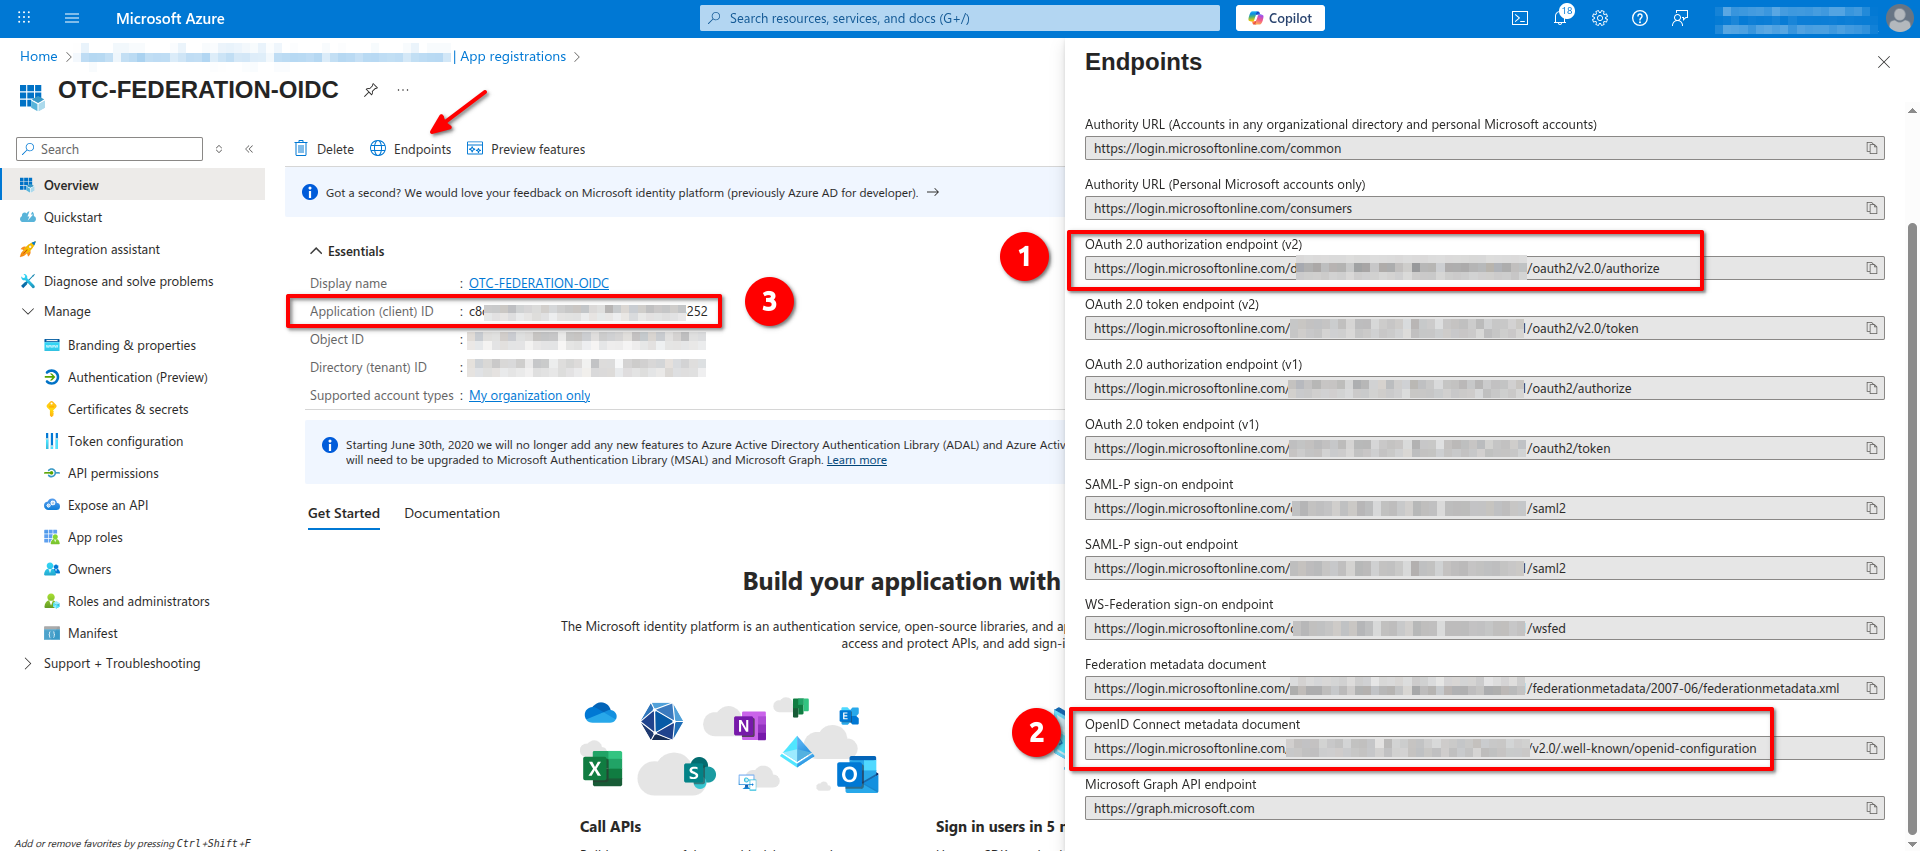
- Open Azure Portal and navigate to Microsoft Entra ID -> Manage -> App registrations, find the application we created in the previous steps in the list and open it and click Endpoints.
You need to write down the values of the following properties in Endpoints:
- OAuth 2.0 authorization endpoint (v2)
- OpenID Connect metadata document
and from Application Essentials the value of:
- Application (client) ID
- Go to T Cloud Public Console -> IAM -> Identity Providers and click Modify on the Identity Provider we've just created and fill in the following information:
Open in a browser the URL of the OpenID Connect metadata document you got in the previous step as we are going to need some values for the Identity Provider URL and Signing Key.
- Identity Provider URL: the value of the
issuerin the metadata document. - Client ID: the value of the Application (client) ID
- Authorization Endpoint: the value of the OAuth 2.0 authorization endpoint (v2)
- Scopes:
openid,email,profile - Response Type:
id_token - Response Mode:
fragment - Signing Key: access the URL given by the
jwks_urientry in the metadata document, and copy the complete response.
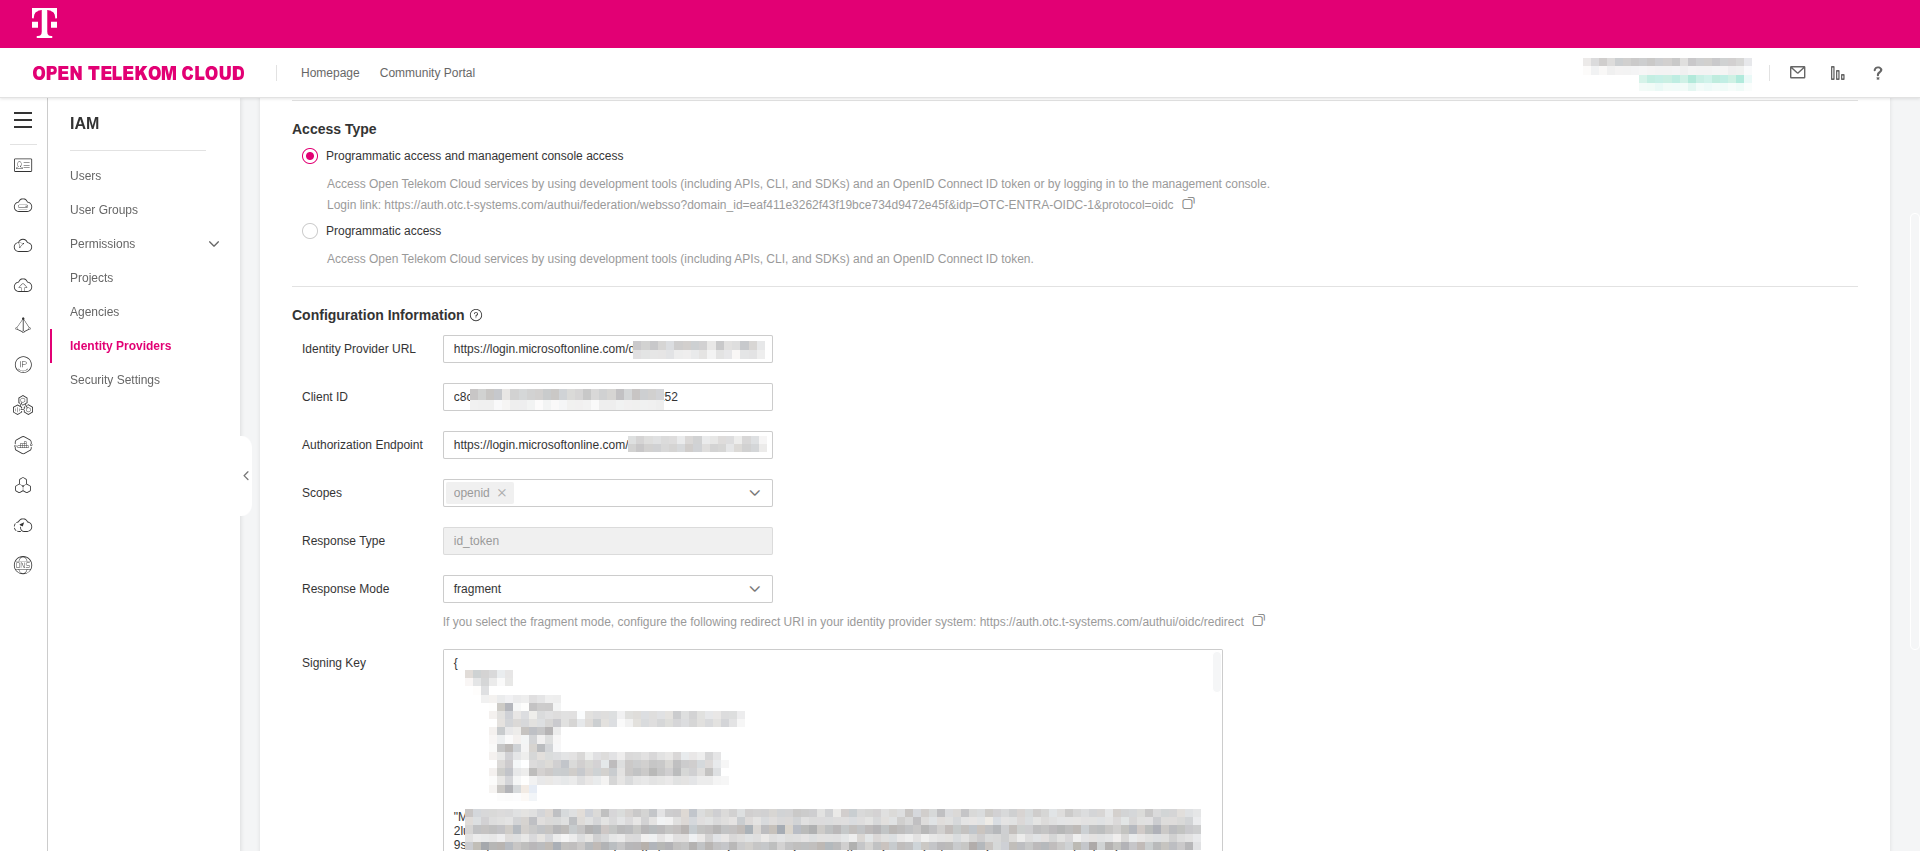
Click OK to apply changes and exit.
Configuring the Conversion Rules
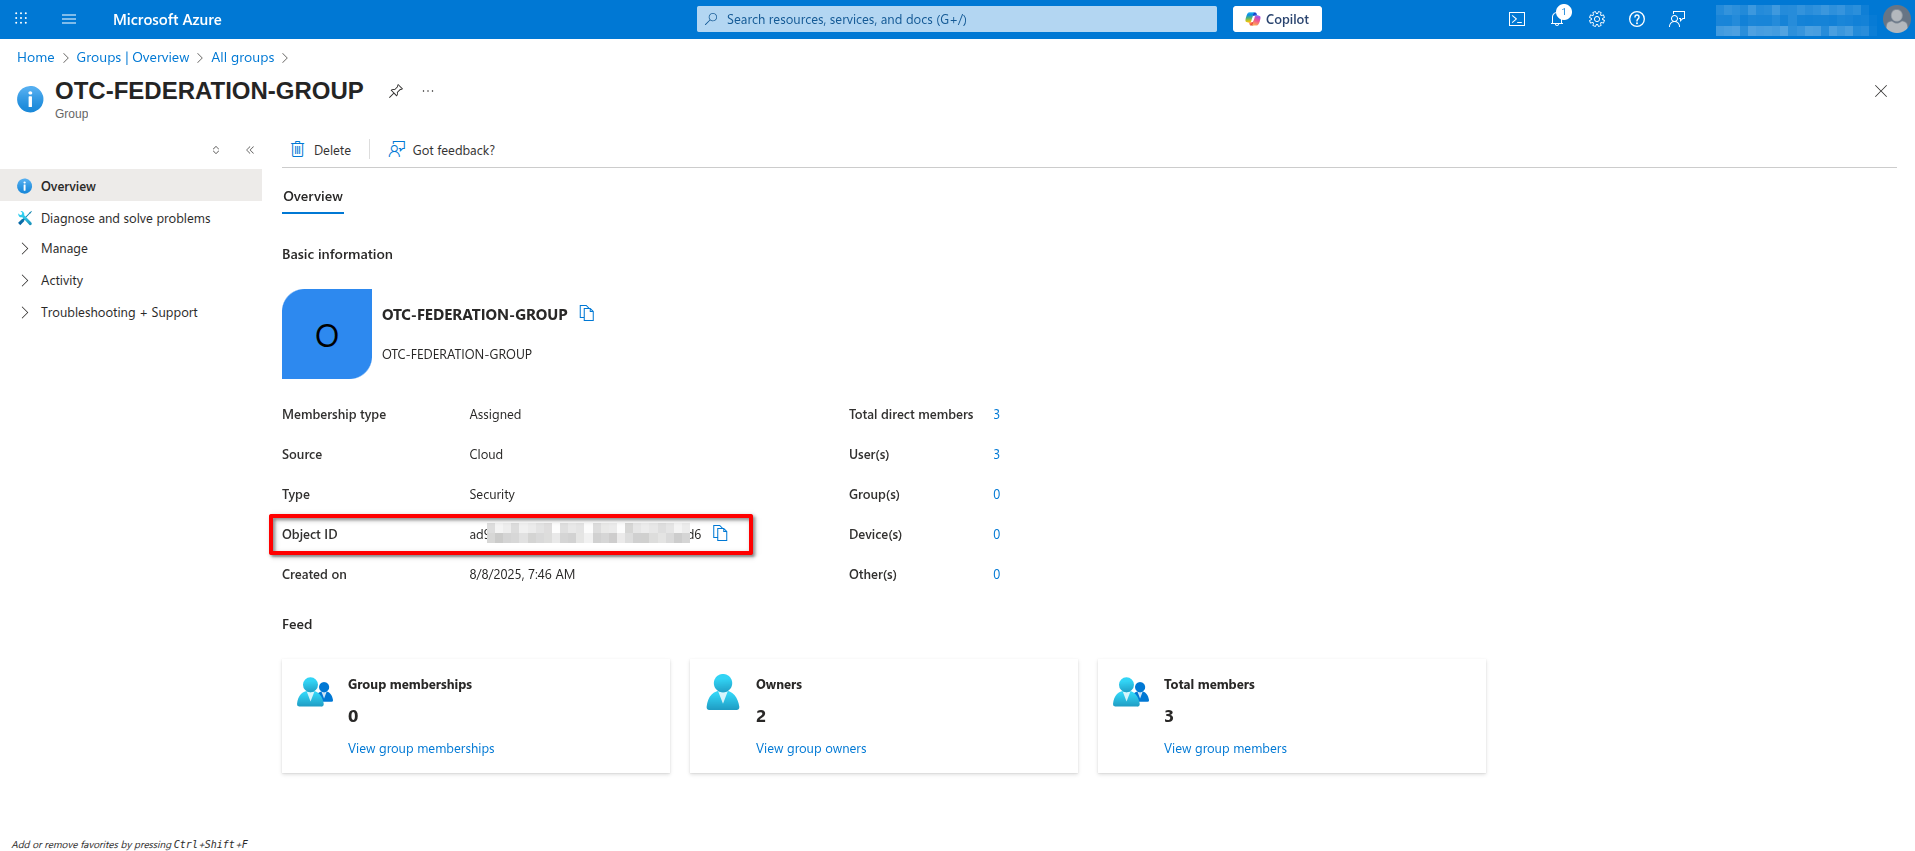
- Open Azure Portal and navigate to Microsoft Entra ID -> Manage -> Groups -> All groups and click on the group you created on the previous steps. Note down the Object ID value.
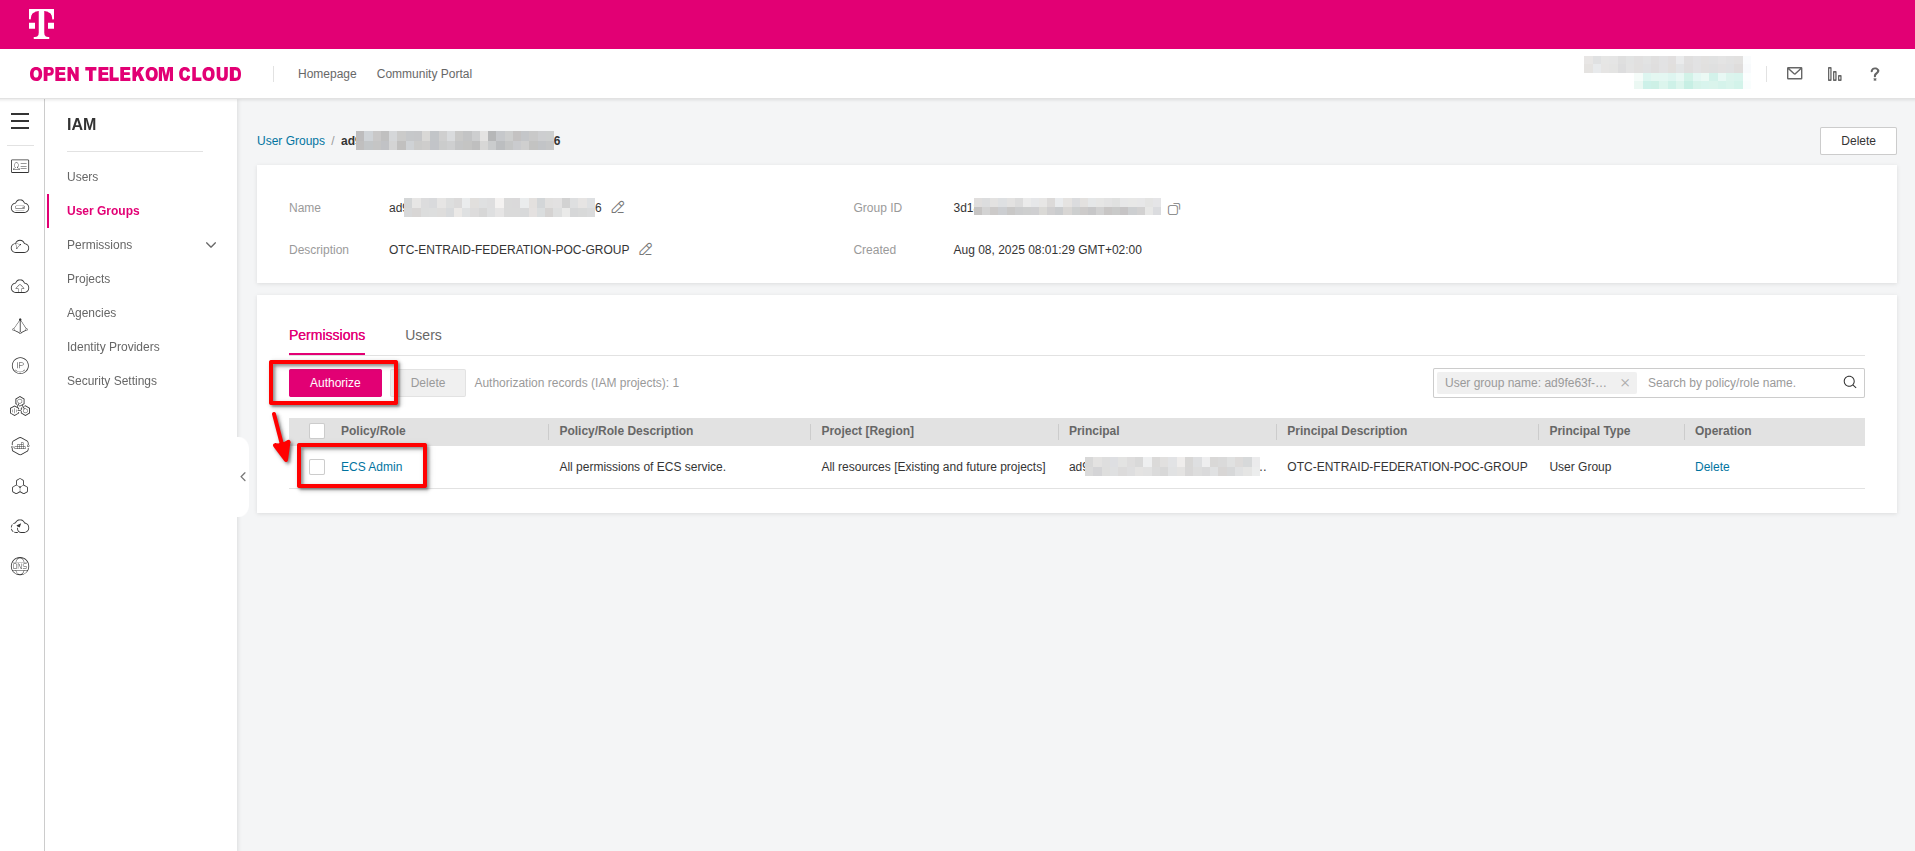
- Go to T Cloud Public Console -> IAM -> User Groups and click Create User Group. Enter as Name the Object ID value you acquired in the previous step and click OK. Open the newly created group and click Authorize under Permissions to grant the permissions you wish for this group; e.g. add ECS Admin and later, after your first successful login, try to perform an action on a non-authorized service to this group.
- Go to T Cloud Public Console -> IAM -> Identity Providers and click Modify on your Identity Provider. Under Identity Conversion Rules click Edit Rule and paste the following rule into the box. Click Validate and if the rule passed the validation, click OK twice to persist changes and exit:
[
  {
    "remote": [
      {
        "type": "family_name"
      },
      {
        "type": "given_name"
      },
      {
        "type": "groups"
      }
    ],
    "local": [
      {
        "user": {
          "name": "{0} {1}@entraid"
        }
      },
      {
        "groups": "{2}"
      }
    ]
  }
]
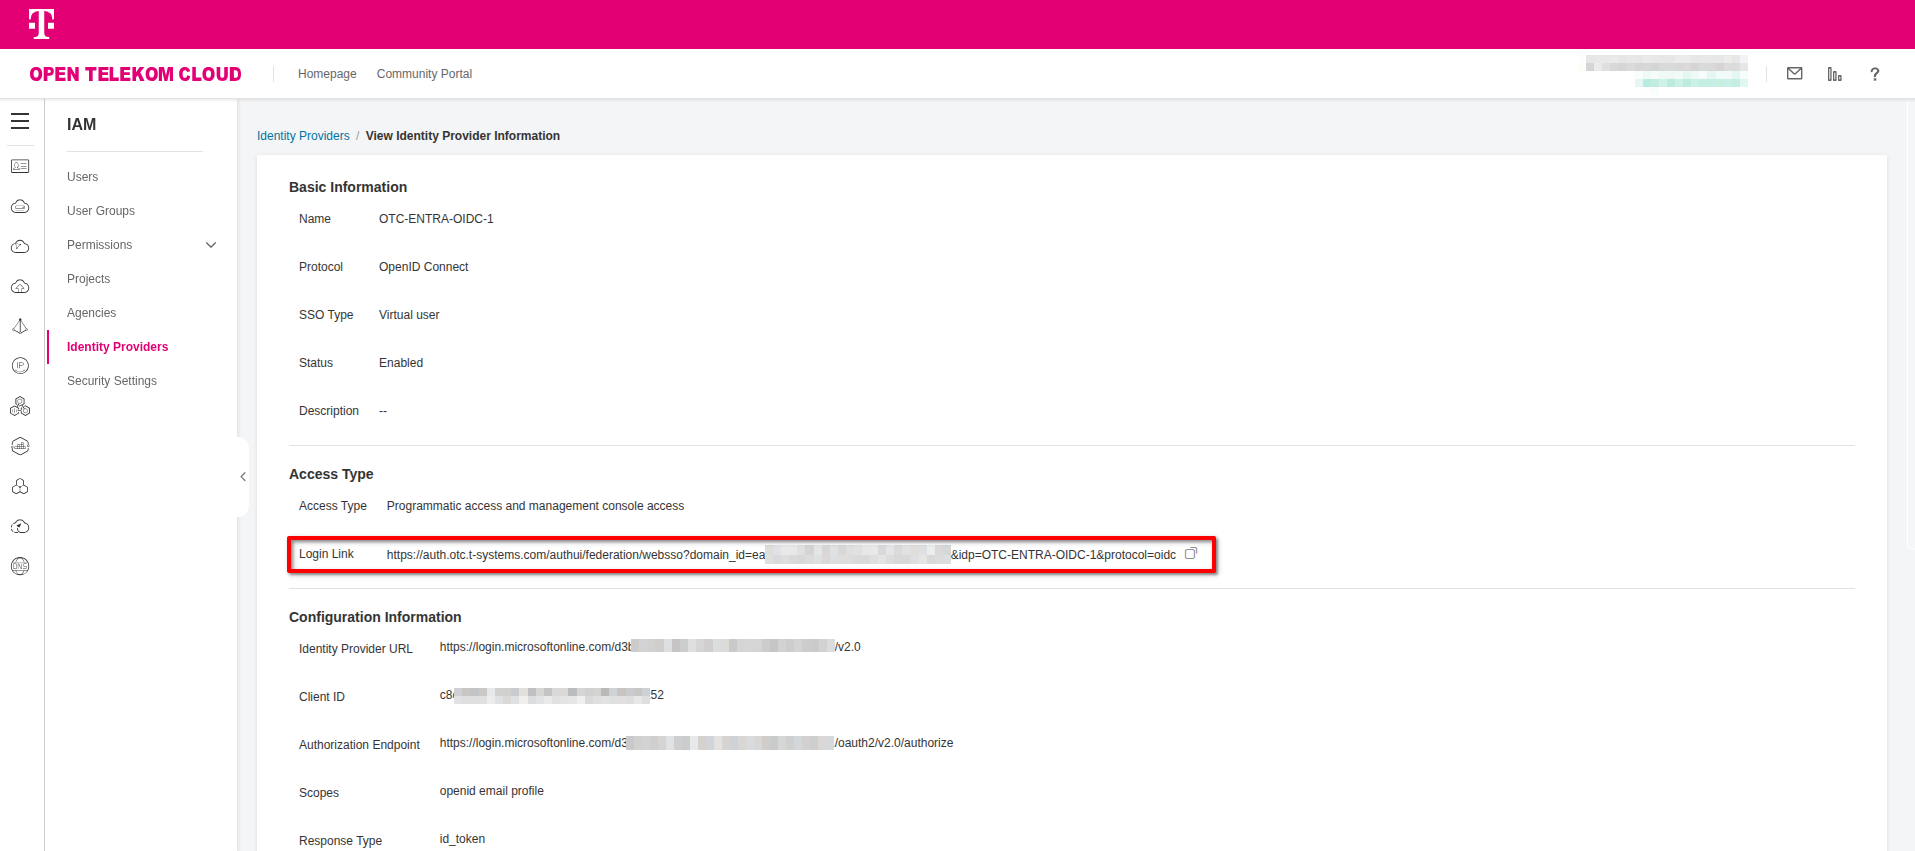
- Go to T Cloud Public Console -> IAM -> Identity Providers and click View on your Identity Provider. Copy the Login Link under Access Type and access the URL from a brand new (preferrably incognito session) of your browser.
If everything is configured correctly, you should be able to log in, view your details as defined in the conversion rules, and be denied access to CCE, since only our group has been granted ECS Admin privileges.
You can use OpenID Connect Debugger to validate and test OIDC requests and troubleshoot any failed responses.

You can find more detailed info about Conversion Rules under: