Deploy Active Directory Federation Services on ECS
In this guide, we'll walk you through deploying Microsoft Active Directory Federation Service (AD FS) on ECS. We'll cover everything from installing Active Directory Domain Services & Active Directory Certificate Services, preparing SSL certificates, configuring DNS zones till installing and configuring an AD FS farm.
Deploying Active Directory Domain Services (AD DS), Active Directory Certificate Services (AD CS), and Active Directory Federation Services (AD FS) all on a single Windows server is supported for proof-of-concept or lab environments but is not recommended for production. Co-locating these roles can lead to:
- Resource Contention: Directory replication, certificate issuance and federation token processing all compete for CPU, memory and I/O, potentially degrading performance.
- Security Boundaries: A compromise of one service (e.g. the CA) could expose your entire identity infrastructure—isolating roles on dedicated VMs or hardened physical hosts reduces blast radius.
- Patch and Maintenance Complexity: Windows updates or configuration changes for one role may inadvertently impact the others, complicating change windows and downtime planning.
For resilient, secure operations, follow Microsoft's best practices by placing AD DS, AD CS and AD FS on separate servers, enforce strict network segmentation, and implement a robust backup and DR strategy.
Prerequisites
Before proceeding with the deployment, make sure you have control over a publicly registered domain name. This is required for configuring a public endpoint for AD FS and enabling secure communication over HTTPS.
For the rest of this blueprint we are going to assume:
- Public Domain:
example.com - Private Domain:
mycompany.com
Creating an ECS Server
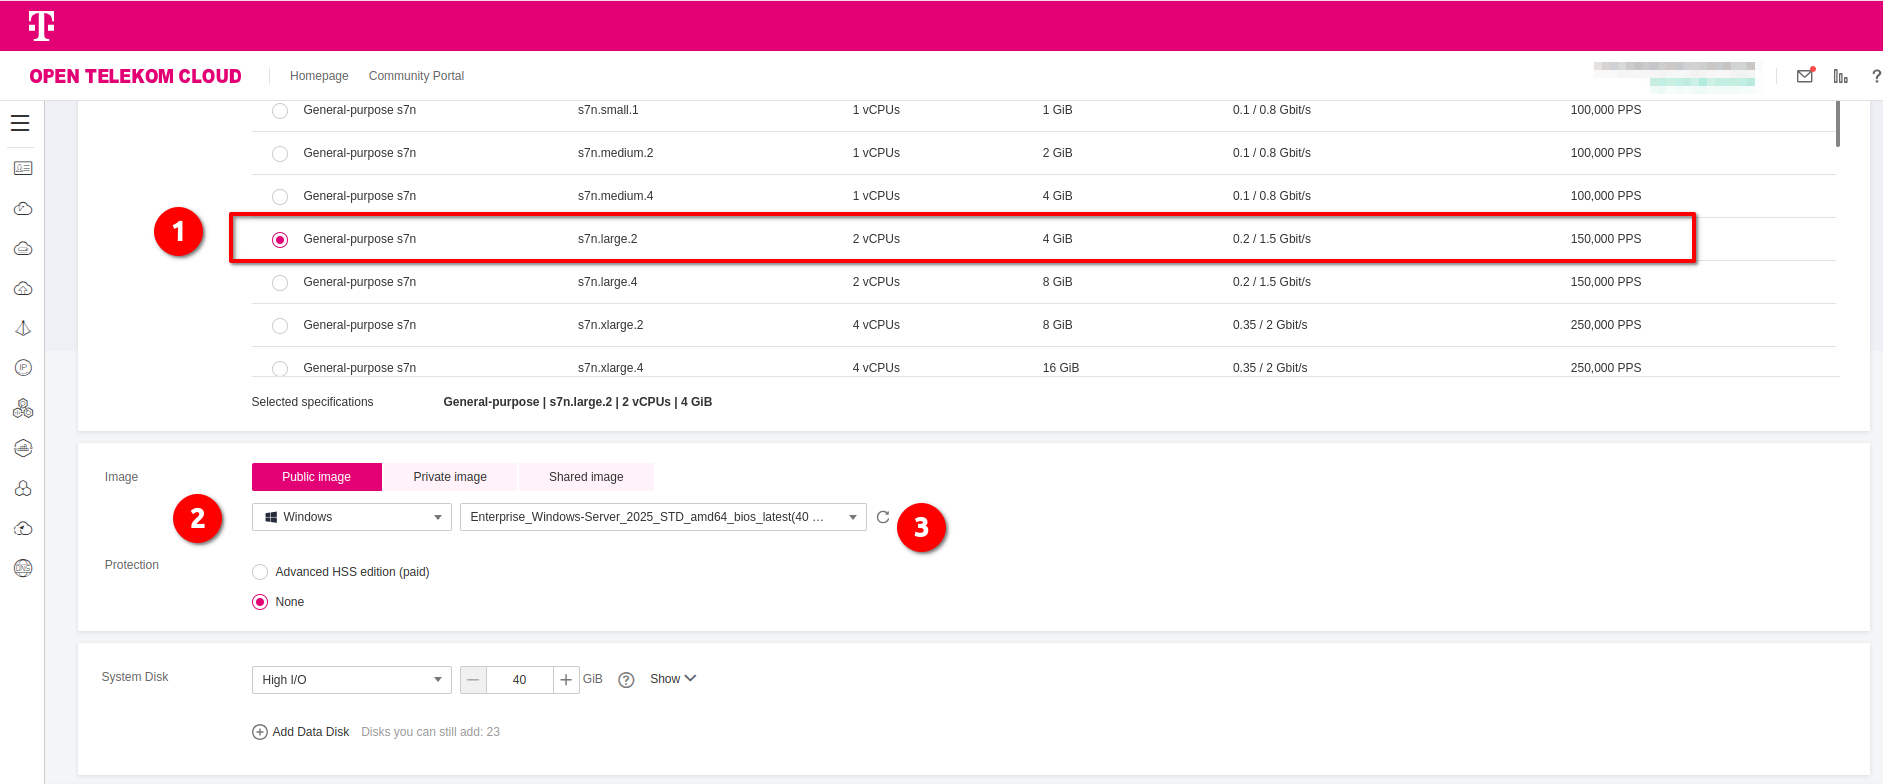
Go to T Cloud Public Console -> Elastic Cloud Server and click Create ECS Server. Choose :
- Flavor: "General-purpose s7n.large.2"
- Image: Public Image -> "Windows" -> "Enterprise_Windows_Server_2025_STD_amd64_bios_latest"
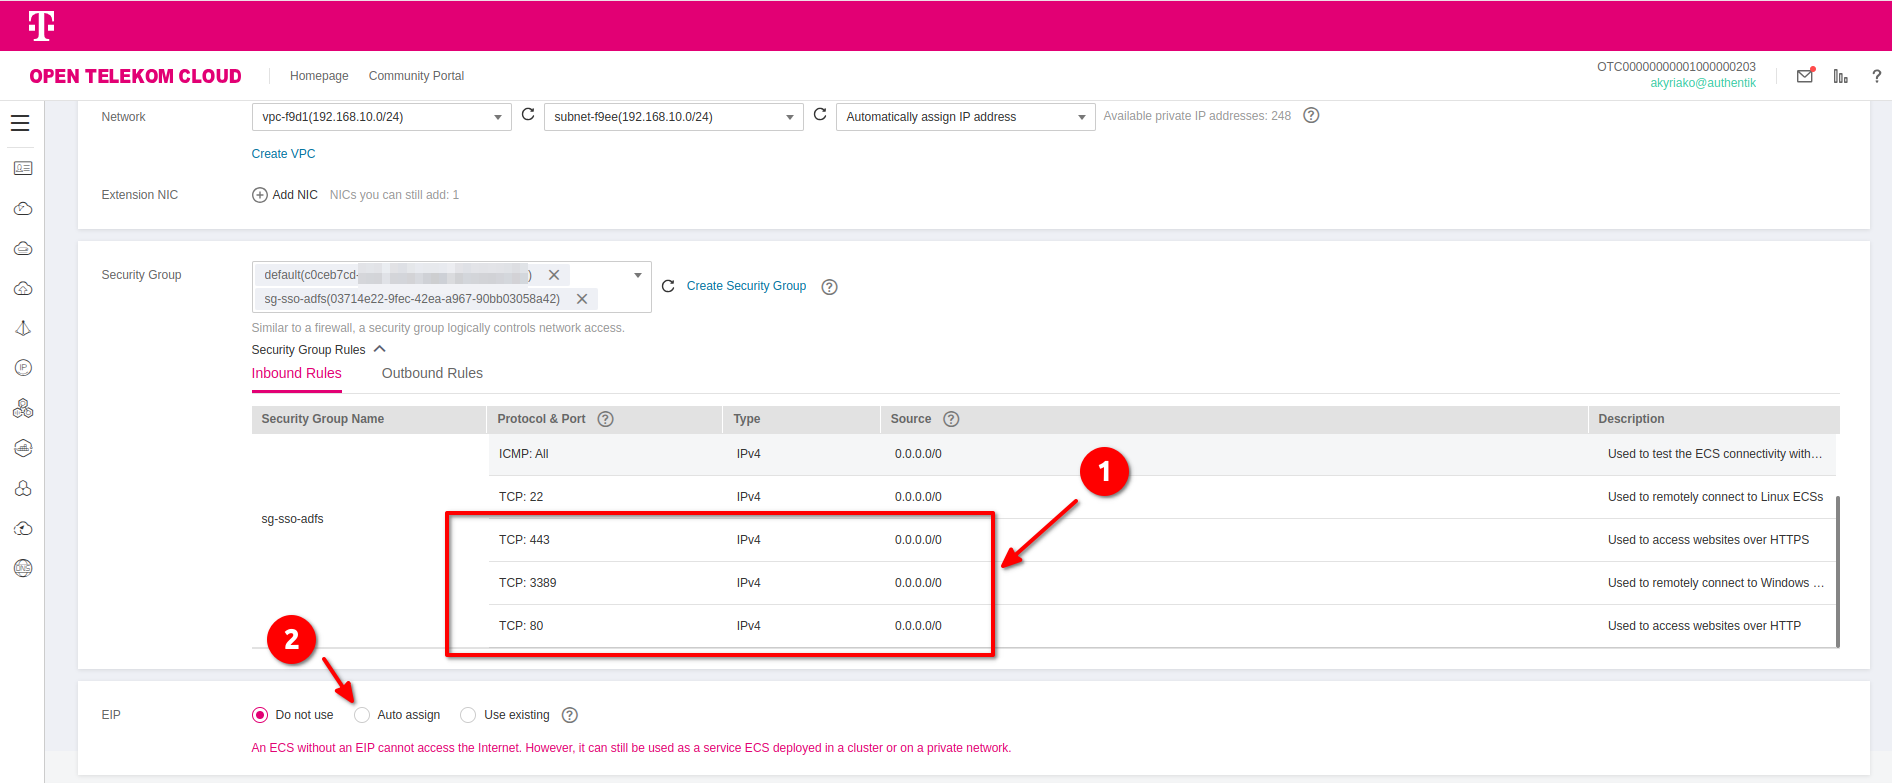
- Security Group: Add the following Inbound Rules to a new Security Group (or amend an existing one):
TCP/80,TCP/443TCP/3389
- EIP: Click on "Auto assign"
Complete the wizard and deploy the ECS instance. Once the deployment completes, return the Elastic Cloud Server, enter your ECS instance and click More -> Get Password. Click Select File to select the Key Pair you used during the installation and click Get Password in order to get the credentials for the local Administrator account.

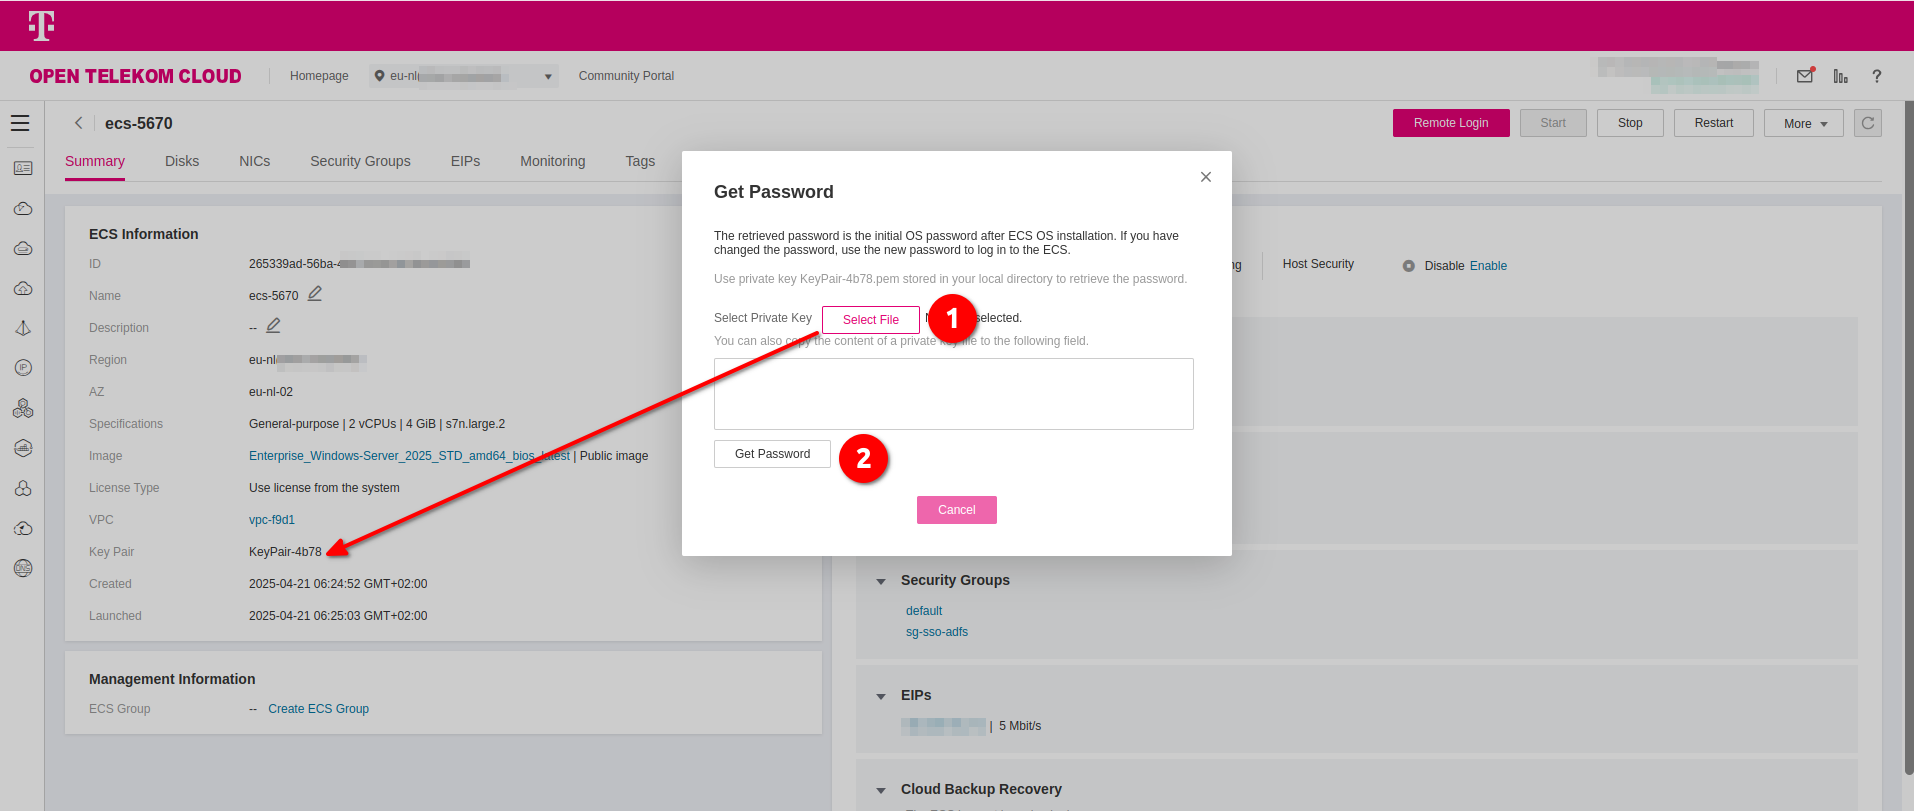
- Make sure you save the Key Pair (a
.pemfile) after its creation in your working station. - Getting the password will not be available for the first 3-5min after the creation of the instance.
Creating a Public DNS Endpoint
When integrating AD FS as an Identity Provider (IdP) within your T Cloud Public tenant—it is essential that the Elastic IP (EIP) assigned to your ECS Server resolves to a valid and secure FQDN. This means the public DNS entry must point to the EIP and be backed by a properly issued TLS certificate.
Without this, the T Cloud Public platform will not accept the IdP registration due to trust and validation requirements. Ensuring your AD FS endpoint is accessible over a recognized, secure URL is not just best practice—it's a prerequisite for federation scenarios with OTC's IAM services.
To enable full DNS-based automation and allow for secure domain validation—especially when configuring AD FS as an Identity Provider—you need to delegate domain management to T Cloud Public's Domain Name Service (DNS). This requires transferring authority over your domain's NS (Name Server) records to OTC.
Start by logging into your domain registrar's control panel and ensure the following:
- Disable any dynamic DNS features associated with the domain or subdomains that will be used by AD FS endpoints.
- Update the NS records of your domain to point exclusively to the following OTC name servers.
ns1.open-telekom-cloud.com
ns2.open-telekom-cloud.com
Once the nameserver change propagates and OTC has authoritative control over your domain, you're ready to define DNS zones and records.
Create a Public DNS Zone in the T Cloud Public DNS service, then define an A record that maps your AD FS public domain (e.g., adfs.example.com) to the EIP you've already assigned to your ECS Server.
Installing Active Directory Domain Services
Installing the Server Roles
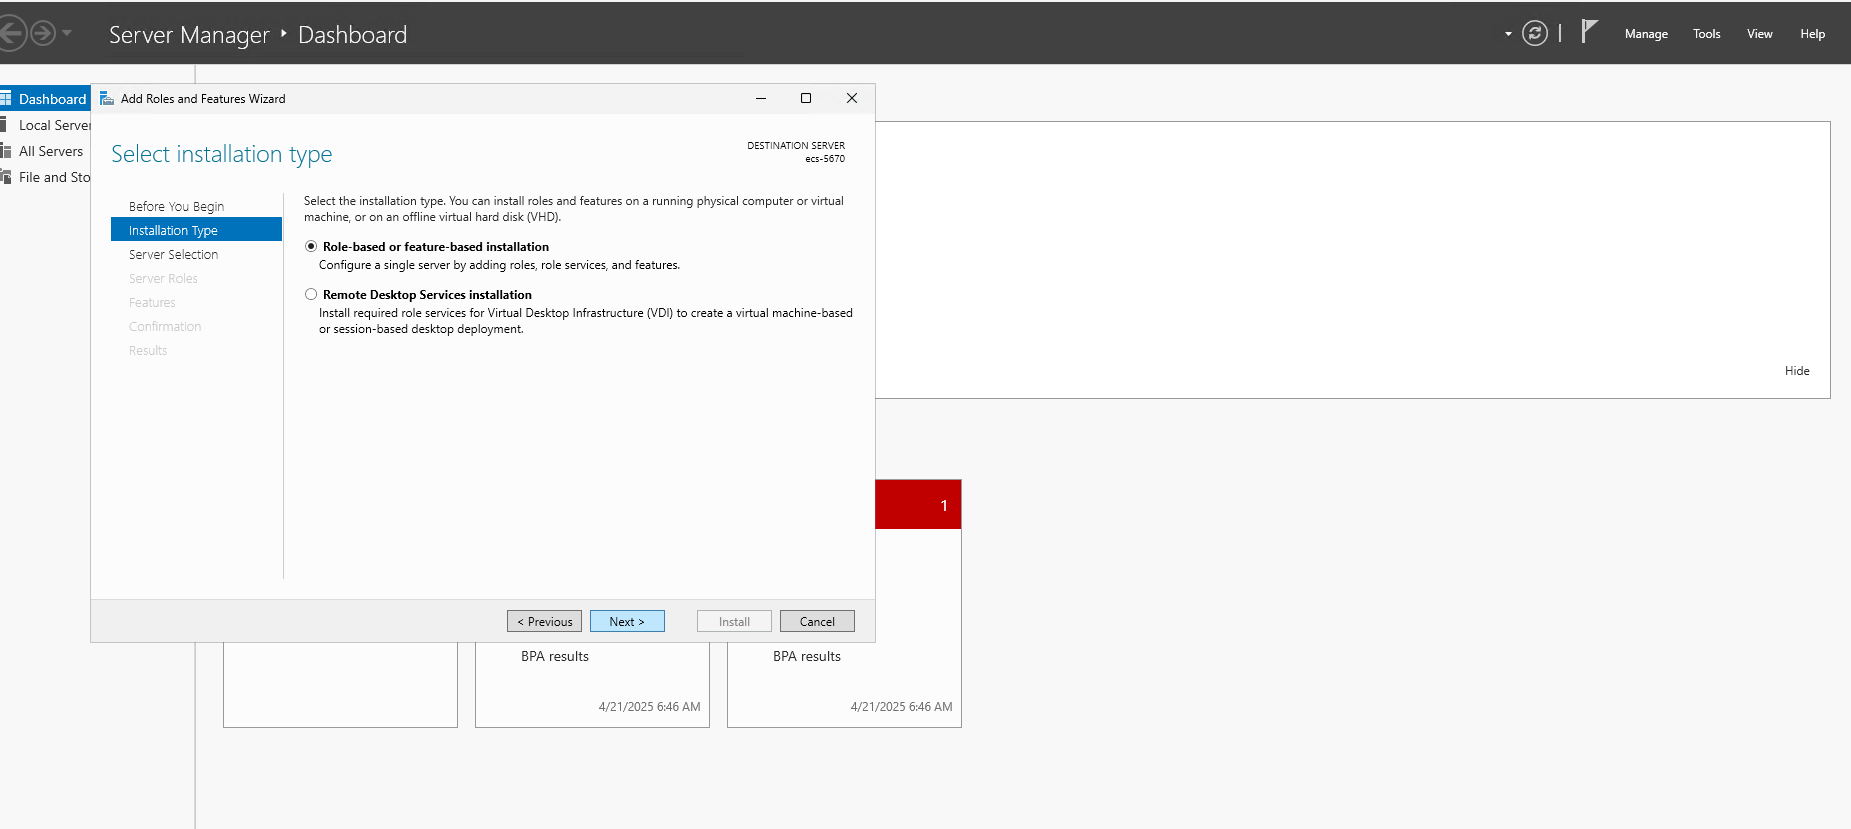
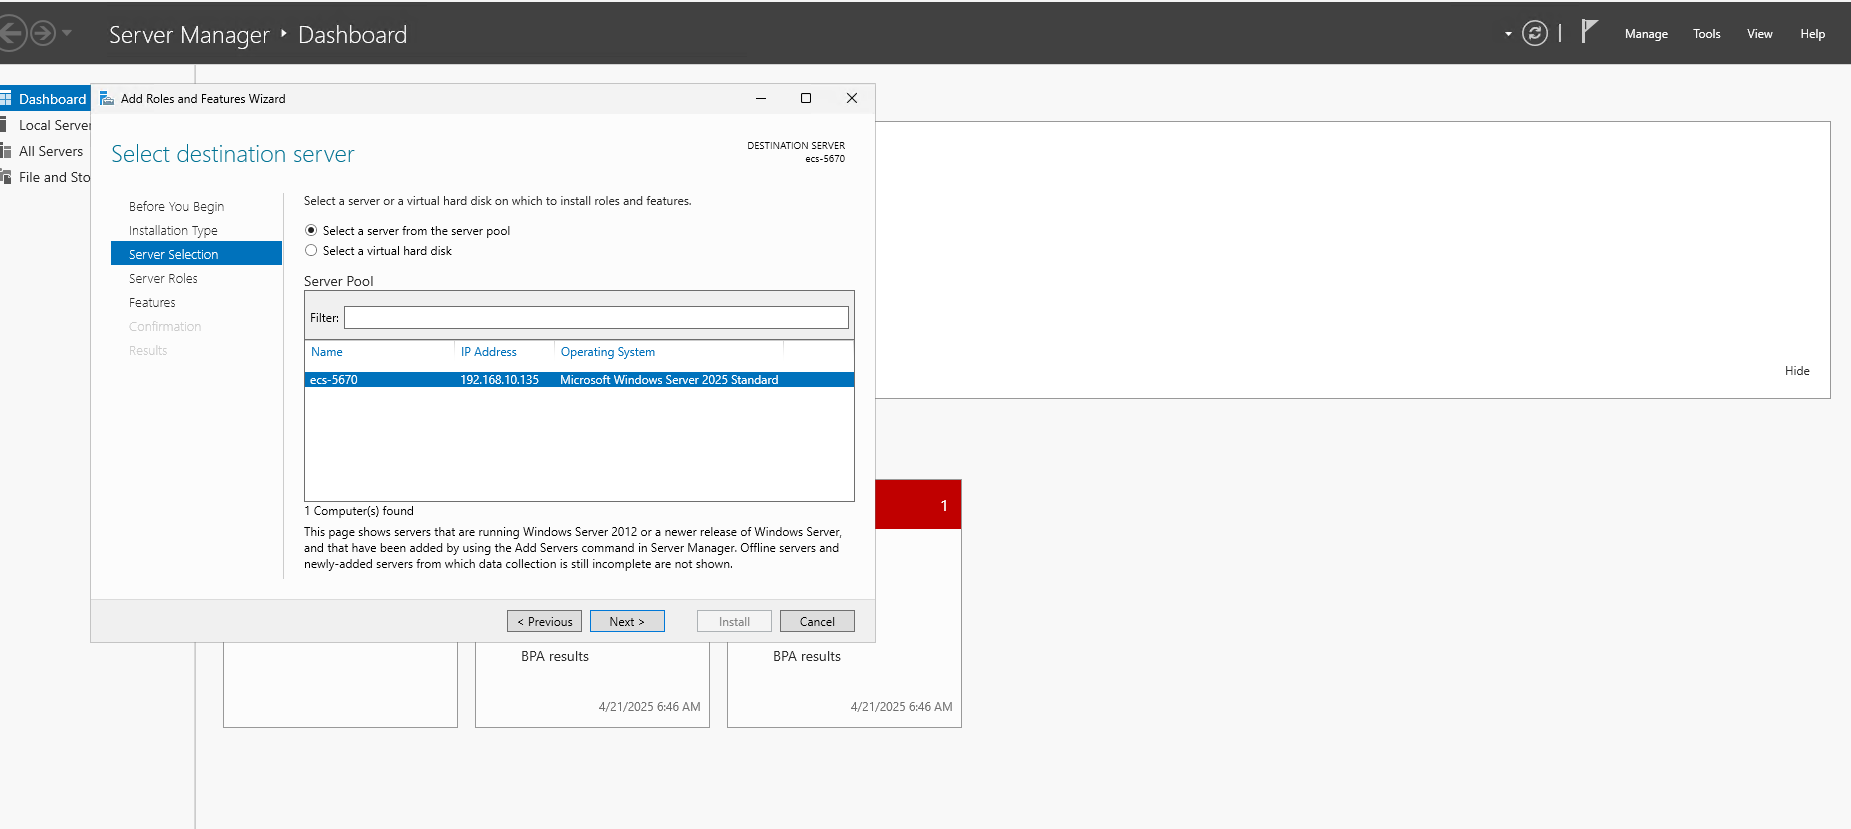
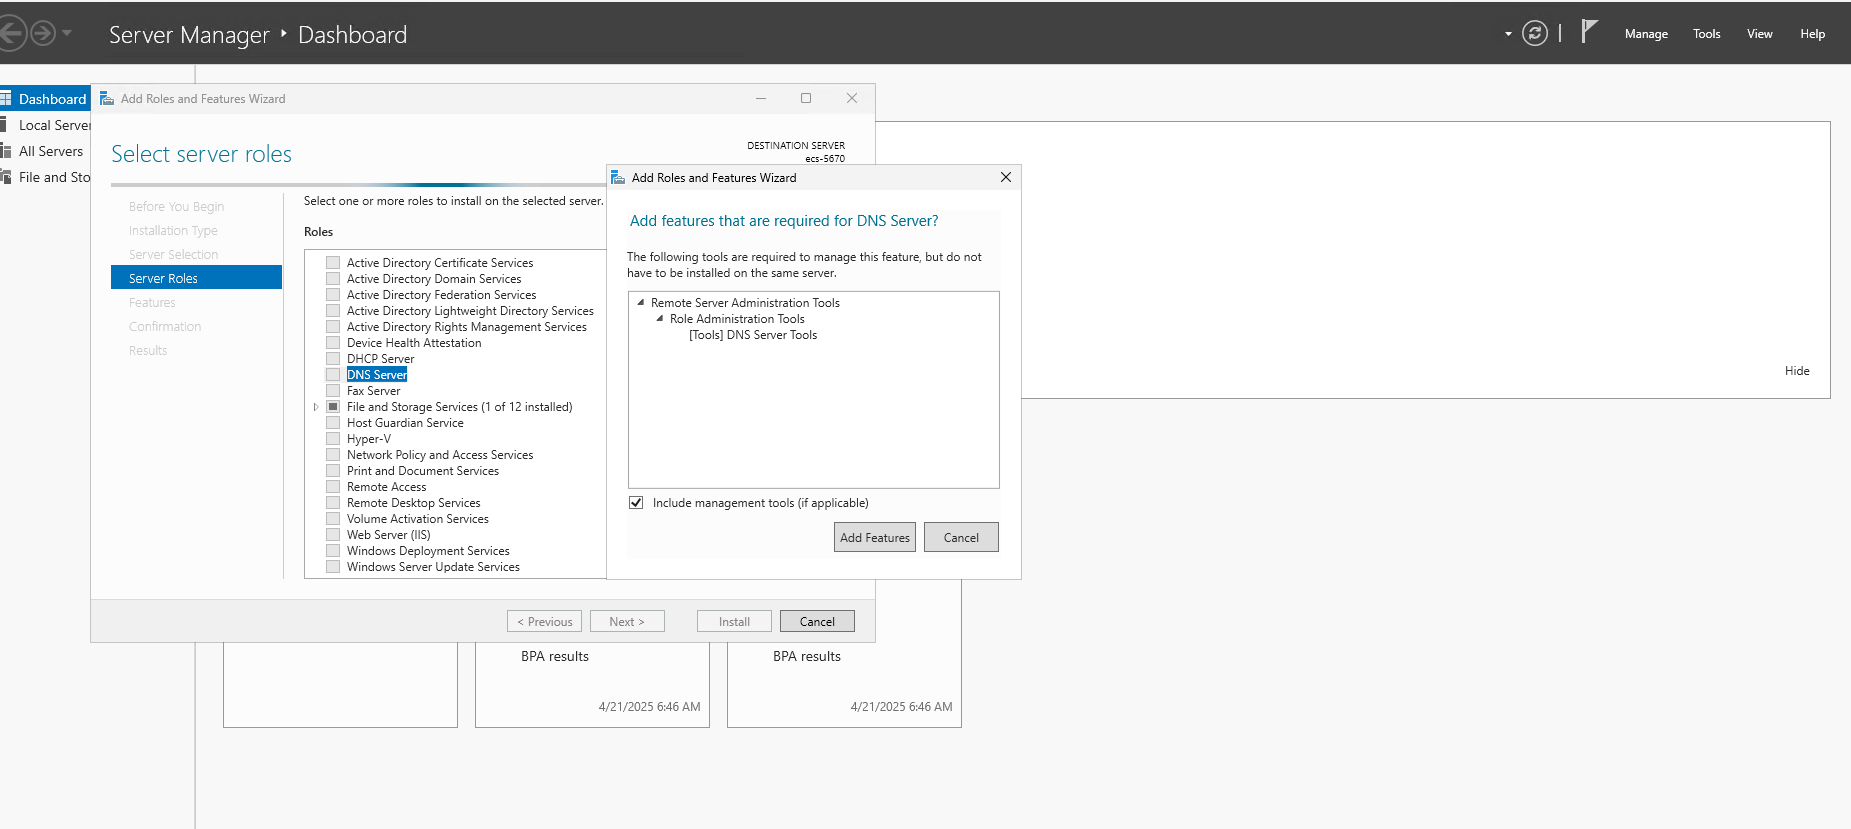
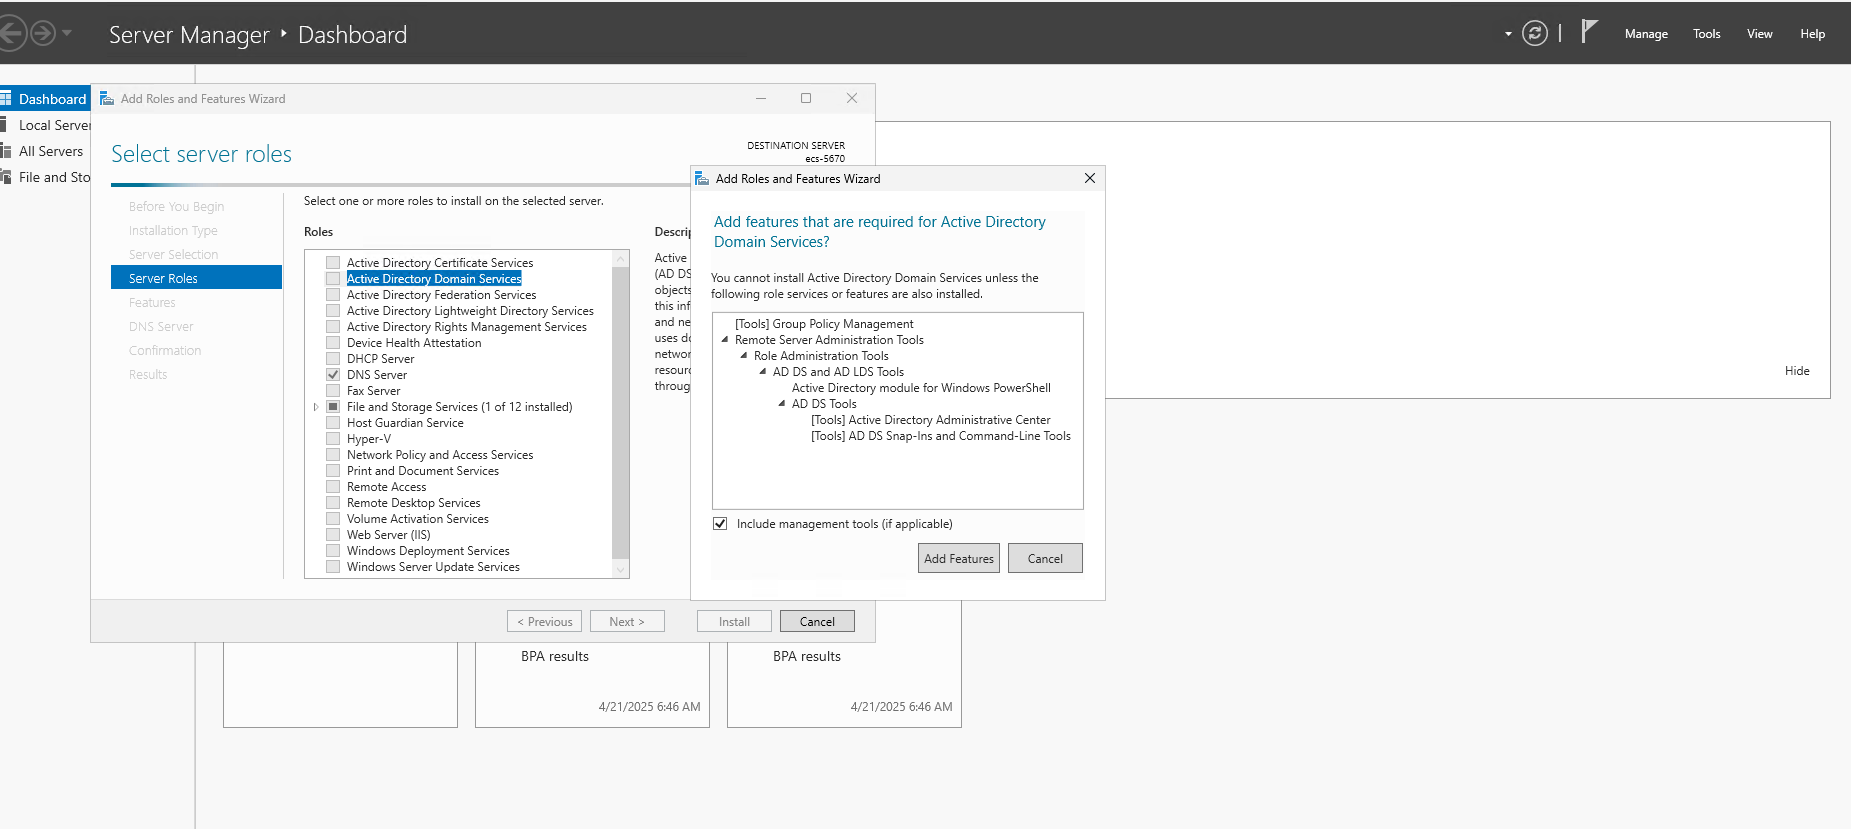
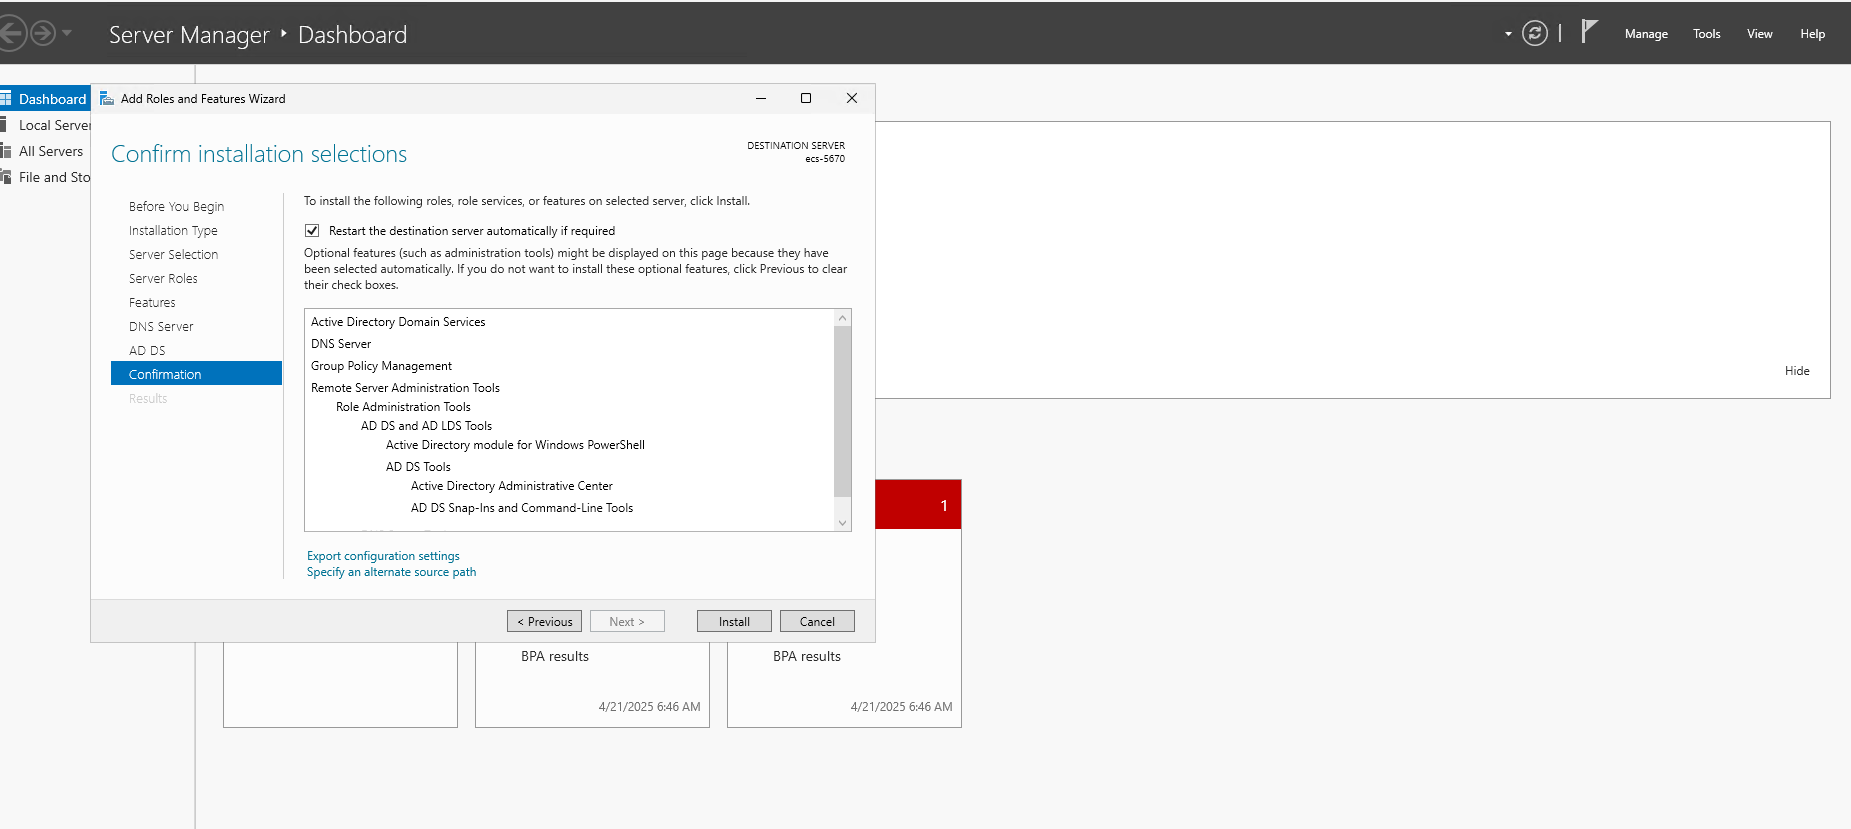
- Open Server Manager → Add roles and features.
- Select "Role-based or feature-based installation" and choose the ECS Server from the Server Pool.
- Under Server Roles, check "Active Directory Domain Services" and "DNS Server"
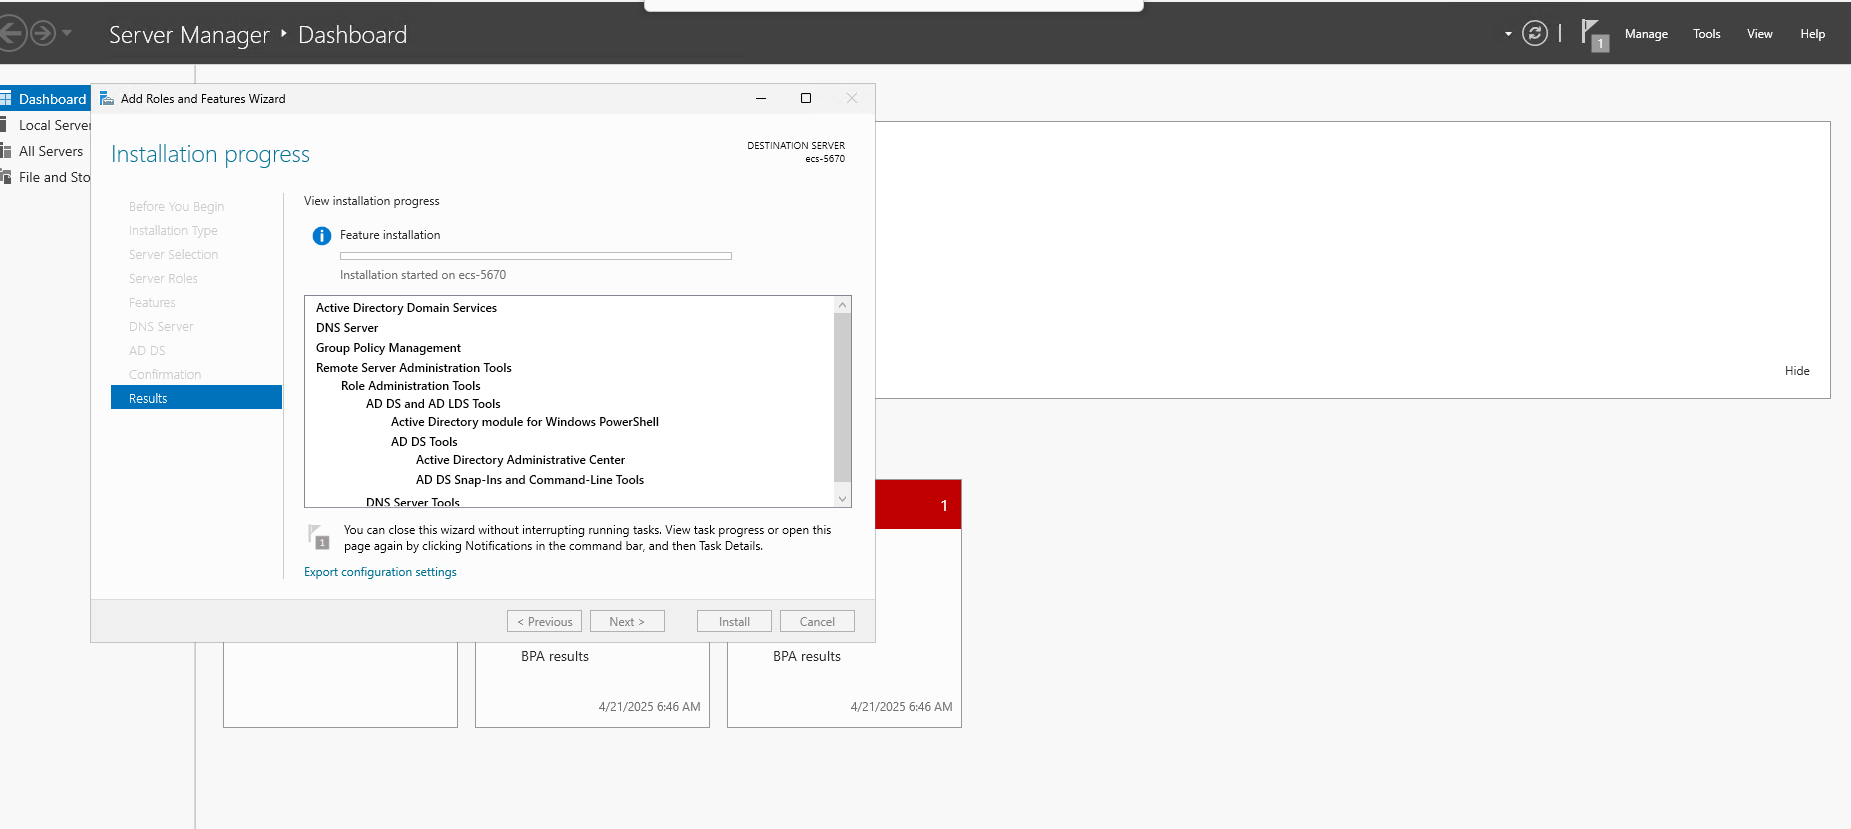
- Click Next through the wizard, confirm installation selections and click Install.

or run as Administrator the following Powershell command:
Install-WindowsFeature AD-Domain-Services, DNS -IncludeManagementTools
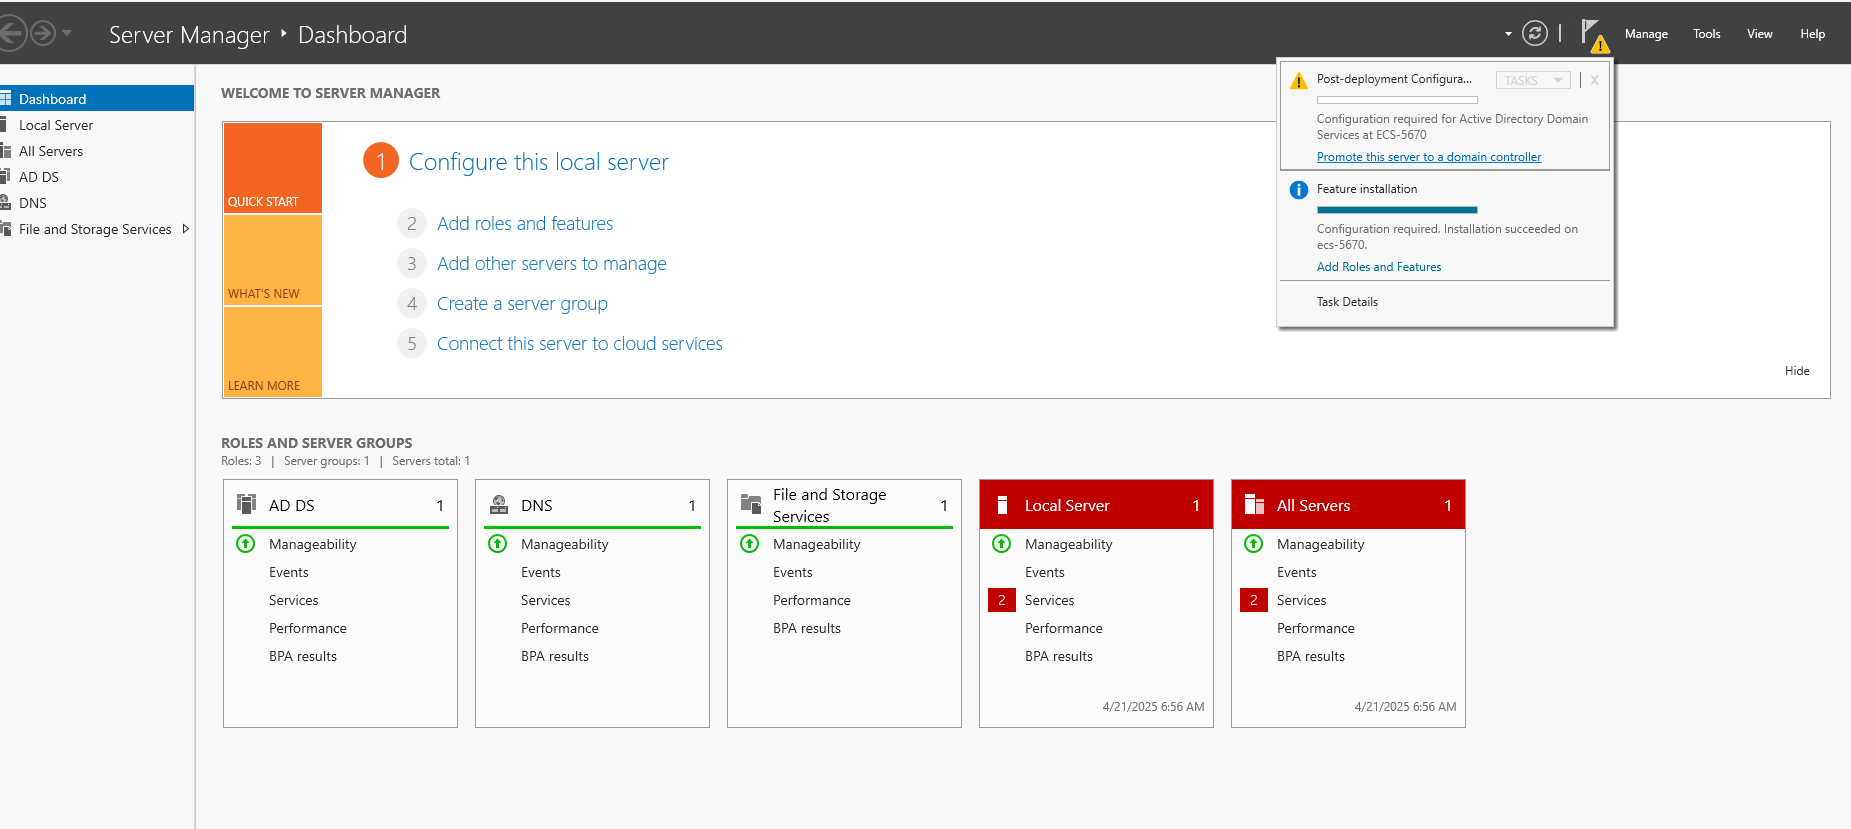
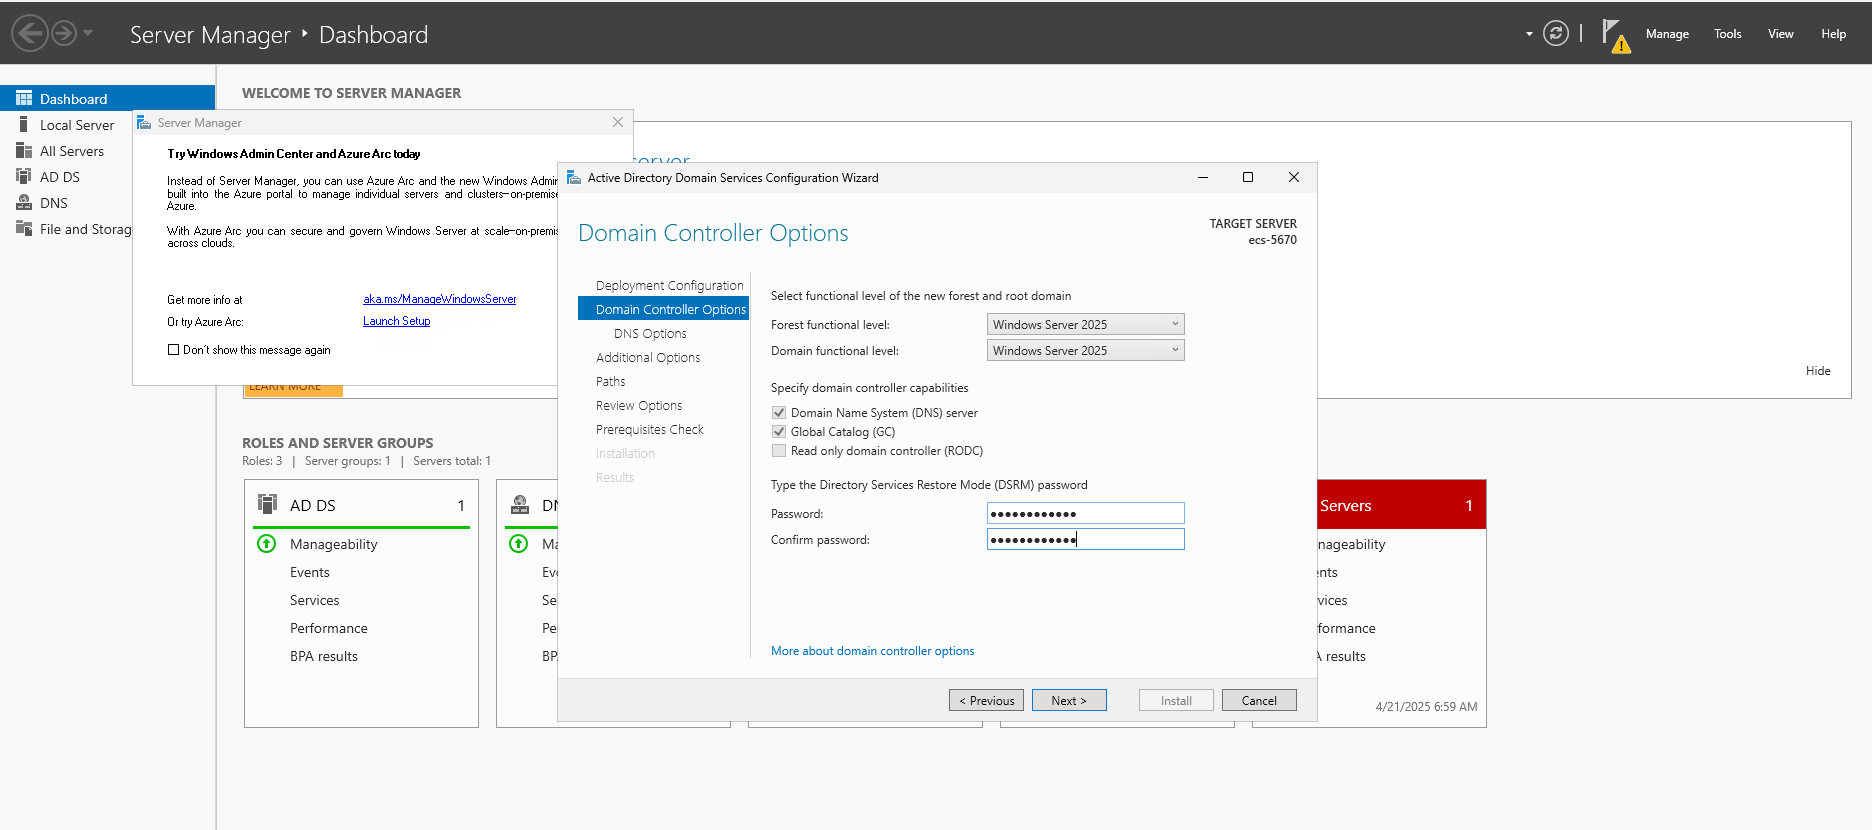
Promoting ECS Server to Domain Controller
Once the ADDS role installation completes, the Post-Deployment Configuration link appears in Server Manager -> Tasks:
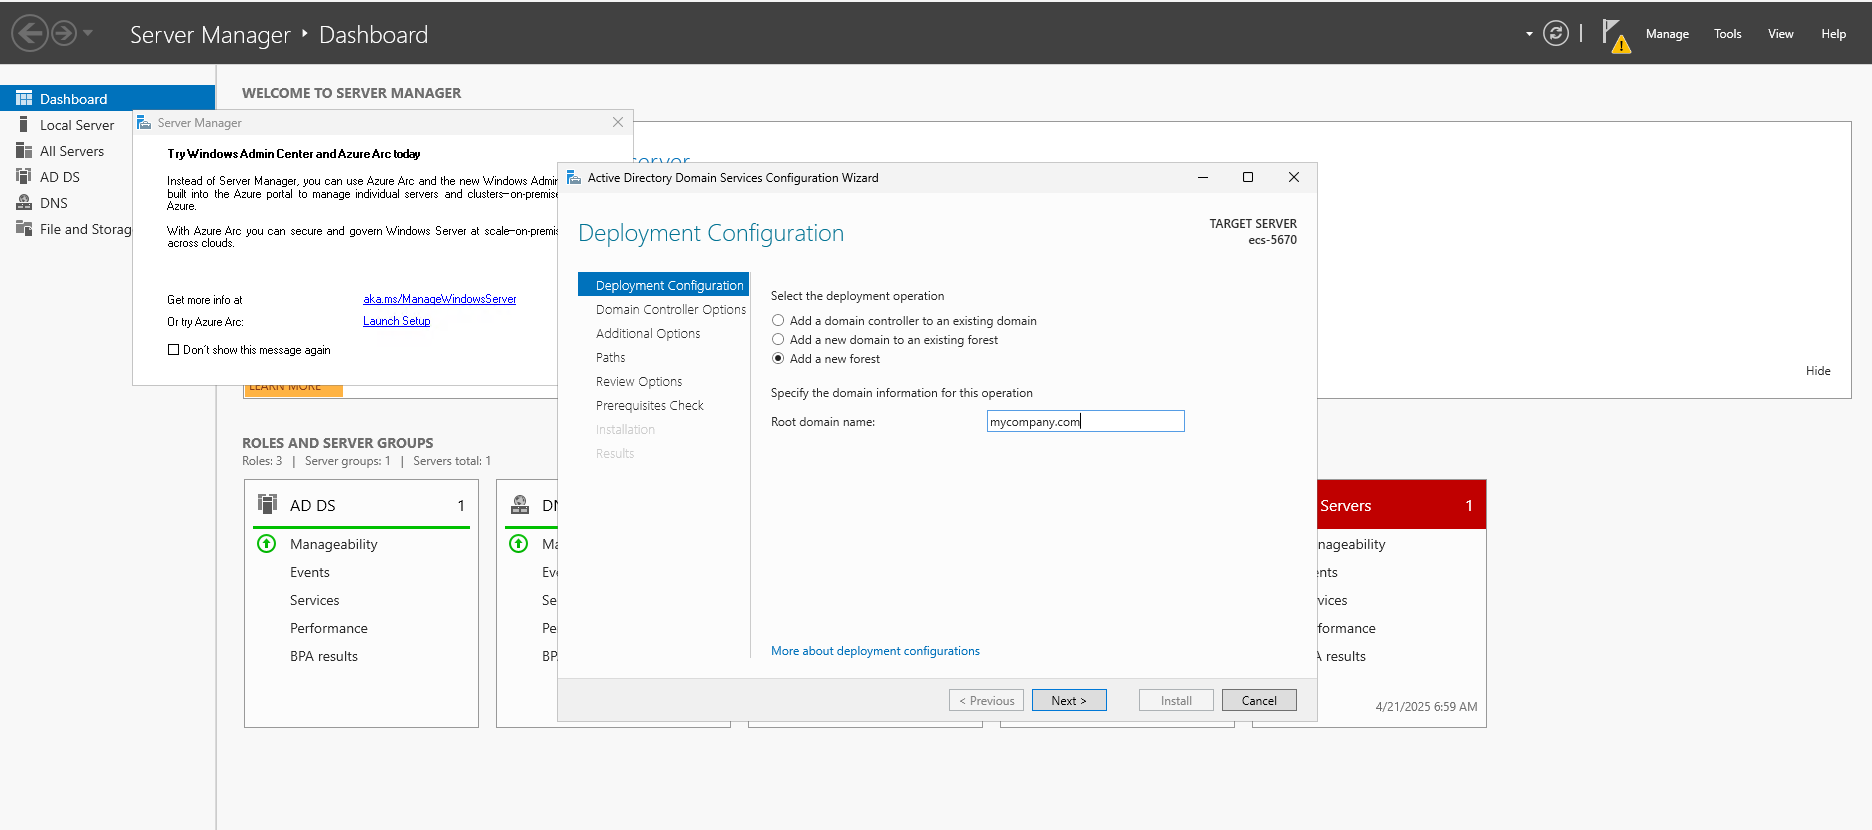
- Click Promote this server to a domain controller.
- Choose Add a new forest and enter
mycompany.comas domain name . - Specify a Directory Services Restore Mode (DSRM) password.
- Accept NETBIOS domain name as is and disable (if it's enabled) the Create DNS delegation option.
- Accept default locations for the database, log files and SYSVOL.
- Review prerequisites, then click Install. The server will reboot when promotion finishes.

Alternatively, use PowerShell:
$secPwd = ConvertTo-SecureString "ThisIsNotASecurePassword!" -AsPlainText -Force
Install-ADDSForest `
  -DomainName "mycompany.com" `
  -CreateDNSDelegation:$false `
  -DatabasePath "C:\Windows\NTDS" `
  -DomainMode "WinThreshold" `
  -ForestMode "WinThreshold" `
  -InstallDNS:$true `
  -LogPath "C:\Windows\NTDS" `
  -SysvolPath "C:\Windows\SYSVOL" `
  -SafeModeAdministratorPassword $secPwd `
  -Force
Be sure to substitute every occurrence of ThisIsNotASecurePassword! with a strong, organization-approved password.
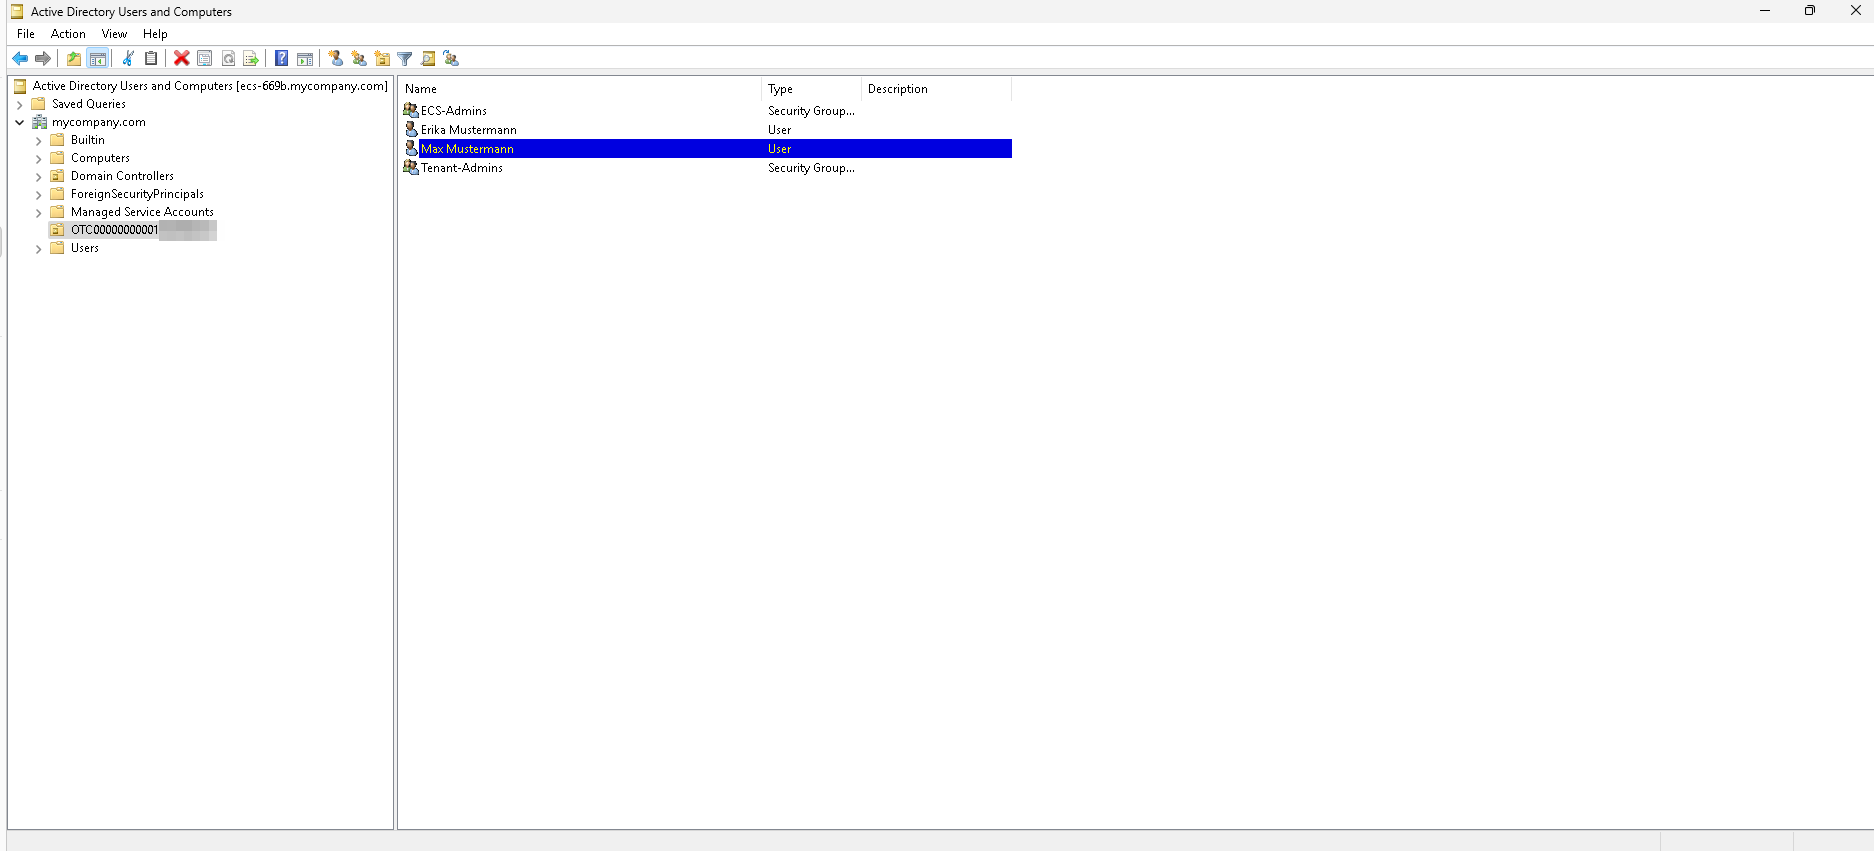
Creating Organization Unit, Users & Groups
Before mapping roles in AD FS and T Cloud Public, we need first to define our administrative scopes by provisioning a new Organization Unit (OU),
two security groups,Tenant-Admins and ECS-Admins, and then create one user per group.
-
Open Server Manager -> Tools -> Active Directory Users and Computers, right-click on mycompany.com -> New -> Organization Unit. Enter as name, the name of your T Cloud Public Tenant and enable "Protect container from accidental deletion" and click OK.
-
Right-click the newly created OU -> New -> Group.
- Group name:
Tenant-Admins - Group scope: "Global"
- Group type: "Security"
Repeat to create
ECS-Admins. - Group name:
-
Right-click the newly created OU -> New -> User. Create a new user (e.g. Erika Mustermann, merika@mycompany.com) and assign them to group Tenant-Admins.
-
Right-click the newly created OU -> New -> User. Create a new user (e.g. Max Mustermann, mmax@mycompany.com) and assign them to group ECS-Admins.
or altenative run as Administrator the following PowerShell commands:
# Define base DN for the OTC OU in the mycompany.com domain
$otcOu = "OU=OTC0000001XXXXX,DC=mycompany,DC=com"
# Create groups
New-ADGroup -Name "Tenant-Admins" -GroupScope Global -GroupCategory Security -Path $otcOu
New-ADGroup -Name "ECS-Admins"    -GroupScope Global -GroupCategory Security -Path $otcOu
# Create users
New-ADUser -Name "Erika Mustermann" -SamAccountName merika `
  -UserPrincipalName merika@mycompany.com `
  -Path $otcOu `
  -AccountPassword (ConvertTo-SecureString "ThisIsNotASecurePassword!" -AsPlainText -Force) `
  -Enabled $true
New-ADUser -Name "Max Mustermann" -SamAccountName mmax `
  -UserPrincipalName mmax@mycompany.com `
  -Path $otcOu `
  -AccountPassword (ConvertTo-SecureString "ThisIsNotASecurePassword!" -AsPlainText -Force) `
  -Enabled $true
# Add users to groups
Add-ADGroupMember -Identity "Tenant-Admins" -Members merika
Add-ADGroupMember -Identity "ECS-Admins"    -Members mmax
Be sure to substitute every occurrence of ThisIsNotASecurePassword! with a strong, organization-approved password.
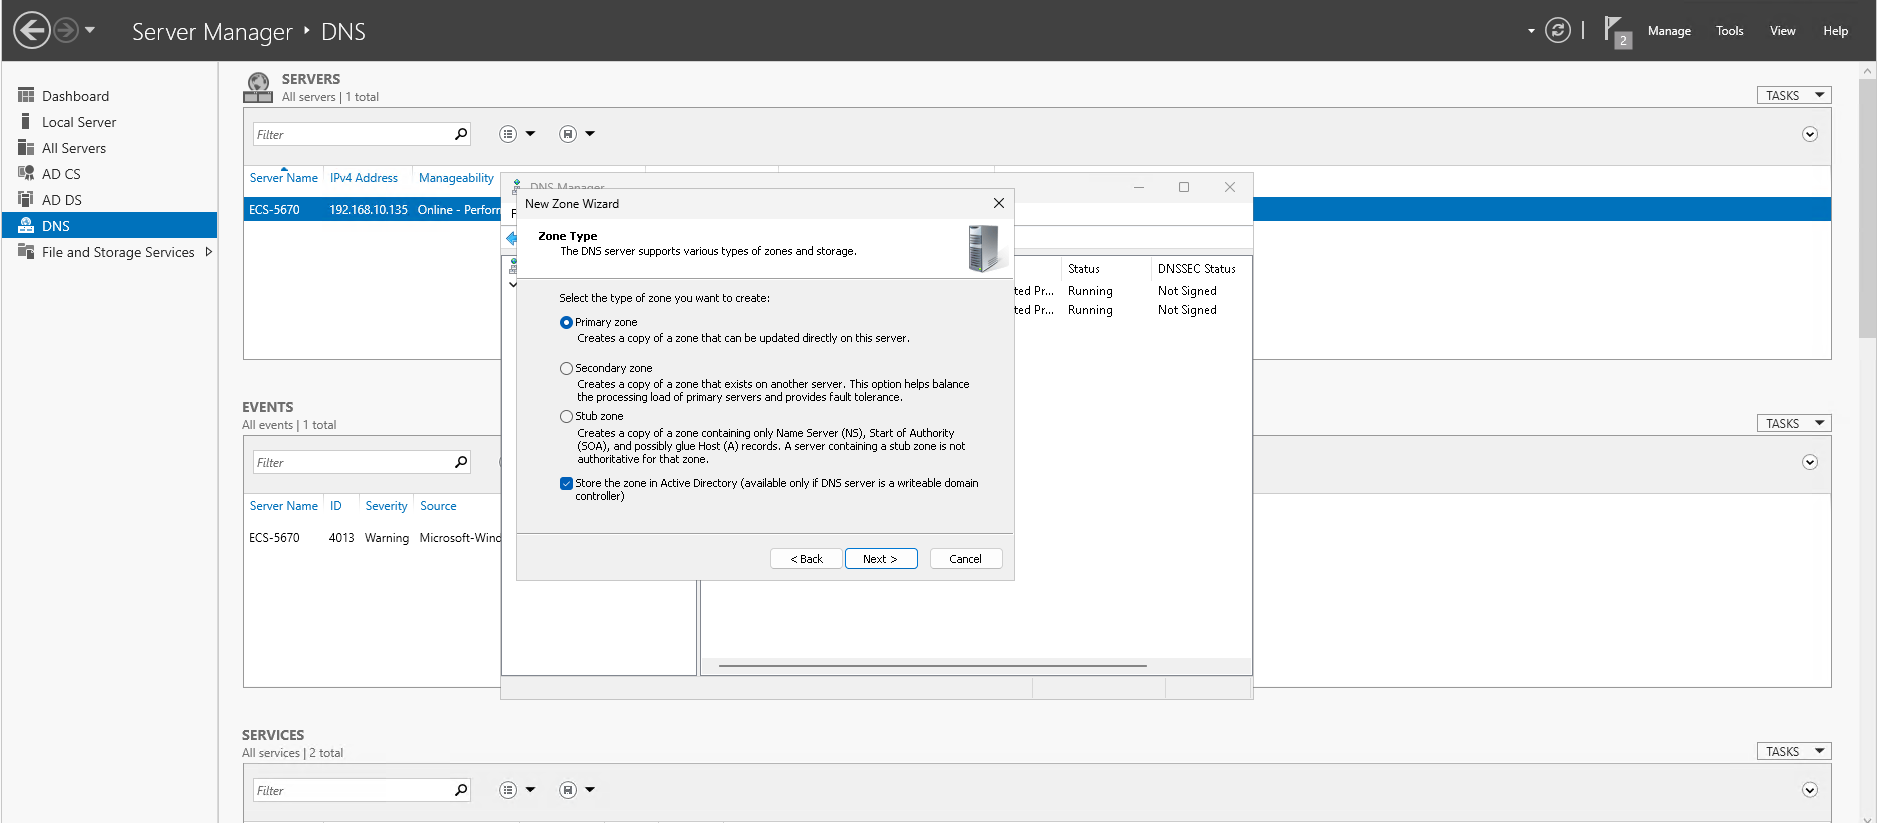
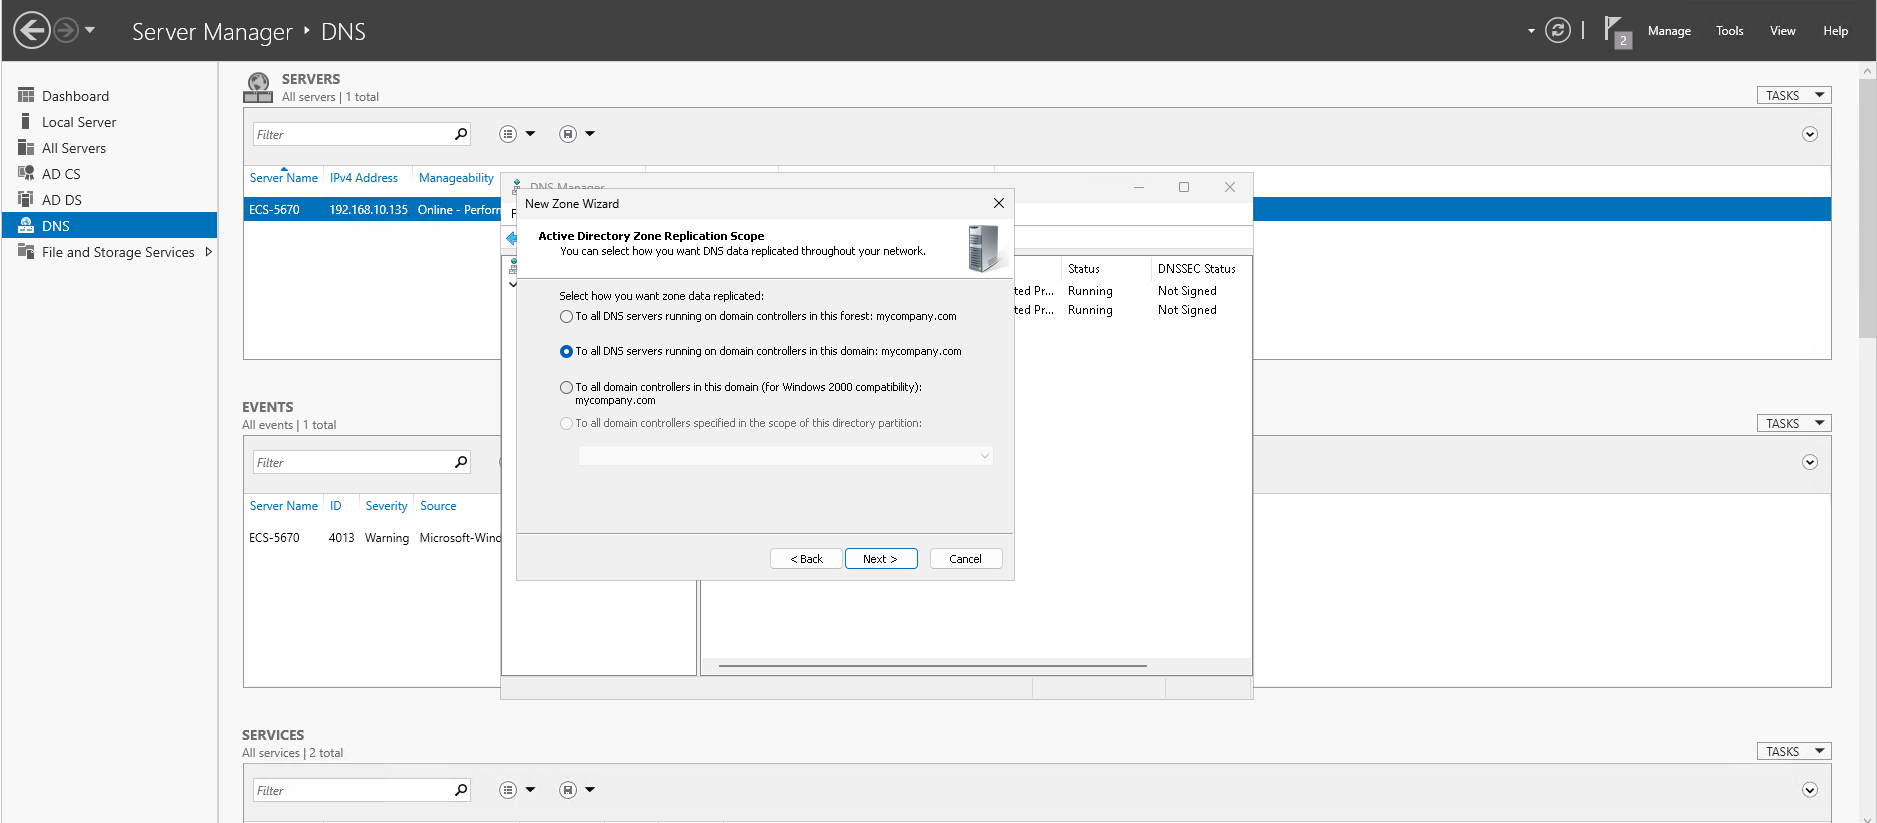
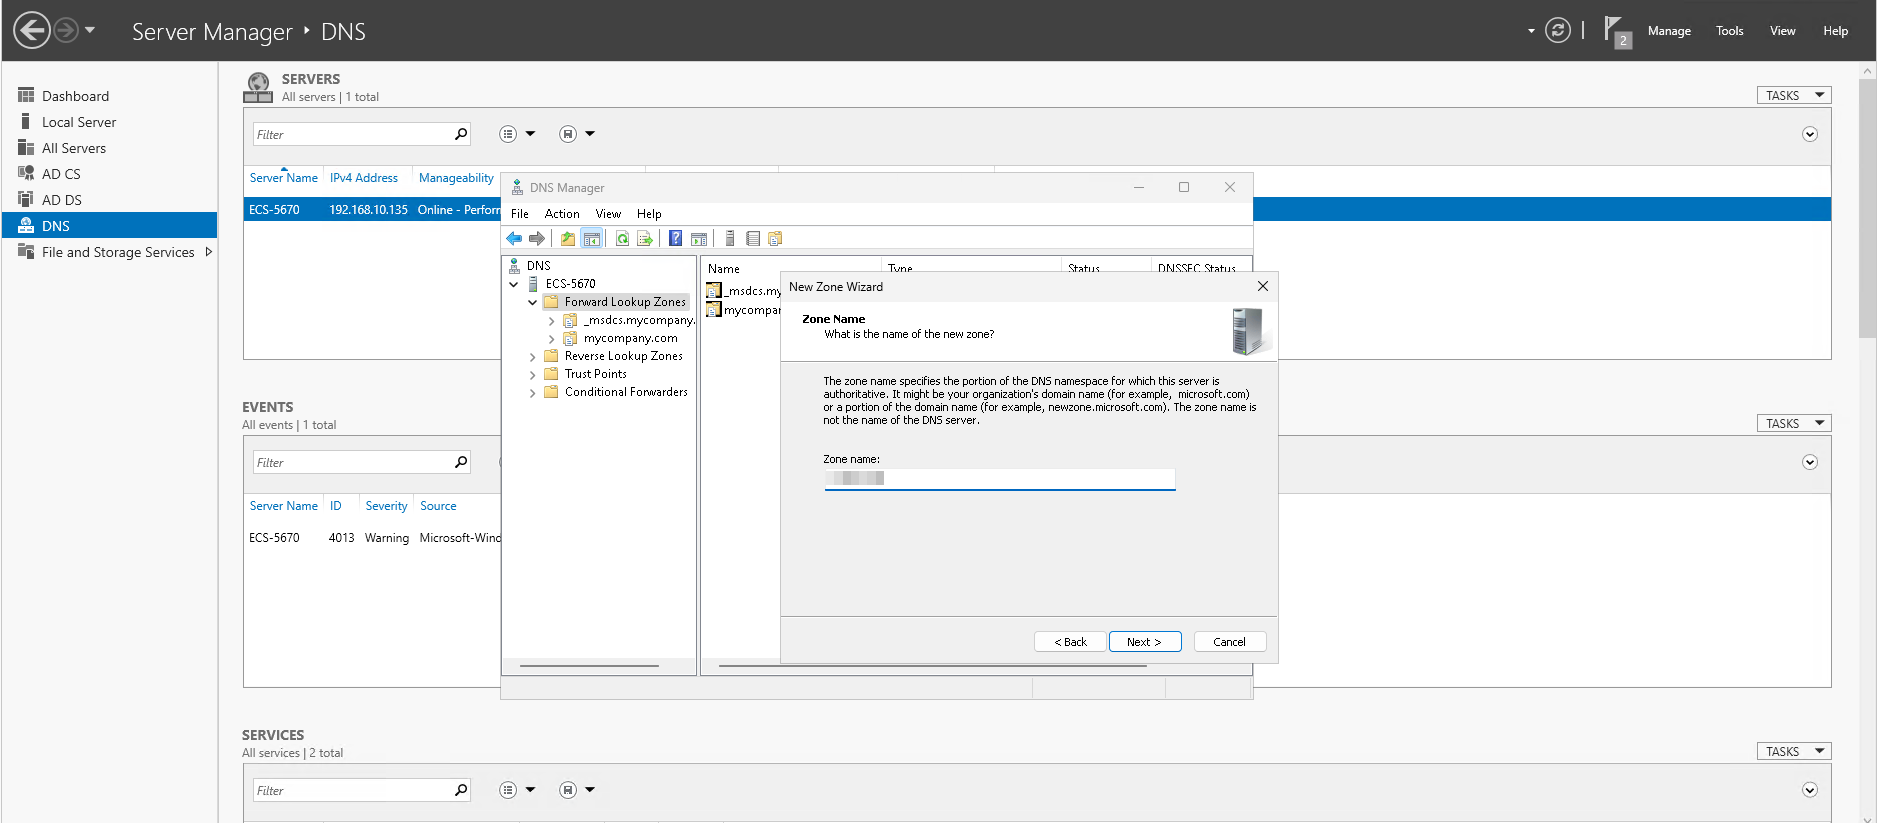
Configuring a DNS Zone
- Go to Server Manager -> Tools -> DNS.
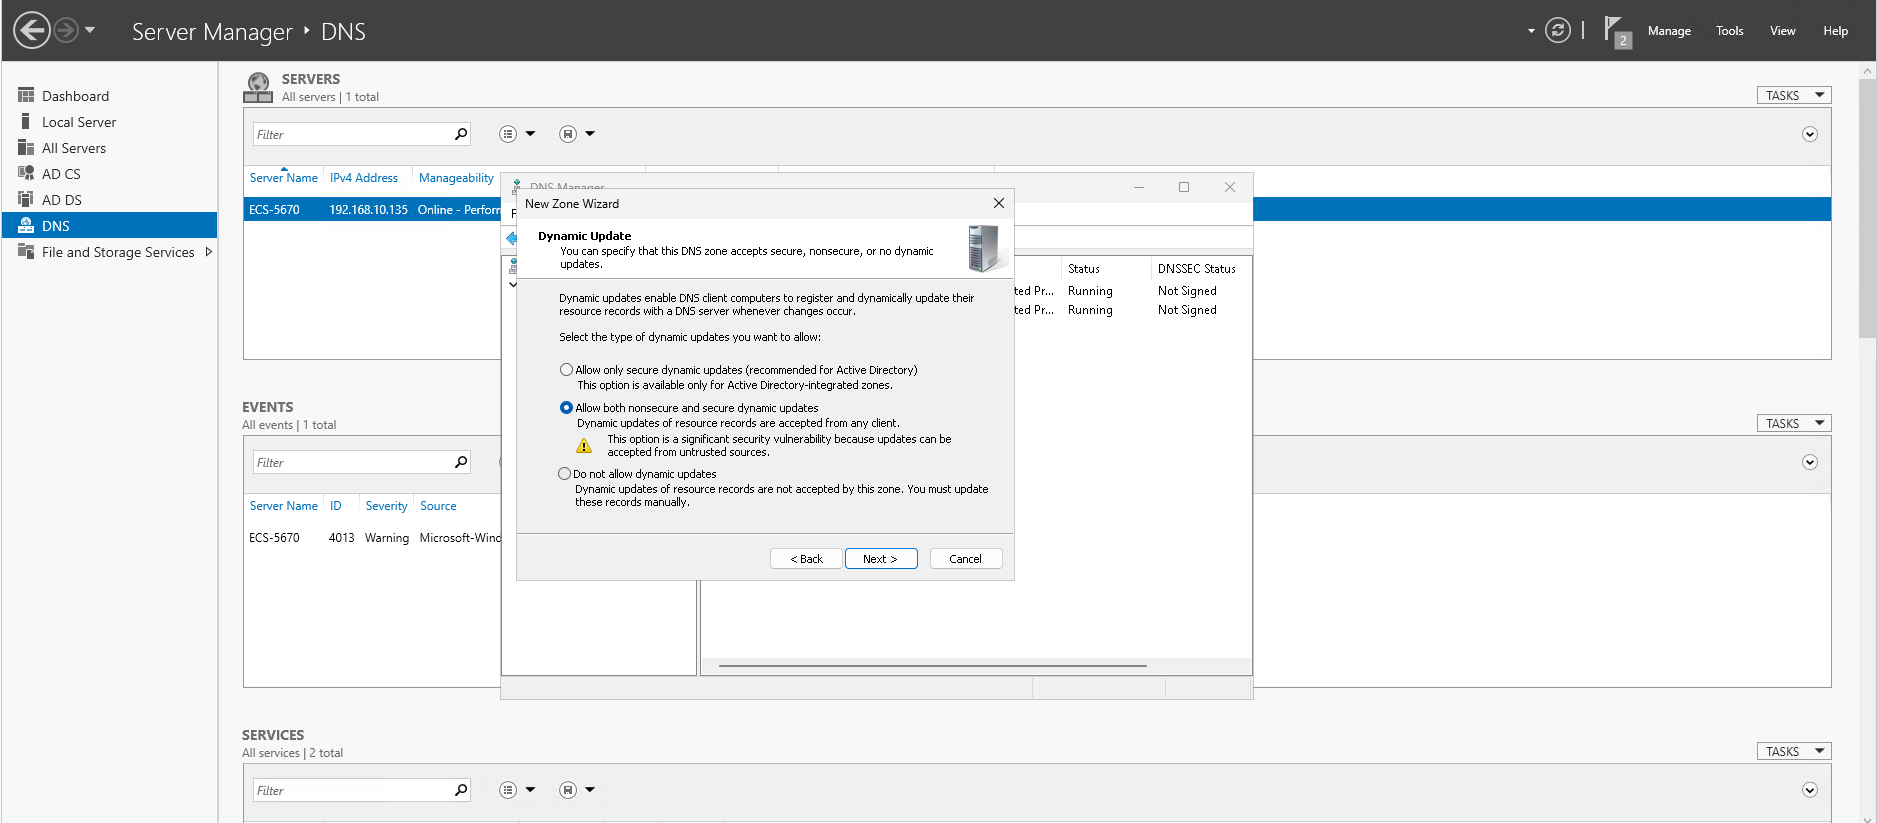
- Expand the tree and right-click Forward Lookup Zones -> New Zone and click Next.
- Choose "Primary Zone" as Zone Type and click Next.
- Choose "To all DNS servers running on domain controllers in this domain: mycompany.com" as Active Directory Zone Replication Scope and click Next.
- Enter
example.comas Zone Name and click Next and Finish.
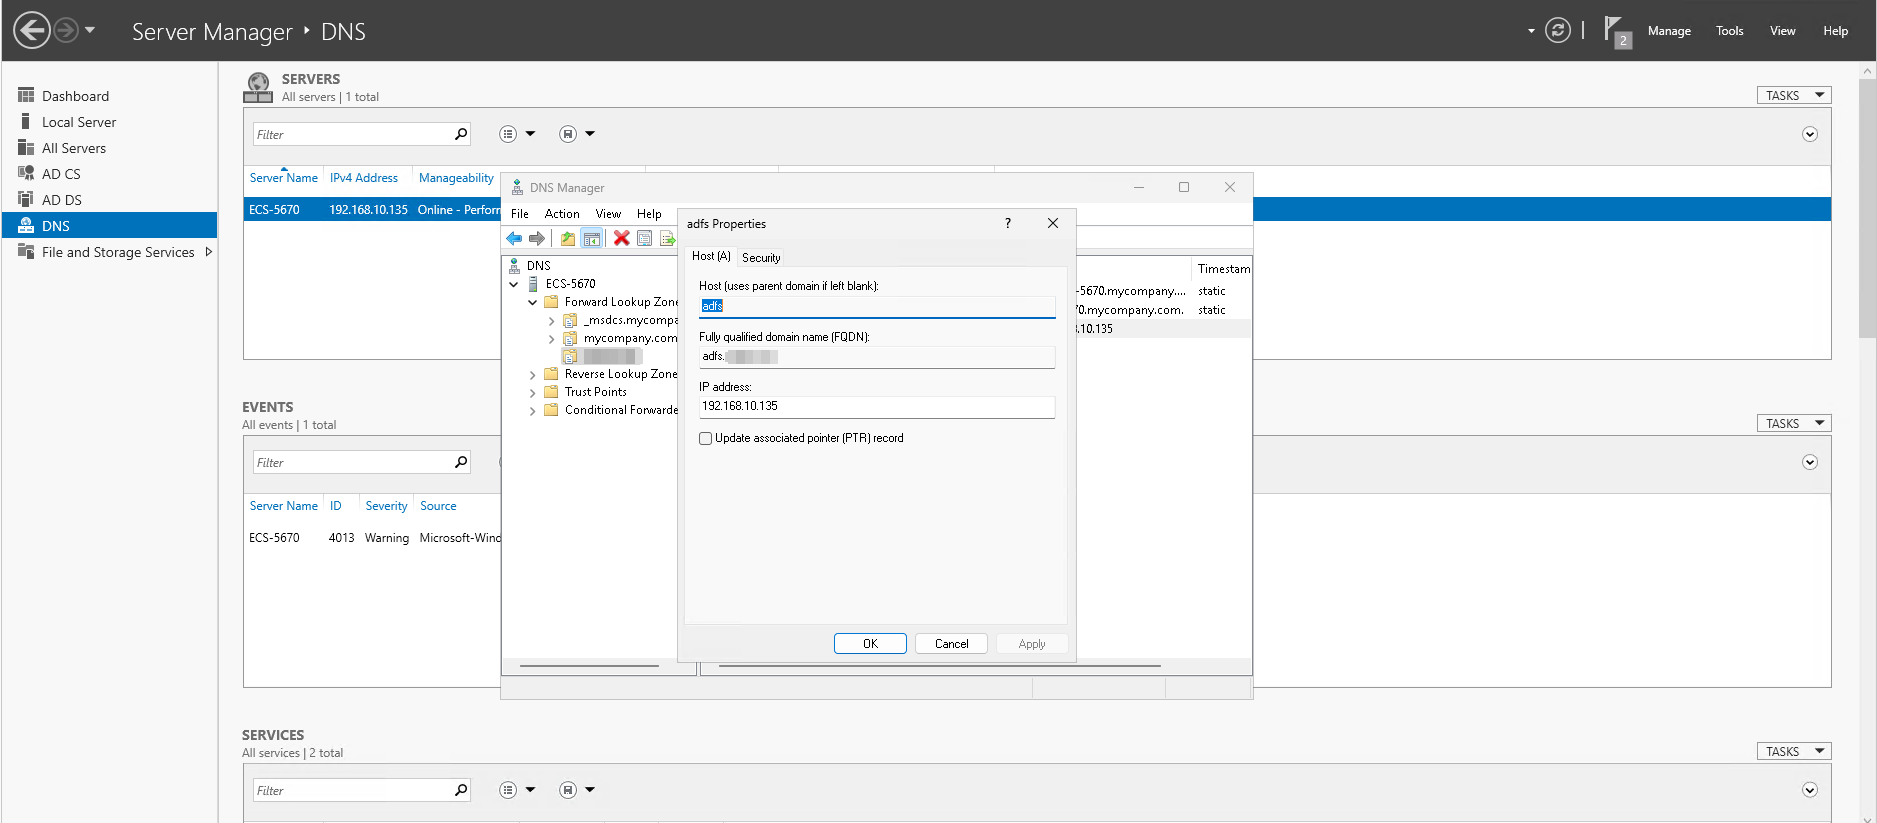
Once the zone is created, right-click on it and then click on New Host (A or AAAA). Fill in the following values for the A record and click OK:
- Host:
adfs - IP address: The private IP address of the ECS Server assigned by the VPC DHCP server.
Installing Active Directory Certificate Services
Before AD FS can issue and consume the SSL/TLS & token-signing certificates it needs, we must setup an Enterprise Certificate Authority on the ECS domain controller.
- Open Server Manager, click Add roles and features.
- Choose "Role-based or feature-based installation", and select the ECS Server from the Server Pool.
- Under Server Roles, check "Active Directory Certificate Services".
- When prompted to select AD CS/Role Services, include the "Certification Authority".
- Click Next through the wizard and then Install.
or alternatively via PowerShell:
Install-WindowsFeature AD-Certificate -IncludeManagementTools
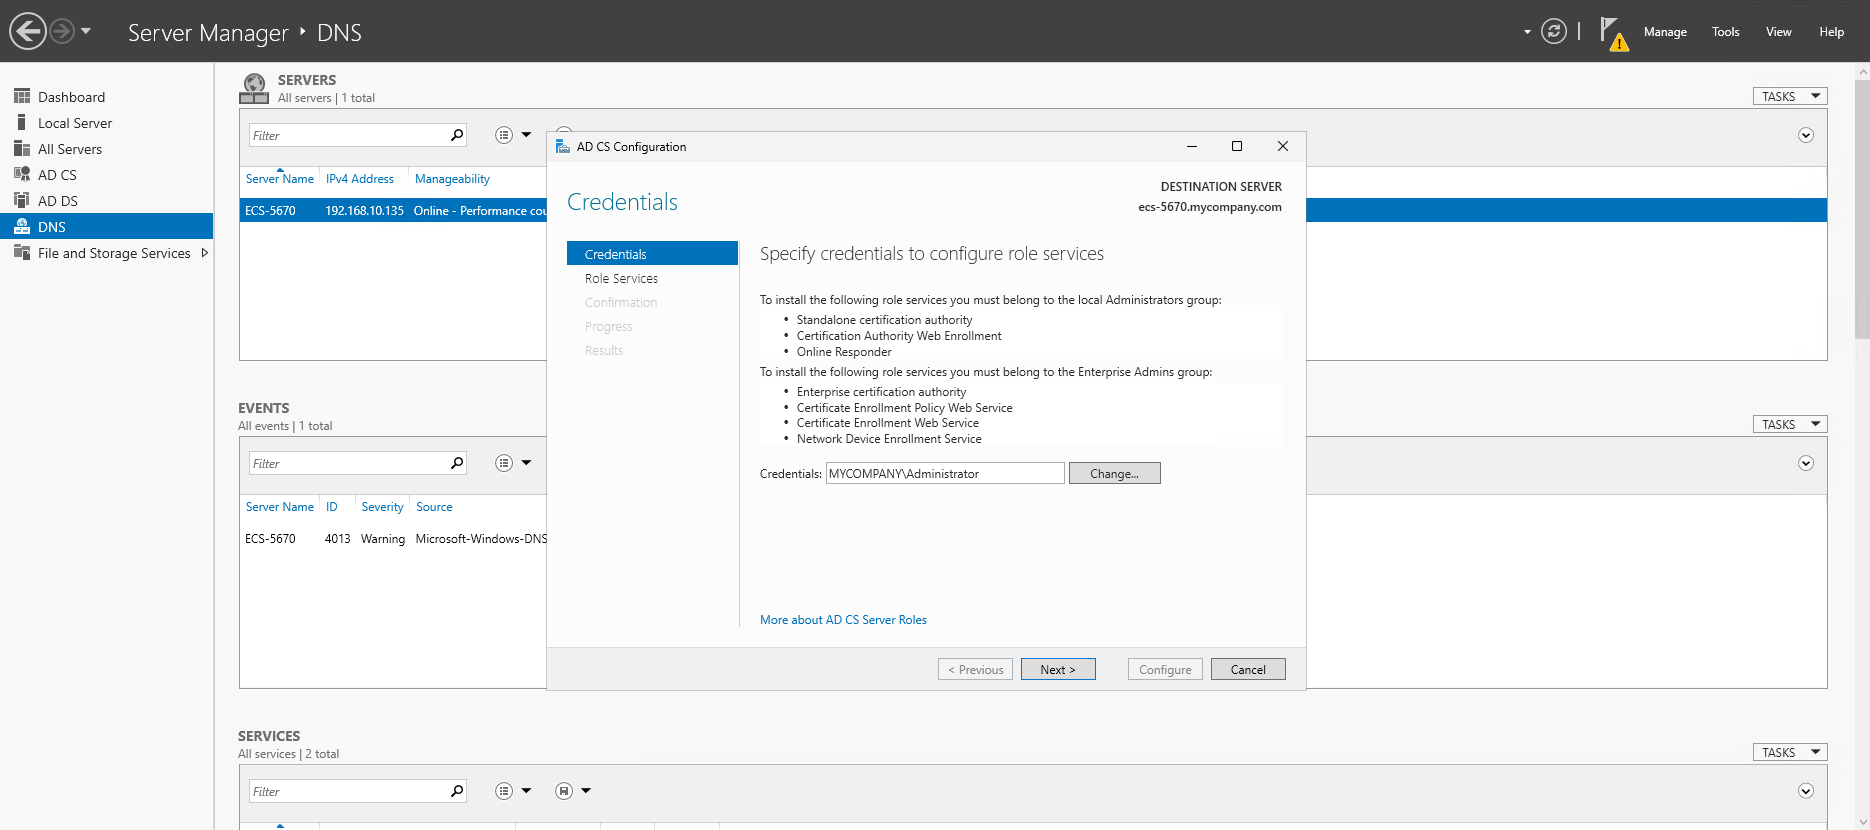
Once the Active Directory Certificate Services are installed, Open Server Manager → Tasks and click the link Configure Active Directory Services

Follow the wizard steps and set the following values:
- Credentials:
MYCOMPANY\Administrator, click Next - Select Role Services to configure: select "Certification Authority" and click Next
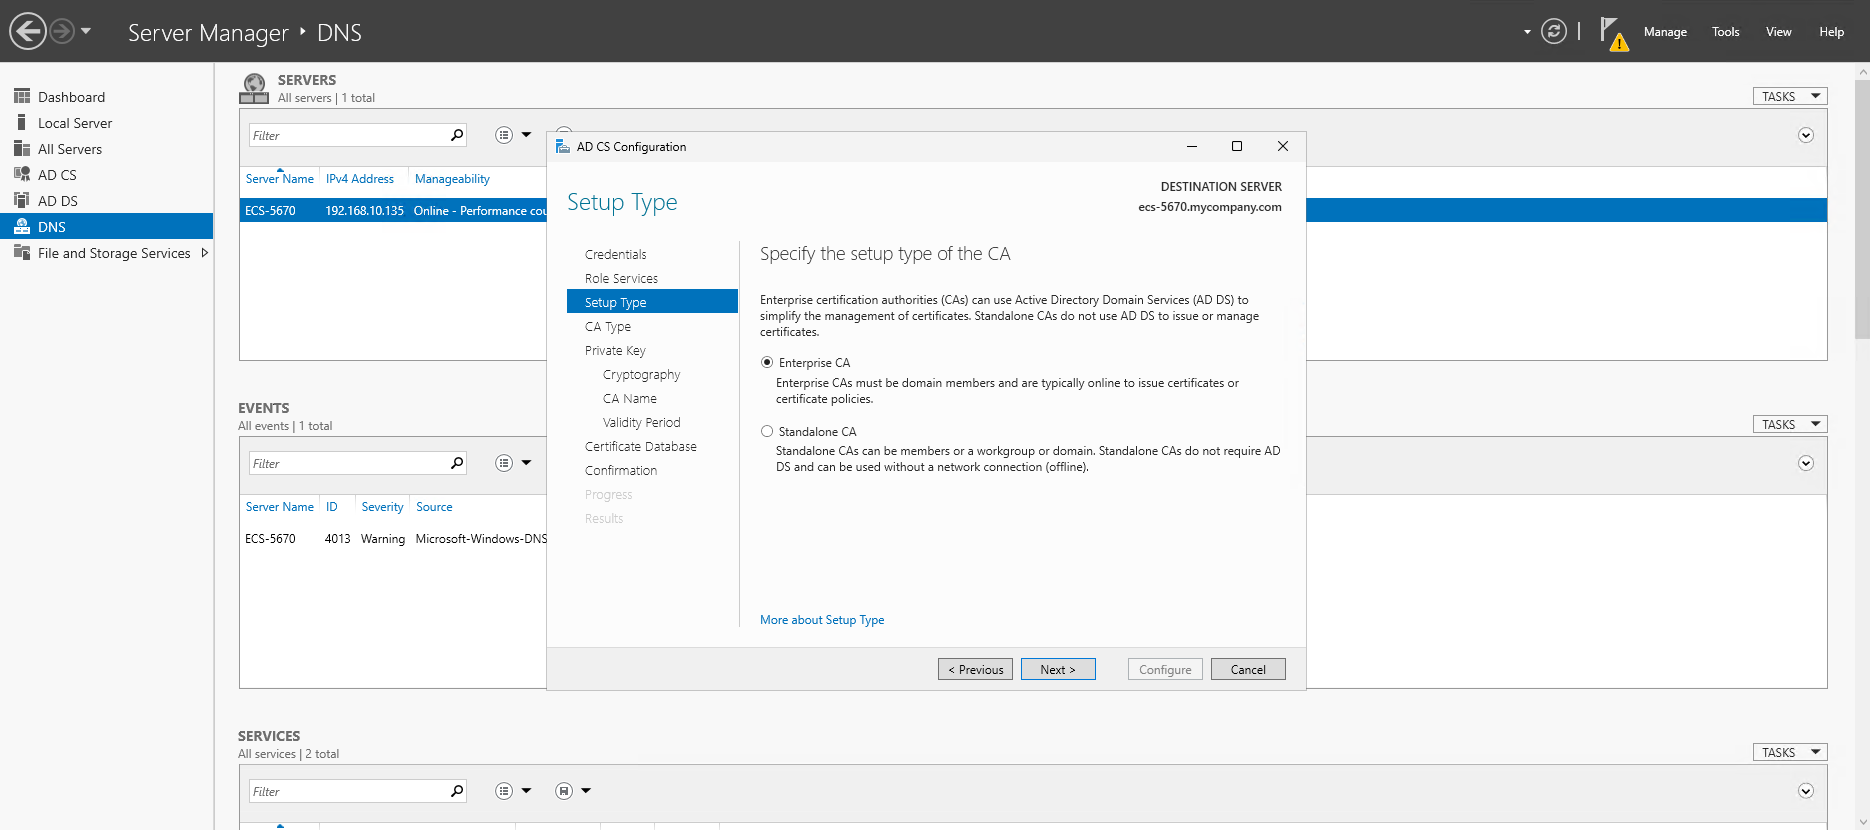
- Specify the setup type of the CA: select "Enterprise CA" and click Next
- Specify the type of the CA: select "Root CA" and click Next
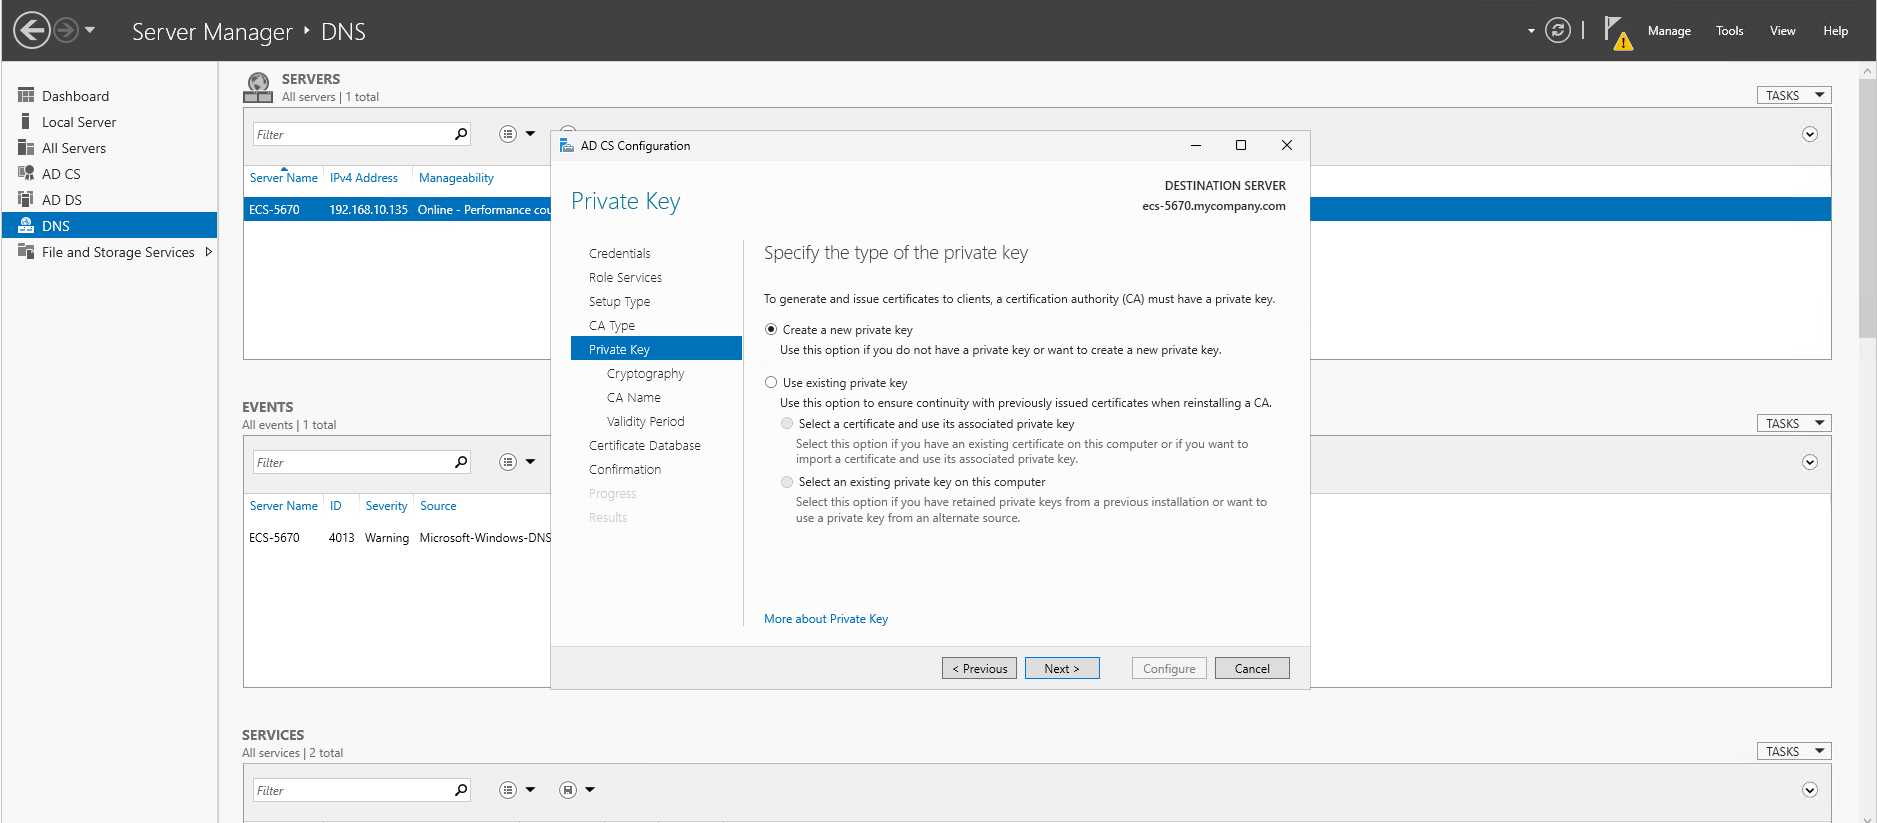
- Specify the type of the private key: select "Create a new private key" and click Next
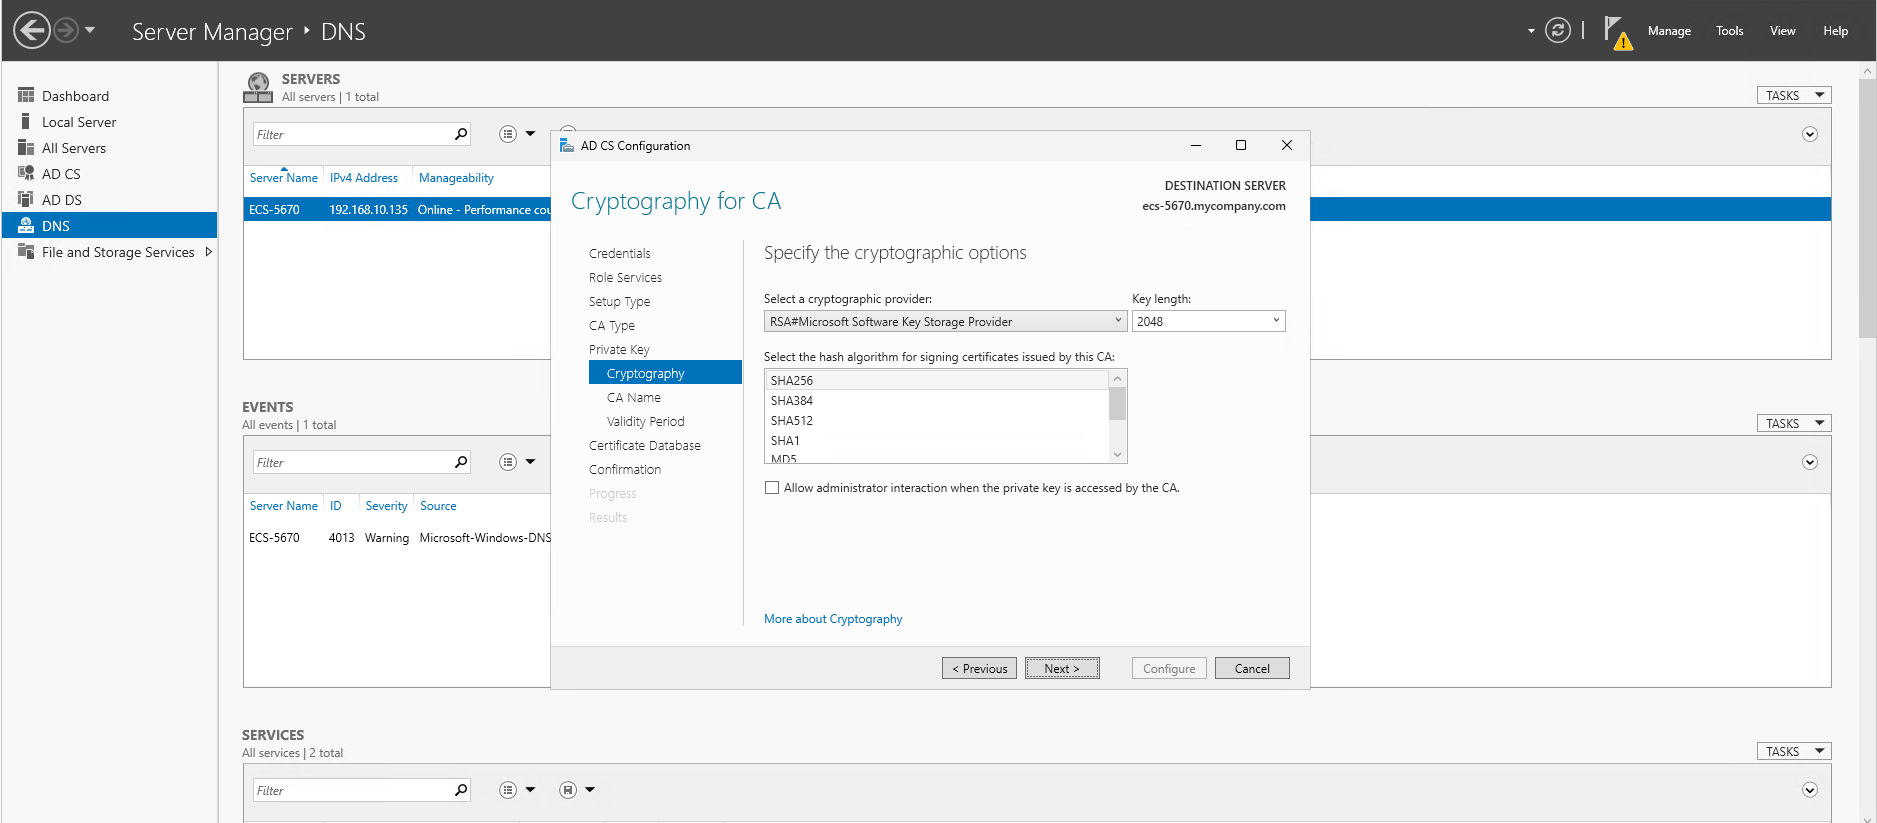
- Specify the cryptographic options: select "RSA#Microsoft Software Key Storage Provider" with
2048length and hash algorithmSHA256, click Next - Click Next for the rest of the wizard steps and finally Configure


Installing Active Directory Federation Services
Creating Certificate
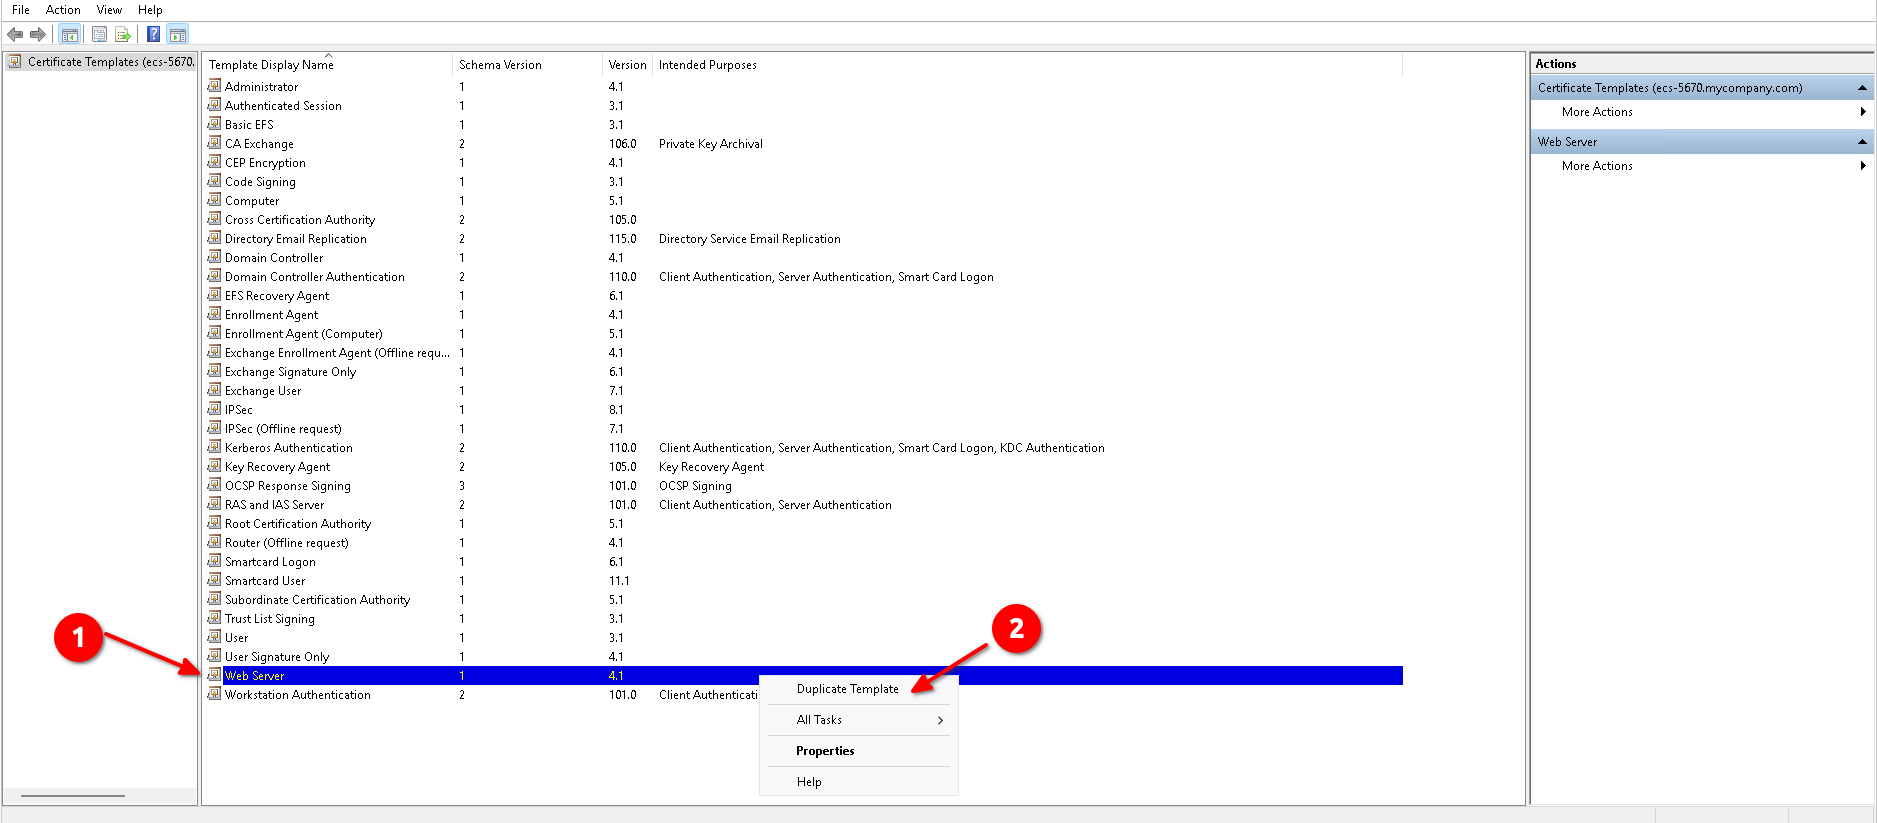
First, we need to create a Certificate Template:
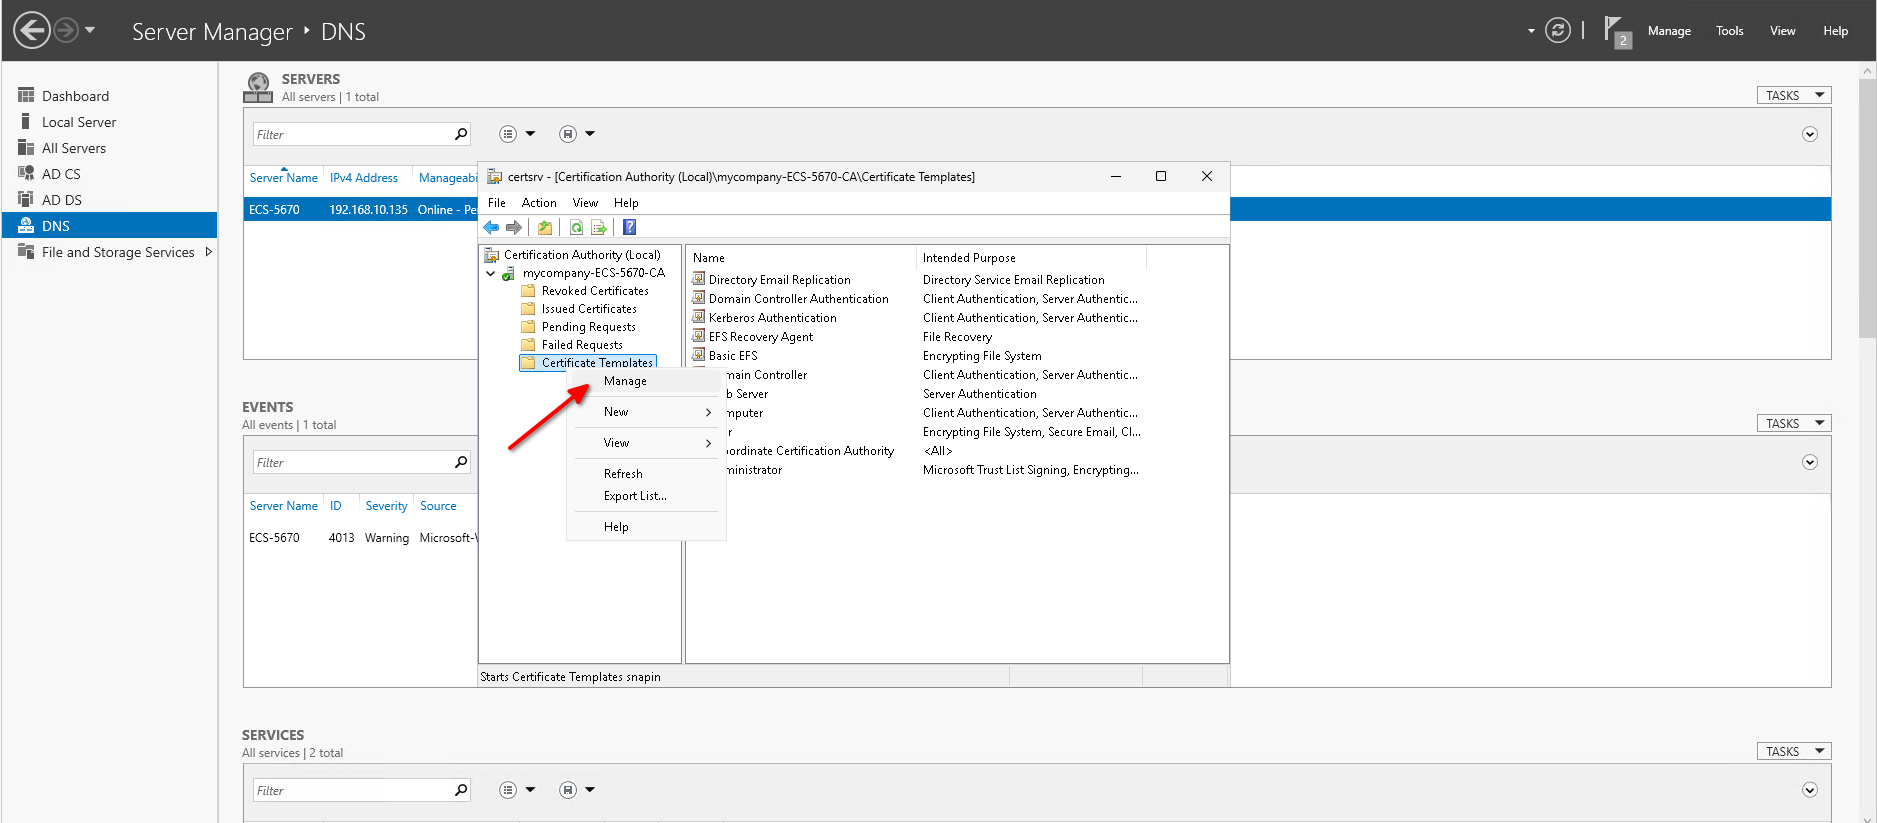
- Go to Server Manager -> Tools -> Certificate Authority.
- Expand the tree of the local authority, right-click on Certificate Templates and then click on Manage and the Certificate Templates Console will open.
- Find the template Web Server in the list, right-click on it and then click on Duplicate Template.
- Fill in the following information:
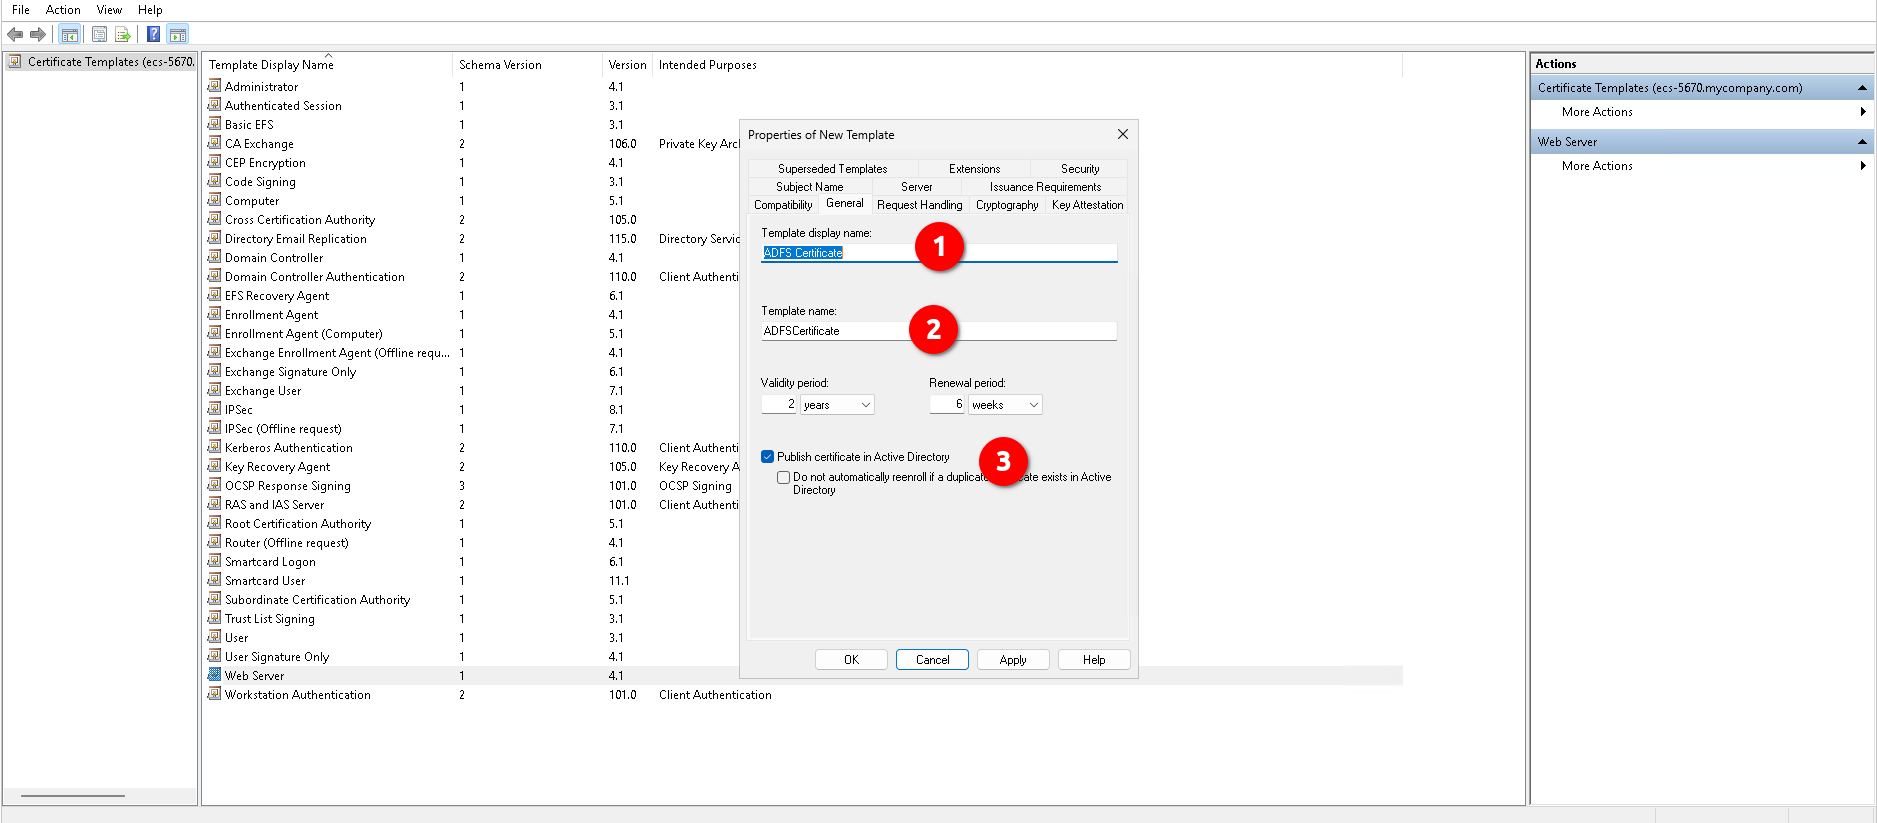
- Tab General:
- Template display name:
ADFS SSL. - Template name:
ADFS SSL. - Publish certificate in Active Directory: Enable this option.
- Template display name:
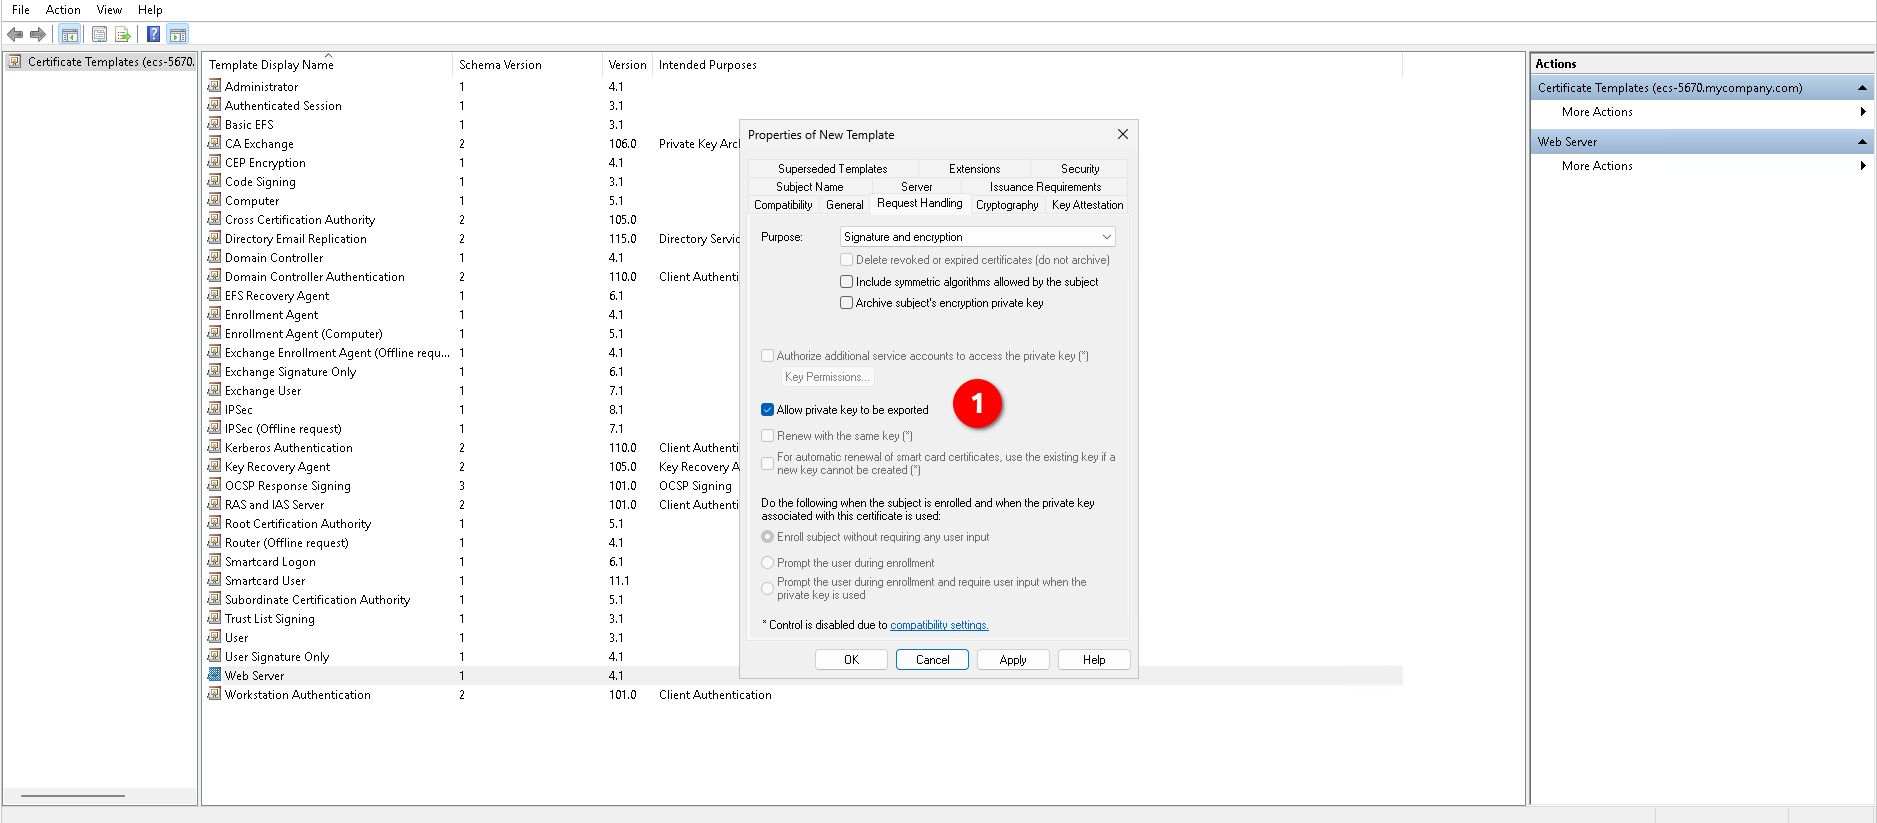
- Tab Request Handling:
- Allow private key to be exported: Enable this option.
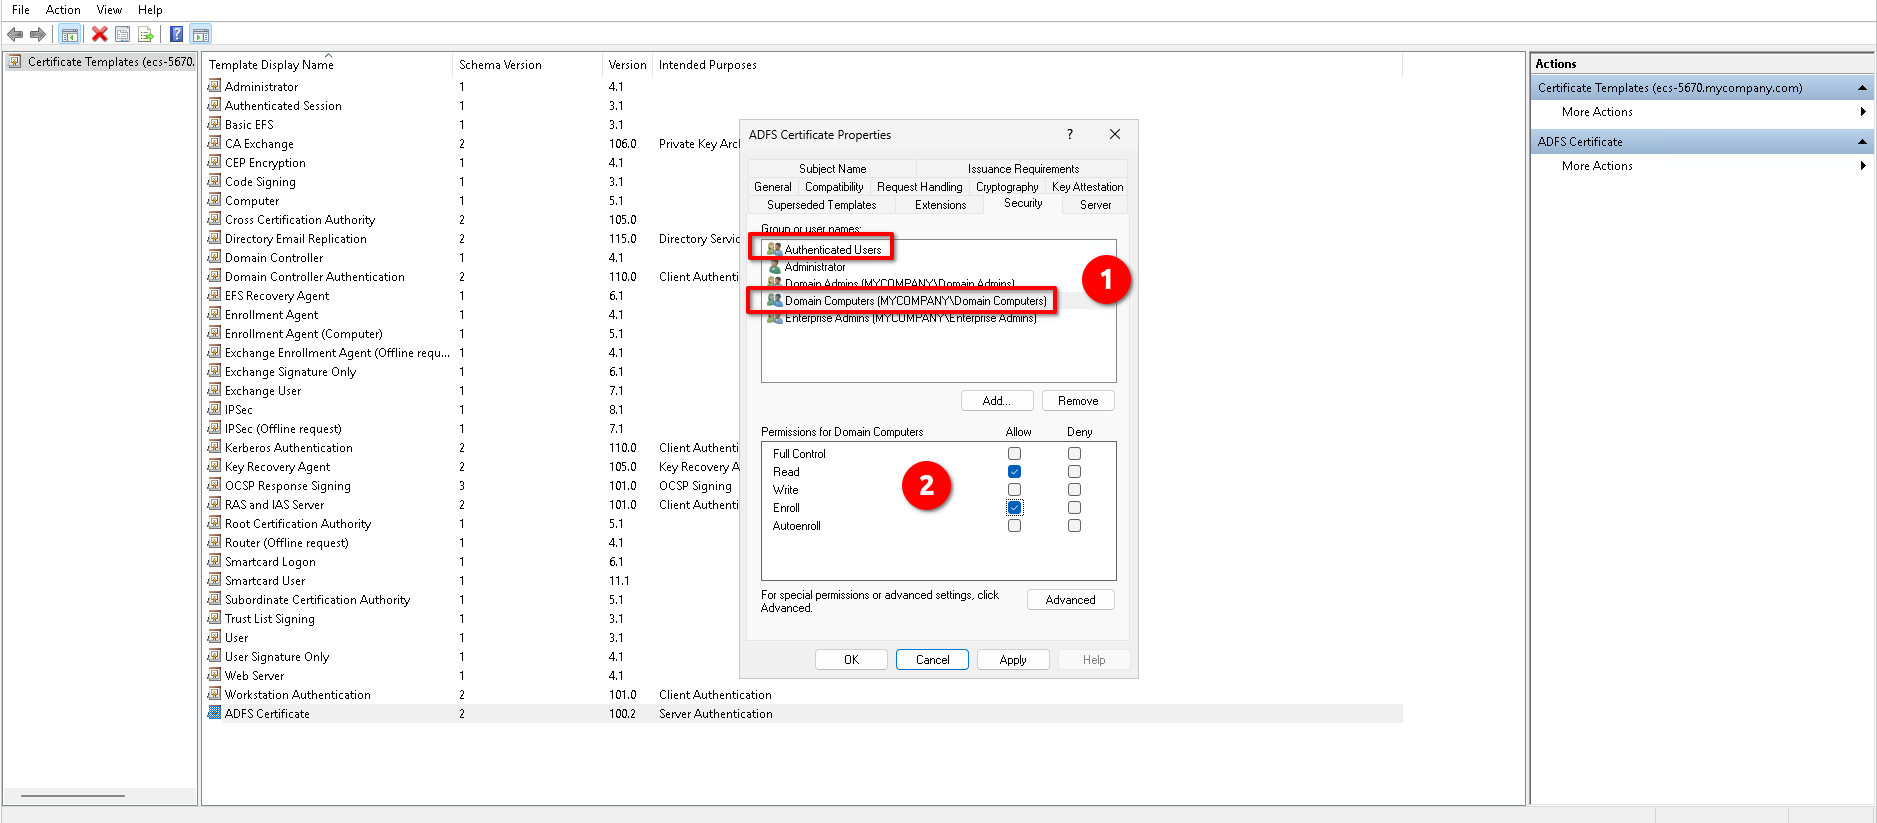
- Tab Security:
- Add
Authenticated Usersin the Group or user names list and assign themReadandEnrollpermissions. - Add
Domain Computersin the Group or user names list and assign themReadandEnrollpermissions.
- Add
- Tab General:
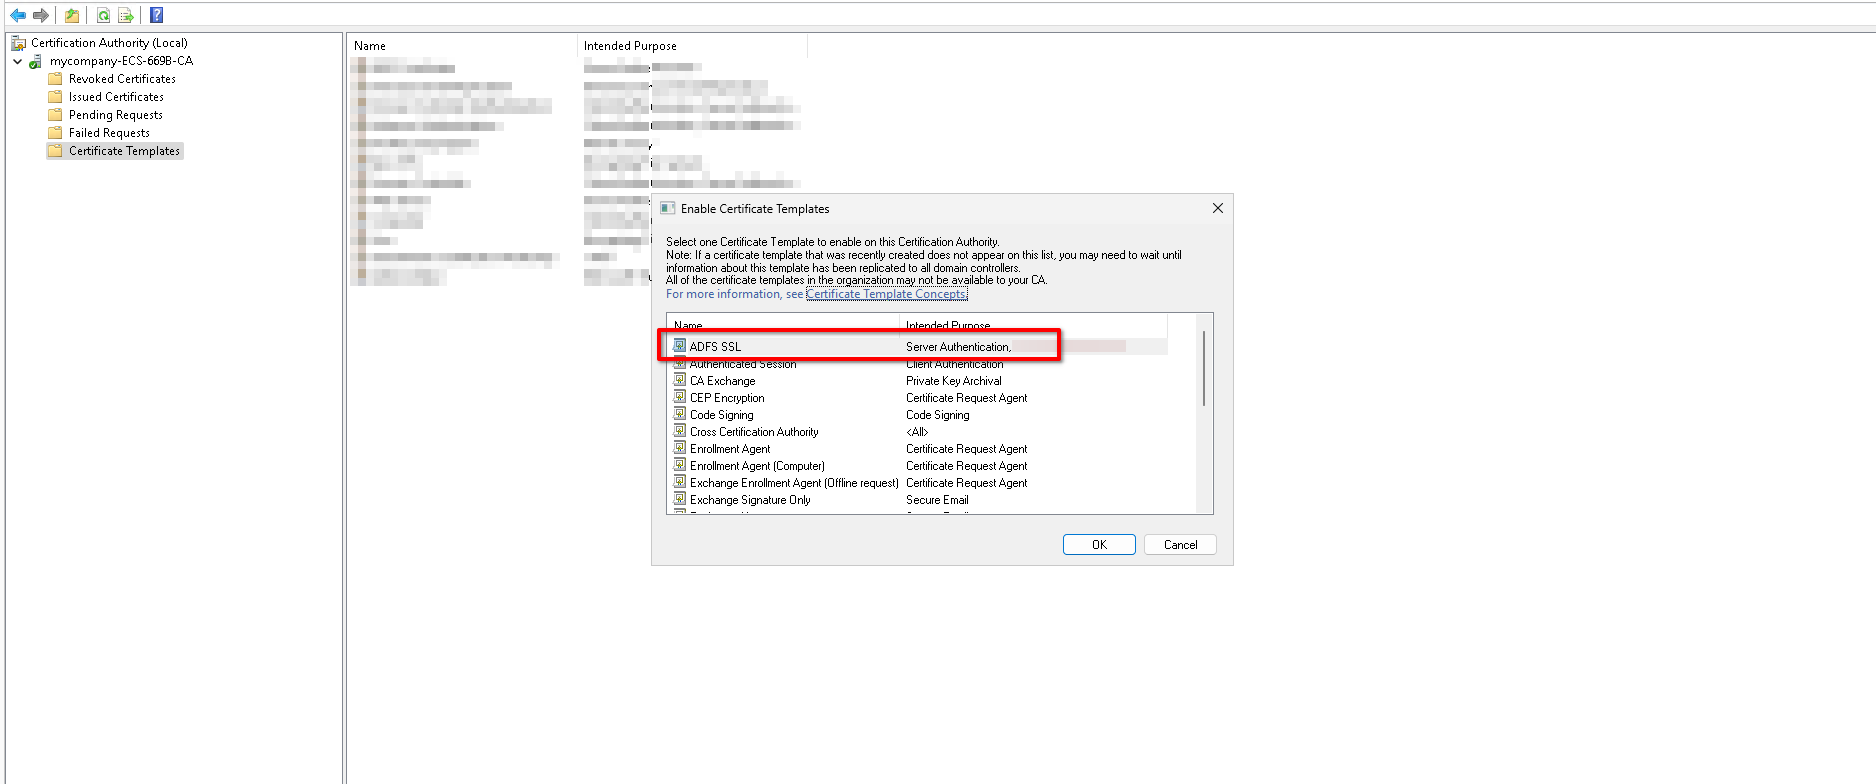
Then we need to enable this Certificate Template:
- Go to Server Manager -> Tools -> Certificate Authority.
- Expand the tree of the local authority, right-click on Certificate Templates and then click on New -> Certificate Template to Issue.
- Pick the template you created in the previous step from the list and click OK.

And lastly, we need to issue the Certificate:
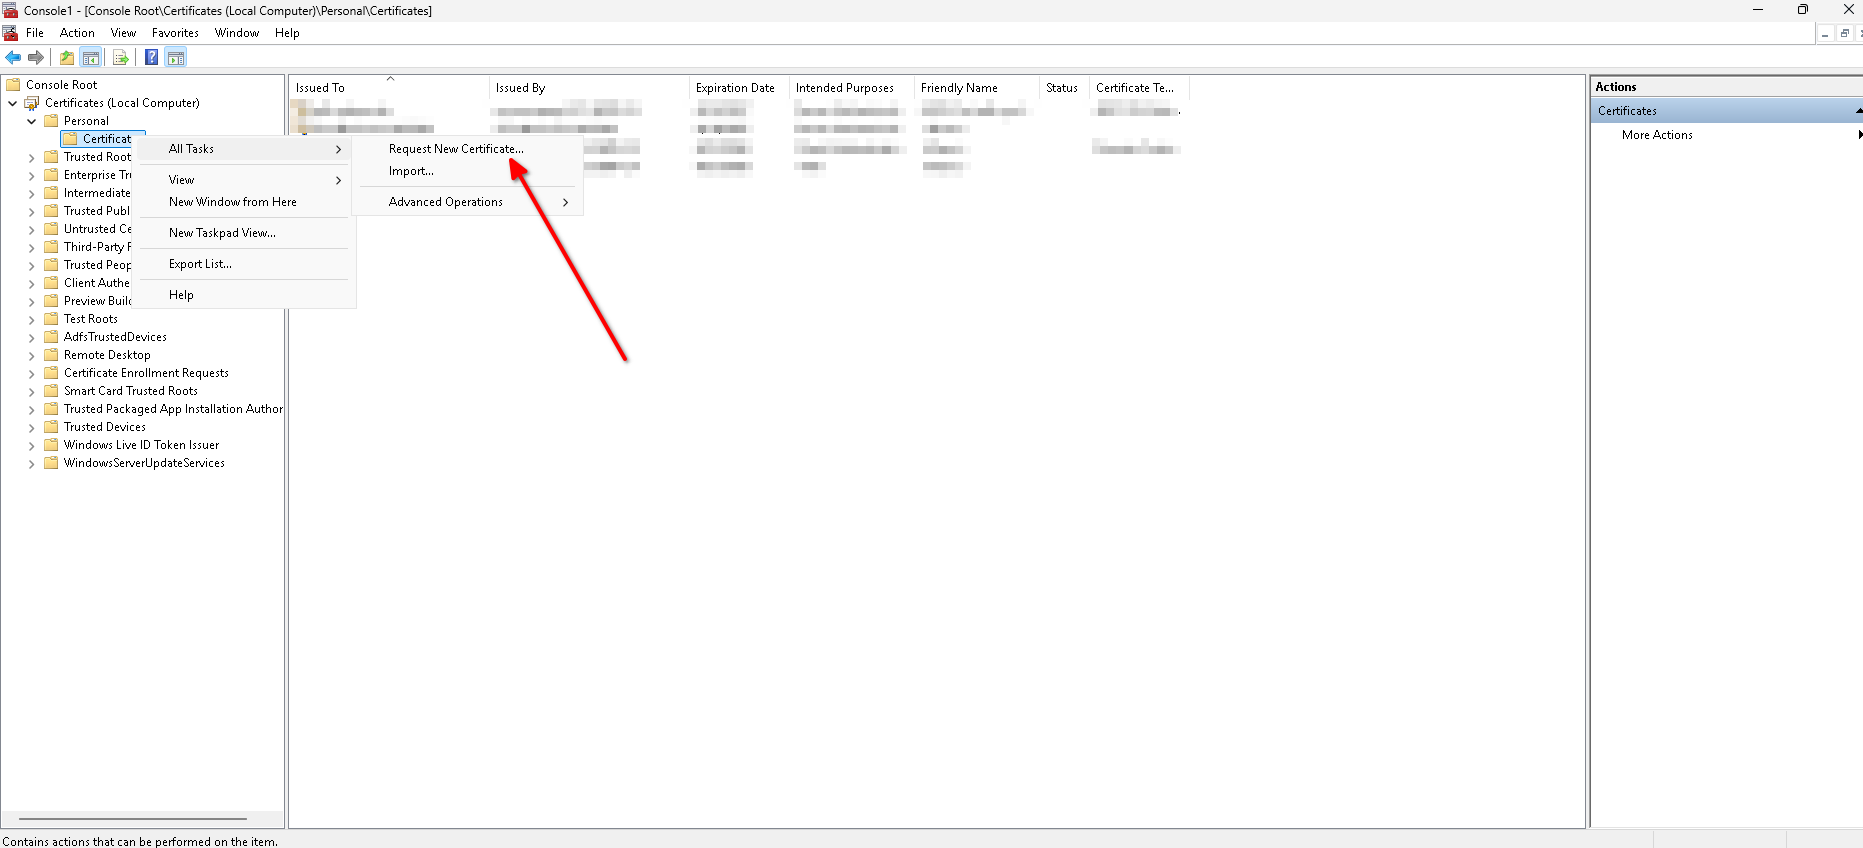
- Open a Powershell Console as Administrator and run
mmc. - Add the Certificates Snap-in. Select to manage a "Computer Account" and click Next.
- Select the "Local computer" and click Finish and OK.
- Right-click Personal -> All Tasks -> Request New Certificate, and the Certificate Enrollment wizard will open. Click Next.
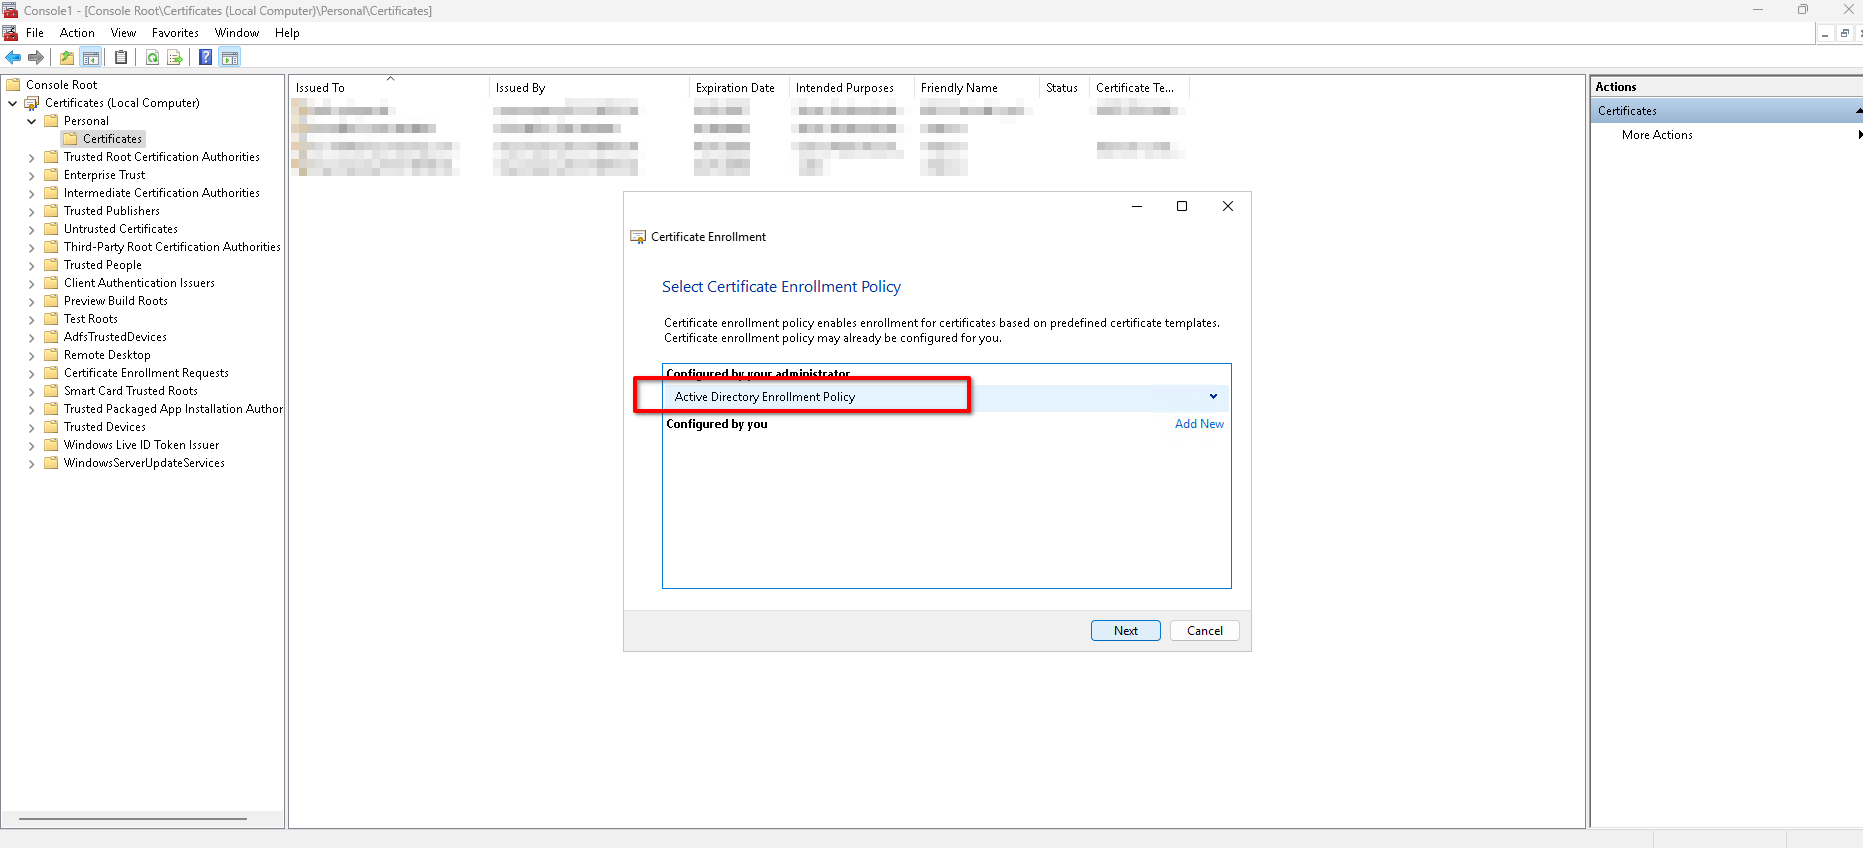
- Select "Active Directory Enrollment Policy" as Certificate Enrollment Policy and click Next.
- Click on the link "More information is required to enroll for this certificate. Click here to configure settings." under your certificate template.
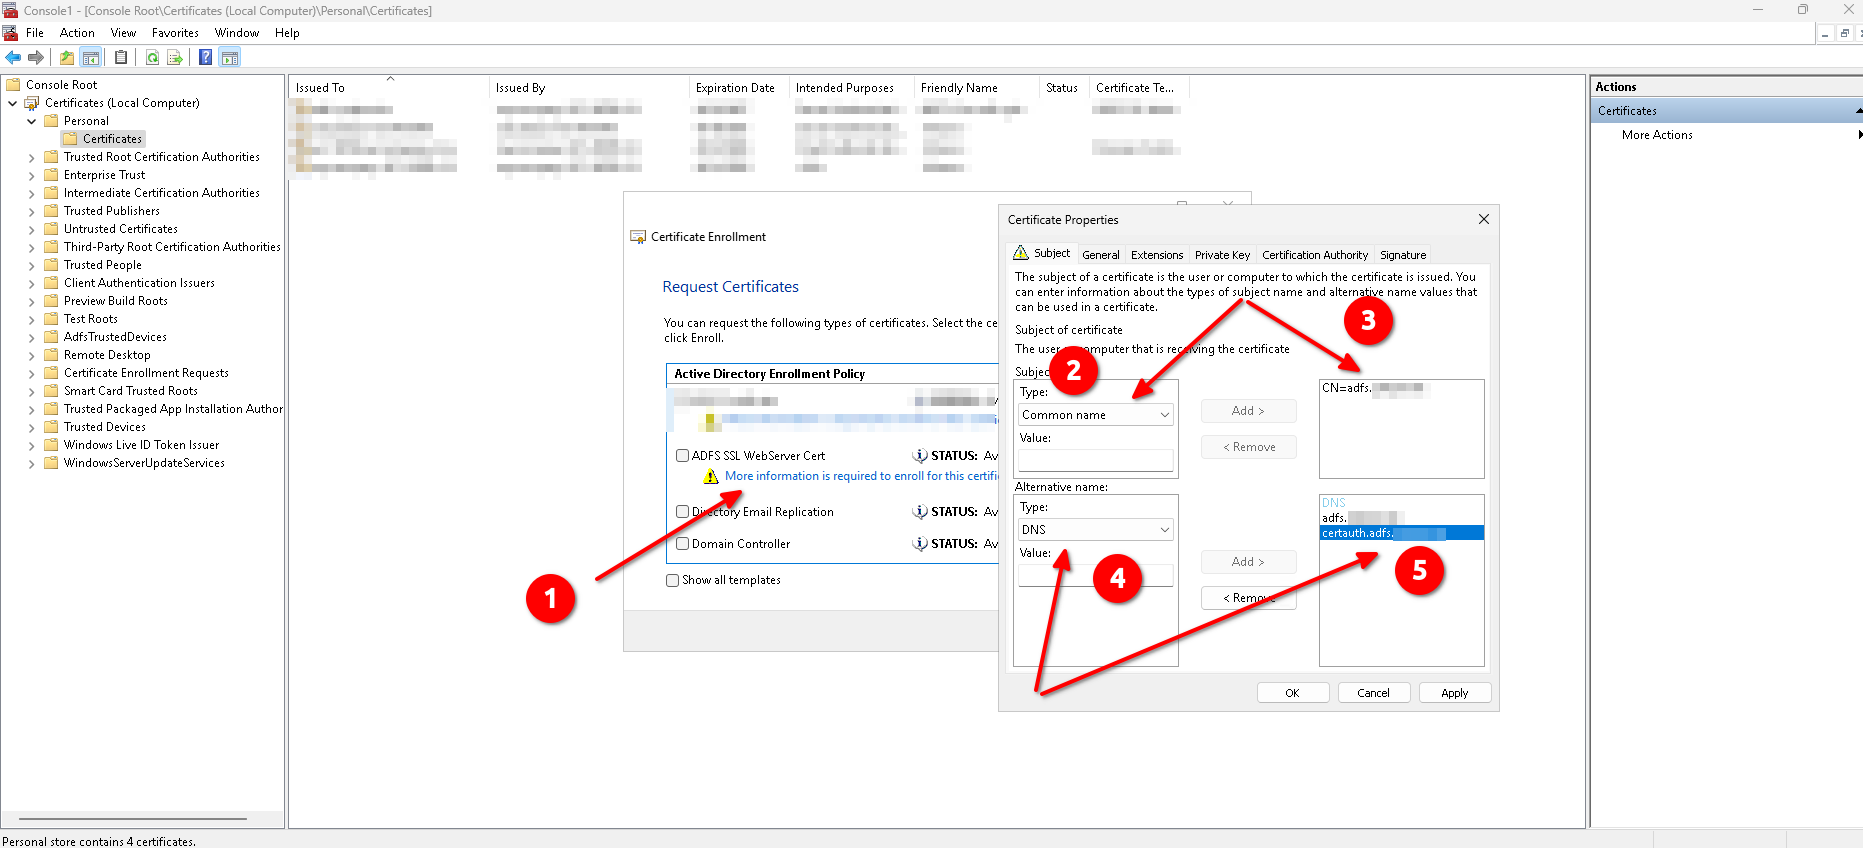
- On the Certificate Properties modal, configure the following and the exit by clicking OK:
- Tab Subject:
- Subject name::Type: "Common name"
- Subject name::Value:
adfs.example.com - Alternative name::Type: "DNS"
- Alternative name::Value:
adfs.example.com - Alternative name::Value:
certauth.adfs.example.com
- Tab General:
- Friendly name:
ADSL SSL Cert - Description:
ADSL SSL Cert
- Friendly name:
- Tab Private Key:
- Key options::Make private key exportable: Make sure this option is enabled
- Tab Subject:
- Select the certificate template you just configured and click Enroll.
Installing the Server Role
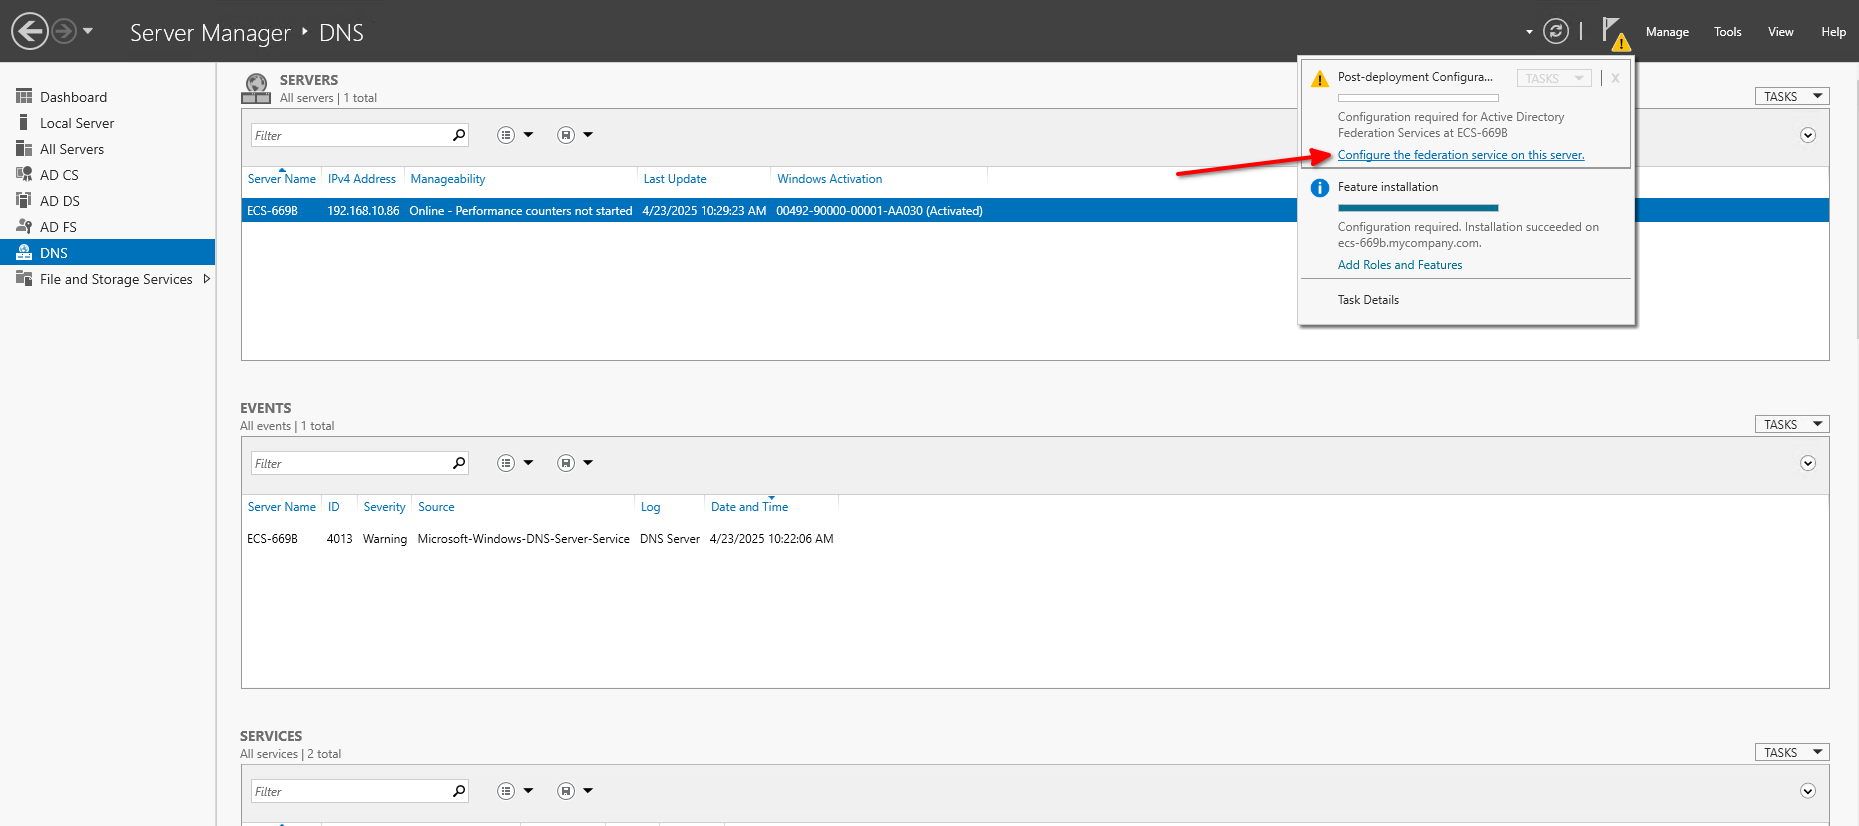
Once the AD FS role installation completes and the certificate is installed, the Post-Deployment Configuration link appears in Server Manager -> Tasks:
- Click Configure the federation service on this server.
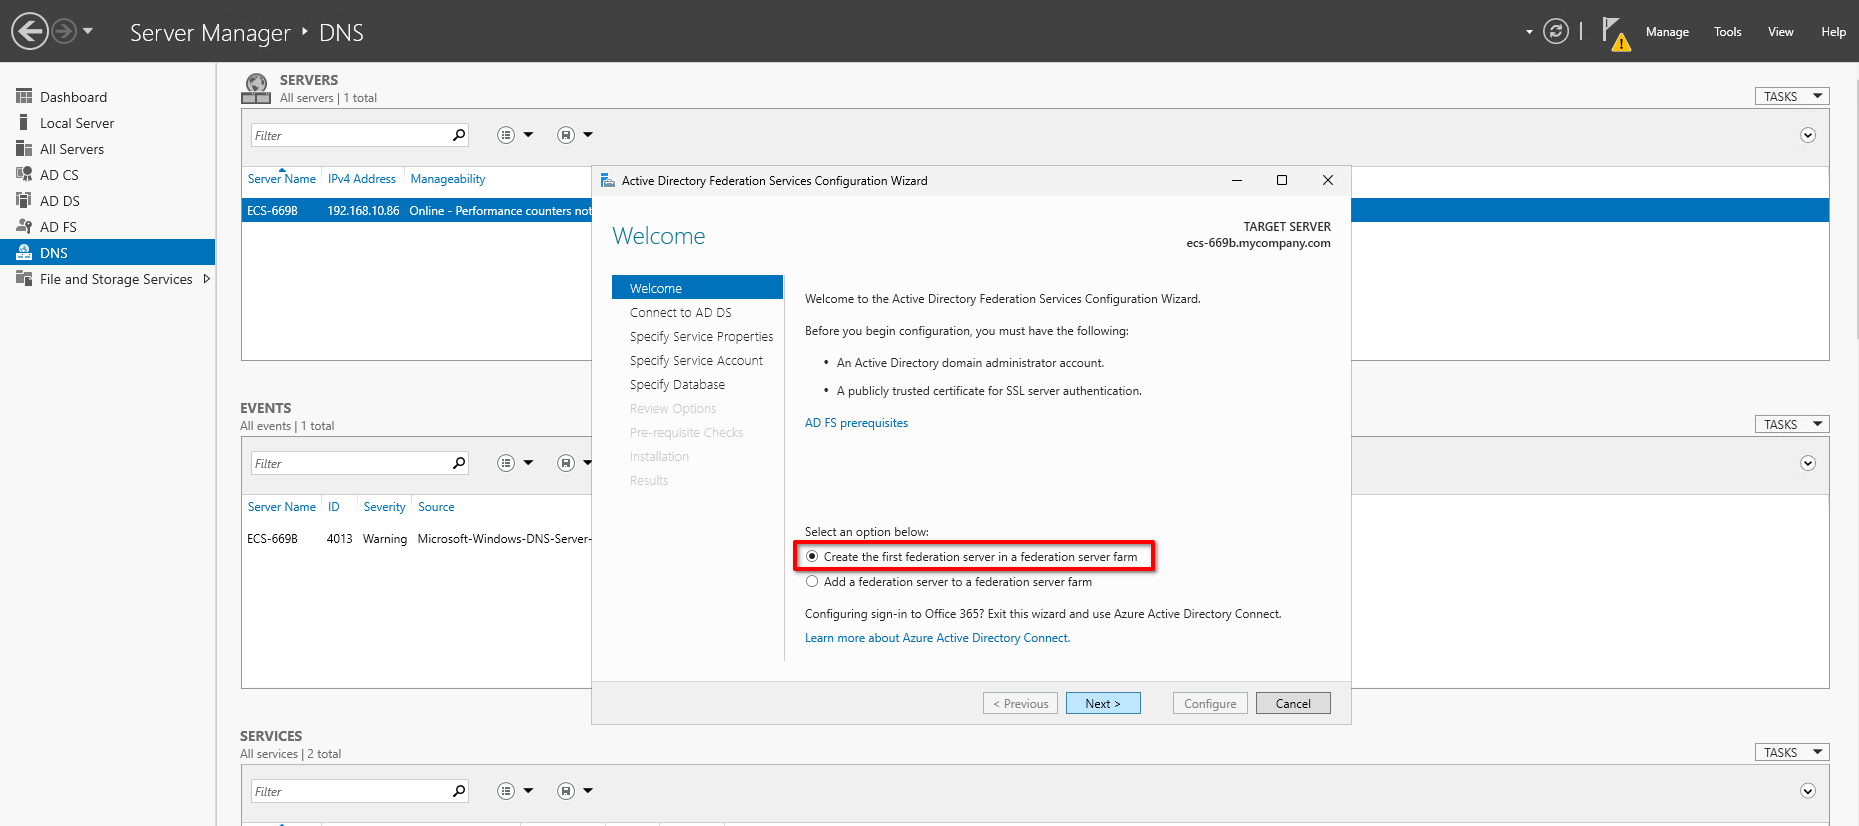
- Choose "Create the first federation server in a federation server farm" and click Next.
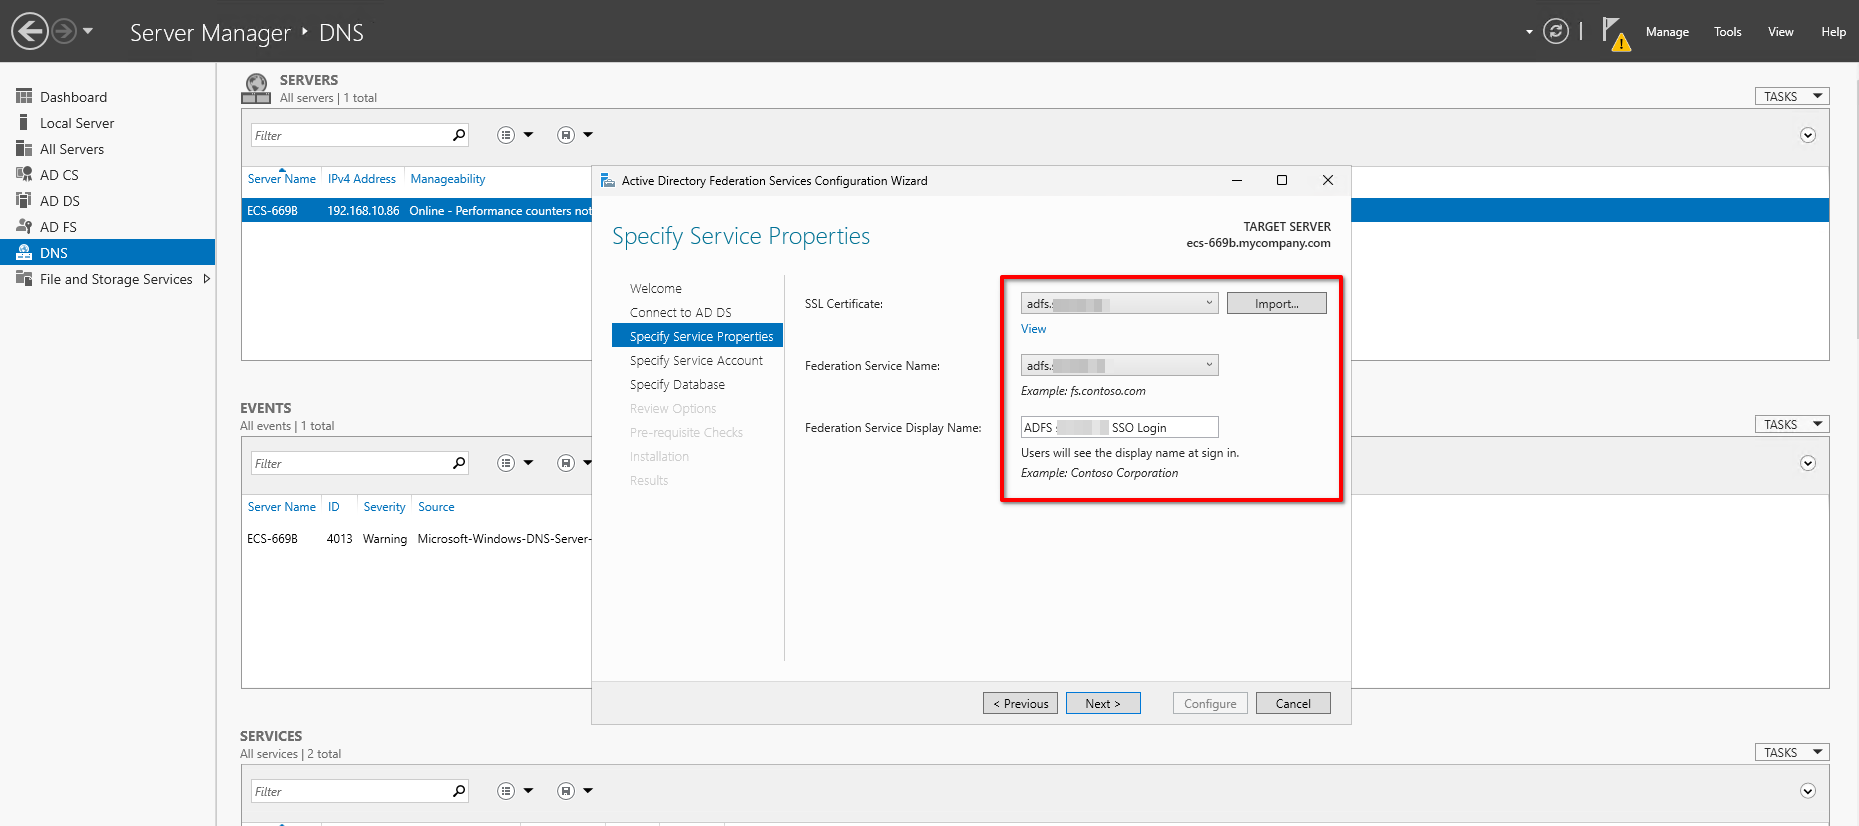
- Add
adfs.example.comas SSL Certificate and as Federation Service Name. EnterADSL example.com SSO Loginas Federation Service Display Name and click Next. - Set
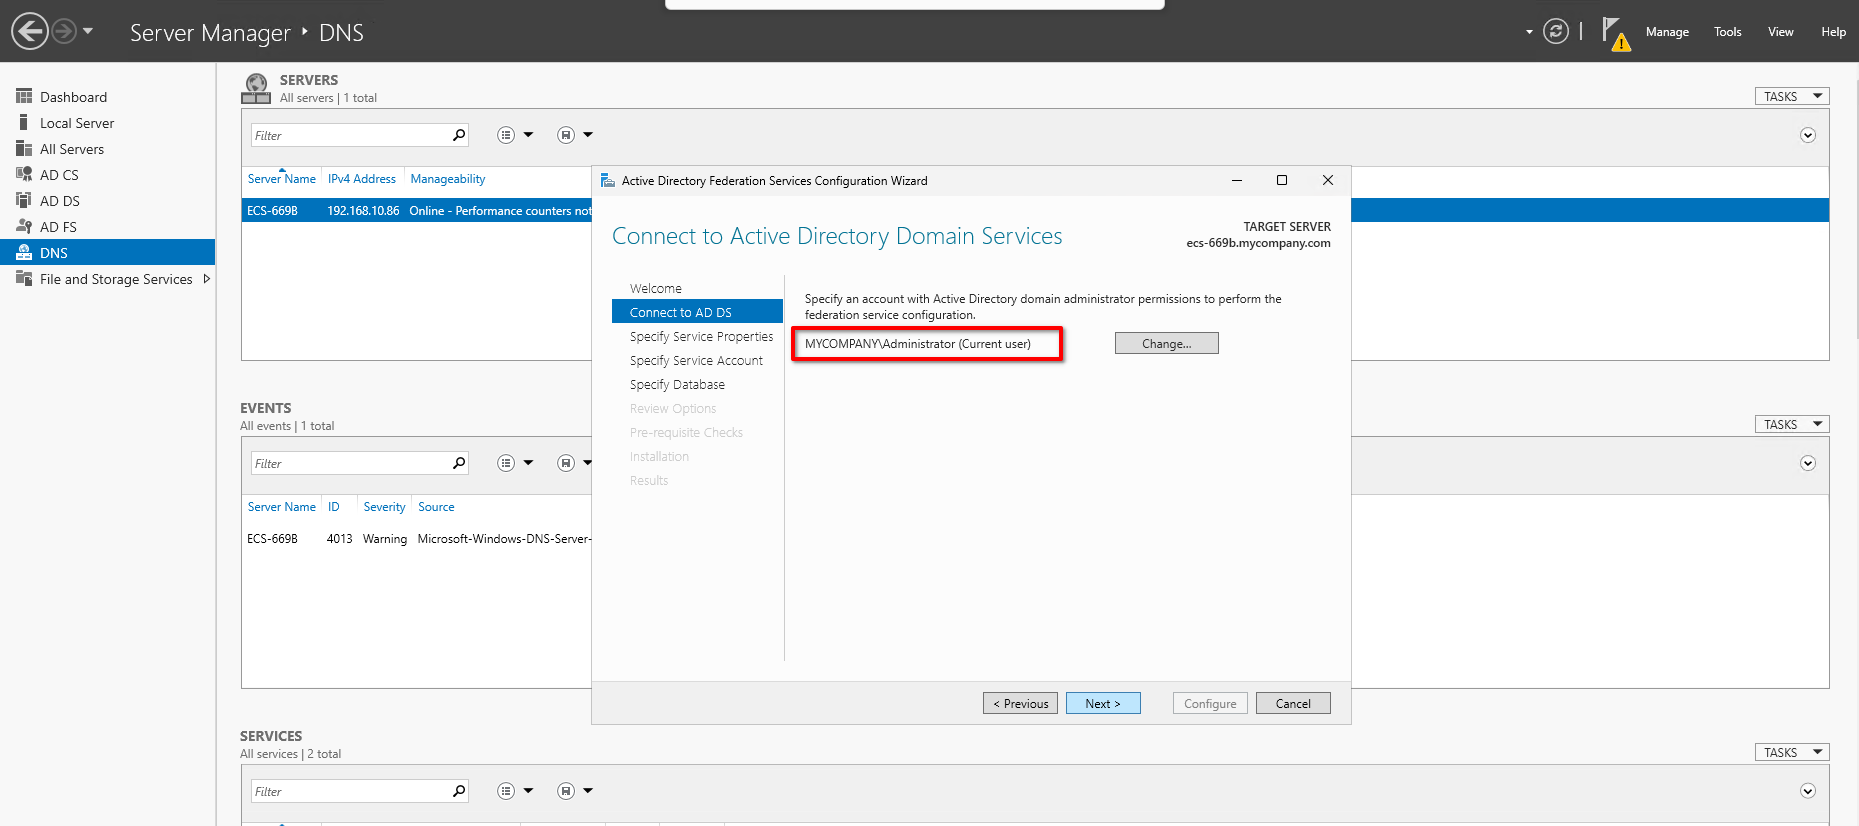
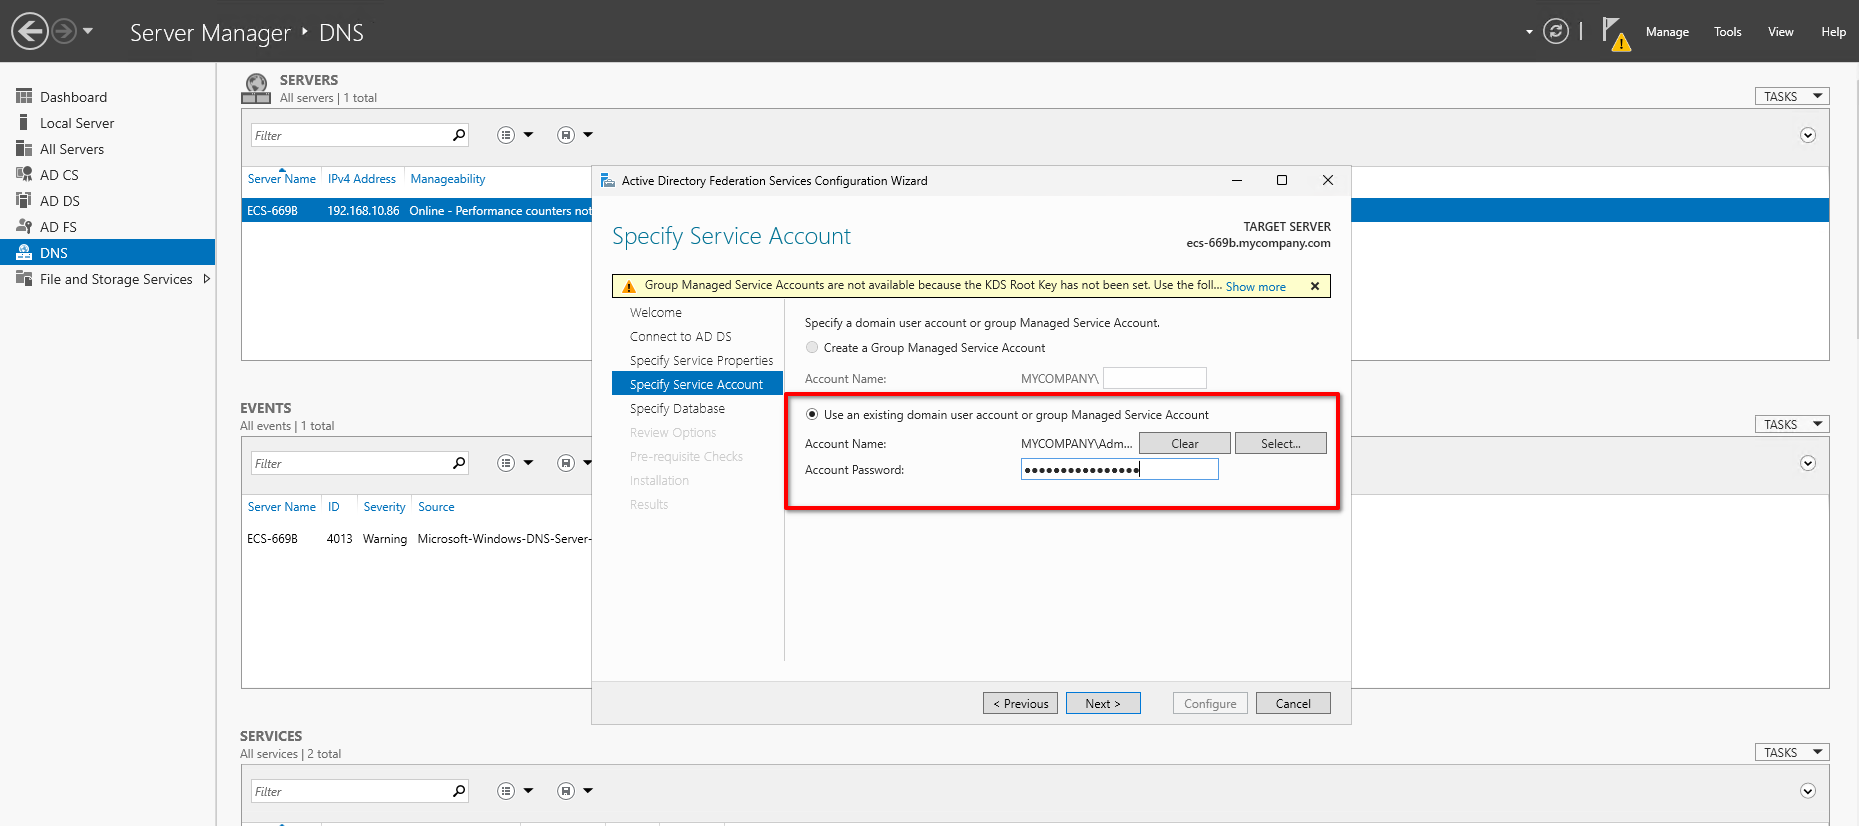
MYCOMPANY\Administratoras the Account Name under "Use an existing domain user account or group Managed Service Account" and click Next.warningIn production environments you should use a Service Account.
- Select "Create a database on this server using Windows Internal Database" and click Next.
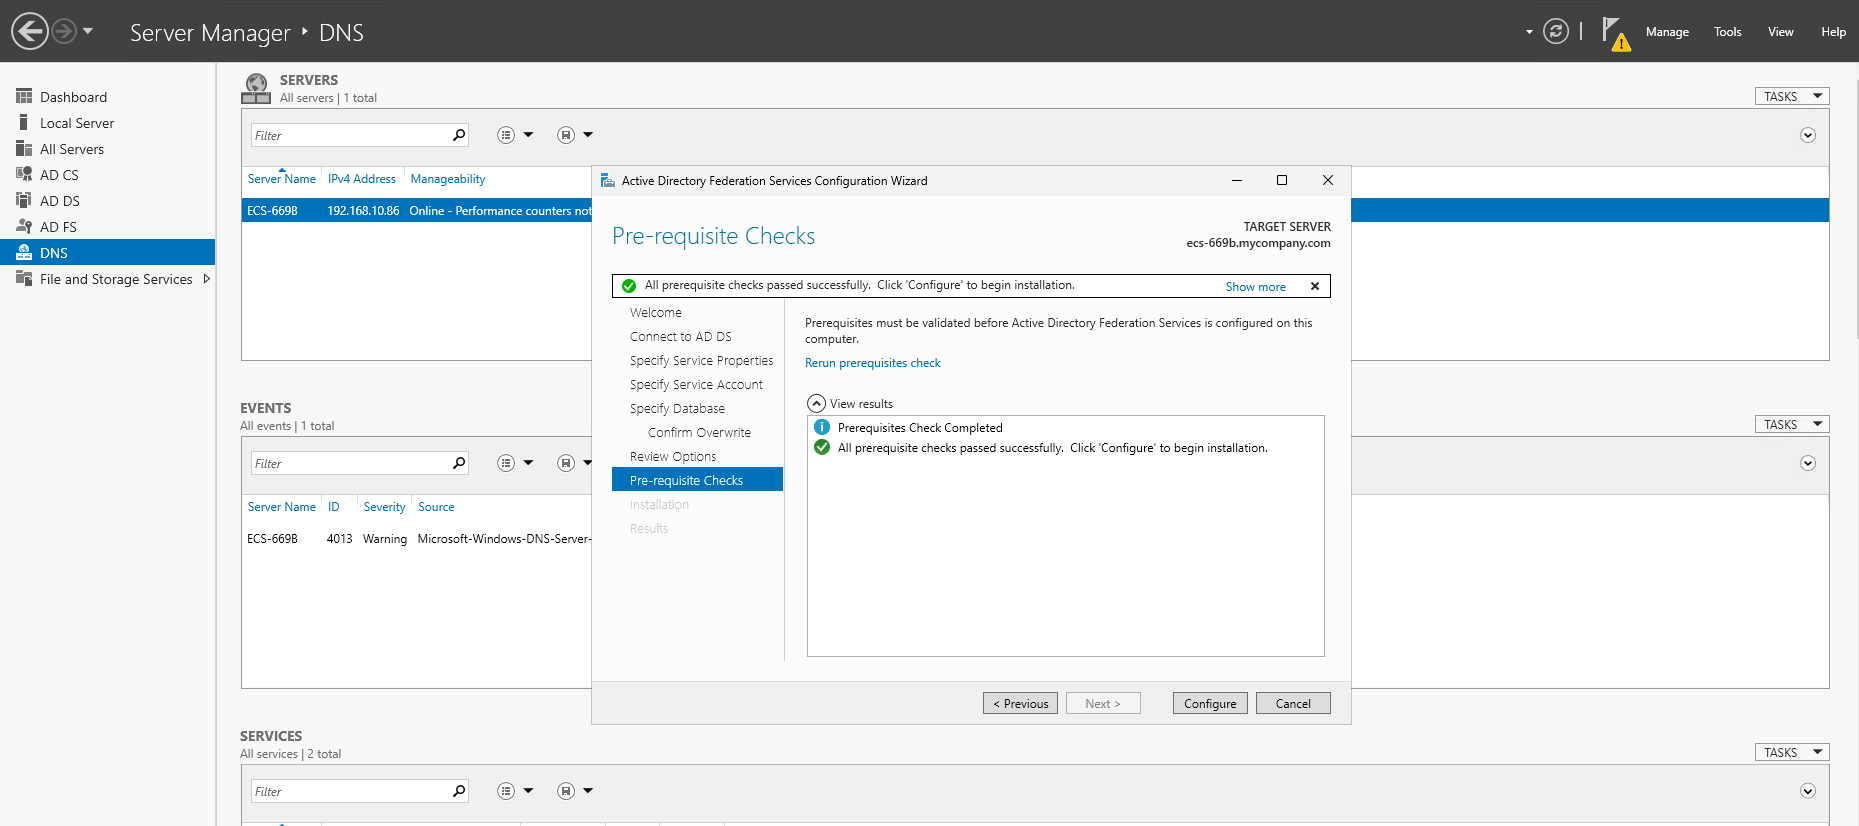
- Wait until the prerequisites checks are completed and if they are successful, click Configure.

Registering SPN
When you configure Windows Integrated Authentication against your ADFS endpoint, the client will request a Kerberos ticket for the SPN HTTP/adfs.mycompany.com.. The Active Directory Key Distribution Center (KDC) must locate that SPN on the correct service account in order to encrypt the ticket with the matching key. If the SPN is missing or bound to the wrong account, Kerberos authentication cannot proceed—clients will either fall back to NTLM or enter a 401 challenge loop. To prevent this, we need to register the SPN explicitly on your AD FS service account in order to ensure that KDC can issue a valid Kerberos ticket and your Windows Integrated Auth flow succeeds.
Run as Administrator the following command in PowerShell:
setspn -s http/adfs.mycompany.com administrator
Disabling Extended Protection Token Check
When you integrate AD FS with most cloud-based IAM or SSO front-ends, you're typically introducing one or more TLS-terminating proxies or load-balancers. Those intermediaries break the Channel-Binding Token (CBT) exchange that Extended Protection relies on, so AD FS sees no binding data and rejects the request.
Disabling Extended Protection is almost always needed when you're fronting AD FS with a cloud-based TLS terminator that doesn't forward the original channel-binding info. Once you have an end-to-end TLS path (or move to non-CBT-based auth), you can safely turn it back on.
Run as Administrator the following command in PowerShell:
Set-ADFSProperties -ExtendedProtectionTokenCheck None
Enabling AD FS Sign-On Page
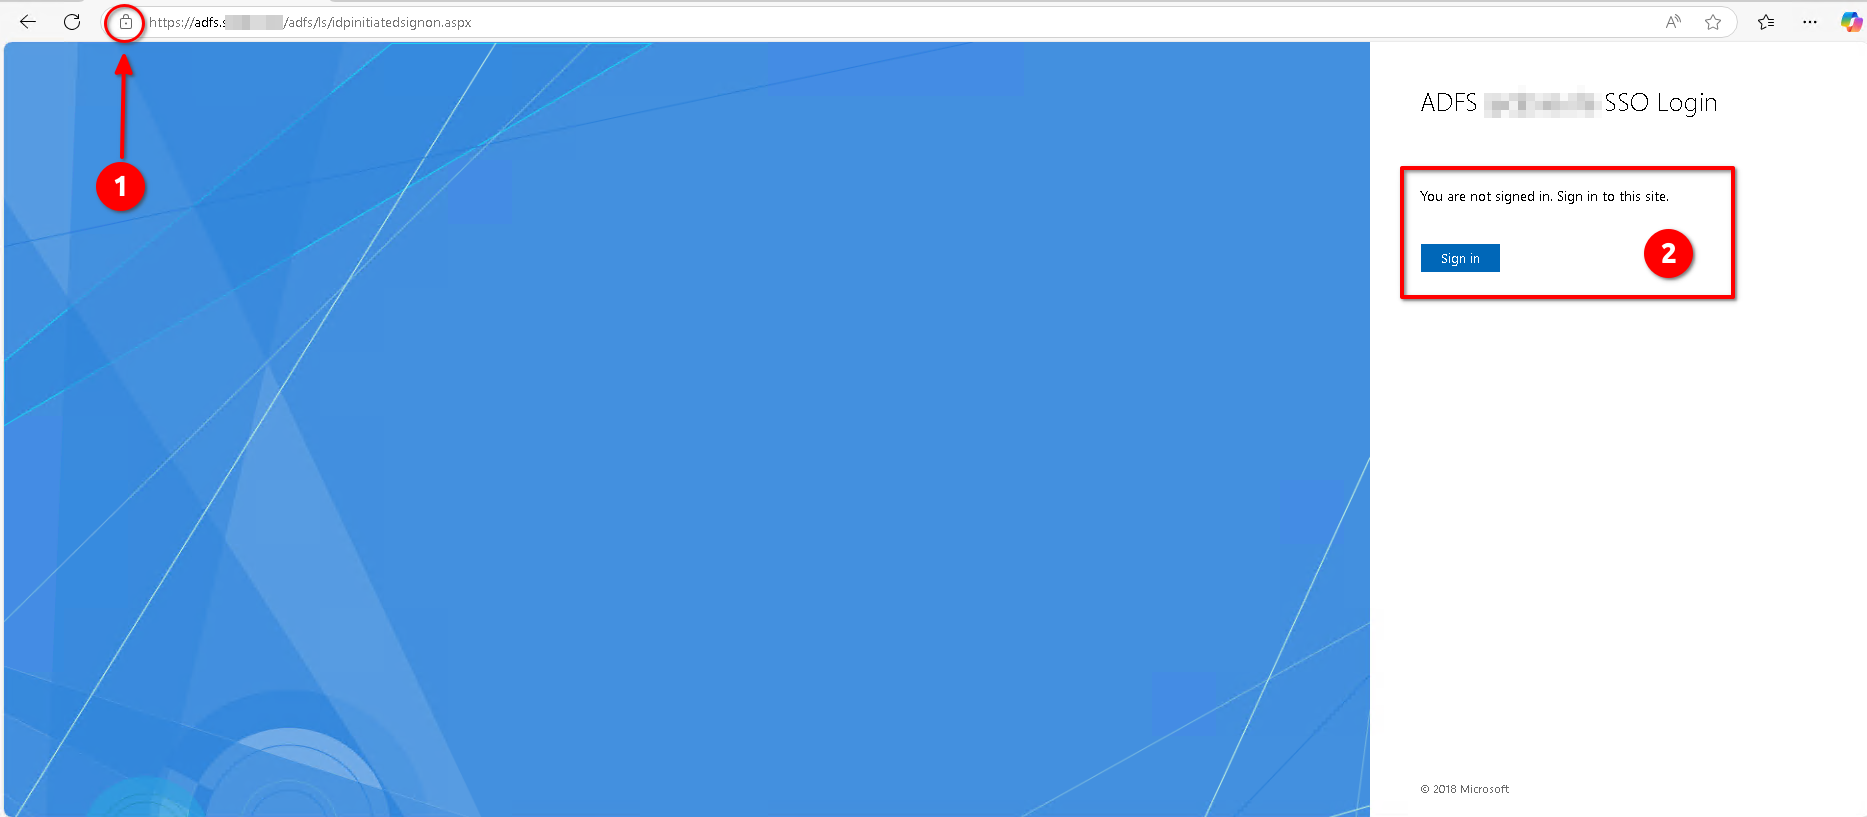
By default (in Microsoft Server 2016 and later) the sign-on page is off, so trying to browse to: https://adfs.example.com/adfs/ls/idpinitiatedsignon.aspx will yield a 404 error.
Run as Administrator the following command in PowerShell:
Set-AdfsProperties -EnableIdpInitiatedSignonPage $true
Automated Public TLS Certificate Management with WIN-ACME
While an internal Certificate Authority (CA) is excellent for issuing token-signing and other internal-only certificates, your public-facing AD FS endpoint (adfs.example.com) requires a TLS certificate that is trusted by all external clients and cloud providers. This section details how to use WIN-ACME and Let's Encrypt to automate the issuance and renewal of a publicly trusted SSL certificate, complementing your internal CA in a hybrid-certificate model.
This approach represents a security best practice:
- Let's Encrypt Certificate: Used for the public-facing SSL Certificate to secure HTTPS traffic. It is trusted globally.
- Internal CA Certificate: Used for the Token-Signing and Token-Decryption certificates, which should not be publicly trusted.
When to Use WIN-ACME for AD FS
This method is necessary when your internal CA is not trusted by external partners or when client devices do not have your internal root CA certificate installed. It provides a free, automated way to maintain a trusted public endpoint.
Install WIN-ACME and Prepare for Validation
First, download the latest WIN-ACME release and extract it to a permanent location like C:\win-acme.
Create the Automated Renewal Script
Because AD FS does not use standard IIS bindings, we must use a script to apply the new certificate upon renewal. Create the directory C:\Scripts and save the following PowerShell script as ADFSSSLRenewal.ps1. This script is specifically designed to update only the SSL certificate, leaving your internal token-signing certificates untouched.
# C:\Scripts\ADFSSSLRenewal.ps1
param($CertThumbprint)
try {
    # Apply certificate to AD FS SSL binding with warning suppression
    Set-AdfsSslCertificate -Thumbprint $CertThumbprint -WarningAction SilentlyContinue

    # For ADFS 2016+ with alternate TLS binding mode, also update the certauth binding
    try {
        Set-AdfsAlternateTlsClientBinding -Thumbprint $CertThumbprint -Force $true -Confirm:$false -WarningAction SilentlyContinue
        Write-Output "Updated alternate TLS client binding for certificate authentication"
    }
    catch {
        Write-Warning "Could not update alternate TLS binding - may not be configured: $($_.Exception.Message)"
    }

    # Restart AD FS service without prompting
    Restart-Service adfssrv -Force -Confirm:$false

    Write-Output "AD FS certificate updated successfully for both endpoints: $CertThumbprint"
    exit 0
}
catch {
    Write-Error "Failed to update AD FS certificate: $($_.Exception.Message)"
    exit 1
}
Request the Certificate and Configure Renewal
Now, run wacs.exe to request the certificate and set up the automated renewal task.
- Open PowerShell as an Administrator and navigate to your WIN-ACME directory.
- Run the following command, replacing the email address with your own:
.\wacs.exe --source manual `
  --host "adfs.example.com","certauth.adfs.example.com" `
  --validation selfhosting `
  --store certificatestore `
  --certificatestore My `
  --installation script `
  --script "C:\Scripts\ADFSSSLRenewal.ps1" `
  --scriptparameters "'{CertThumbprint}'" `
  --emailaddress "admin@example.com" `
  --accepttos
This command tells WIN-ACME to get a certificate for adfs.example.com and certauth.adfs.example.com, validate it using the built-in web server, place it in the local computer's certificate store, and configure the renewal to run the ADFSSSLRenewal.ps1 script.
Verification
Open the address https://adfs.example.com/adfs/ls/idpinitiatedsignon.aspx, in an incognito or private browsing session using your preferred browser,
and:
- Confirm that the SSL certificate is properly installed and trusted.
- Verify the login page loads without errors and that the “Sign in” button is displayed.